DocRob
-
Posts
7,041 -
Joined
-
Last visited
Content Type
Profiles
Forums
Events
Gallery
Everything posted by DocRob
-
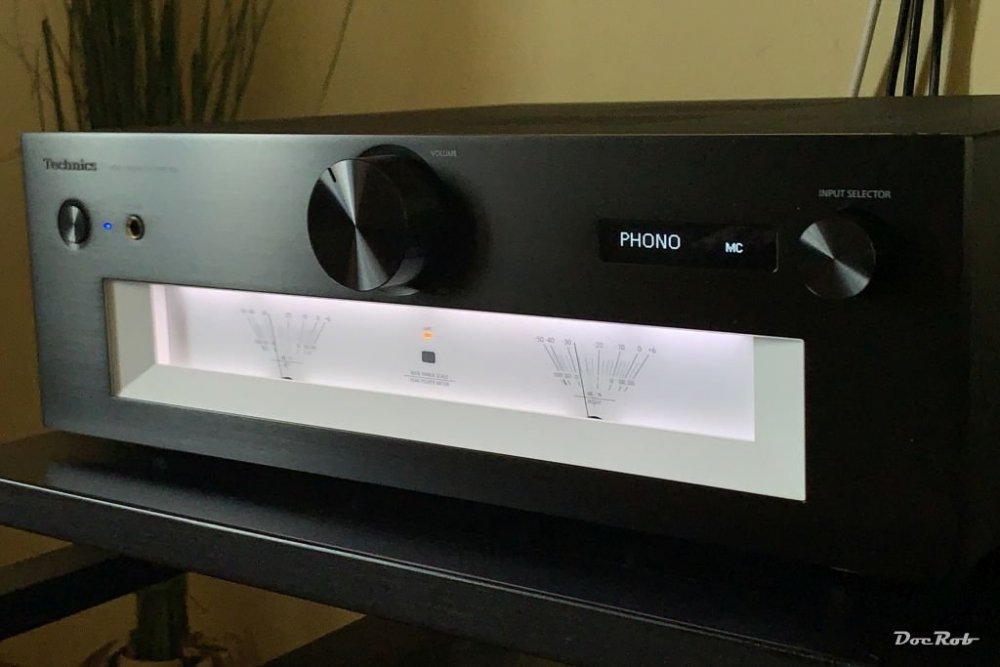
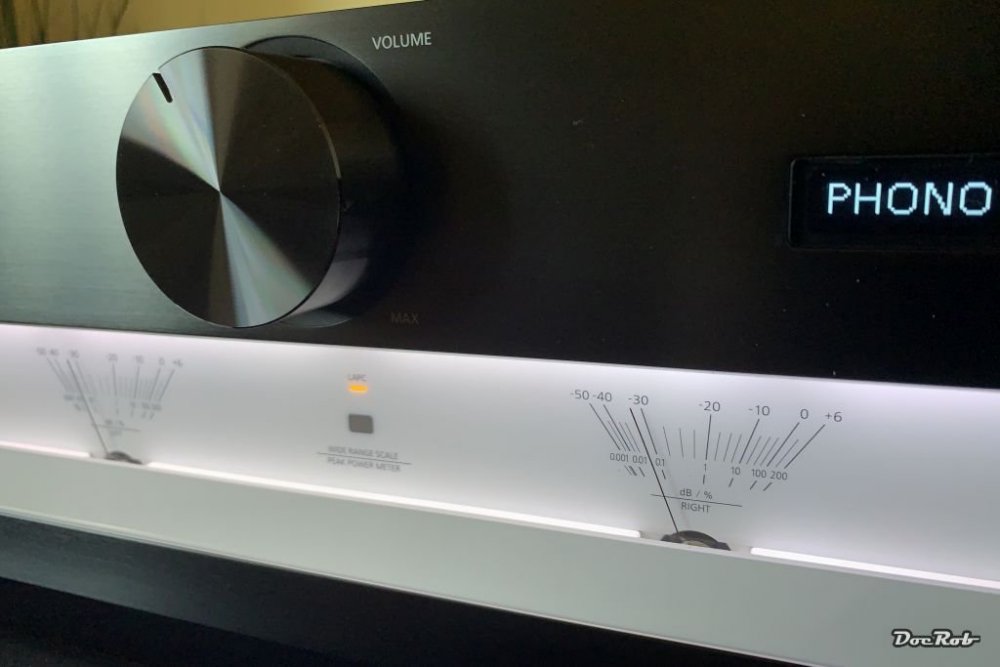
Slightly OT, but keeping me from modelling today. After an Odyssee of some month, my new Stereo Amplifier arrived today and is warming up for some serious hearing sessions. Call ma a happy listener . I wanted to have a VU-metered Technics Amp, since I'm a teen. Now this beauty will have to fight hard to outscore my old Symphonic Line amp. Sound wise, it will be close with uncertain outcome, but it has remote control, digital inputs, included good vinyl mm/mc preamp, ... and these sexy meters. Cheers Rob
-

Done - F-4EJ Kai Phantom - The Last of it's Kind ZM 1/48
DocRob replied to DocRob's topic in LSM 1/48 Work in Progress
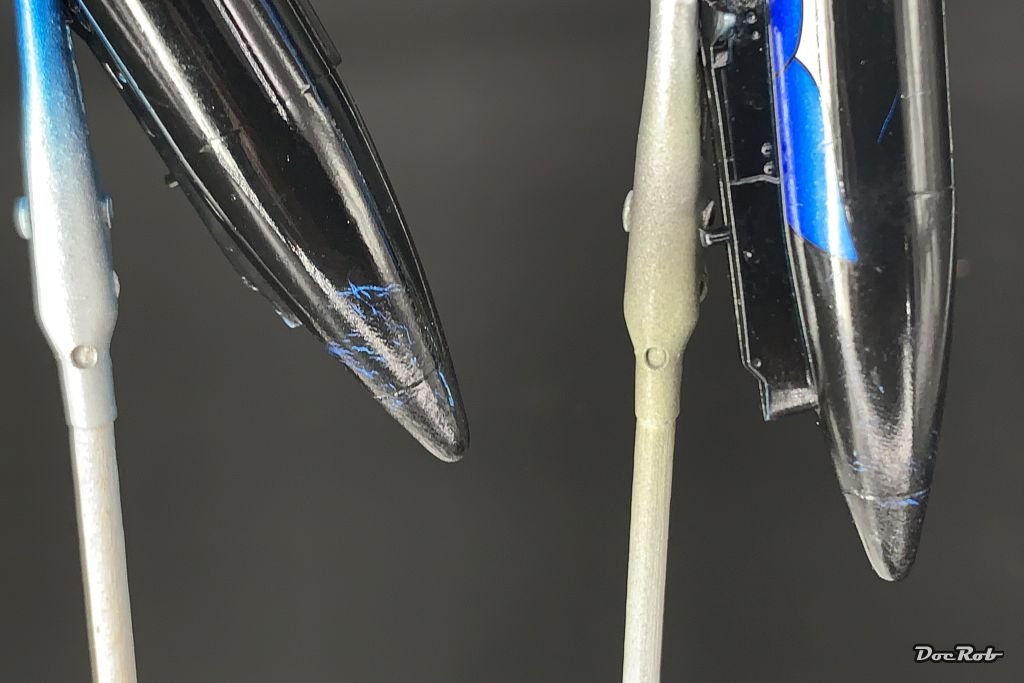
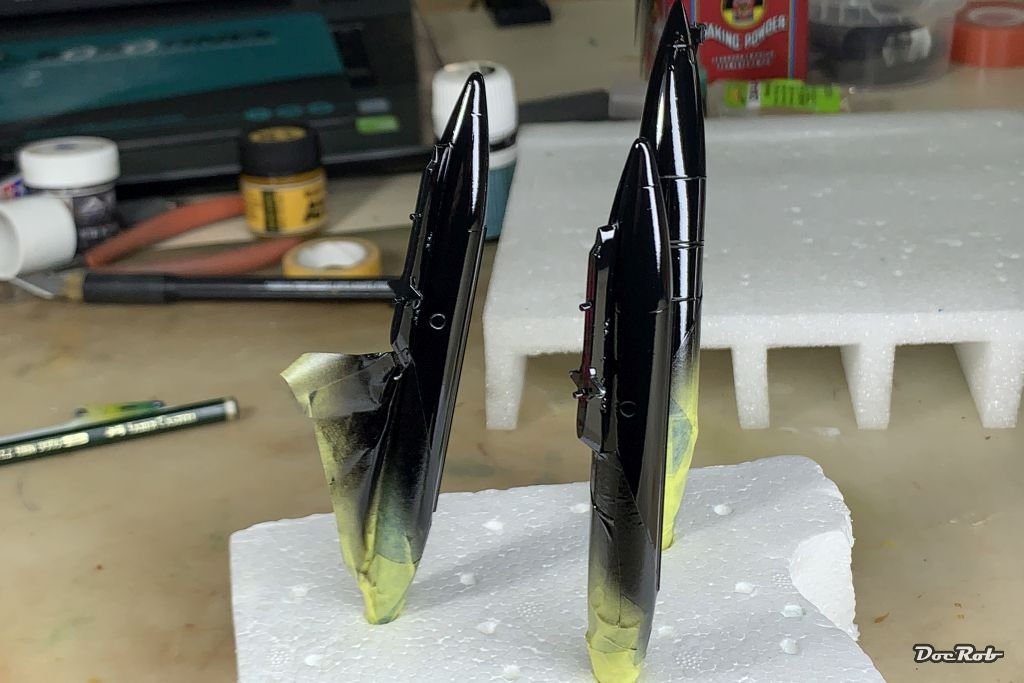
Phew, stenciling is nearly done, only some decals and stencils on the tail section last. This was truly a tour de force and I will not buy another Kai Phantom, but have an Eduard boxing in stash. The drop tanks are not easy to handle for decaling, where you have to apply all the decals floating at the same time, to adjust the placement. To make it easier, I attached them to holes in a styrofoam block, which somehow reacted with the black lacquer paint. There was no pressure applied or twisting involved. I freehand resprayed the tail parts, as I wanted no masking border in the shine. The picture shows the tanks before respraying. The decals settled well, with some tiny creases on one tank, which I hope to get away with some mor Micro Sol. The sprayed blue is a great match to the decals blue section. Cheers Rob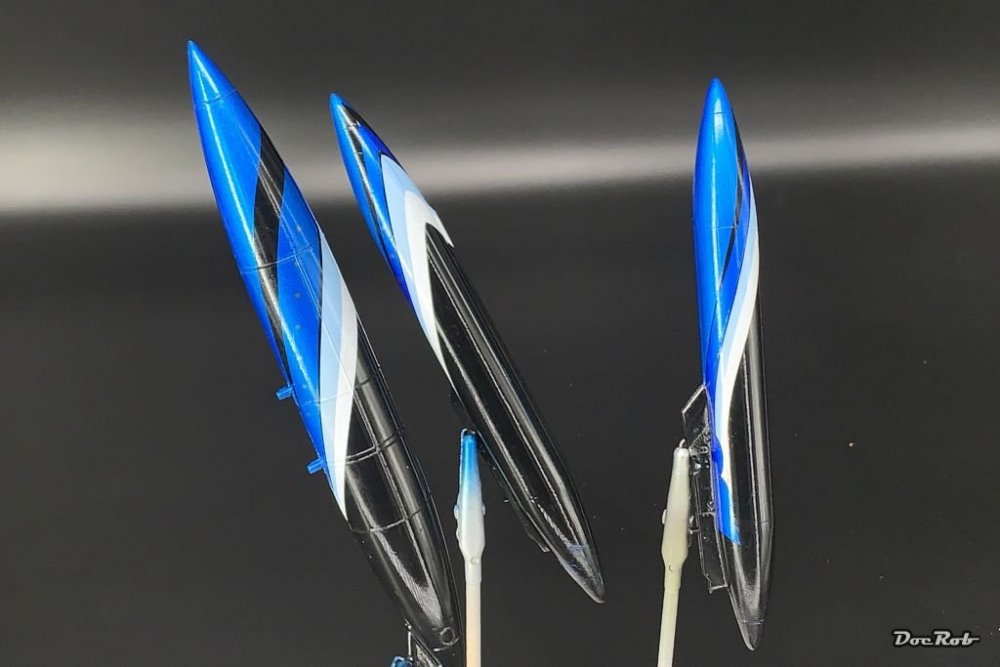


-
There are quite some on the market (Beemax, Nunu and others), most in 24 scale and a new mold Lancia HF Integrale from Italeri in 1/12. It's Italeri and therefore I'm not interested. Tamiya is planning to re-release it's F1 Renault RE 20 Turbo this year in 1/12, as they did with their Brabham BT44b this year, which I had to have. Cheers Rob
-
What is on your bench right now ? Share a picture :)
DocRob replied to Martinnfb's topic in Modelling Discussion
Cool scheme Carl, I like these black and white early camos. Cheers Rob -
Great that you solved it Kevin, aluminum looks super cool. I had the same probs once with Alclad. After a while of cleaning and cursing, I discovered, that the tip of the needle was bent. I straightened it as good as I could and then honed it on a Japanese grinding stone. Worked perfectly. By your description I remembered the strange look of flying color particles before the repairs, which resembled metal chips. I'm a vinyl addict too, having some thousand albums, but not in my cave, where I rarely listen to music. Cheers Rob
-
Done - F-4EJ Kai Phantom - The Last of it's Kind ZM 1/48
DocRob replied to DocRob's topic in LSM 1/48 Work in Progress
My Micro Sol lastet, but my Micro Set is empty . Today I decaled the external tanks, which proved very tricky, to get the decals fitted correctly. There is no margin of error and the placement of the large decals has to be made in one go. I'm looking forward to the after decaling stages and my soon planned Tamiya Tomcat build has been rescheduled to an indefinite future, miraculously . Cheers Rob -
Done - F-4EJ Kai Phantom - The Last of it's Kind ZM 1/48
DocRob replied to DocRob's topic in LSM 1/48 Work in Progress
Thanks Carl, the weird thing is, there are English written stencils and Japanese written ones, somehow I think, they used both sets. Most of the bottom side stencils are grouped, but given the very narrow carrier film connections make t difficult to apply them without folding them over. I cut the bigger groups of stencils in two or three parts for easier application. Cheers Rob -
What color do you use, Kevin? Have you checked your airbrush. You have pigments of color in the air, when the tip of the needle is bent or the nozzle has cracked a bit on the front opening. Cheers Rob
-
Done - F-4EJ Kai Phantom - The Last of it's Kind ZM 1/48
DocRob replied to DocRob's topic in LSM 1/48 Work in Progress
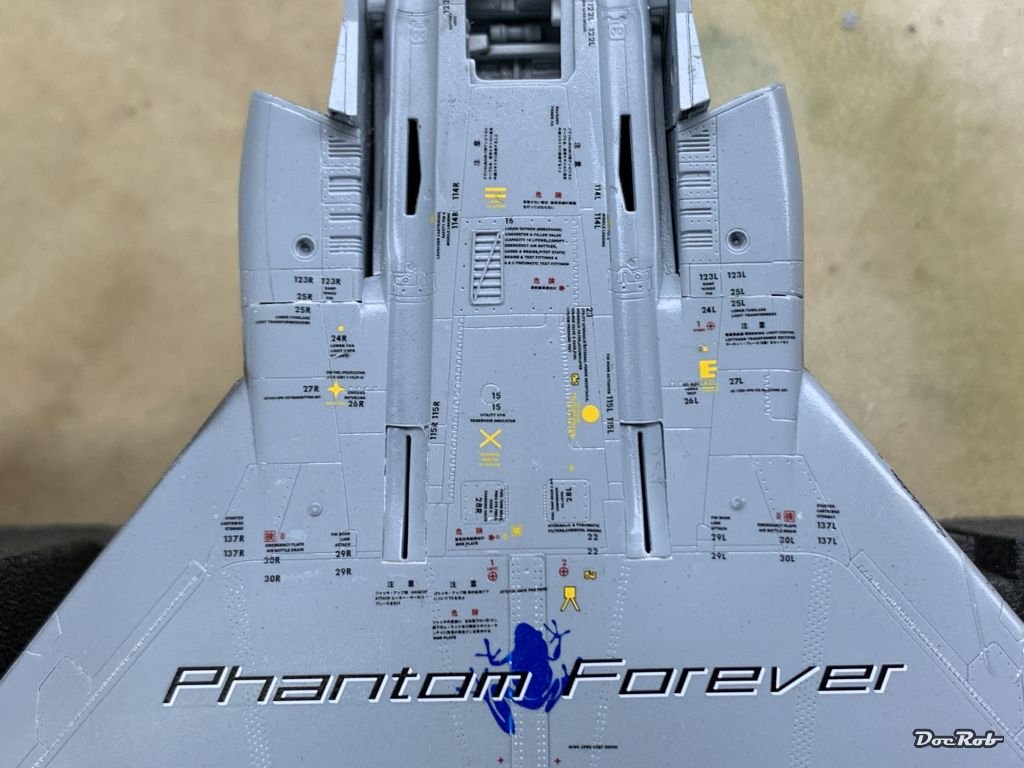
Stencils, stencils, stencils, don't these Phantom mechanics have books too read? There is more content stenciled onto the Kai F-4 than printed into Tolstoy's War and Peace. Cheers Rob
-
Dragon Panther A with Zimmerit
DocRob replied to GazzaS's topic in LSM 1/35 and Larger Work In Progress
I like lead foil from wine bottle caps for this purpose. It's easy to cut, easy to bend, stays in the desired form and is not sticky. Watch your MP42 Gaz, the barrel looks already bent. Cheers Rob -
617 Sqn Tornado Dambuster 70th
DocRob replied to Kaireckstadt's topic in LSM 1/35 and Larger Work In Progress
Nice refining of the parts, Kai. Italeri should be forced to let their engineers study model design with the known mayors. My dislike of the company grows steadily and often I see one of their boxings and think, what a nice..., but wait, no way, it's Italeri. Your masochism shows, that you can produce fabulous results with their kits. Cheers Rob -
Looking forward to your progress Phil. a 32 scale Lysander would be very welcome though and I don't mean the Matchbox one. Cheers Rob
-
Done - F-4EJ Kai Phantom - The Last of it's Kind ZM 1/48
DocRob replied to DocRob's topic in LSM 1/48 Work in Progress
Thanks a lot, after stenciling the bottom part tomorrow, I hope the rest of this vivid bird build will be a breeze . Cheers Rob -
P-51 racer Bardahl Miss #49 finished
DocRob replied to JohnB's topic in LSM 1/32 and Larger Aircraft Ready for Inspection
Excellent and vivid result John, I like your racer a lot. Interesting to see, how the clipped wings alter the appearance of the P-51. Cheers Rob -
Done - F-4EJ Kai Phantom - The Last of it's Kind ZM 1/48
DocRob replied to DocRob's topic in LSM 1/48 Work in Progress
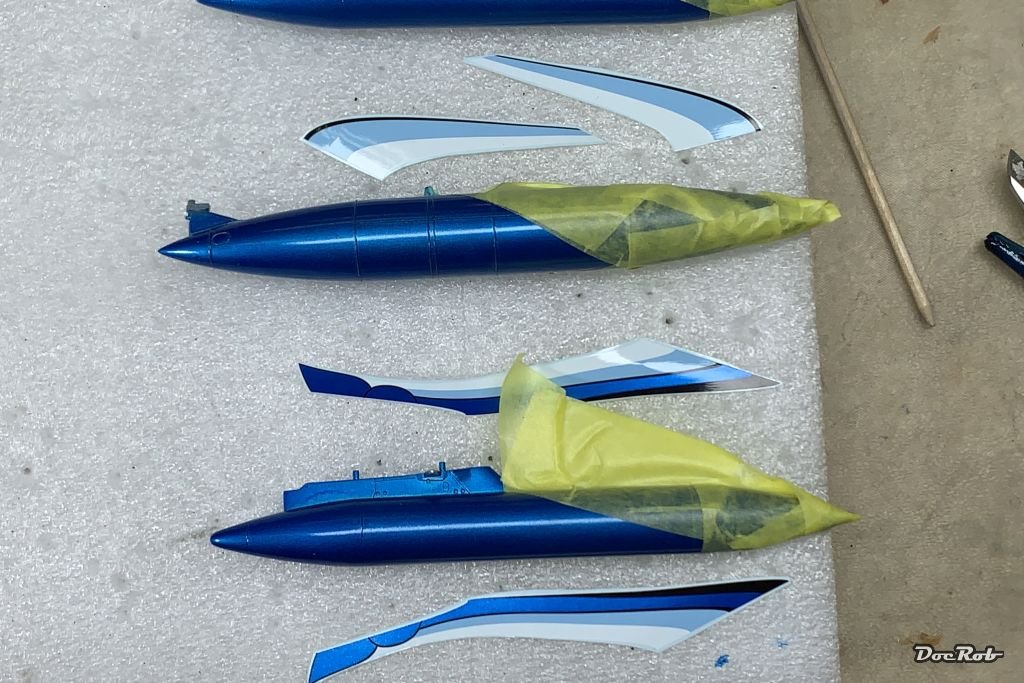
Today I finished the wing stencils and hit all decals with three coats os Micro Sol, which has not completely dried on the pic. Next will be stenciling the underside and the tail section. I then continued with the drop tanks, which need to be masked under the decals for the black tail parts. This proved to be tricky and I cut the decals very close to their later shape to check, if the curved demarcation is completely covered by the decal. Next, the external tanks got their tails sprayed with Tamiya's gloss black lacquer paint. Cheers Rob

-
A bit small to live in, compared to the sold house, I guess, but gratulations anyway, what a nice ride . Cheers Rob
- 2,035 replies
-
- 4
-

-

-
- car related stuff
- anything about cars
- (and 6 more)
-
Done - F-4EJ Kai Phantom - The Last of it's Kind ZM 1/48
DocRob replied to DocRob's topic in LSM 1/48 Work in Progress
Thank you Kai, my head is spinning in the moment, after applying half the stencils on the upper wings. This is particular unpleasant, because on the black areas the decaling plan shows no panel lines and it's hard to find the correct places and to have them looking congruent on both sides. I developed a step by step system, to work through the different decal sheets in a proper order, color coding the stencils on the plan. I wont do a jet again soon, but I have said that before... . Cheers Rob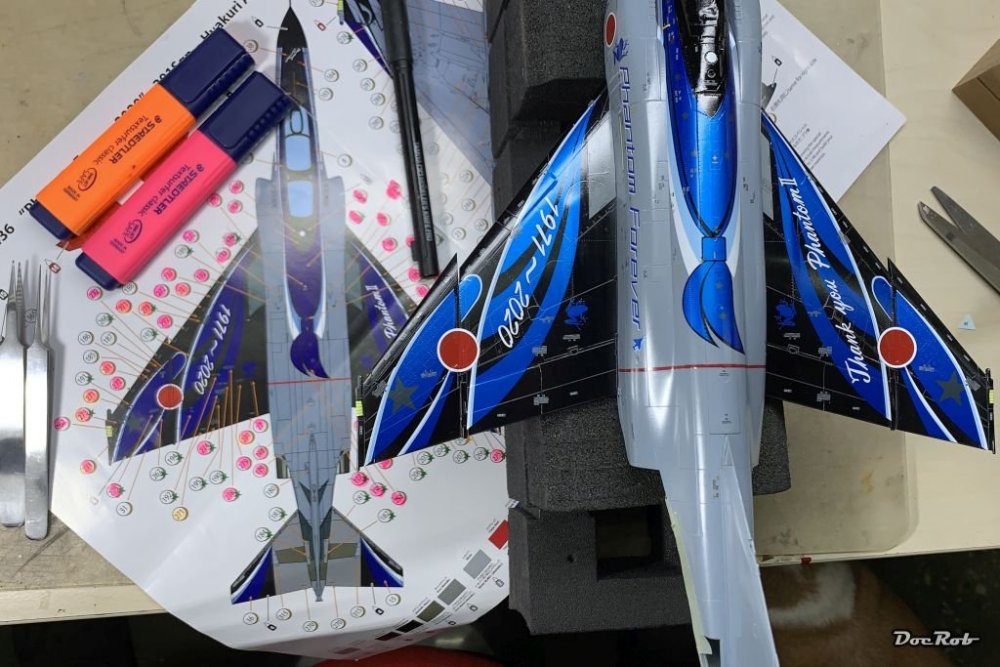
-
Dragon Panther A with Zimmerit
DocRob replied to GazzaS's topic in LSM 1/35 and Larger Work In Progress
Nothing boring about your Panther, it looks great. Good to see, that you are pushing with the figures. Cheers Rob -
Tamiya P-51 racer Bardahl Miss #49
DocRob replied to JohnB's topic in LSM 1/35 and Larger Work In Progress
Absolutely stunning looking bird. This Mustang will get all the attention on the shelf. I think, I've a new genre to discover. Cheers Rob -
Phew, this thing has a lot of guns. Nice Progress on the main assembly though and I haven't seen perfect fitting leading edge inserts in my modelling career, not even on Tamiya kits.
-
Done - F-4EJ Kai Phantom - The Last of it's Kind ZM 1/48
DocRob replied to DocRob's topic in LSM 1/48 Work in Progress
Muchas gracias amigos, I'm pleased that you like my work. @GusMac, the yellow Kai is as beautiful as the blue one and the stenciling, err, it has to be done, at least the decals are great, as is the decaling plan. @Bomber_County, I did the same, as it takes time to check and re-check stencil placement and you have to switch between decal sheets at times. Cheers Rob -
1:32nd scale Salmson 2-A2
DocRob replied to sandbagger's topic in WW1 1/48 and larger Ready for Inspection
I completely agree with Hubert, Salmson, figures and setting looking absolutely fantastic. I'm utterly fascinated, how you motor trough your builds, solving all issues methodical. The rigging is outstanding and the main reason, why I let the Salmson pass. Cheers Rob -
Done - F-4EJ Kai Phantom - The Last of it's Kind ZM 1/48
DocRob replied to DocRob's topic in LSM 1/48 Work in Progress
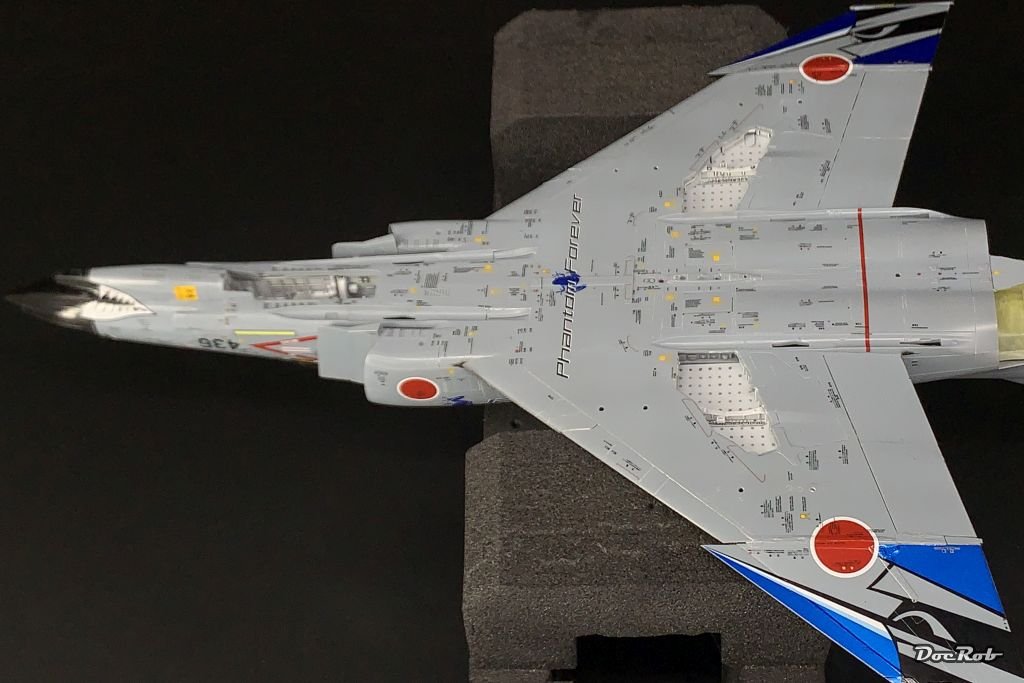
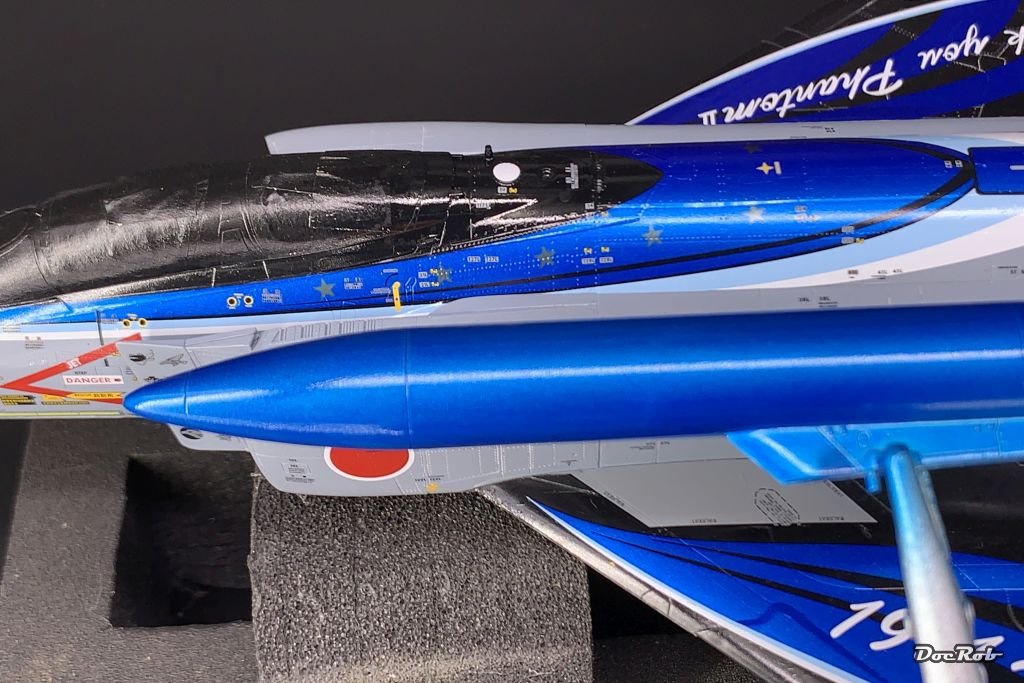
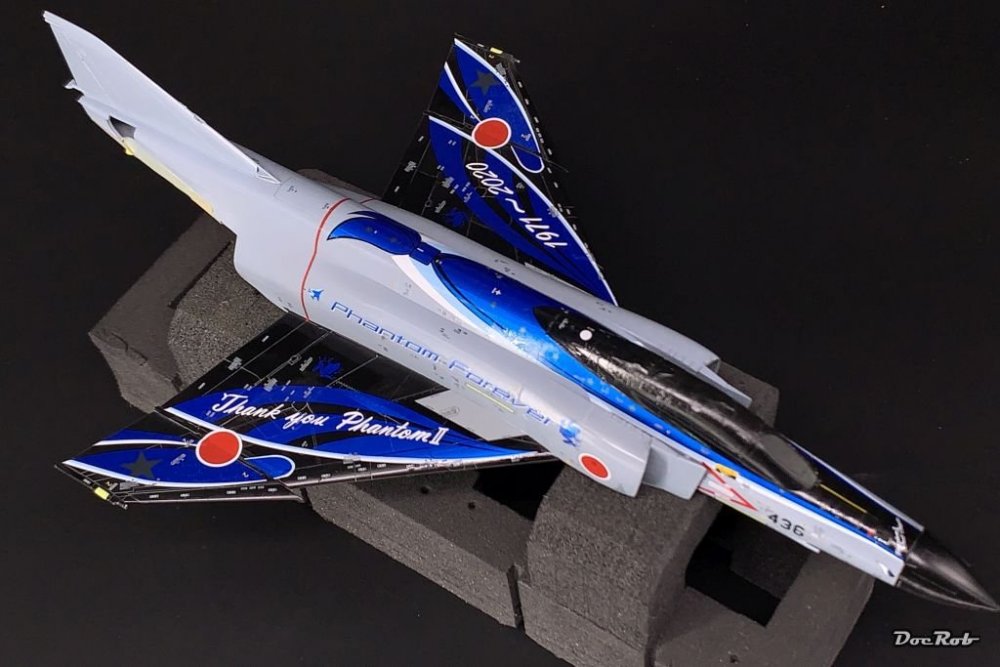
Muchas gracias hombres, the Kai Phantom really sports a very stylish outfit. Until stenciling time, I thought about building a second one with yellow livery (which will be released soon by ZM), but after this one, I have to rest my eyes. Yesterday, I noticed that while drying thoroughly, my painting idea for the external tanks was not good enough. The transparent blue, based on sparkling silver developed a slightly greenish tint. I sprayed two more layers of thinned transparent blue and now I am where I wanted to be. The match is good enough now. On pictures and even to the eye, it's hard to tell the difference, because of the glitter effect, which looks differently from every angle you look at it. The final gloss will be polished to match. Cheers Rob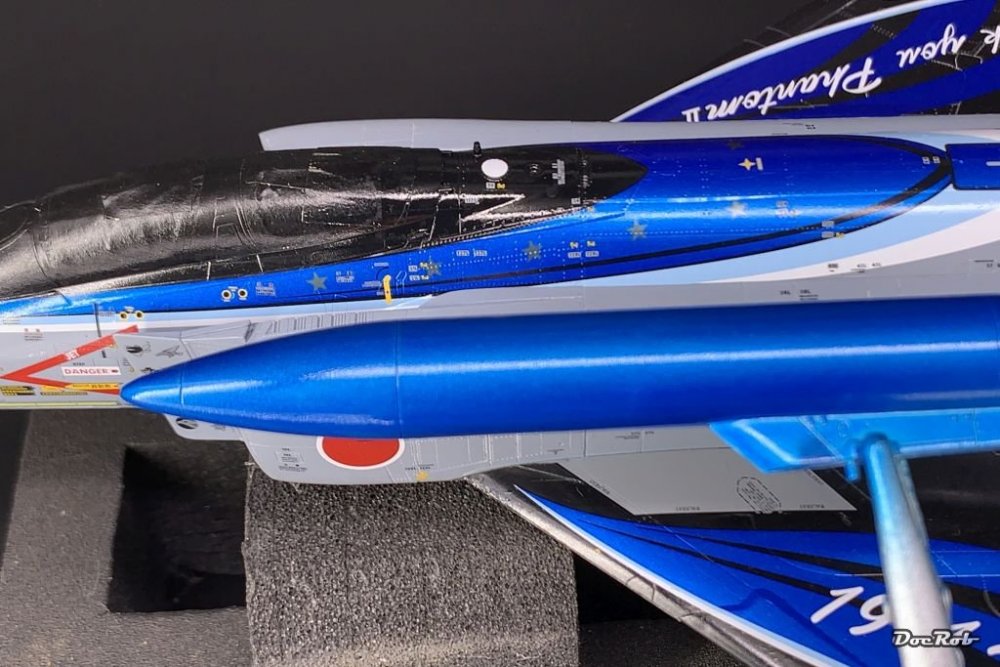
-
Done - F-4EJ Kai Phantom - The Last of it's Kind ZM 1/48
DocRob replied to DocRob's topic in LSM 1/48 Work in Progress
I definitely choose rigging a WWI aircraft, than stenciling a modern jet. In this case, at least, the decals are great and the supplied decaling plan is very helpful. Nonetheless, it's painful eye straining work . I managed to apply the upper fuselage and left side stencils. Normally, I cut my decals without guiding numbers, but not in this case, where it really helps to have the numbers present. Cheers Rob
-
Done - F-4EJ Kai Phantom - The Last of it's Kind ZM 1/48
DocRob replied to DocRob's topic in LSM 1/48 Work in Progress
Thank you Phil, indeed, preparation is the key to glossy and metallic finishes as well. It has been a learning curve for me, beginning with some car and bike models, where I learnt a lot. Last year, I added polishing to my skills and tools and it did a wonderful job on glossy surfaces and clear parts. No need to be jealous about the surf / modelling thing. We had sand storms for over a week, where the air is polluted dangerously with ten times more dirt and germs and whatever than the worst Berlin road in winter time. Besides, since a week, we try to have the garden looking like it looked before the storm and there still is no end in sight. The beach was the only place where there was no storm miraculously. It was surfing or staying home for more days without opening windows or doors. Cheers Rob