DocRob
-
Posts
7,082 -
Joined
-
Last visited
Content Type
Profiles
Forums
Events
Gallery
Everything posted by DocRob
-

Arado 234 Nachtigall on Speed
DocRob replied to DocRob's topic in LSM 1/35 and Larger Work In Progress
Good to have you on board Gaz, and yes, the thread dates a while back . Cheers Rob -
Arado 234 Nachtigall on Speed
DocRob replied to DocRob's topic in LSM 1/35 and Larger Work In Progress
Indeed Phil, but it was meant as a build, with others in between. There are kits on the SOD, where I ask myself, why I haven't binned them, but others like the Nachtigall, which always magnetizes me to continue. Cheers Rob -
Arado 234 Nachtigall on Speed
DocRob replied to DocRob's topic in LSM 1/35 and Larger Work In Progress
Thank you Carl, for browsing through your sources. Sadly it seems to add more fog to an already misty area. The graphic from the Vailiant Wings book seems to indicate towards a glass topped radar star, like on the HE-219. The profile of the SM FE coded plane, the one, I will build, is not clear in that point, but shows the bombsight under the nose, where I read, this was not equipped on the nightfighters. I seem to hunt a mystery plane and you are absolutely right, the night fighter Arados are not well documented, but that's maybe because they were a fail and only a handful were converted. Cheers Rob -
Arado 234 Nachtigall on Speed
DocRob replied to DocRob's topic in LSM 1/35 and Larger Work In Progress
Thank you Peter, it's a plane, which always fascinated me, as I think it's the most advanced design of it's time, which really flew. The build is not an easy one, but on the other hand, I was never really frustrated with it. Cheers Rob -
1:32nd scale Albatros D.I
DocRob replied to sandbagger's topic in LSM 1/32 and Larger Aircraft Ready for Inspection
Another beauty, Mike. The relaxed pose of the figure fits perfectly to the Albatros. It's amazing to see, how different the plane looks from different angles, with the lower blue on some pics and the upper camo on other pics. As always with your builds, I especially like the materials appearance and weathering. Cheers Rob -
Revell P-51D Mustang - 2nd time around
DocRob replied to Peterpools's topic in LSM 1/35 and Larger Work In Progress
Nice progress Peter, it looks like a Mustang now, what a pleasant sight. Hopefully, the wings will fit well. Cheers Rob -
Франкентанк Т-34 in 1/35 scale
DocRob replied to GazzaS's topic in LSM 1/35 and Larger Work In Progress
Argh, that sounds bad Gaz, two centimeters is quite deep. Hopefully your hand will be ok. I use tweezers to grab the tiny drill bits and push them into some foam for better handling. Tracks and handles look good on your Frankentank Cheers Rob -
Arado 234 Nachtigall on Speed
DocRob replied to DocRob's topic in LSM 1/35 and Larger Work In Progress
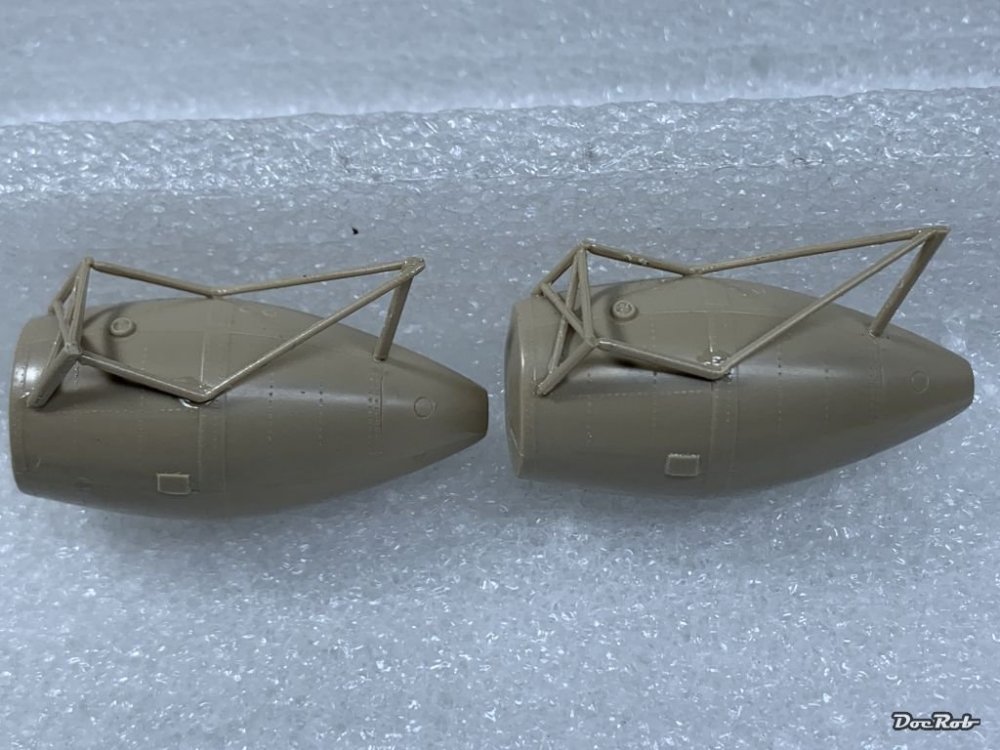
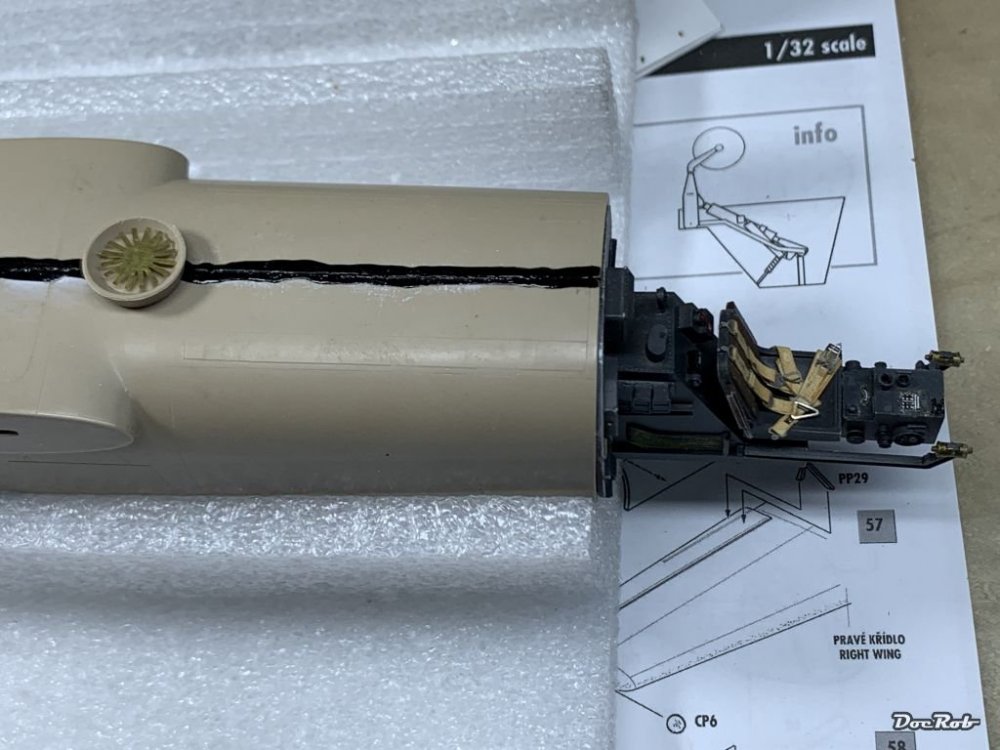
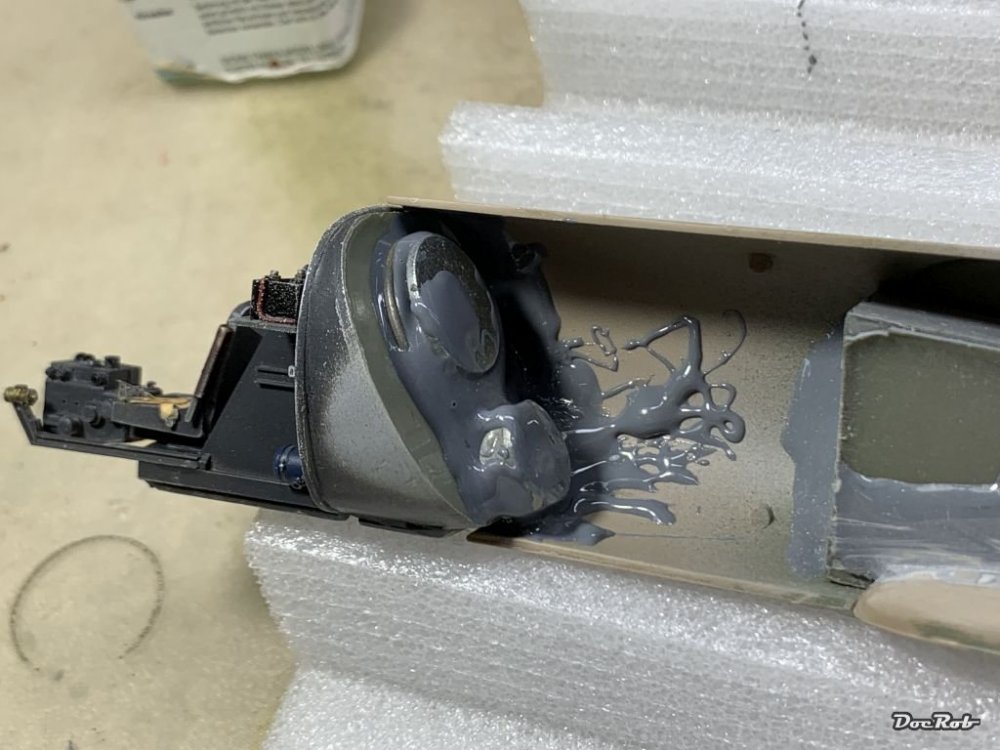
I told you in the beginning, this will be a long term project, but I decided to continue a bit with the Nachtigall and like so often, I have a question for you experts out there. How should the upper fuselage side on the night fighter from Oblt. Bonow look? My two Kagero books do not cover the night fighter variants and the Fly building manual, cover art and painting plan are not conclusive either, as are the model pics, I found in the net. Variant 1: with the radar in front of the wingroot (of course build in flush with a clear part covering it) Variant 2: With what looks like a perioscope under a drop shaped canopy in the shown position or a bit more to the cockpit. or Variant 3: are there both or none build into the specific plane. So far, I closed the fuselage, but not before adding some nuts and washers as extra weight with two component glue. Looks messy, but never will be seen again. I tried to glue the fuselage halves together as good, as possible, but with all the innards, there were small steps after curing. So for the first time, I added black CA too the seams as putty, which will be leveled later. I did the same on the leading edges of the wings, where it's already grinded. I also added the tiny round windows for the operator, which I put in from the outside, after step by step, widen the hole in the fuselage, until it fitted. As I will prime some components like the nacelles and jet intakes and exhausts next, I assembled the Rato jets with their fragile mounting frames, which are built of four parts each. I glued these together and before the glue settled, tried to align the parts in the correct angles, matching the attachment points on the wings. Cheers Rob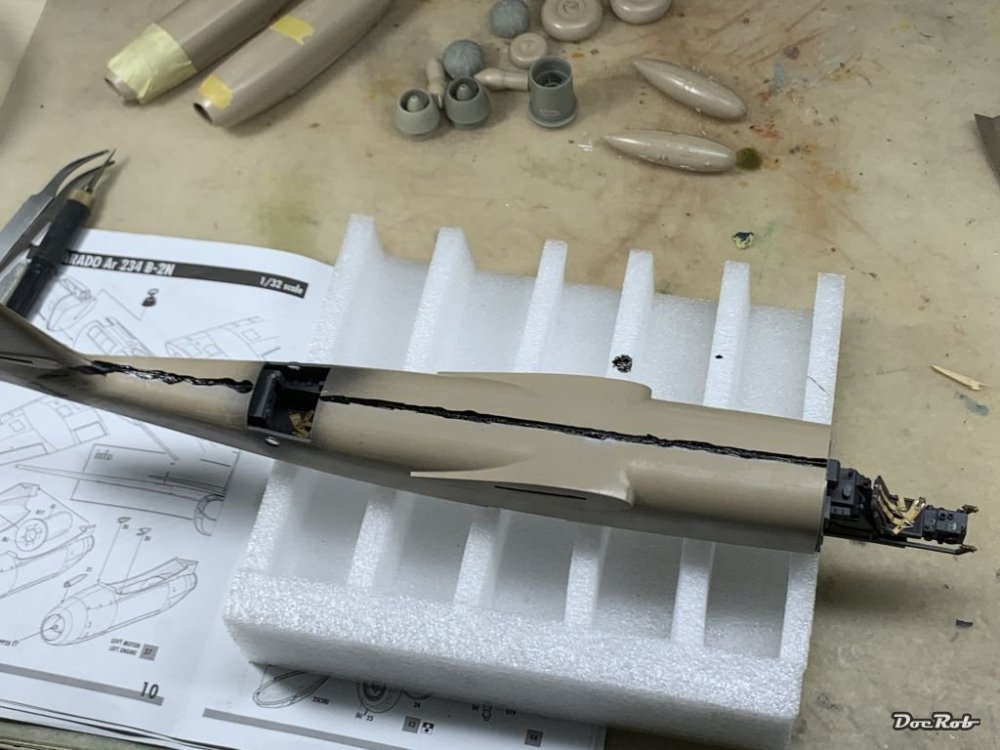

-
RCAF Liberator GR Mk VI
DocRob replied to BlrwestSiR's topic in LSM 1/35 and Larger Work In Progress
Great progress, even with that suboptimal working contractors . Cheers Rob -
PZL P.11c - Polish Fighter - IBG - 1/32
DocRob replied to DocRob's topic in LSM 1/35 and Larger Work In Progress
Thanks a lot, you should give it a try, the kit itself is great and there are so many different ways, to give the plain colors an interesting aspect. My go was oils this time, an experiment, which I maybe try again on a 1/16 Chinese Tankette, I almost finished building a while ago. I saw your Tankette build and that's what got me started. Cheers Rob -
PZL P.11c - Polish Fighter - IBG - 1/32
DocRob replied to DocRob's topic in LSM 1/35 and Larger Work In Progress
Amigos, I'm getting red in the face, blushing with your kind appreciation . It's a kit which let you shine easily, as it's so well detailed and has so many different and well represented surfaces. It's an invitation to do something good with it. Cheers Rob -
I built the BT-7 early many moons ago and I absolutely loved the kit. One of Tamiya's finest. I'd really like to see a WIP, as it's such a long time ago, I did it and it was one of my first kits, back into the hobby. Cheers Rob
-
PZL P.11c - Polish Fighter - IBG - 1/32
DocRob replied to DocRob's topic in LSM 1/35 and Larger Work In Progress
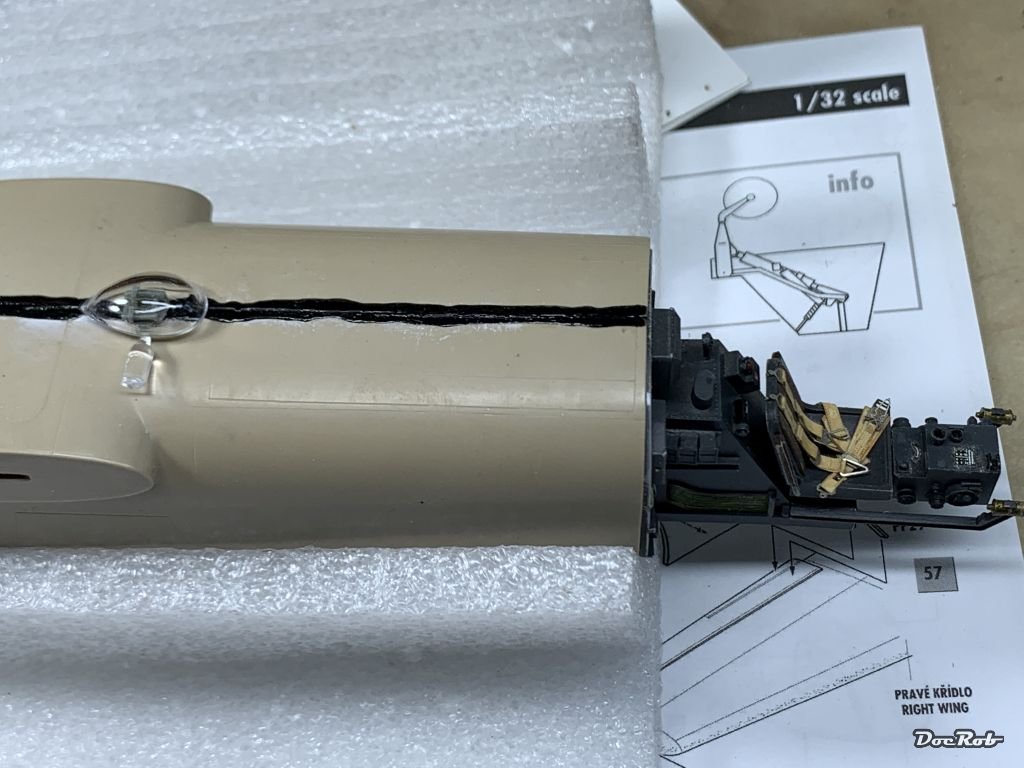
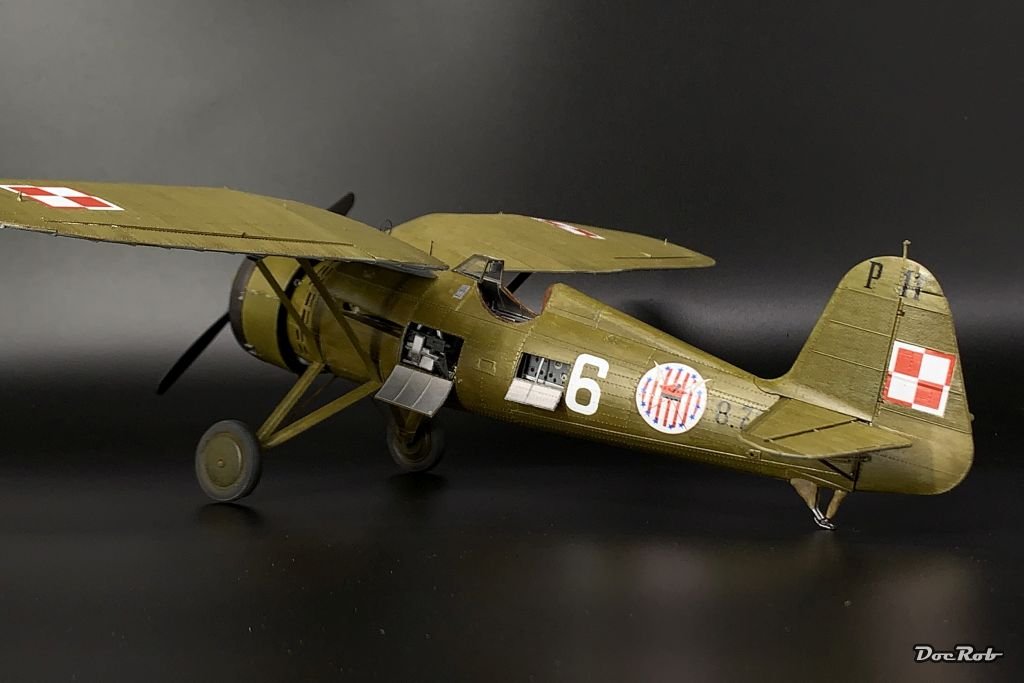
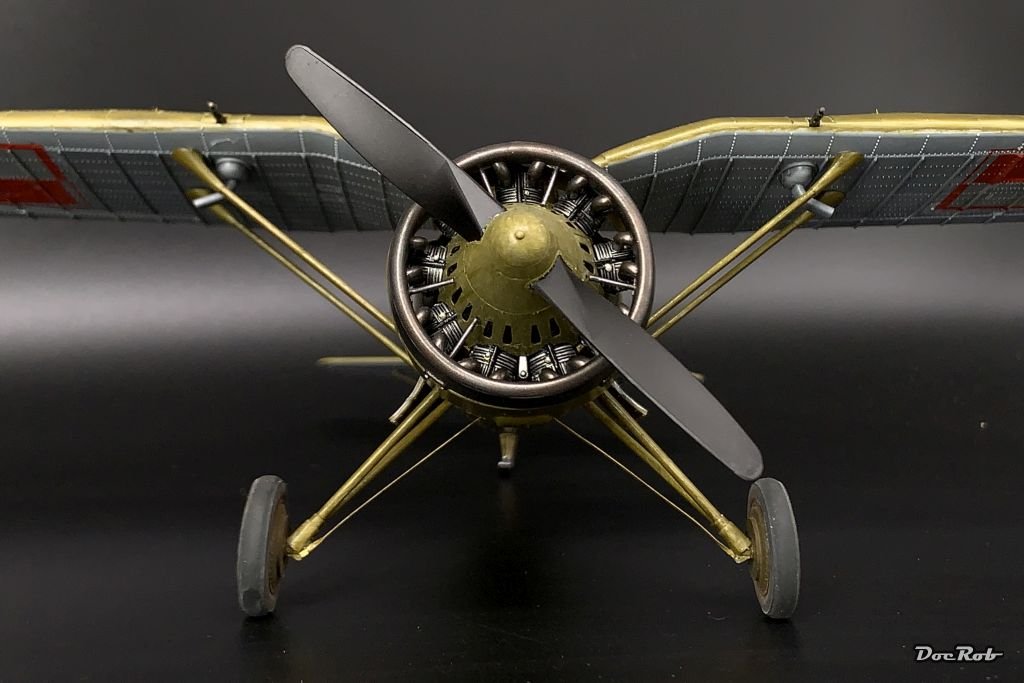
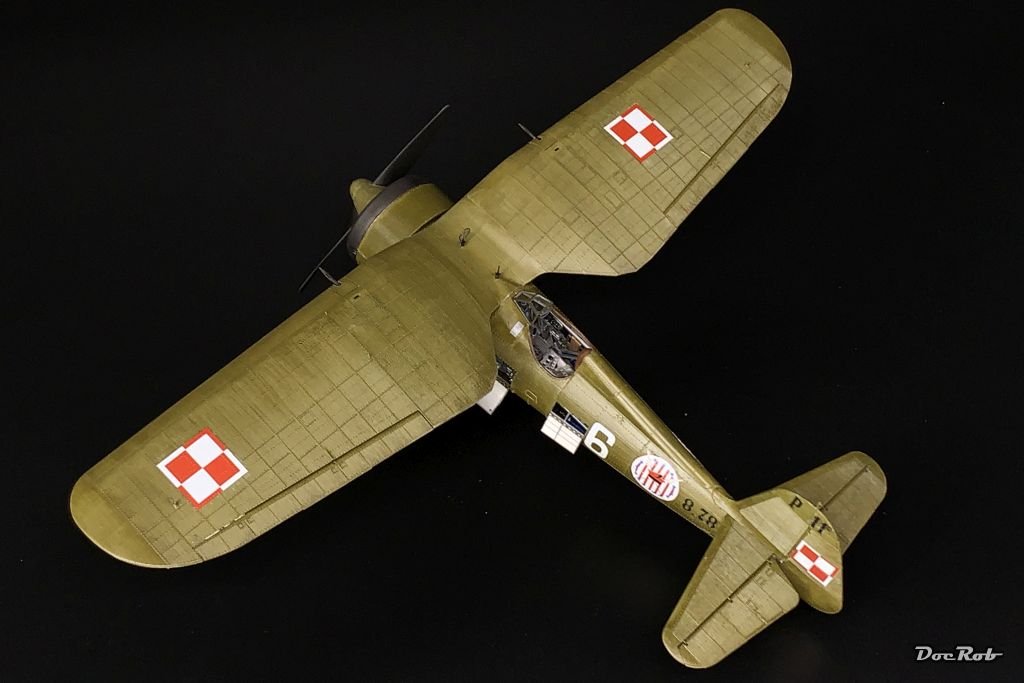
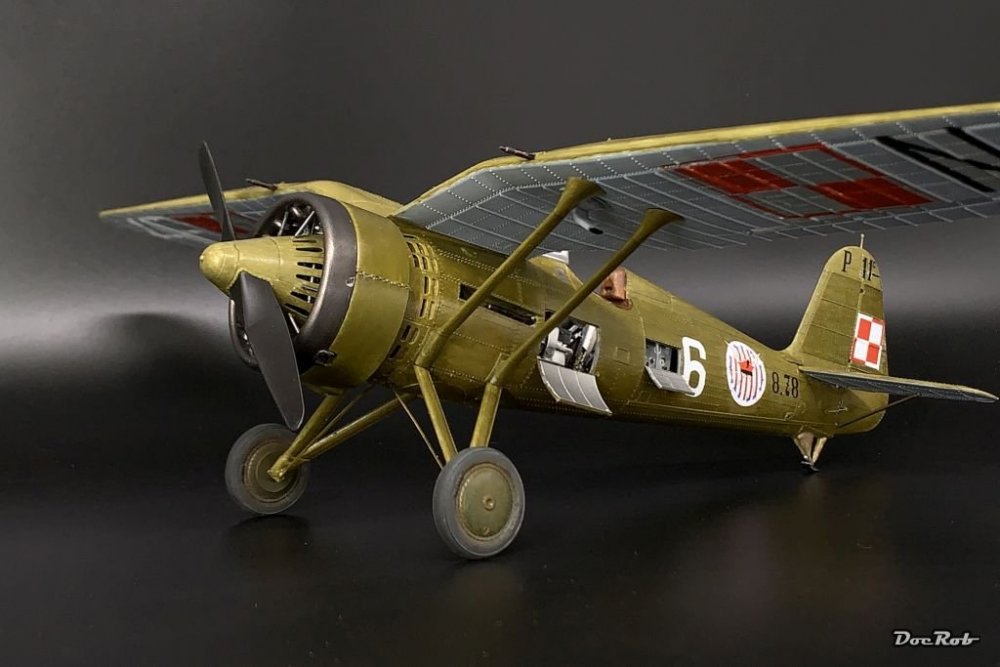
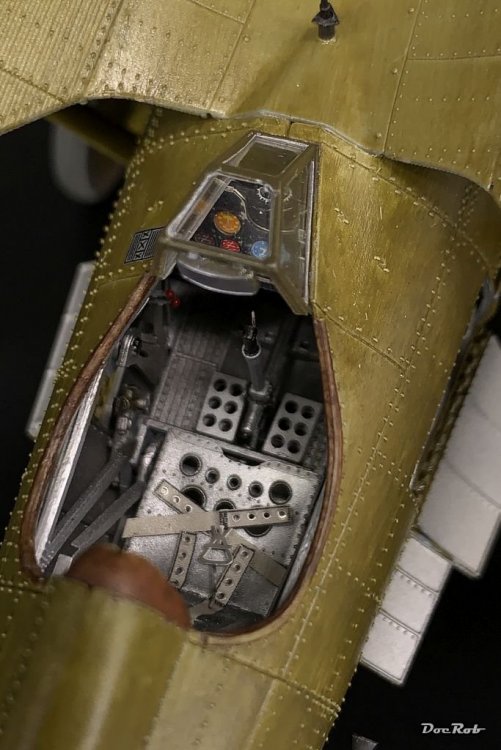
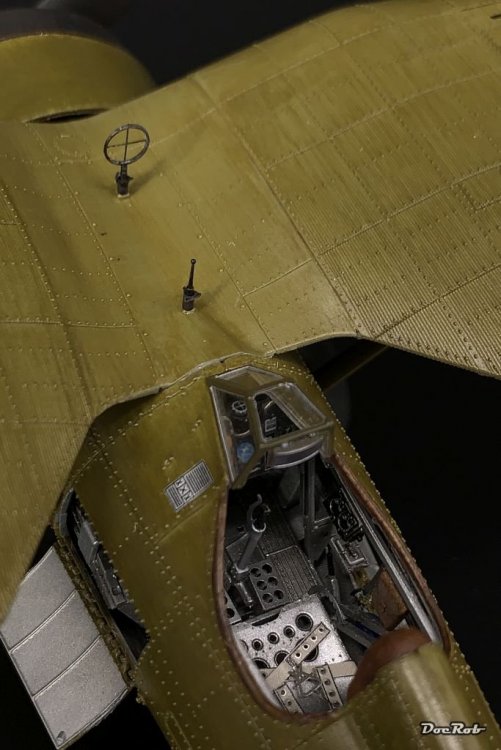
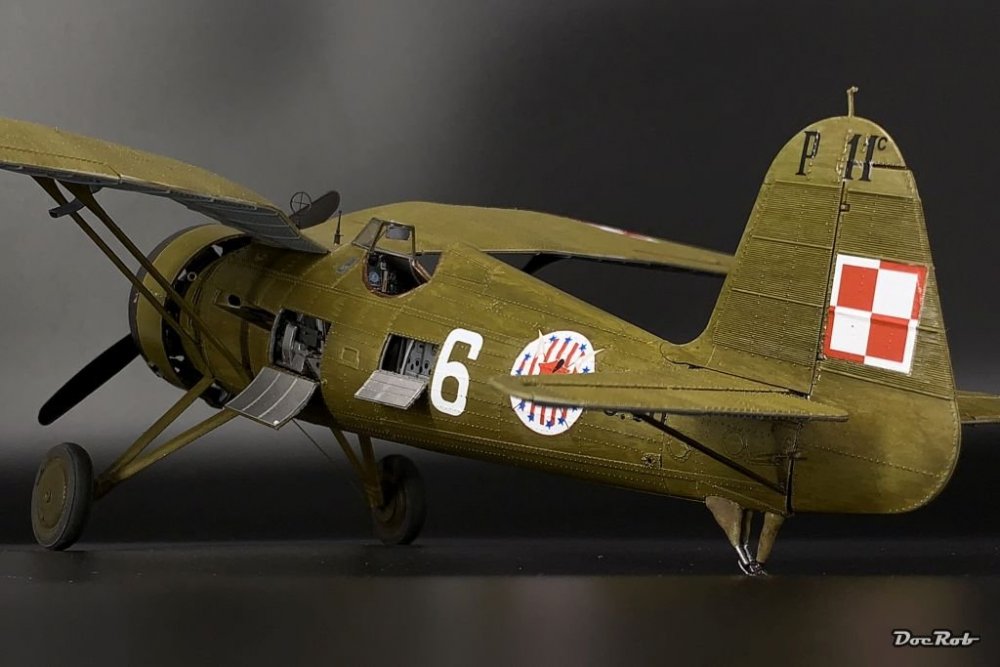
Done all the little things lately, like applying the barrels, the sight, the hatches, canopy and rearview mirror and lots of detail painting, I'm more or less there. There will be some touchups and then the PZL is done. It was an all out fun project and I love the shape of the plane and the very detailed interior. Albeit I used some AM, it can be built out of the box. The surface detail is exceptional and mirrors pictures of the real thing. The oil painting experiment was mostly successful, but it proved extremely difficult to distribute the color evenly. It's another approach. I applied more color than needed and then reduced the amount of color, by spreading it further and further, cleaning off excess color on a paper towel and add a bit more thinner with every pass. Cheers Rob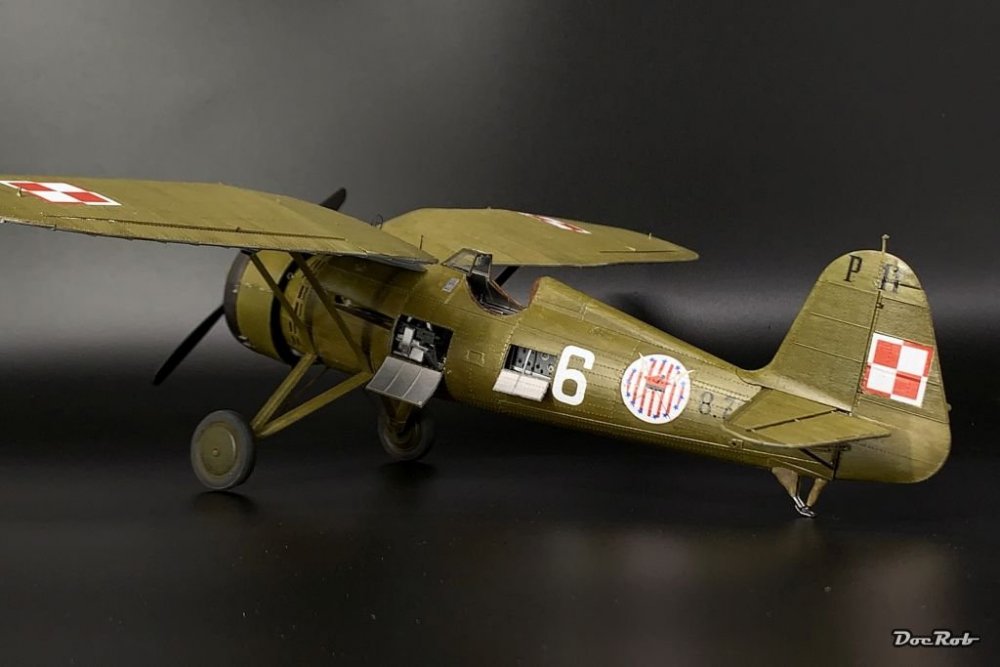


-
Nice progress and enjoy your vacation to Bath. Happy memories for me as I visited Bath maybe twenty years ago and loved it. I was specially impressed by visiting the Roman bath at nigh time with torches for illumination. Astounding how advanced the Roman livestyle was by the time, compared to us barbarians (I'm German born). Cheers Rob
-
What is on your bench right now ? Share a picture :)
DocRob replied to Martinnfb's topic in Modelling Discussion
Medieval or not, the result is what counts and your spinner looks great. Never tried to cast myself, except clear resin in wood . Cheers Rob -
PZL P.11c - Polish Fighter - IBG - 1/32
DocRob replied to DocRob's topic in LSM 1/35 and Larger Work In Progress
Thank you Peter, burnishing brass parts is the way, I like to treat my brass parts. It has no thickness, like paints on these fine detailed small parts and has the right slightly metallic, matte black-browness. The parts have to be fat free and moving them rapidly in the bath is essential, to hinder air bubbles to settle and stop the reaction, where they are. CA is a show stopper too, but with the sights and Venturi horn, there was no way around that. I dab on some black pigments later and all will look good. Cheers Rob -
If you'd like to go subtle on the weathering, you are on the right way, Gaz. Chipping is barely visible on the hull and I think, the result of the pin wash, doesn't look too prominent. To me, the scale reduction by 35 needs a bit of 'overscale' pronounciacion to look right. All in all your Marder looks great, but I've never seen tracks so clean on a used tank. Cheers Rob
-
Love the exhaust stains, but only after the dabbed on oil color which made it look right. The exhausts are also looking perfect. Cheers Rob
-
Ferrari 330P4 Open top 24Hrs Daytona 1967
DocRob replied to mark31's topic in LSM 1/35 and Larger Work In Progress
This is a really beautiful engine Mark, it's impressive to see how the details pop out with some paint on it, where the cast itself looks a bit more dull. Cheers Rob -
That pit looks sweet, John. Nice painting and weathering, a very believable rendition. Cheers Rob
-
PZL P.11c - Polish Fighter - IBG - 1/32
DocRob replied to DocRob's topic in LSM 1/35 and Larger Work In Progress
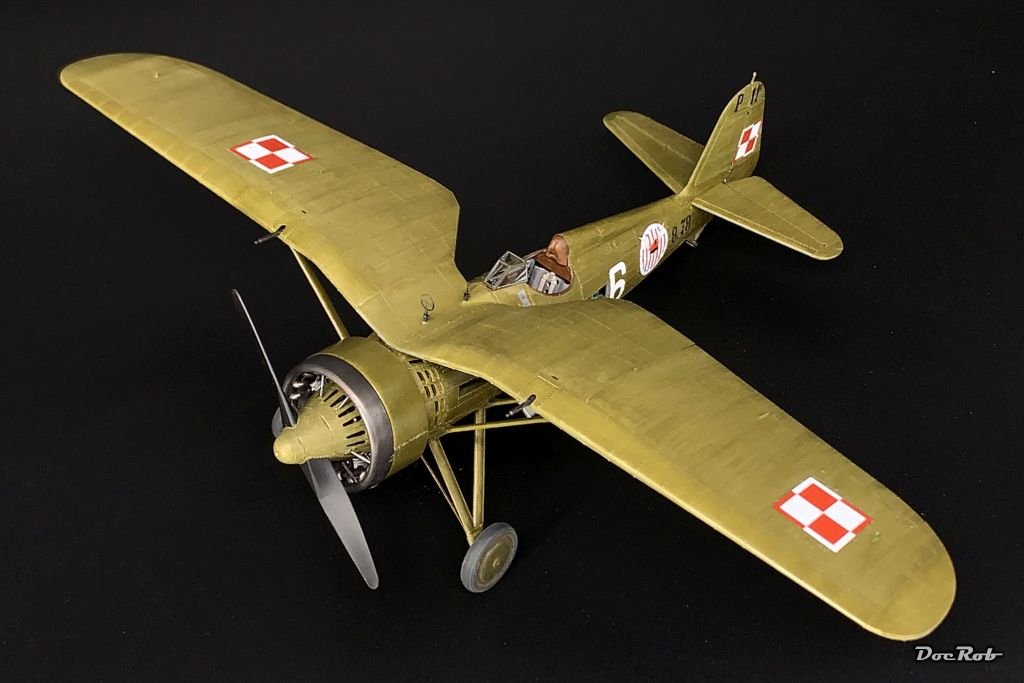
Do yourself a favor and buy one, Martin. It's a great and complete kit, where there is no real need for AM. Interior and surface detail is exceptional oob. It's a beautiful plane at least to me with the elegantly shaped gullwings, and nice proportions. Cheers Rob -
PZL P.11c - Polish Fighter - IBG - 1/32
DocRob replied to DocRob's topic in LSM 1/35 and Larger Work In Progress
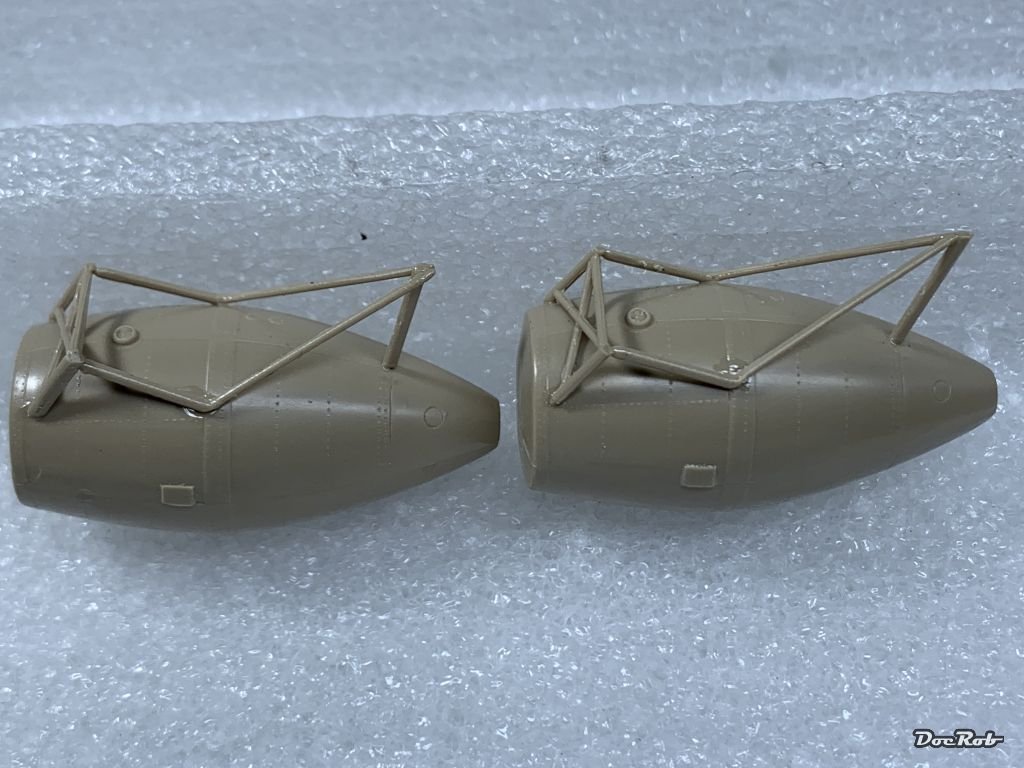
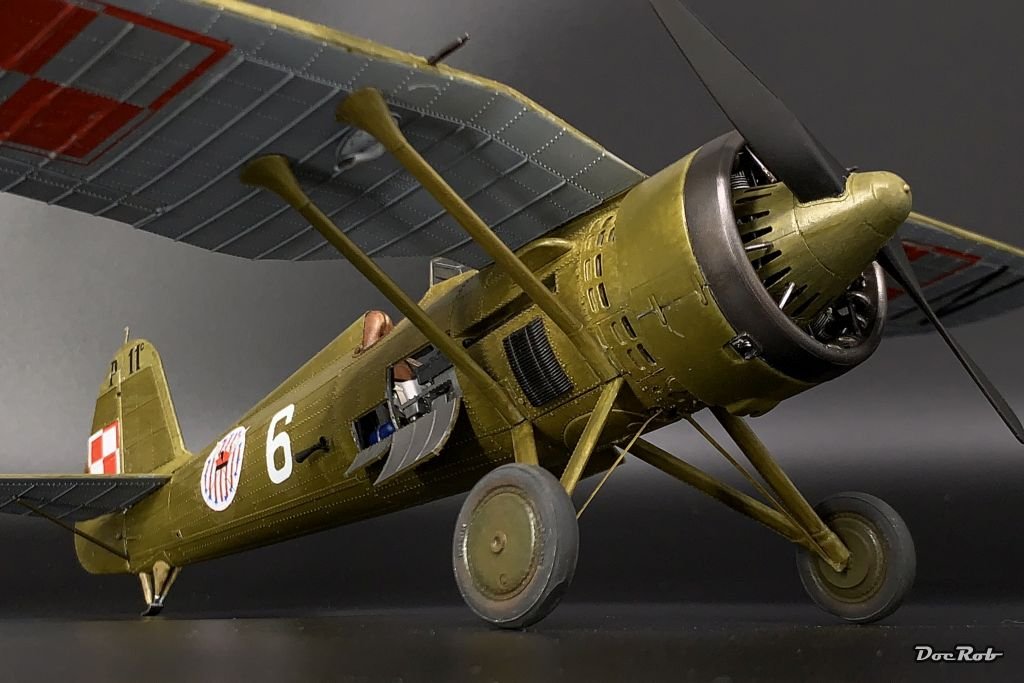
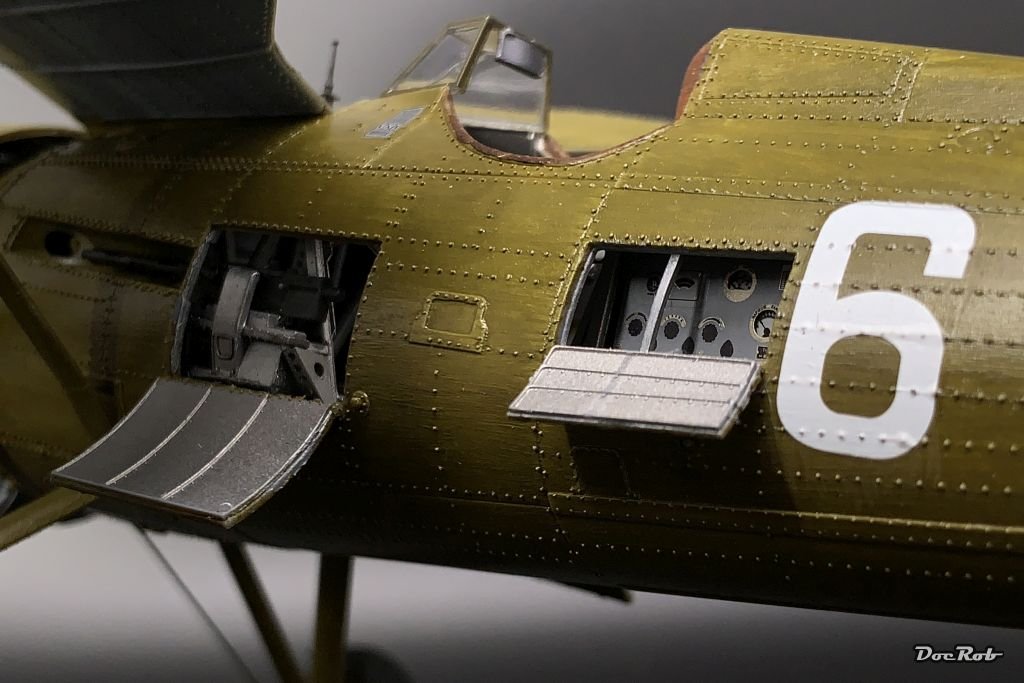
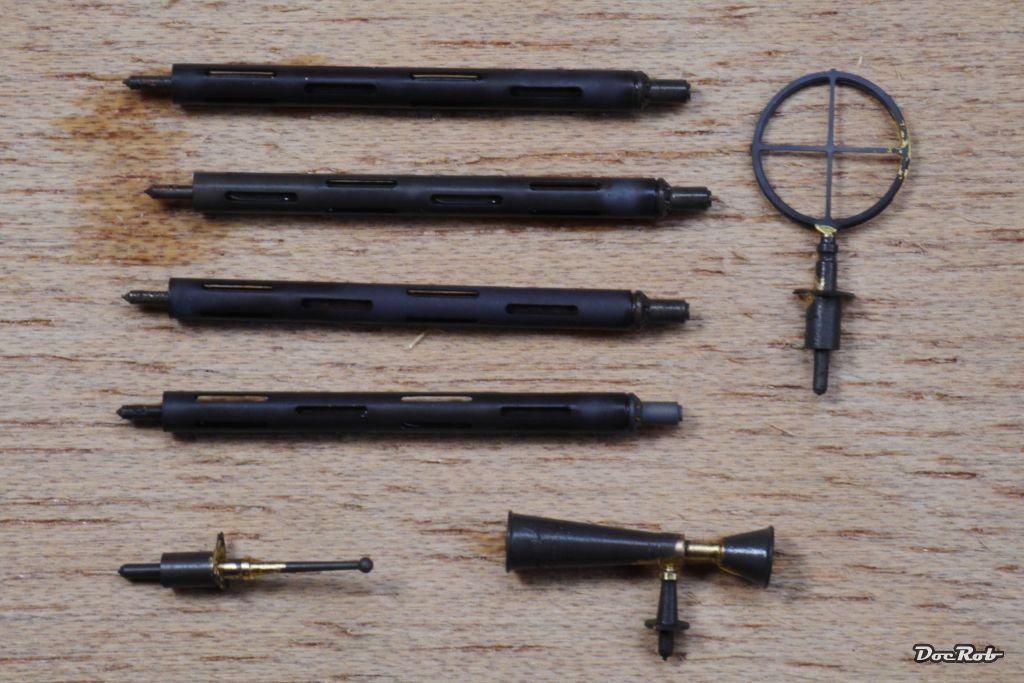
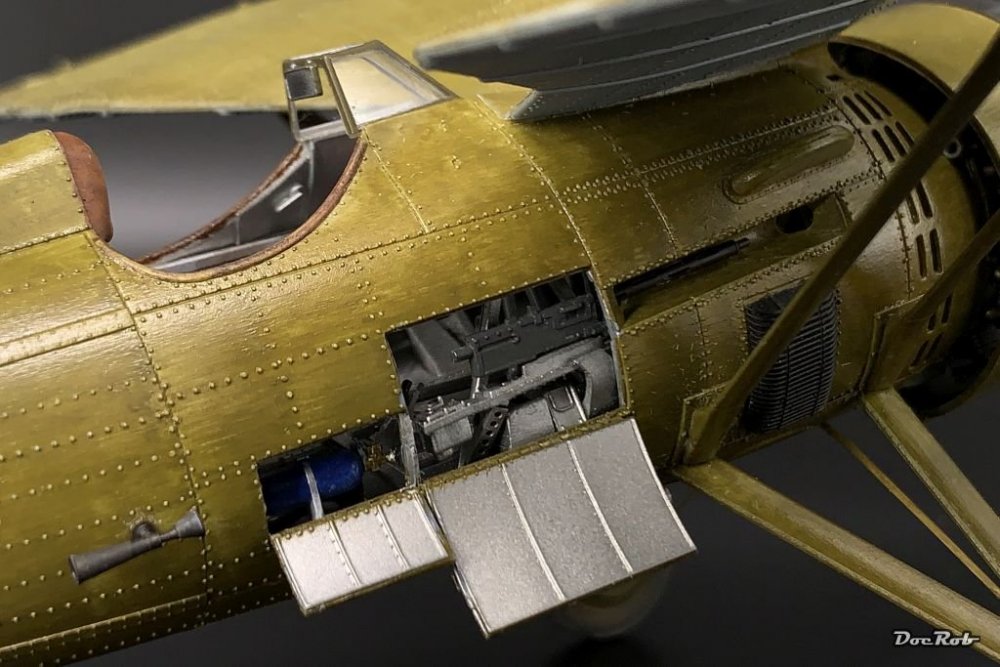
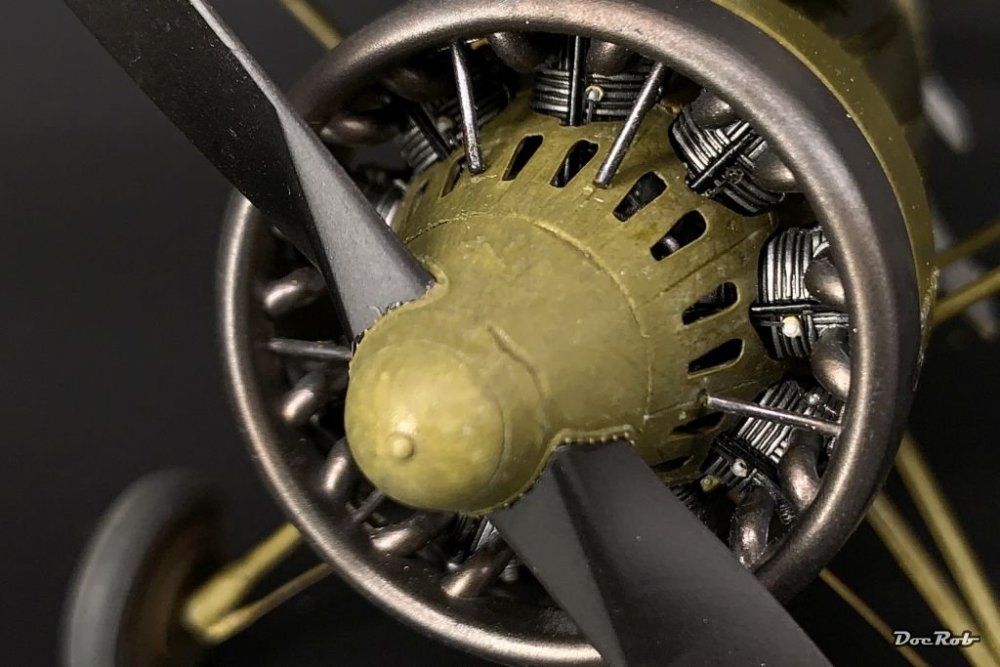
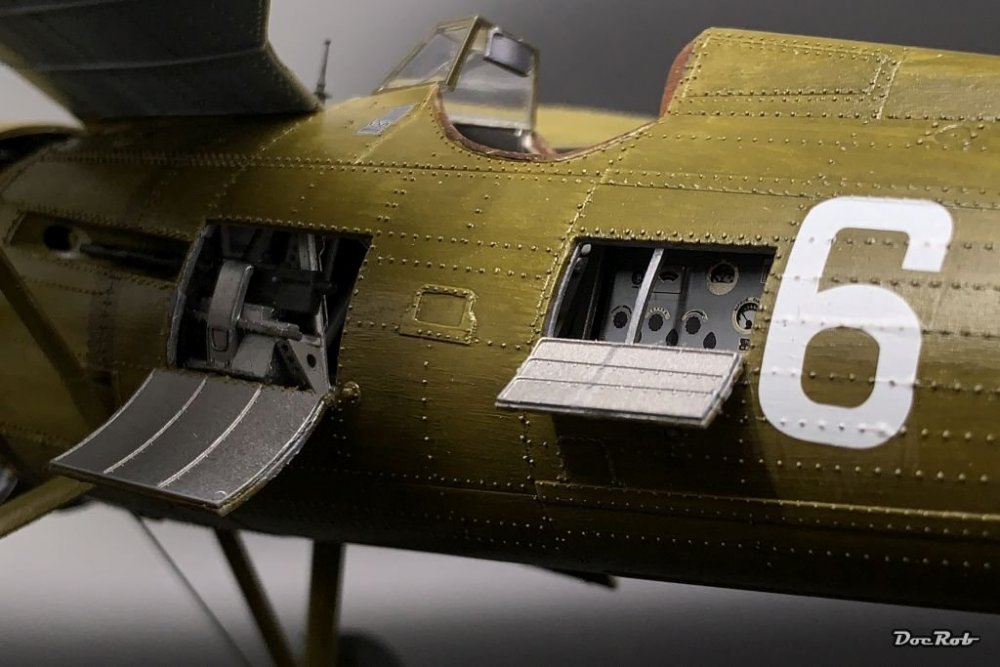
More detailing was prepared, as I assembled the only really essential AM for the PZL, the Master weapon set, which includes not only the nicely done brass barrels, but also the Venturi horn and the aiming devices. I used my usual method of burnishing the brass parts, moving them rapidly in the chemical solution, to hinder air bubbles and when the shade is right, I rinse the parts in clear water and put them on a paper towel. There is still some brass showing, where there was contact with the CA, but that will be corrected later after gluing the parts to the model. I glued the plastic bodies of the MG's, after some pigment treatment, into the open hatches, which was a bit fiddly and should have done before. The barrels will be added tomorrow. Cheers Rob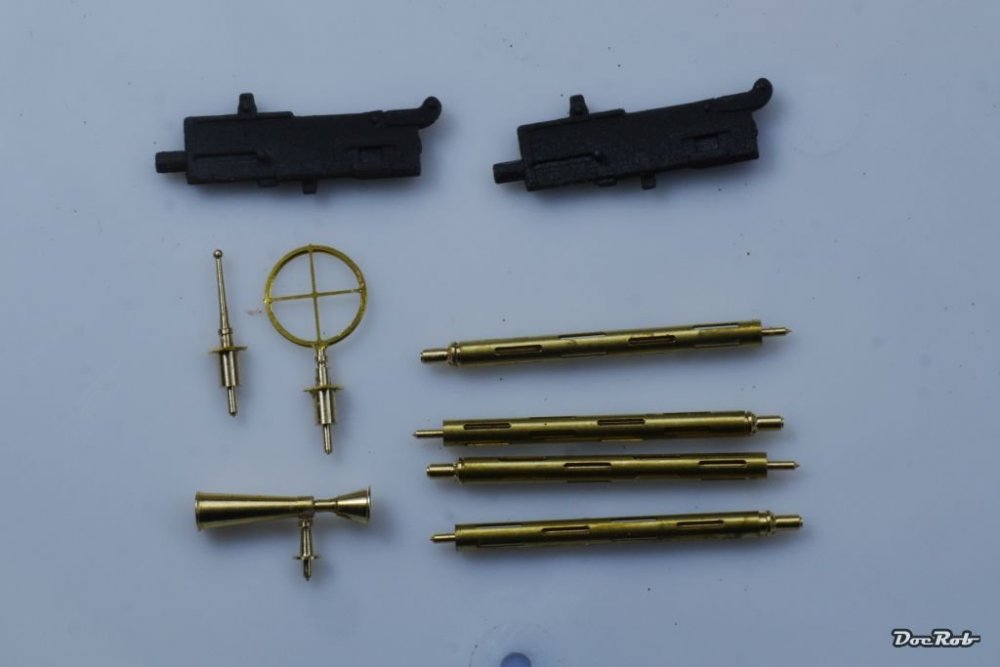

-
PZL P.11c - Polish Fighter - IBG - 1/32
DocRob replied to DocRob's topic in LSM 1/35 and Larger Work In Progress
Thanks Phil, I love experimenting, but sometimes fear the outcome as well, but hey, we are not performing heart transplants. If something goes wrong it can be stripped and repaired or, ultima ratio, binned. Failure is only bad for the ego, but that can be healed with some Martinis . Cheers Rob -
PZL P.11c - Polish Fighter - IBG - 1/32
DocRob replied to DocRob's topic in LSM 1/35 and Larger Work In Progress
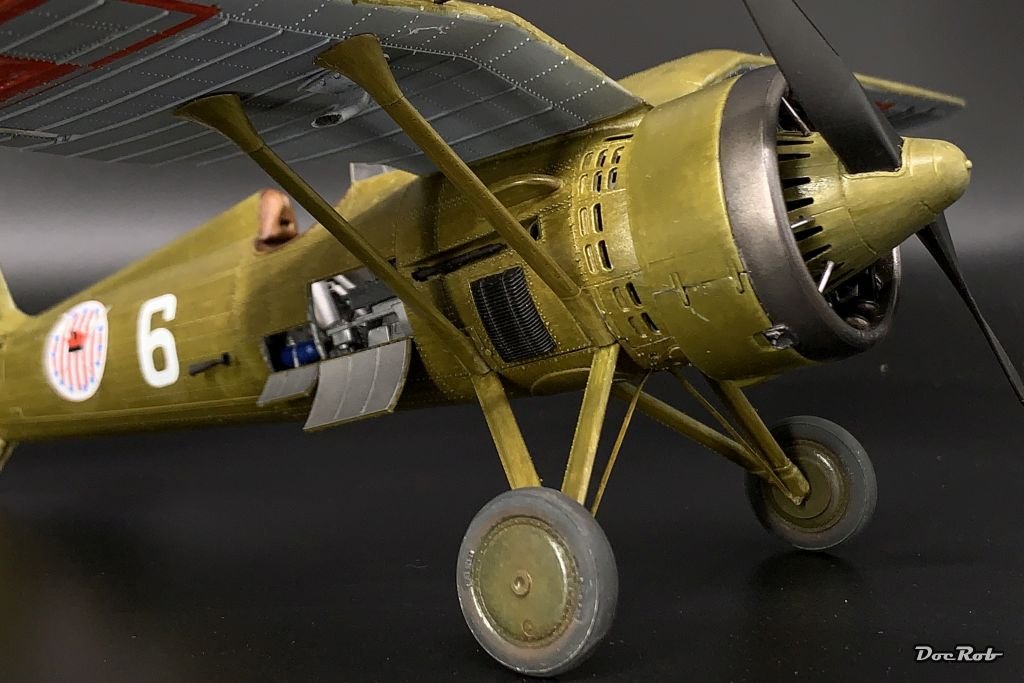
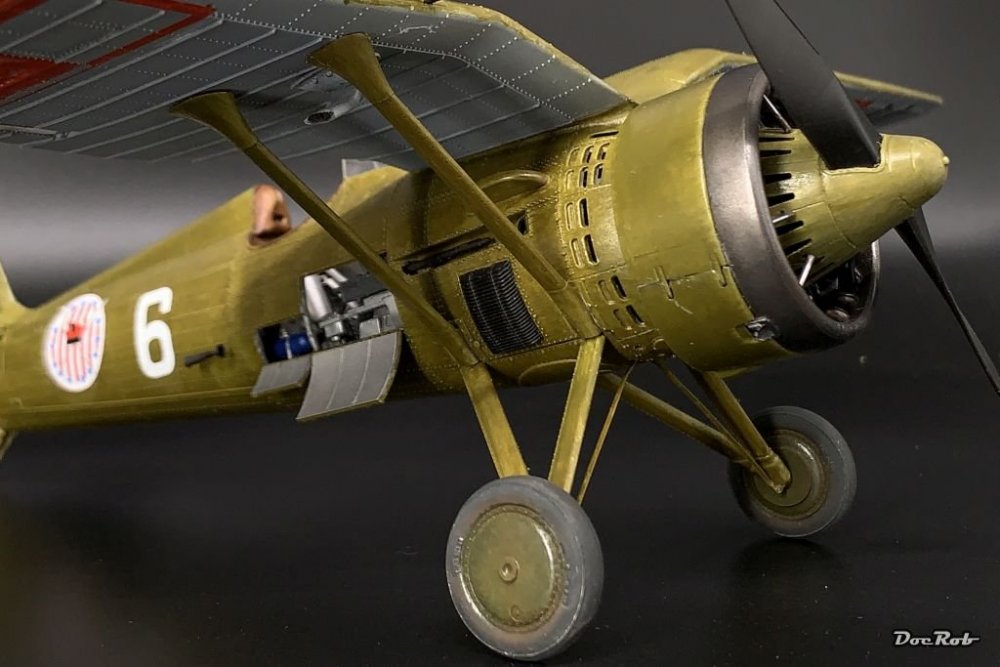
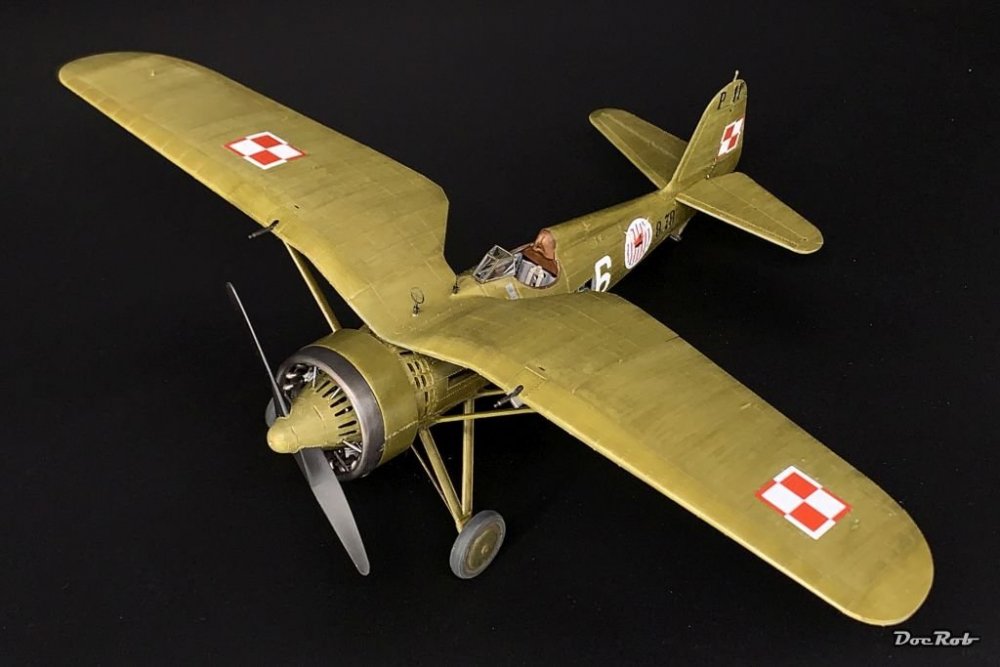
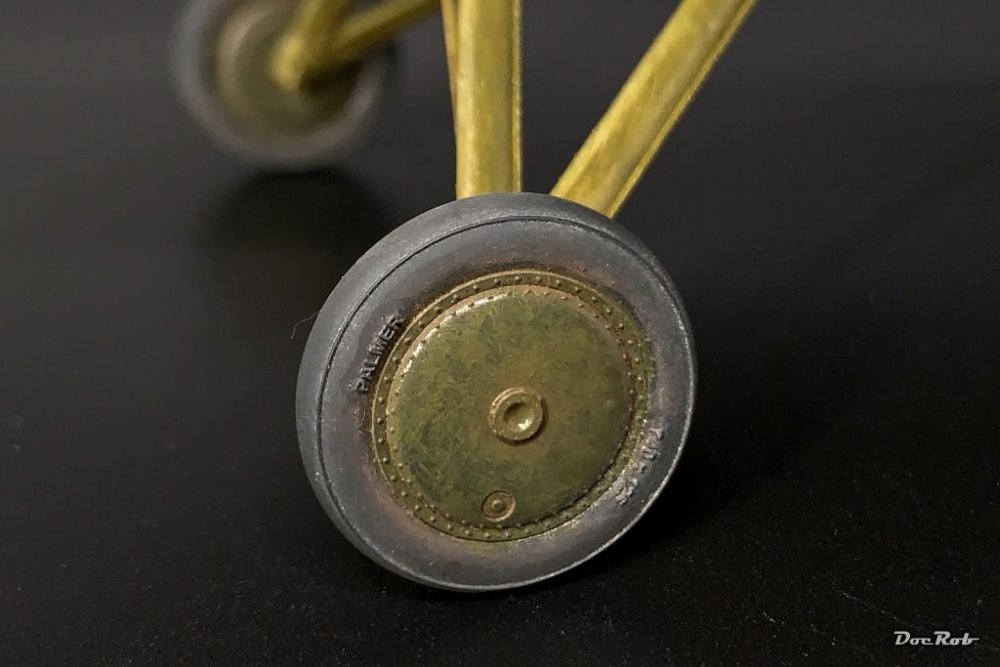
Thank you Ernie, I followed your great build by the time and referenced sometimes during my build. Like you, I absolutely enjoyed all aspects of the build and the kit itself is a gem, design-, detail- and fit wise. I had no issues with the fuselage seam and the fuselage openings fitted perfectly, when I glued them in temporally for painting. The only weak part of the kit are the tiny spots, which are supposed to hold the wheels. If they hold, good, if not, I have to somehow insert some brass rod for enforcement. Normally, I prefer to build my birds closed as well, because all these opened hatches disturb the pureness of the design. With the PZL, I liked the opened panels a lot, as they do not alter the sleek elegance of the plane and add some detail to catch the eye in all that Polish khaki. Speaking of the wheels, I used resin wheels from Aires. They were nicely detailed, but the flattened part was at the same place for both wheels, but the mounting rectangles are angled, therefore, one flattened area is in the right spot, the other is somewhere . The masks were equally bad, so I cut my own. Getting some type of modulation was the main idea for using brushed oil paints for the finish. It was a tedious process, but I like the result. I'm not sure, if I go any farther with weathering, using panel liners and pigments or not. Cheers Rob -
PZL P.11c - Polish Fighter - IBG - 1/32
DocRob replied to DocRob's topic in LSM 1/35 and Larger Work In Progress
Thank you fellas, I'm blushing. The PZL is slowly closing in at the closing line and I had so much fun with the kit, I nearly couldn't wait for the oils to dry properly. Cheers Rob