DocRob
-
Posts
7,048 -
Joined
-
Last visited
Content Type
Profiles
Forums
Events
Gallery
Everything posted by DocRob
-
It's good to see, that LSM is a place, where members care for each other, beside the obvious modelling stuff. Great to have you back here, after that hard time you encountered. From personal experience I know, that modelling can be helpful for recovery. It sometimes help to lift the burden of heavy thoughts, with the need to focus on a kit and getting distracted with thoughts about the right shape of a Spitfire cowling. I wish you a fast and full recovery. Cheers Rob
-
We need you here Harv, get well soon buddy. Cheers Rob
-
Good to see you progressing with the Taube and great that you have a different scheme chosen, than me for my future build. The engines are looking beautiful, but I will build the Argus, just because I have to many Daimler derivates built or in stash. It's good to hear, that your headaches are gone. Cheers Rob
-
Hi Gaz, I will not give my vote to one option, because it so much depends on what you want to achieve. One method is adding layers (acrylics) another is to remove layers (hairspray) and the sponge or whatever you use is only an addition to the first method. Mostly, I will use the method, which is incorporated by the original. Chipping in reality is to get rid of layers and show what is beneath. If I want to get it right, I will use hairspray, sometimes multi layer hairspray, like primer colour, hairspray, base colour hairspray, second colour (if necessary) and expose different layers, by using various tools for abrasion. Then I add weathering effects on top, if needed. Here is an example, the base layer is aluminum on the sides, wood on top, then hairspray, then semi gloss black, hairspray again and finally Nato black. The chipping was achieved after dampening the surface and use toothpicks tweezers, sanding tools and old stiff brushes. The idea was to replicate a tin like surface covered with a tar like colour, which has a different shining, where rubbed off. Finally algae and salt effects were added. You get the idea, if you want to do it right, do it as if it is right, understand the material and the coatings and the kind of usage or surrounding influences. Dabbing on with a brush or sponge is simple and fast, can be enhanced, simulating multi layer dents and abrasions and can be good enough, if well made. Here is a cheapo, not really convincing, but one of my examples for that second method. Chipping to me is a technique of imagining the real thing in it's surroundings and therefore an important part of the weathering process, to get a realistic result. There is a lot of experimenting involved, and a basic knowledge about the real thing, material wise, coating wise and an idea about the conditions. Cheers Rob


-

HK Models Do-335 A-12
DocRob replied to JeroenPeters's topic in LSM 1/35 and Larger Work In Progress
Great result Jeroen and not only with the heads. The Do is a mouthwatering beauty and makes me want to start my one seater. I used Abteilung oils for the first time on figures on my last build (two German WWI naval airmen) and loved the result. The approach is quite different, than with acrylics, but they blend so much better. If you use matte varnish, you even reduce the unrealistic shine. I was so happy about the result, that I decided to paint the figures completely in oil, which I will do more often now. Cheers Rob -
PCM Focke Wulf FW 190 A-1/A-2/A-3
DocRob replied to GazzaS's topic in LSM 1/35 and Larger Work In Progress
Great work with the surfaces and scribing, this will ensure a smooth paintjob for sure. The approach with the landing gear covers is interesting and will be convincing. Cheers Rob -
1:32nd scale Roland D.VIa
DocRob replied to sandbagger's topic in LSM 1/35 and Larger Work In Progress
Nice work, Mike. It's always a scary moment, closing the fuselage. Good that this is sorted now. Cheers Rob -
I feel the need... for Shake and Bake... Tamiya StuG
DocRob replied to GazzaS's topic in LSM 1/35 and Larger Work In Progress
Really like your shake 'n bake approach, with all these nuts, Friuls and PE. What is left out is the Zimmerit. Do you have any plans for that? I have a started Dragon Stug IV in my stash, which will be in winter finish too, along with metal tracks, Attack Zim and some great figures, but this has to wait a little before compleation. Meanwhile I take yours as a canvas. Cheers Rob -
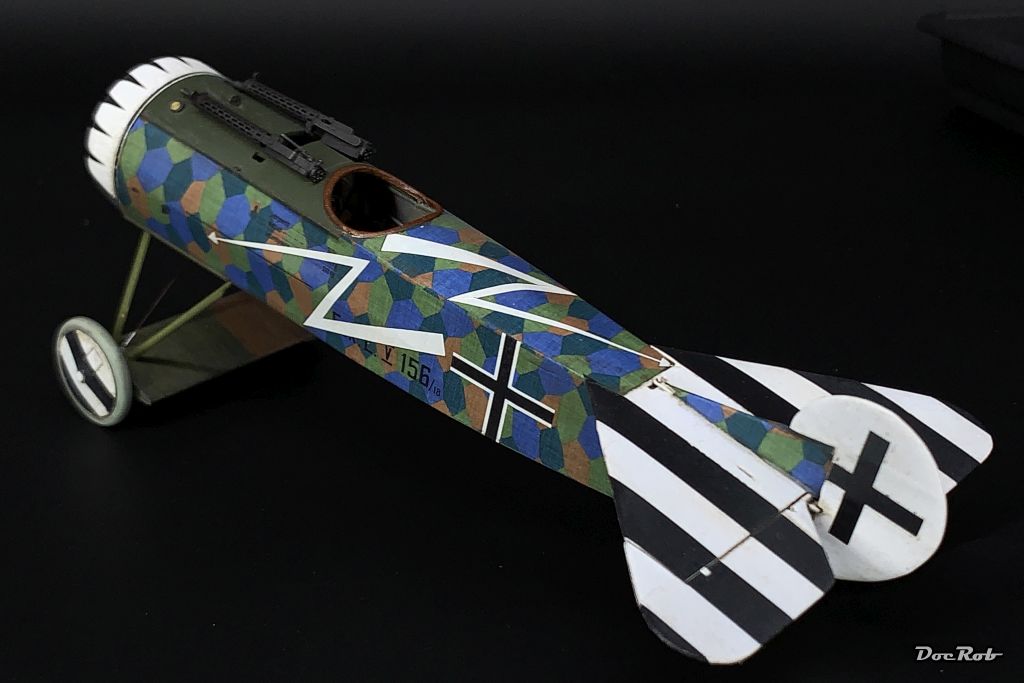
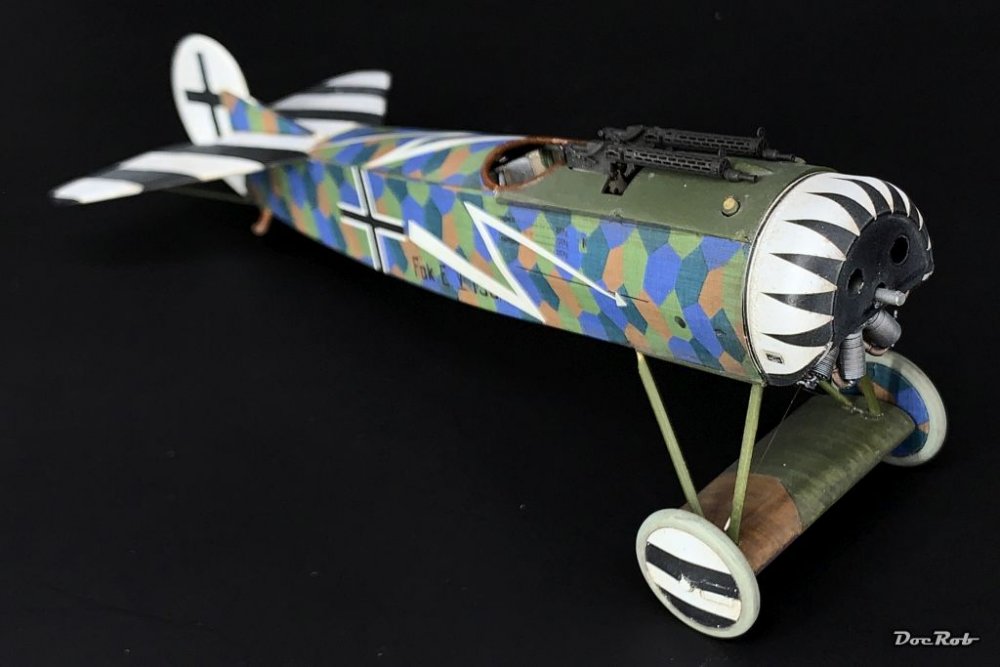
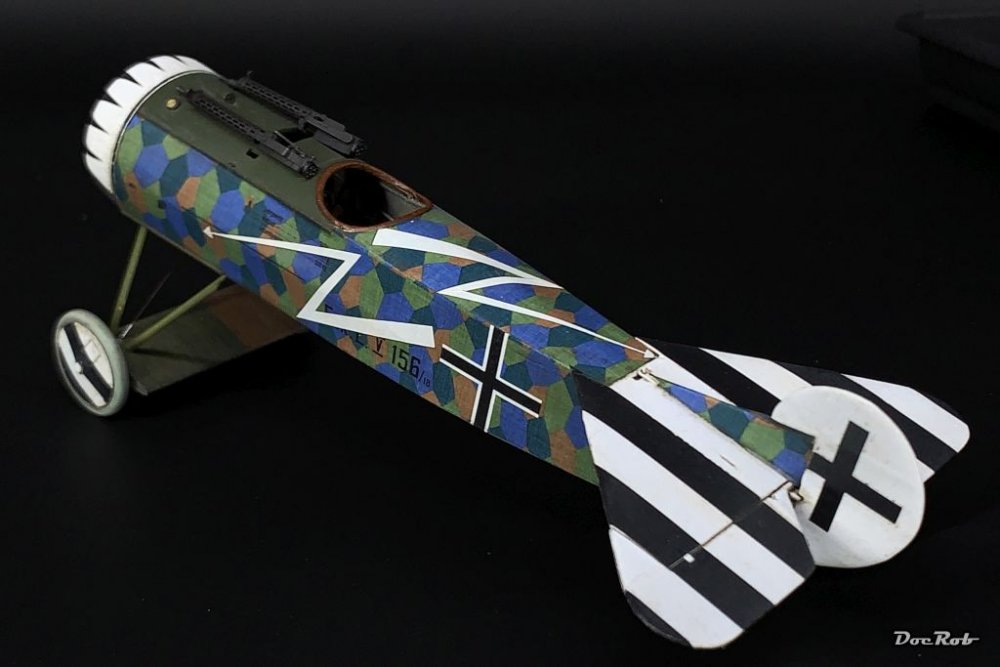
Fokker E.V / D.VIII Parasol Mikro Mir 1/32
DocRob replied to DocRob's topic in LSM 1/35 and Larger Work In Progress
Muchas Gracias Señhores, I'm quite pleased, how the Fokker turned out at this stage. There were a few obstacles, but it was a rewarding pleasure build until now. There will be the razor wing attached after all the work and experimenting which went in, Gaz. It is a Fokker D.VIII and not the Fokker E.V early model, which had the tendency to loose the wing midair . For this one, I have no figures planned, I have to to the little dio for my long finished Hansa Brandenburg first, where the figures are almost painted, but the scenery give me the creeps, with acrylic water, shoreline waves and beach surroundings. Cheers Rob -
What is on your bench right now ? Share a picture :)
DocRob replied to Martinnfb's topic in Modelling Discussion
Thanks for the invitation, I'm quite honoured, but I have to cook for my wife now. It will be Salmon and Peto along a Salsa made from grilled cherry tomatoes which then is added with fresh Passion fruit and a little brown sugar to caramelize a little. Accompanied by some Ebly (a kind of sun wheat) which is roasted, then cooked with white wine and then get Parmesan and Estragon added. I will raise my glass to you, when finished . Cheers Rob -
Fokker E.V / D.VIII Parasol Mikro Mir 1/32
DocRob replied to DocRob's topic in LSM 1/35 and Larger Work In Progress
Thank you for your kind words Hubert. Maybe I should follow the path of a fellow member here and leave the wings off, before I mess something up . Cheers Rob -
What is on your bench right now ? Share a picture :)
DocRob replied to Martinnfb's topic in Modelling Discussion
I could help testing and consuming . Happy Chinese New Year Cheers Rob -
Fokker E.V / D.VIII Parasol Mikro Mir 1/32
DocRob replied to DocRob's topic in LSM 1/35 and Larger Work In Progress
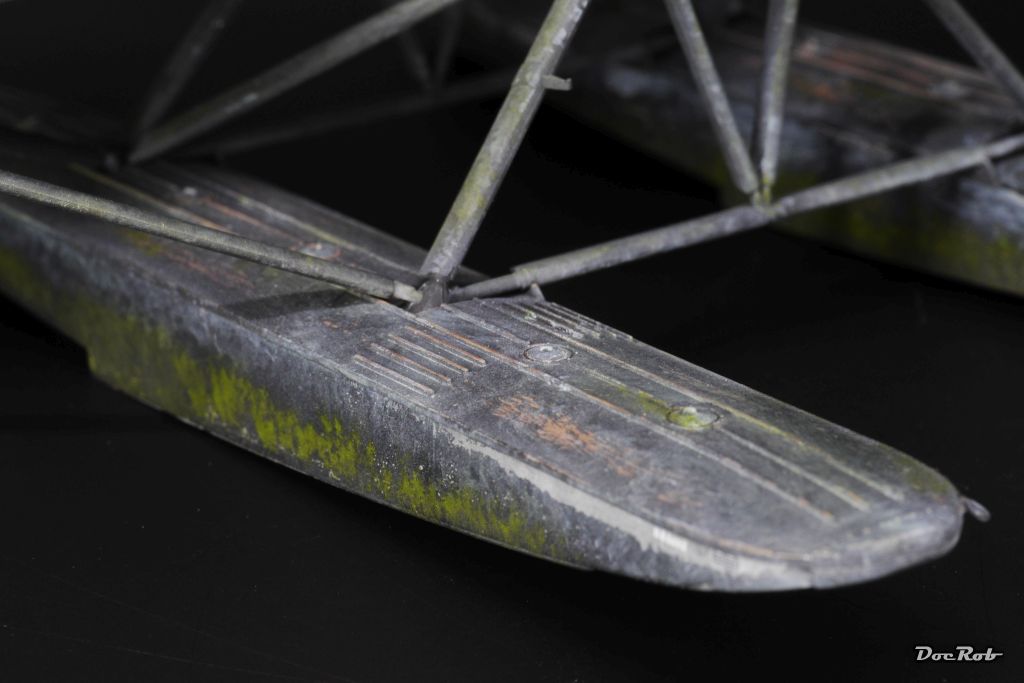
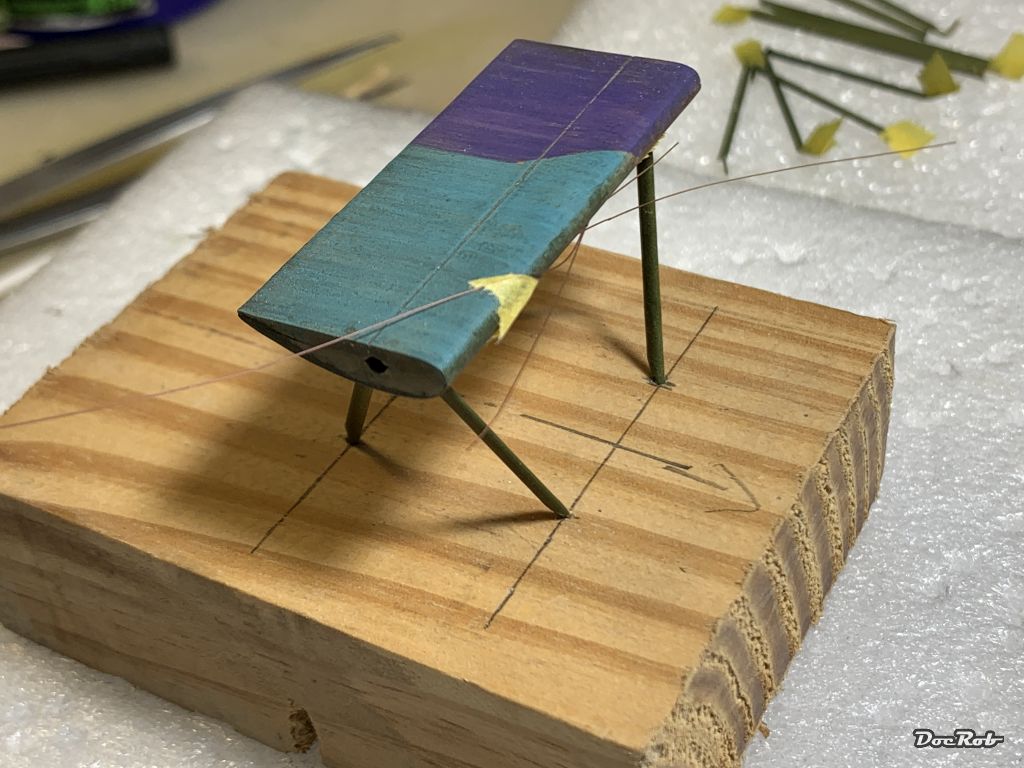
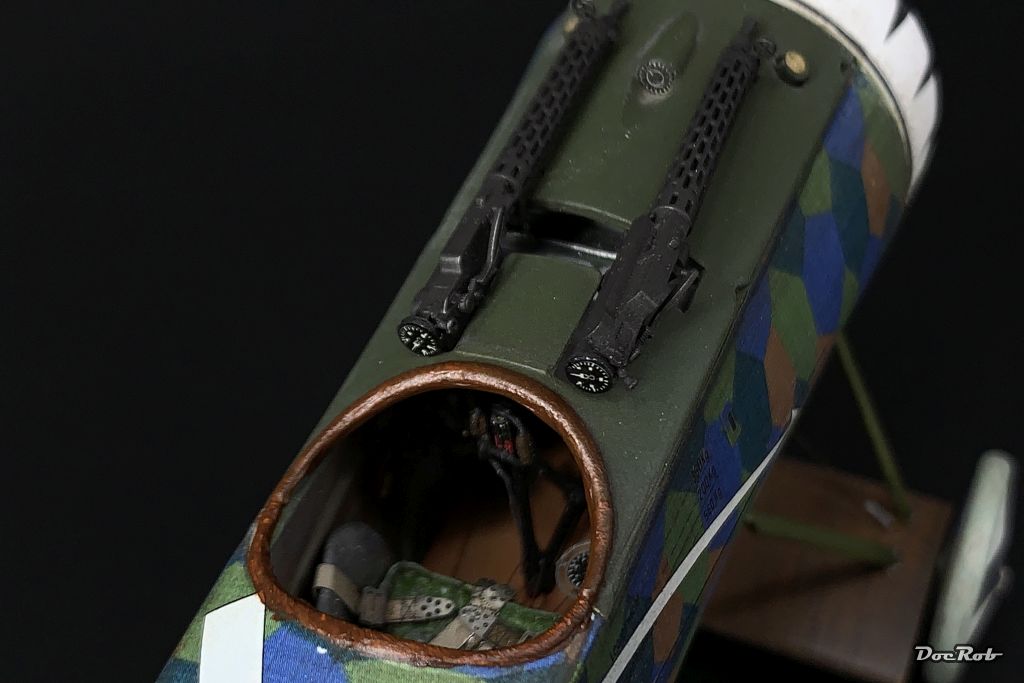
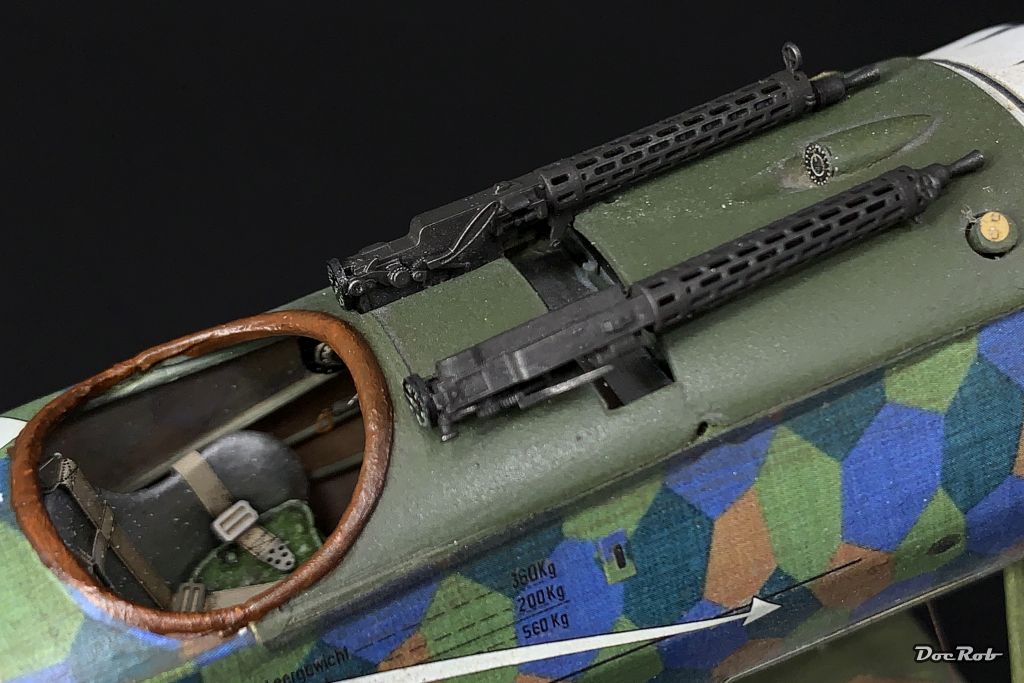
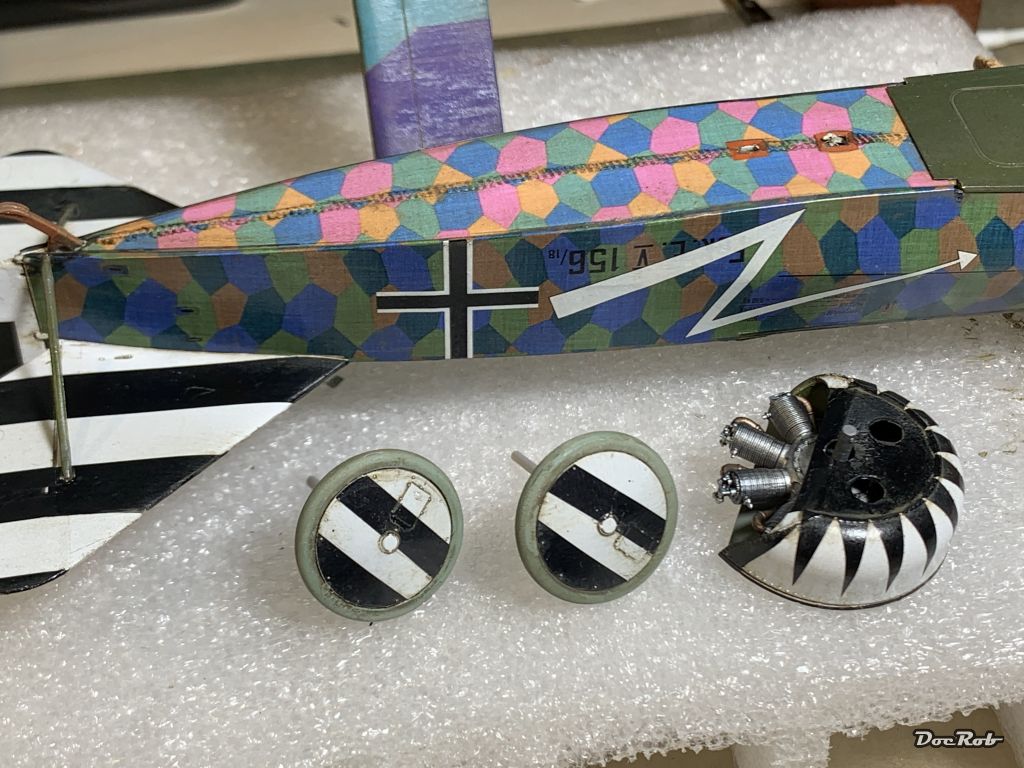
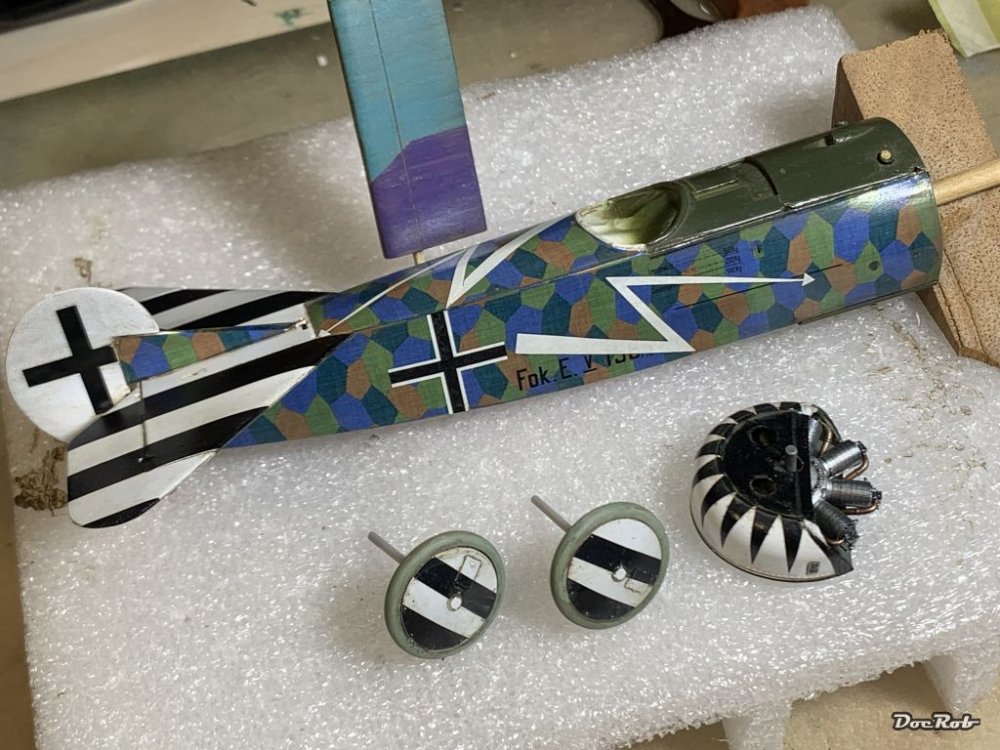
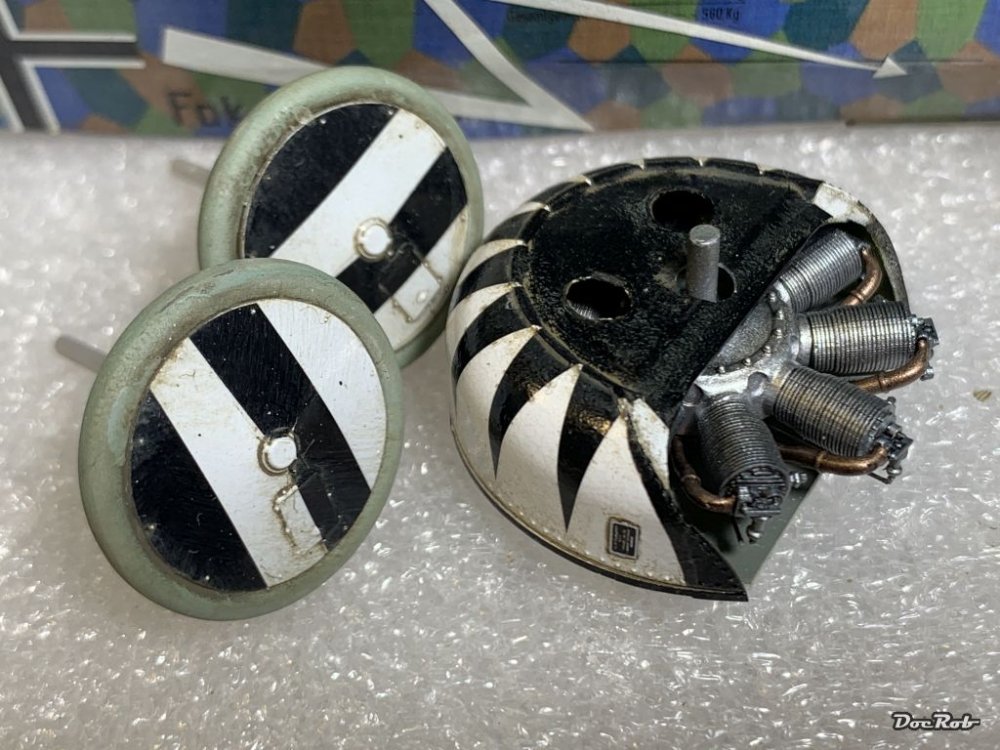
After matte coating fuselage and wings, It was time to start with the undercarriage. Because of the fast drying time of the CA, I decided to build a jig for assembly out of a block of wood, which represents the underside attachment points of the fuselage. The little UC wing got pre rigged for the cross bracings and then glued on the struts. Then, after curing, everything was attached to the fuselage, including the cross rigging, which was inserted first in the strut's holes in the fuselage, followed by the CA'ed struts. I had a little wiggle time, to adjust the whole undercarriage. Finally, the turnbuckles were pulled taught and secured with CA. The extra brass work payed off, as the undercarriage would carry a B-52 now, in 1/32 scale. Then I attached the nose section to the fuselage, where the fit is not perfect, but I decided, I can't think of a makeable solution for this and finally glued everything together. It was the second high trouble area, I identified with the build and it proved the toughest one. There is a tiny gap now, that I can live with, so be it. The Spandau machine guns received a coat of black pigments, followed by some steel pigments and finally got the custom punched out round counters decaled with some Airscale dials. They are not attached finally. Last but not least, the leather parts were painted in different brown tones and still have to dry, as they are to shiny right now. Cheers Rob


-
Fokker E.V / D.VIII Parasol Mikro Mir 1/32
DocRob replied to DocRob's topic in LSM 1/35 and Larger Work In Progress
No need to be jealous, I had a very bad elbow pain the last weeks and running was the only thing to do in the way of sports, which I did extensively, be it rainy, stormy, cold and rarely sunny. Today it was the first swim since four weeks, but the arm held up for a pretty long distance. Now, all my muscles are aching, but I guess the last coat of matte varnish should be dry by now and next up is the long awaited assembly of the main components, yeah . -
That looks very WOW. Great modulation and great work with layers, beside from all the enhanced detail. Cheers Rob
-
Fokker E.V / D.VIII Parasol Mikro Mir 1/32
DocRob replied to DocRob's topic in LSM 1/35 and Larger Work In Progress
Muchas Gracias Hombres, I'm still having fun with the Fokker and slowly see the finish line in the distance, but the ongoing repeated sealing with the necessary drying time is winding me up. Work for an hour, wait for the next day. If my bench wouldn't be that cluttered up, I would start another project in the meantime, but the weather is great, I will have a Jog instead and a swim today . Cheers Rob -
Looking good, like Phil said. I have to build a Sherman (Firefly) sometime. I have one in my stash from Asuka, along with some nice figures. Keep on rollin' with this one. Cheers Rob
-
Fokker E.V / D.VIII Parasol Mikro Mir 1/32
DocRob replied to DocRob's topic in LSM 1/35 and Larger Work In Progress
Today, I took all my courage together after the decal disaster luckily solved. The gloss coat was completely dry, so I used a clay wash to make the little Fokker a bit grimy and the decals stayed in place while rubbing the dried clay off the parts with a cloth. I will not go too far with the weathering, but the look should also not be brand new. Everything went well and tomorrow, all will be sealed with some matte varnish. Cheers Rob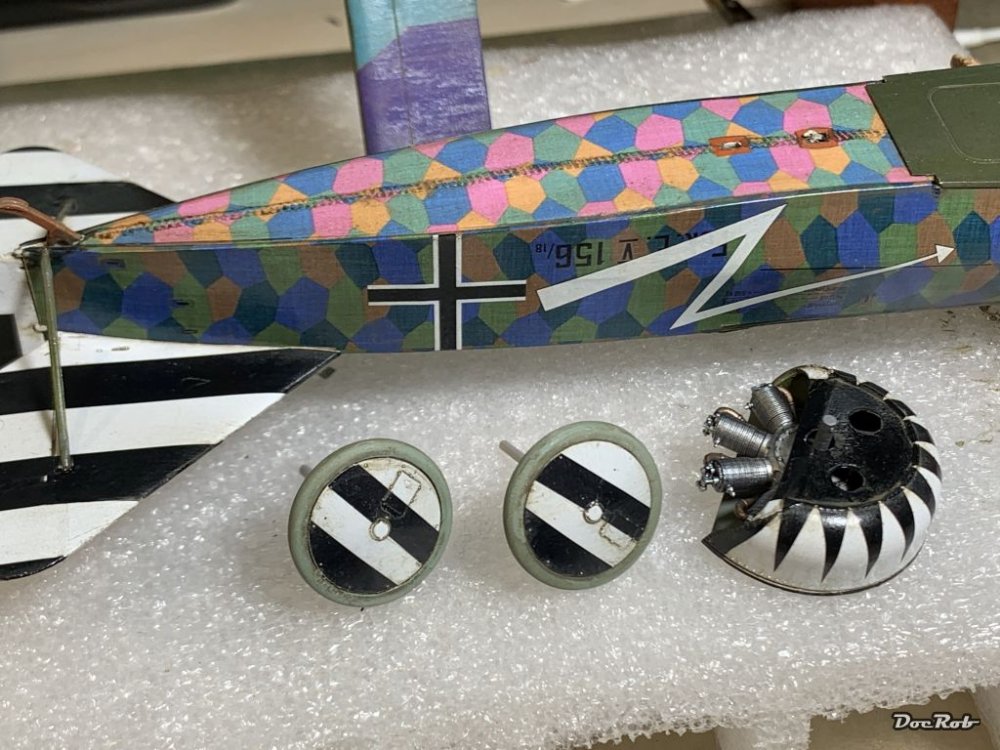
-
That stuff never worked for me with the Vallejo colours, like Mr. Levelling thinner does with Tamiya acrylics. Cheers Rob
-
Stash stock take, I should be..........
DocRob replied to Bomber_County's topic in General Discussion
Personally I think the depth of a stash is relatively unimportant. What counts more is the will to build what you have, the dedication and people are different in that case. Some are hoarders, (I have to confess ) others are more selective or simply fast in fast out and up to the next one. The purpose for building models is also way different among us. Some have historical reasons, others go for the challenge, and some are doing it for pleasure and relaxation or all or none of it. I can't work on different kits at the same time except, they are connected in a way, so it's one after another, but I need a big stash, to let my thoughts wander to future projects and let me tempt by whatever reason I find. It's the same with books to me, I can't have only one book in the pipeline, I need a shelf full and have to develop some anticipation for the next one. I cannot finish a good read without having an idea about the next book. As it's the same with models, I need a stash to choose, but I envy others who are less dependent than me. Beside from hard facts like money, space, acceptance by the family,..., it is mainly a question about what type of character you are. I bought all my kits to build them, all my books to read them, all my vinyls to hear them (that at least has a checkmark ), all my shoes (I have a fetish here) to wear them, ... . I'm a hoarder, but I try to convince myself, that all purchases are for a purpose, which is more than adding to a stash. Not all of these projects will be realized for different reasons, but that's part of the game. I know it's partly hypocryte, but that's how I am . Cheers Rob -
When all conditions are perfect, they spray well, but some colours were hardly to thin to a correct grade. sometimes I couldn't get decent results at all, they behaved like oil on glass not covering well. I have a lot of them and used them on many occasions. You can achieve good results with them, but the tendency to clog in the airbrush is higher than with other products. You can't thin them with Mr. Leveling Thinner, they will turn to a big tar like lump in the airbrush. I'm switching back to Tamiya acrylics and said leveling thinner. The results are more consistent, the painted surfaces are more durable and the tendency to clog in the airbrush is reduced with the levelling thinner, which gives better results and stress free airbrushing . Cheers Rob
-
Stash stock take, I should be..........
DocRob replied to Bomber_County's topic in General Discussion
The benefit in having only a few kits, is the percentage increase is much bigger with every new one. Stats never lies . Cheers Rob -
Fokker E.V / D.VIII Parasol Mikro Mir 1/32
DocRob replied to DocRob's topic in LSM 1/35 and Larger Work In Progress
Thanks Kai, I used your method on loose edges of decals before, which lifted a little during later steps of the build and it worked. This time I haven't expected any problems, as the decals lied down perfectly and looked like tattooed on. Cheers Rob -
Lancaster-Crew finished
DocRob replied to Kaireckstadt's topic in LSM 1/32 and Larger Aircraft Ready for Inspection
Wow, great result with the subtle figure painting. The figures with their individual poses looking great, enhanced by your fine brushwork. Cheers Rob -
Fokker E.V / D.VIII Parasol Mikro Mir 1/32
DocRob replied to DocRob's topic in LSM 1/35 and Larger Work In Progress
Thank you Carl, I read about that Tamiya decal potion, but never tried it. I will try to get a bottle of that stuff and test it on some stubborn decals You are probably right about the availability of the 3M rattle can glue Hubert. Not many aerosol driven cans are on the shelves here anymore and importing them is impossible, since they changed the types of aeroplanes for mail delivery to my island. There is a strict 'rattle can ban' in order for the transport. In this case, I think even this type of glue would have lifted the decal, because the type I used was luckily so much detacked, that it barely sticked on the surface. This was the only reason, I could pull the decals off the tape and reapply them. I pity and envy you at the same time, for not having reached the latter stages of a build recently, for obvious reasons . As much as I like painting, masking and weathering, decaling gives me the creeps and if I could outsource this step for money, I would . Failing at decaling as one of the last steps of a project just hurts too much. Cheers Rob