DocRob
-
Posts
7,048 -
Joined
-
Last visited
Content Type
Profiles
Forums
Events
Gallery
Everything posted by DocRob
-
Well the plastic guns are not too shabby, but the Master barrels are always an improvement, a fiddly one though. If you pre drill the plastic body of the gun you can leave the barrel off for the painting of the plane and stick it in after. I love to burnish brass parts and dip them into burnishing liquid for some seconds and rinse them under water, to stop the process. Cleaning the parts with alcohol before is necessary and while in the burnishing bath, you should move the parts with a tweezer, to hinder bubbles being caught, especially inside the barrel. It's best to burnish before assembling the parts, because on CA there will be no burnishing process. The benefit against priming and painting is, that there is no actual coating which erases details on these delicate parts, like with paints. I also like the (adjustable by burnishing time) brownish black very matte effect of the burnishing process. If you prefer a more metallic appearance in the end, some steel pigments rubbed on help there. Cheers Rob
-
Can't see why you need this . Anyway, an interesting book with some nice ideas and inspirational dios. Cheers Rob
- 4 replies
-
- 2
-

-

-
- ak-interactive
- wrecked
- (and 1 more)
-

What is on your bench right now ? Share a picture :)
DocRob replied to Martinnfb's topic in Modelling Discussion
Looks like one of the better maintained Greek ones (Have they had Mig's?). Looks fantastic and nice save to an otherwise struggled project. Cheers Rob -
Nearly forgot about ugly (in a unique way) Russian multi wheelers in desolate condition. Good to see you back with the Frog. Cheers Rob
-
1:32nd scale - Bristol M.1c
DocRob replied to sandbagger's topic in LSM 1/32 and Larger Aircraft Ready for Inspection
An interesting plane design wise and you've done it justice. Beautiful painting and weathering as ever and the little scene tells a story. Cheers Rob -
Das Kamel - Hansa Brandenburg W.12
DocRob replied to DocRob's topic in LSM 1/35 and Larger Work In Progress
Thanks Hubert, for make me aware of him. Actually I have to admit, that I never heard about him. I may have seen some of his works though. He definitely has this smoothness in his works. Unbelievable what he can do with some paint and brushes. I will take a more intense look for his works, there should be a lot to learn. An artist, I do like a lot is Jean-Bernard Andre. He is more a diorama builder, often working with 'water, but a fine figure sculptor and painter too. His work is very poetic and in this way, a league of his own. https://www.jeandiorama.com/ Cheers Rob -
Maybe these are the guys for you, they can be made to inspect battle damage. https://www.scalemates.com/kits/dartmoor-military-models-48a001-wwii-three-luftwaffe-pilots-inspecting-aircraft--238180 Can't wait to see how you tackle the all black finish. Cheers Rob
-
Das Kamel - Hansa Brandenburg W.12
DocRob replied to DocRob's topic in LSM 1/35 and Larger Work In Progress
Thanks Gaz, mastering figures is like the holy grail in modelling to me and I'm always a little jealous, to see the smooth work of the masters. That smoothness or blending techniques or whatever you call it are the key to perfect figure painting, I think, everything looks so natural when done that way. I'm way on the patchy side of mastering the figures, but oils help me coming closer to the desired finish. Cheers Rob -
Decals too, not only because of the reasons mentioned by Carl, but to make it worse, decaling mostly is one of the last steps, while finishing a project. Problems with decals, which I have with every build are a pure mojo killer. The only cure, use Aviattic Lozenge or linen decals. With proper preparation, they work perfect and that's to me a little miracle, given the huge areas they cover. Cheers Rob
-
WnW Sopwith 2F.1 ShIps Camel.
DocRob replied to Bomber_County's topic in LSM 1/35 and Larger Work In Progress
About which hook I have spoken? Here is a very good description of the rigging process with Chameleon line https://www.ww1aircraftmodels.com/page6.html Cheers Rob -
1:32 scale - Nieuport N.28C1
DocRob replied to sandbagger's topic in LSM 1/35 and Larger Work In Progress
A shame, you should have used only half of the fuselage . Cheers Rob -
WnW Sopwith 2F.1 ShIps Camel.
DocRob replied to Bomber_County's topic in LSM 1/35 and Larger Work In Progress
You can rig a dozen of Camels with those. Remember to clean the holes with a drill or tip of a scalpel after cutting, it's not so easy to fiddle the Chameleon line through for the second time, even with cleaning. Cheers Rob -
Das Kamel - Hansa Brandenburg W.12
DocRob replied to DocRob's topic in LSM 1/35 and Larger Work In Progress
Thanks Phil, I have a well filled stash of figures and busts in different scales and materials for diorama purpose or stand alone, better you get the dust off your lurkers, and on you go... . Cheers Rob -
Das Kamel - Hansa Brandenburg W.12
DocRob replied to DocRob's topic in LSM 1/35 and Larger Work In Progress
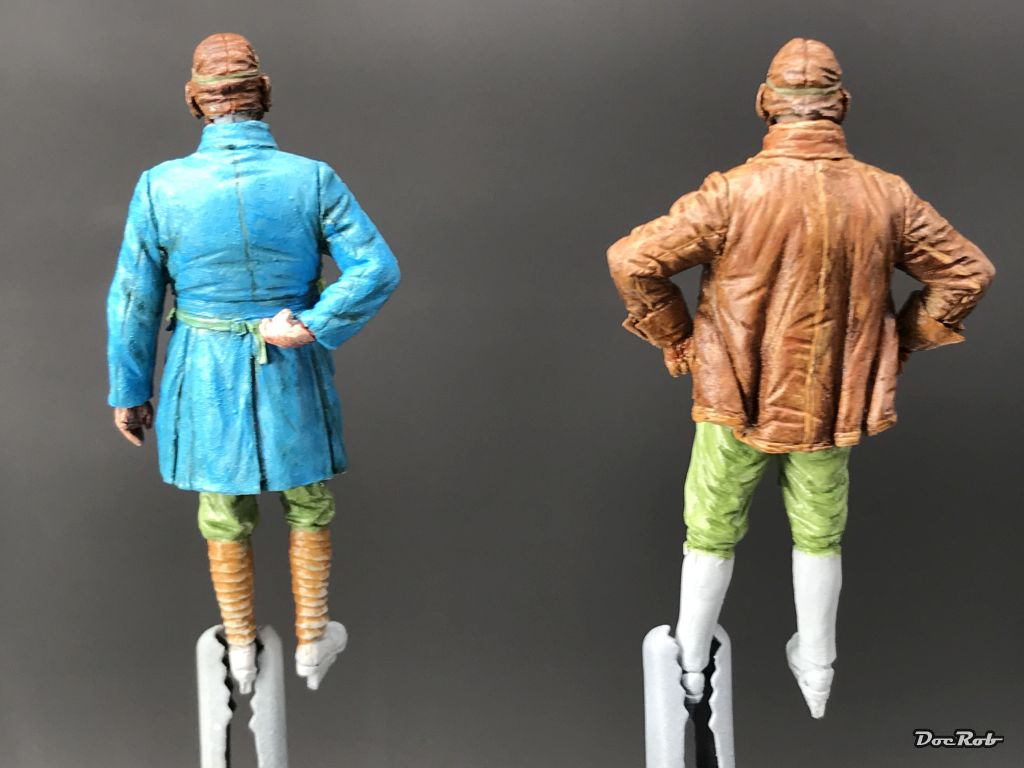
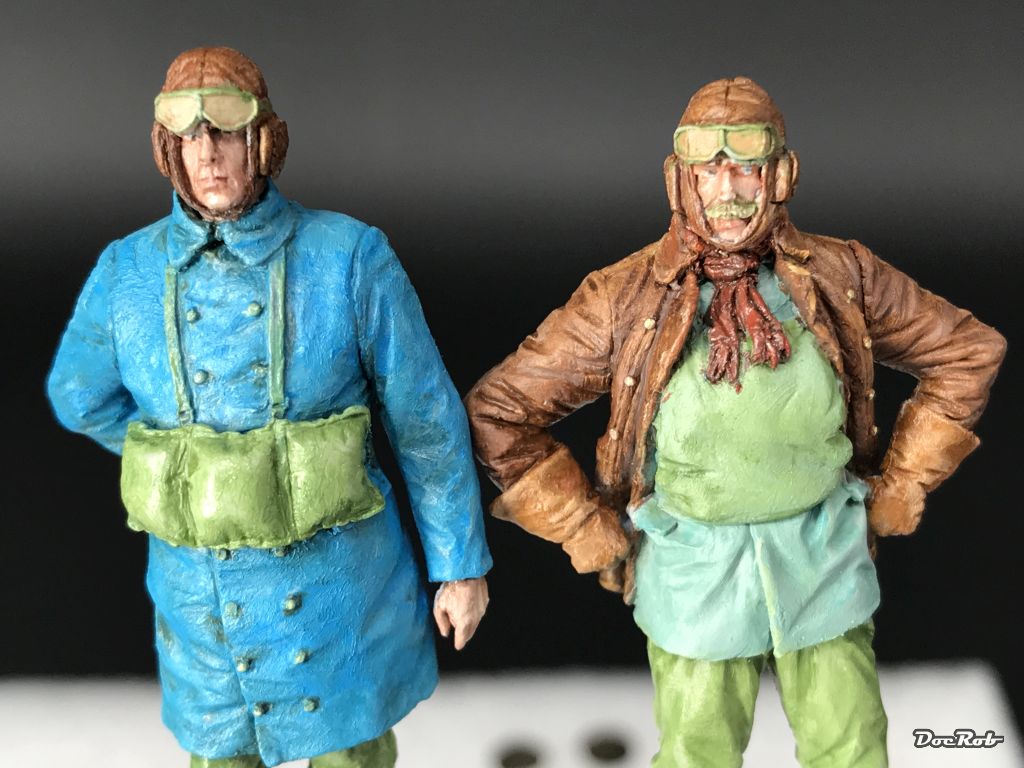
Muchas gracias Señhor, I'm blushing right now. Like you, I like the shearling leather jacket best, besides the gauntlets. I found it much easier to work with oils, because they blend better. I experimented with different types of thinners/turpentines for the first time. Oils leave a shine whn they dry, with normal turpentine, which is great for leather, but not so for cloth and skin. Here worked AK's Flat Thinner beautifully, drying matte enough. Like I said, there is a lot to learn with figure painting and I always have to force myself to do it, but there are tiny successes and more experience leads to better results. I used new good brushes this time and that helped a lot too. Another thing to mention is, the quality of the cast is important obviously and these figures were great, with crisp details. The eyes were problematic (aren't they ever?), they lay deep into the hollow, because of the leather caps and goggles. Cheers Rob -
Das Kamel - Hansa Brandenburg W.12
DocRob replied to DocRob's topic in LSM 1/35 and Larger Work In Progress
I know Hubert and I normally do so. In this case I waited, because I haven't made my mind up, where to place the figures in the dio. One of them might stand on a float of the Kamel or on a wooden plank leading to the plane, maybe the other is so close to the water, that I place him into the transparent Acrylic. Cheers Rob -
Das Kamel - Hansa Brandenburg W.12
DocRob replied to DocRob's topic in LSM 1/35 and Larger Work In Progress
Thanks Carl, I always like to be a better figure painter, but it's a hard way. Poco a poco, like we say here in Spain, step by steep. Cheers Rob -
Das Kamel - Hansa Brandenburg W.12
DocRob replied to DocRob's topic in LSM 1/35 and Larger Work In Progress
Yeah guys I know, the Kamel already was in the RFI section, but I gave the figures a go. Not my strong side, but I push myself, as to learn a little about figure painting t's my first attempt, using oil colours only and it was a nice experiece. The bonus is the longer blending time, while acrylics tend to dry to fast for my liking. The downside is, yeah sounds strange, the long drying time too. It's not easy to hold the figures without getting fingerprints. With the use of different turpentines, you can adjust the sheen of the oils and simulate different materials like leather or cloth. Some details and the boots are left to paint, but this will be done, when inserted into the dio, if ther is one... Cheers Rob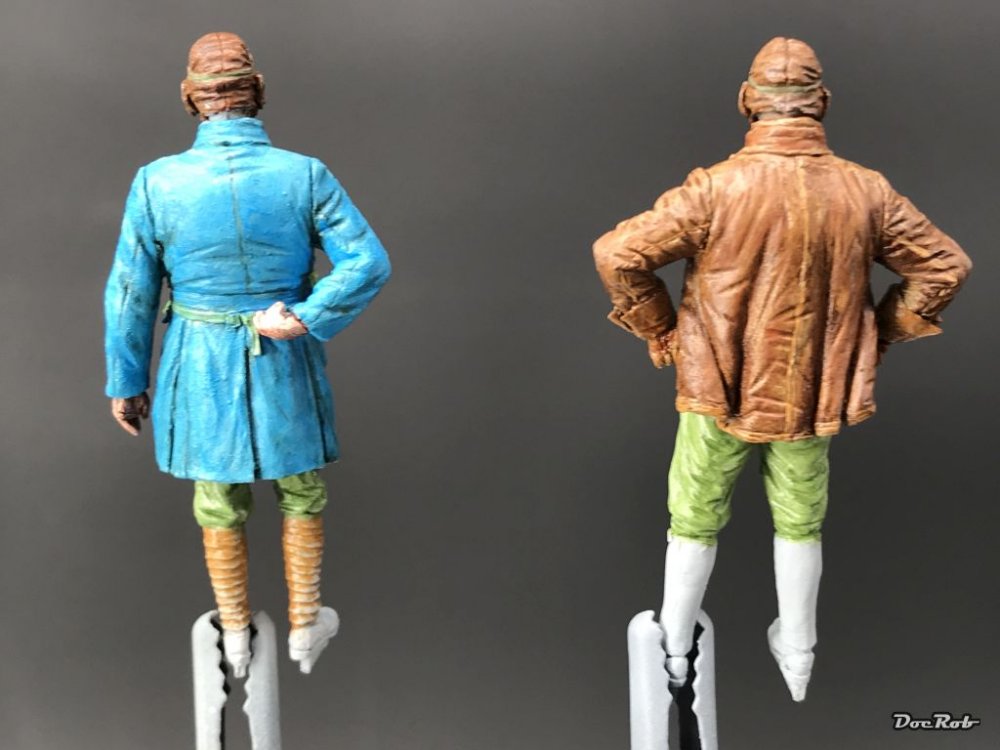

-
You'll need more panel liner, than a thirsty sailor could drink for al these surface details. This will look great, with a decently weathered Japanese green paintjob over bare metal, bring it on. Cheers Rob
-
What is on your bench right now ? Share a picture :)
DocRob replied to Martinnfb's topic in Modelling Discussion
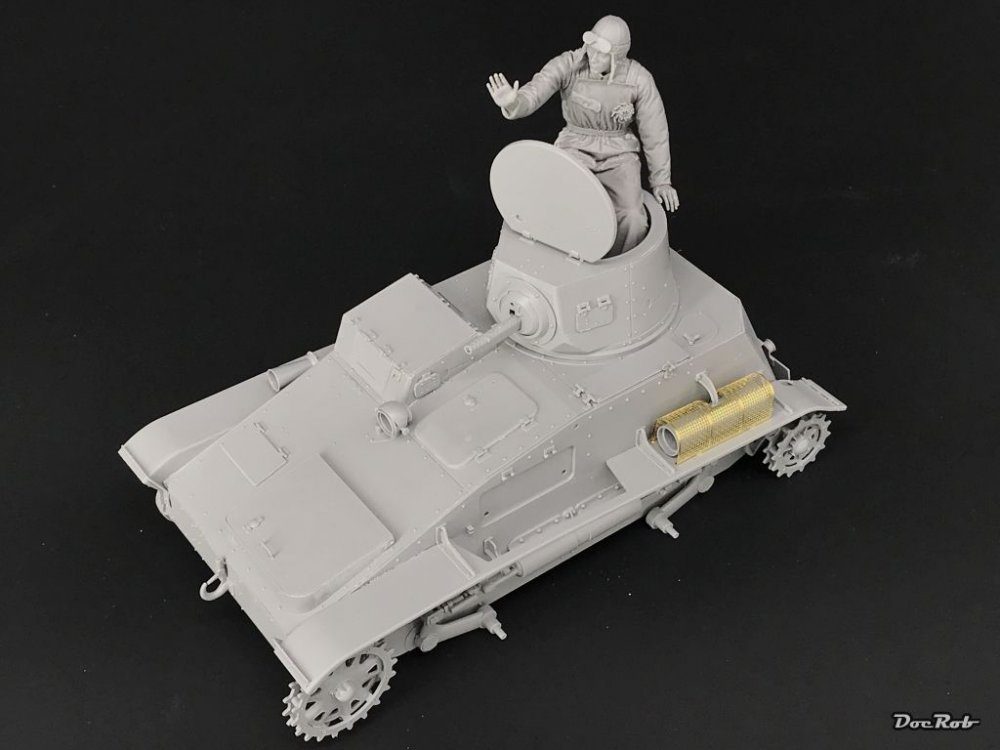
The assemble process of the tiny 1/16 Chinese tankette is nearly done, a fast and uncomplicated task. The fit is good and there are just some minor quirks, where the engineering is not the best, but really nothing to worry about. Running gear exhausts and tools are not added, because they will be painted separately. There are only three PE parts, which are easily handled too. If painting will start soon will be determined by the beginning of my Christmas project, for which I need the postal service to hurry up. Cheers Rob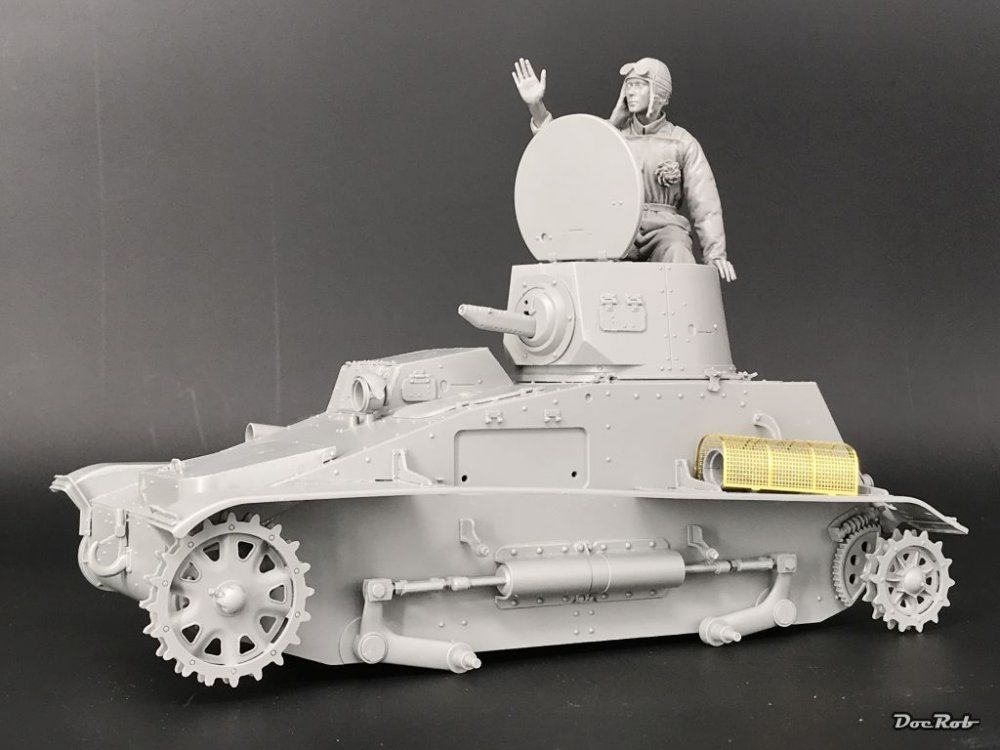
-
1/32 Focke Wulf D9 // Wrnr 600150
DocRob replied to Rowdy's topic in LSM 1/35 and Larger Work In Progress
I like the look a lot, a bit on the dark side, but will look fantastic under some dense trees, with toned done grounds and plane, to enhance the realistic lighting. Cheers Rob -
You could display a 1/32 B-52 beside your B-24 and it wouldn't be noticed . Indeed an eye catcher. The paintjob looks great and definitely unique, well done. Cheers Rob
-
Thanks for the review Fran, the book seems to be very comprehensive and should be a nice source of how to's for AFV, dioramas and figures. I will not buy it though, because with that kind of assumed price tag, to me it's to biased towards Valejo products. No wonder here, since they produce the book, but even with most of the AK books, the builders/artists use different kind of products, wich is interesting for me, as there are products within the Valejo range, which I use happily and others, where my experiences have been not too good. Painting and weathering has a lot to do with the used products, besides of course skills, techniques and creativity. To me focusing seemingly on only one producer is shortening the subject for one very important part. Cheers Rob
-
Chipping looks great to me and certainly not overdone. I like the chipping multi coloured like you did it, with some bare metal some corrosion and some abrasion. The cupola looks gorgeous, like Phil said. Cheers Rob
-
Silver Wings Hawker Hart
DocRob replied to BlrwestSiR's topic in LSM 1/35 and Larger Work In Progress
Nice and smooth work with all that filling. With the silver coating it looks stunningly beautiful. Cheers Rob- 39 replies
-
- 4
-

-
-
- silver wings
- hawker
- (and 1 more)
-
I miserably failed with the finish, German pilots polished the floats with their toothbrushes seemingly Cheers Rob