DocRob
-
Posts
7,132 -
Joined
-
Last visited
Content Type
Profiles
Forums
Events
Gallery
Everything posted by DocRob
-
 Little Spittie looks good, but I would've had a hard time to choose the wash. I might have used a brownish-grey one for both sides of the underside as I don't like using different wash Colours at one side of a kit. the capillary nature of the wash makes it hard to control the effect on the Colour borders. What I saw on the Spit as well as the Seiran is a pretty rough last coat, which makes subtle weathering very hard. Instead of micromeshing, you should play with your airbrush regarding pressure and/or thinning. I used different wash Colours only once on my TA-152 build, where I tried to emulate the icy conditions the bird might have been in, in early 45 and found the problem of bordering fuselage Colours not to easy to solve. I even considered to give the canopy a frosted look, but chickened out, because of the doom potential. Cheers Rob
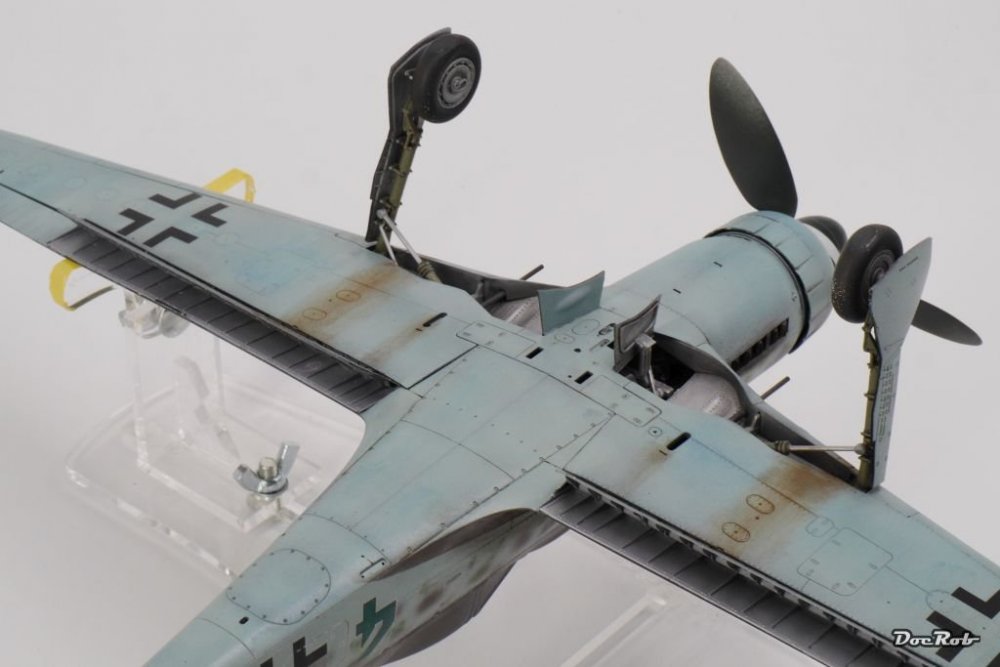
-
Great build and even better paintjob. That translucent cobalt blue is nearly radiating. Cheers Rob
-
I have used the AK pencils lately on my RSO project for weathering and didn't run into your issues, but I didn't use another product as a wash. I don't know, if you blended the pencils in with water (it's almost usable like a wash, but with different Colours, if desired) or you used them with a dampened tip. The chalking might be an effect produced by the drying wash leaving some dried out pigments from the pencils. If that's the case you have to seal every step separately. Was there a different treatment or process at the lower side of the plane? What I notice on all your pictures, is a bit too much grain in the last layer of paint/varnish. I suspect the varnish, because it's noticeable in different Colours. That hinders a smooth weathering job, equal which media is used. Anyway, I think, the effect looks good in the end, even it is unwanted, like Hubert mentioned. Light washes are often overlooked on certain types of planes. On Japanese like yours, the emulate abrasion on the corners of panels and on others you ca use the effect for depicting a plane in icy conditions. Cheers Rob Here is a picture from my first go with the AK pencils and a damp brush to blend. For the dark grey, I used only light pencils in different grey, green and rust shades.
-
That is good news Carl, stay strong Hombre Cheers Rob
-
RSO Radschlepper Ost - Having a Break
DocRob replied to DocRob's topic in D-Day 75th Anniversary Group Build
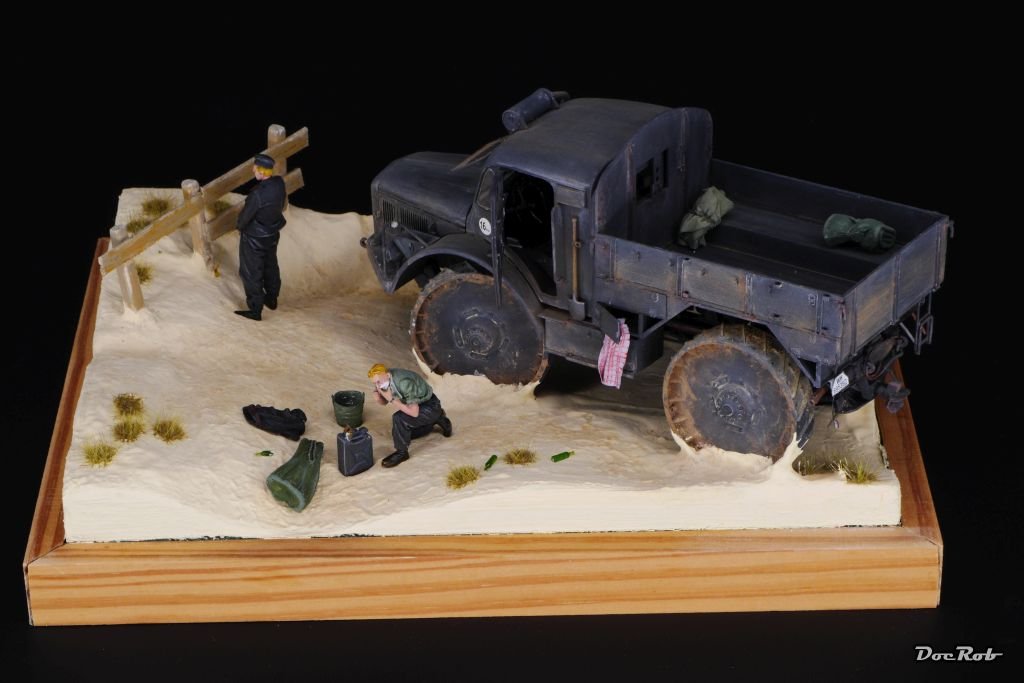
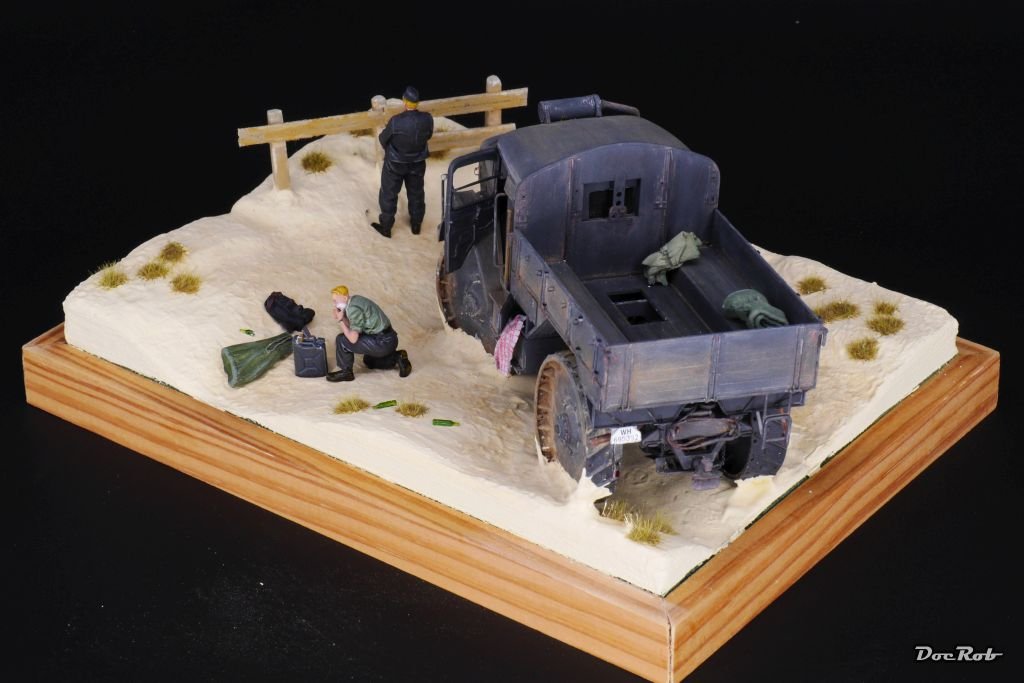
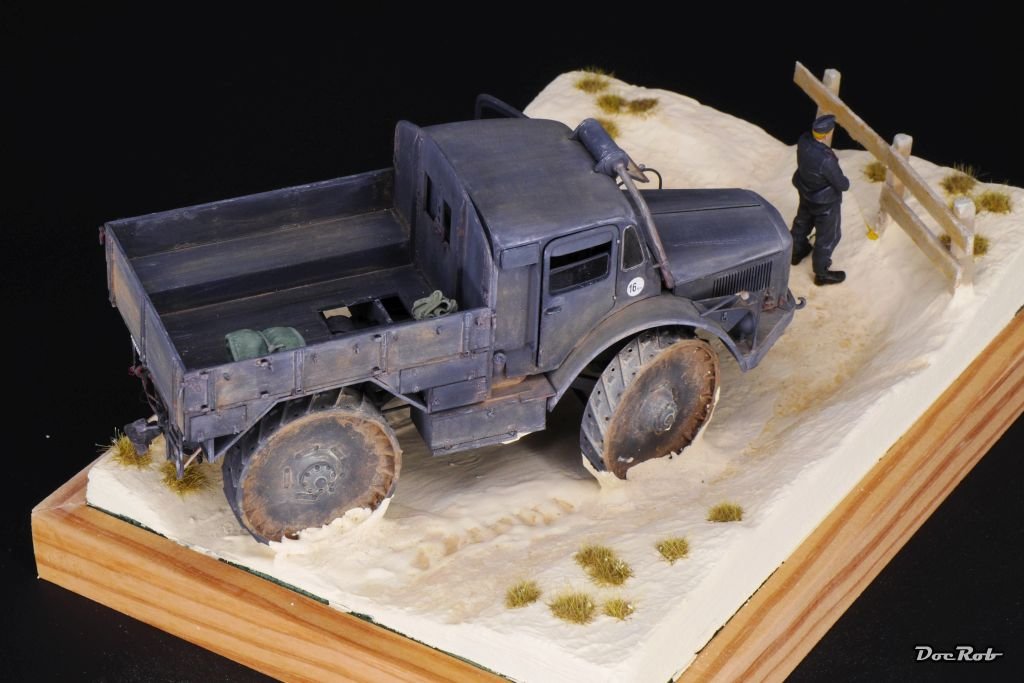
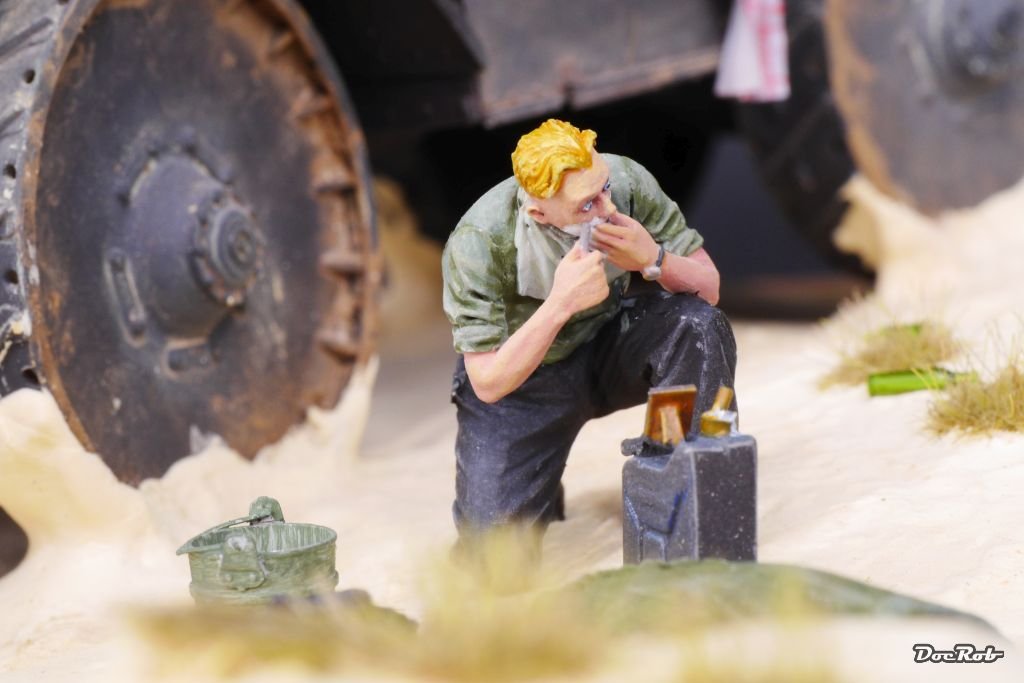
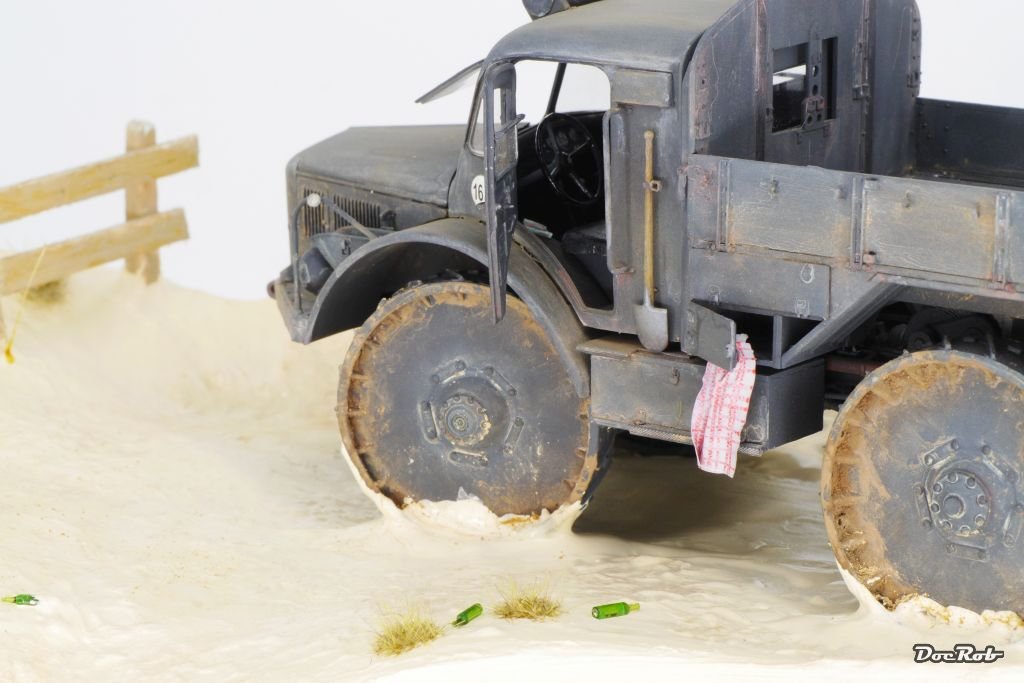
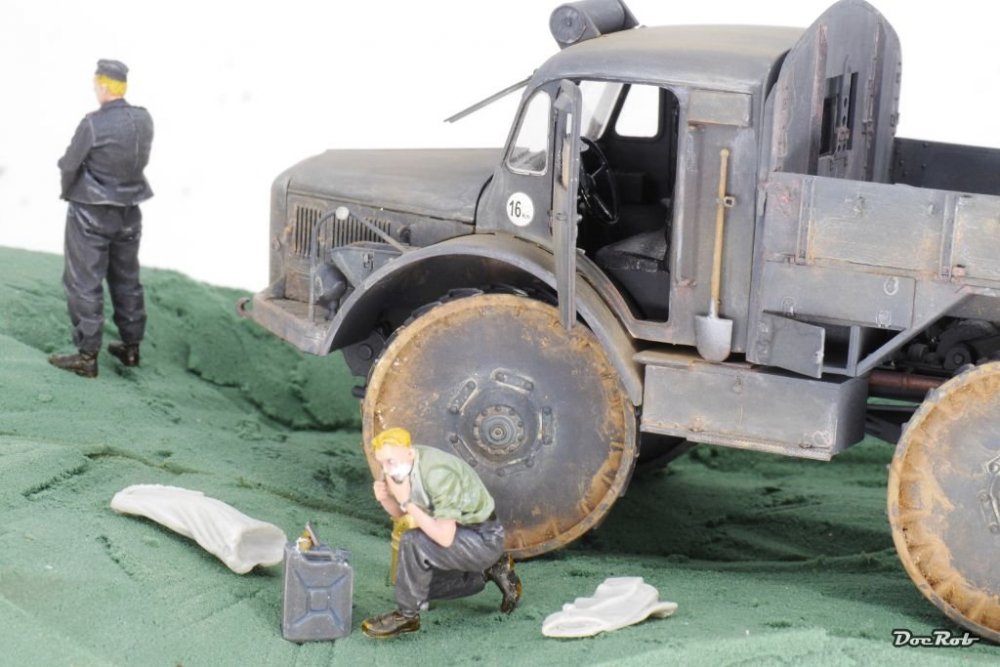
Yee-haw, I can see the finish line for the RSO dio. I added the figures and some pigments to the RSO, to give it a little bit more sun baked appearance. I added some blankets, a bucket, a bag and some thrown away bottles. When everything is dried, there will be a last make over, specially on the wheels pressuring the sand and then voila to the GB-ready-folder with some better pics. Cheers Rob


-
Now that's interesting, at least to me. All my builds I build for myself and some are more documented through a WIP than others. The main drive to build was my own interest into a subject though. Even on a GB, I would only participate if there is a fitting match to my building desires. It's great to learn how different we all are. This makes our hobby shine in more dimensions and gives insights into your minds and raises temptations sometimes. Cheers Rob
-
That's a nurse to be scared off. If you hear the eek, eek, eek from her rubber soles on the linoleum, you know what fear is. For discussion purpose only Cheers Rob
-
All the best wishes Carl, we are with you with this one, It's your most important WIP and I'm sure you share other less important with us after your full recovery. Cheers Rob
-
RSO Radschlepper Ost - Having a Break
DocRob replied to DocRob's topic in D-Day 75th Anniversary Group Build
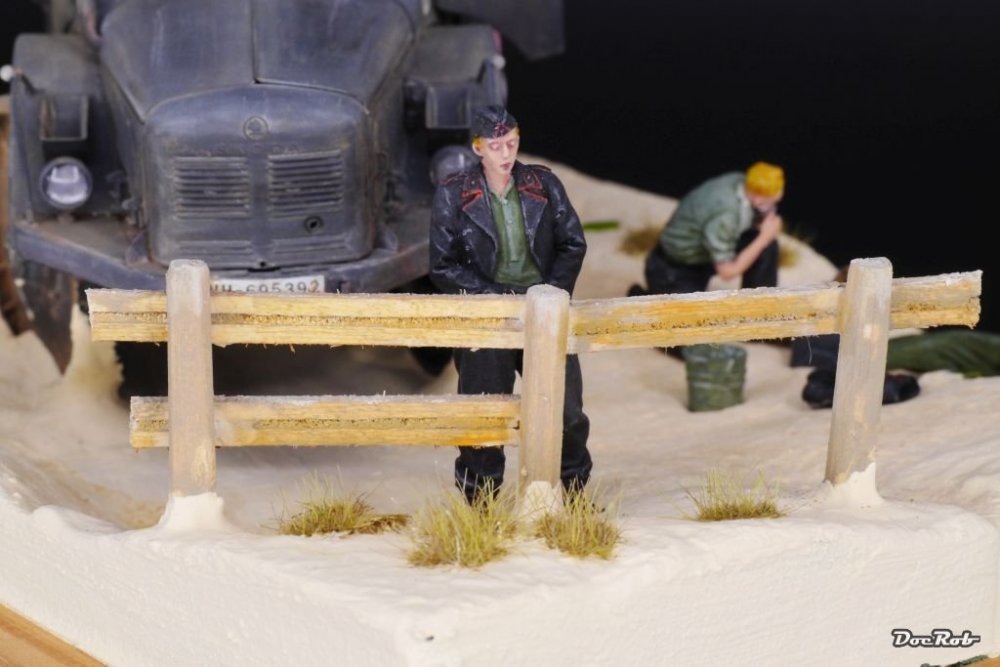
Hola Senhores, here is a sneak peek at my sandy dio attempt. I want to have the RSO off the bench and continue with the Arado Nachtigall. I added a wooden fence, some beer bottles and a checkered towel, made out of tin foil and some small grass flecks. The sand was designed by using AK-Beach Sand paste, which is nice to work with. It dries matte and has a little texture in it. I put on the paste in varying thickness and gave it texture by using brushes of different size and dampness. I left some areas like they were walked on and some untouched. I added some random Sand pigments and blended them in for a little depth. I will check the effects, when everything is dried. Cheers Rob

-
Good to have you here, ghost. I built the Hasegawa P-47 lately as a 'Dottie Mae' and really enjoyed the project. It was a trouble free and easy kit to build, which suits me perfect sometimes, because it leaves brain capacities for painting, weathering and a little scratching. Cheers Rob
-
A warm welcome to you and make yourself comfortable among us. It's a friendly and non dogmatic corner of the web here and if you want to show us your car builds, feel free to do so. Cheers Rob
-
Kitty Hawk North American T-28 Trojan. Thoughts?
DocRob replied to Sir Desmond Glazebrook's topic in Modelling Discussion
Thanks for the warning, I haven't done any research yet. I'm not an obsessed rivet counter, but at least it has to look right. My build will represent this one and I will dig a little deeper into references before starting. Sorry Sir, for T-6ing your thread, I'm out now with that ancestor of yours. Cheers Rob -
Kitty Hawk North American T-28 Trojan. Thoughts?
DocRob replied to Sir Desmond Glazebrook's topic in Modelling Discussion
I have only the T-6 Texan in stash and the kit looks decent to me. The reception was, if I remember right, not too shabby, but I will find out soon while building her as a Portuguese FAP bird. In modelling, I don't know, but have you ever tried to get rid of #### Cortana and it's also #### Bing derivates on an actual Windows-PC? I can tell you Sir, my feelings tend to that state . Cheers Rob -
I'm very sad to hear that from you Ernie and believe me, I know from own experience how it felt when there is seemingly no wind in the sails. There are just times, where real live takes over, and if it does in a very concentrated and sinister way, it's easy to get melancholic or even depressed. All the things which haunt the mind tend to accumulate to an unbearable status in these times, with no more aim or purpose to be found. The good thing though is, that doldrums are temporally and there will be a fresh breeze on the horizon soon. If you have been in situations like this before, it is a good thing to just know, that they are not indefinite and if it has never been that bad, I hope you get the spiriting thought from others who have been there. When I had these phases years ago I tried to enjoy the situation, seeing the good thing about isolating myself a little bit more than usual from the outer world. Sometimes, I even started to enjoy the melancholy. Like Hubert said, it might be good to let go off some steam, if there is and most importantly look for yourself and what is good for you. To have some time to lull over the own situation may help a lot and sooner or later there will be a change, maybe conclusions. Like my wife use to say, leave it, love it or change it. When I felt really bad some years ago, I turned to modelling, which helped me to refocus, because of the high grade of concentration involved. That calmed my ever wandering and unfocused thoughts to get straight again. In fact, I changed my whole live afterwards and am as happy as can be now. Cheers (literally) Rob
-
Wow Carl, that's bad news. Good that you got support and get checked soon. I wish you the very best for you and your family. I will not like your message, because what is to like about it and the 5 k-likes were already history . Stay strong Hombre Cheers Rob
-
Great story and a happy ending, your father will be very proud. Cheers Rob
-
RSO Radschlepper Ost - Having a Break
DocRob replied to DocRob's topic in D-Day 75th Anniversary Group Build
Thanks Graham, the holes in the wheel were on the prototypes, as far as I know. The kit wheels represent the production batch. Being an engineer in my former live, I can't believe that cast iron was used for wheels, but I will check with the reference I have. Cast iron is very brittle and I think the wheels were made of rolled iron sheets, with welded traverses, because of that fact. Cheers Rob -
Your modelimg choices, what spurs you on?
DocRob replied to Sir Desmond Glazebrook's topic in General Discussion
Yeah Jeff, I have to tell you, there is a world out there to discover, behind these man cave doors and Google is not the only way to do it. Sometimes it's just great to go out and look for yourself . I call that empirically approach. Cheers Rob -
Arado 234 Nachtigall on Speed
DocRob replied to DocRob's topic in LSM 1/35 and Larger Work In Progress
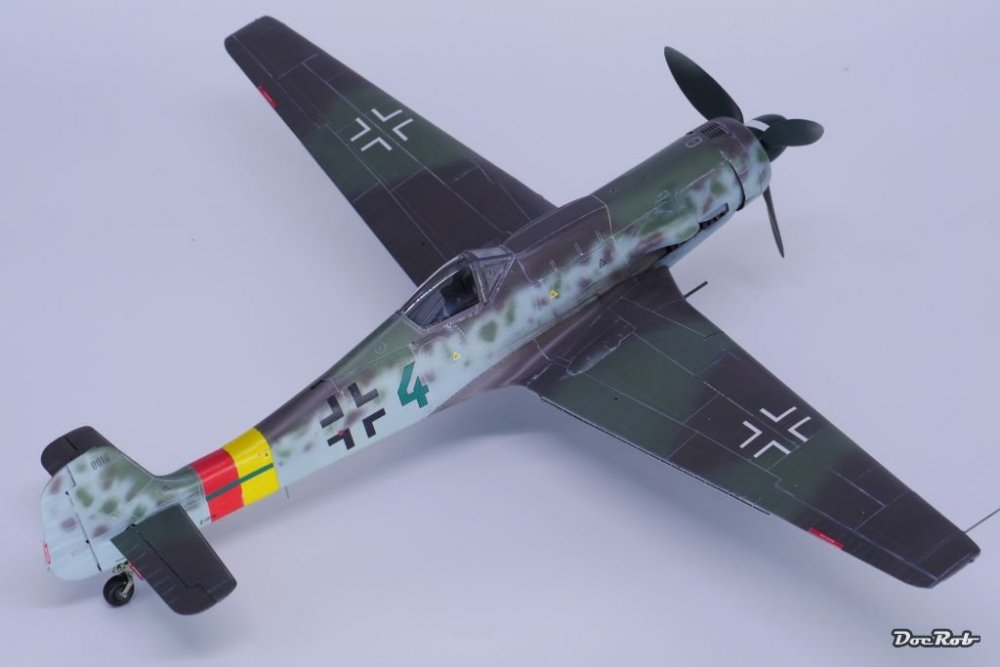
Thank you Alfons and by the way welcome to one of the friendliest and most helpful corners of the web, concerned large scale modelling. I will dig into your link later and might try to get my hands on that old Jet & Prob mag. My sources leave me to think that four to five Nachtigall Arados where built and flight. The Kagero book states firstly there were two converted from the reconnaissance version. Later one of those crashed and three (more?) formed a unit which tried to hunt Mosquitos, but without success. Generally the suitability to the nightfighter role was put into question by the pilots, because of lots of light refractions in the huge canopy and the lack of frontal armor. Cheers Rob -
RSO Radschlepper Ost - Having a Break
DocRob replied to DocRob's topic in D-Day 75th Anniversary Group Build
It's not like I already feel the GB-deadline, but days and what's left of the year is getting shorter, so it's about time to go ahead with the RSO. Today I cut some flower foam to proportion, which will later be 'converted' in some little dunes in the May of 44 near Caen or wherever in Normandy. Then I arranged the RSO and the figures. The upright guy will get a fence to do whatever he is doing there and the other guy got a bucket of water for his shave. I robbed another kit for some blankets and a tanker jacket. These will be added with some beer bottles and cigarette buds. Finally I cut and glued together a simple wooden frame for the foam. Cheers Rob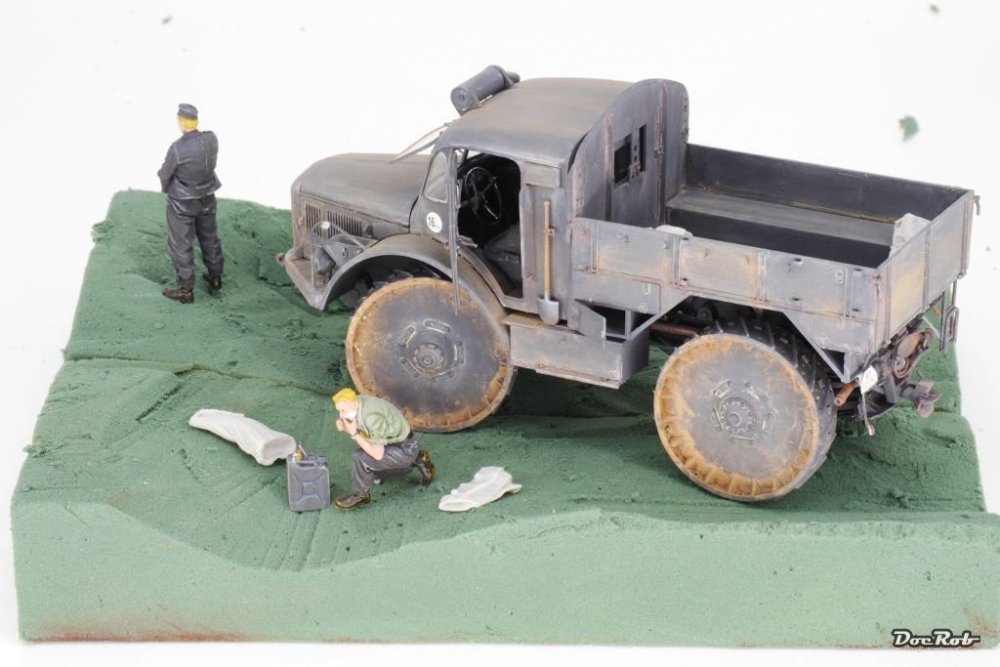
-
Just found some guys to man your 10/5. They are from Nato in Miniatures, # SOGA-14 Cheers Rob
-
Your modelimg choices, what spurs you on?
DocRob replied to Sir Desmond Glazebrook's topic in General Discussion
You are a lucky man, with your wife showing interest in your builds. My better half is an engineering consultant who has a deep connection to ships engines, the bigger, the better, automotive parts and other sophisticated stuff, but excludes my modelling in her praises, but I love her nevertheless. My finished kits go into boxes, until there is no more space and then wherever. With you guys here, I started to take photos of my builds, that mean I have some reminders of old builds left now. On my tiny island, there is a neighbor, born in Angola, but Madeira rooted, who was a member of the Légion étrangère with a quite bizarre story of his live to tell, who is very interested in my modelling. I gave him some of my builds as a present. He, a farmer now pays back with lots of fresh vegetables, black potatoes and even some Vinho verde, which is all much appreciated. Cheers Rob -
Your modelimg choices, what spurs you on?
DocRob replied to Sir Desmond Glazebrook's topic in General Discussion
Like many of you, I build lots of Airfix and Matchbox kits when I was a kid, brush painted them and was never satisfied with the result. Getting older, I abandoned modelling completely, but being an engineer I never lost interest in planes and other subjects. In my twenties I was very interested in product design and photography and started with airbrushing illustrations only on paper. About ten years ago, I found myself in a very difficult phase in my life and lost my focus of the future. To relax my ever working sensors and my unsteady mind, I turned to modelling again, using it as a mind relaxing kind of 'lava lamp'. Fully concentrating on a model eased my mind and helped me to get my live arranged newly. What is left of that time, is that I love to build paint and weather, but after finishing a kit, I loose interest in it, the deed is done. Finding you lot here was and is my only modelling connection to the outer world, as my wife is not interested in modelling and most of my friends are not as well. Now my life is perfectly in sync since some years, I'm happy where I am and this reflects well into the hobby too. For one thing there is limited bench time due to lots of other hobbies and slowly but surely my interests in subjects shifts. I still build kits, mostly planes and some Armor preferable in LS, but my mindset starts to change. I consider building wooden ships in LS and have already started one. Other projects involve Steam Punk resin kits in LS which will be displayed in illuminated dios and casted in clear resin blocks. There will be a copper submarine towed to a jetty above a colourful coral reef with some people diving around. These are only a few future projects, which show, that my focus changes to a more; let's call it 'freestyle' way of modelling. This involves to permanently learn new techniques, which I really love to do. What is a permanent guideline in my modelling approach is, that a subject has to fascinate me, be it design-, engineering- or otherwise. There is no fixation on a political or historical background, because if I would do, I would tend to be in the footsteps of Hubert here and don't build WWII birds or armor and specially not Axis ones. Being a little schizophrenic here is part of the deal and yes, sometimes it feels false to build weapons with a high grade of accuracy, which I am very happy not to have seen in action, but hey who is perfect. Cheers Rob -
Arado 234 Nachtigall on Speed
DocRob replied to DocRob's topic in LSM 1/35 and Larger Work In Progress
Hehe, thanks Carl, I almost chickened out myself, but for the fixated idea to leave the well detailed cockpit open to show everything in it. The very thick canopy is good, because of it's stability while sawing, but it takes some time to get through with trembling hands. I know about the AMS wheelsets, smooth and threaded, but they seam not easy to source. Living on a little island with a dedicated tax system has it's benefits, but lots of vendors don't deliver here. Thanks Gaz, be my guest , The Nachtigall, of which existed only a few for testing purpose and the Arado 234 in general are really interesting subjects technically. A milestone in engineering, a twin engine layout and fast enough to outpace every allied plane in midair. The engineers didn't bother to install defensive weapons except some backward firing cannons for tests, which proved unsuccessful and therefore where not added anymore. The reconnaissance version flew so high, with very little vibrations, that the delivered images where crystal sharp. There is lots to tell about that bird, which always fascinated me. By the time the Fly kit hit my radar, I knew I had to get one and I suspect, that a future one from ZM might not be looking better oob. The resin of the Fly kit is marvelous and the plastic is ok. The ZM may be easier to build, but until now, I found nothing too difficult to achieve on that Fly kit until now, beeing a short run one. If you do the reconnaissance version, even the needed surgery is limited. Cheers Rob -
Arado 234 Nachtigall on Speed
DocRob replied to DocRob's topic in LSM 1/35 and Larger Work In Progress
Thanks Wumm, you possibly could argue both ways. I found no real evidence, being it one way or the other. What I found is a pic of the internal structure of a wooden mock up build. It shows, that there is no internal structure at the top of the fuselage behind the bulkhead of the backwards fuel tank (That is where the camera compartments were in the reconnaissance version. The upper hatches for the cameras have differently shaped outlines, than either the oval window or the full upper fuselage segment. They are bigger than the oval, rectangular with rounded edges. The oval opening for the night fighter version (measured from the kit part) would have been about 60 cm x 53 cm. A very narrow hatch to an already cramped space. Not easy to access, with a flight suit and an attached parachute.