DocRob
-
Posts
7,054 -
Joined
-
Last visited
Content Type
Profiles
Forums
Events
Gallery
Everything posted by DocRob
-

Arado 234 Nachtigall on Speed
DocRob replied to DocRob's topic in LSM 1/35 and Larger Work In Progress
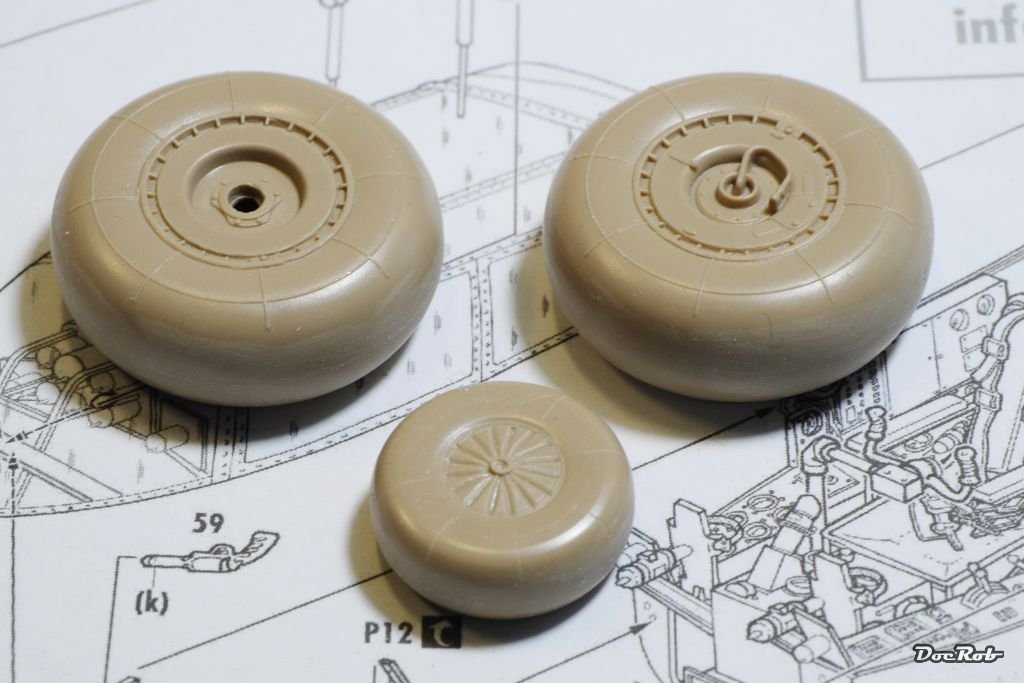
Hola Senhores, today I took all my cojones together and did more of the feared surgery work on the clear canopy. I want the cockpit to be open, so it had to be. I used some Kabuki tape for the borders and added Dynotape on the Kabuki. I did that, because the Dynotape left some black marks on the fuselage after removal. For cutting I used first a scalpel and then different kind of 0,1mm razor saws, because I want to use the cut rectangle as the opened canopy roof. After a nerve tangling hour, I'm now in line for a whiskey to cool down a little. What a relief, I didn't broke the canopy nor did I leave scratches. I then glued the halved wheels together and evaluated, if I use them or if I source some resin substitutes. Dimension wise the wheels seem a little bit off, if the Kagero book is correct. The main wheels have a diameter of 29 mm, where 29,9 would have been right, the front wheel should have been 17,92 mm in diameter and is 18,7 mm. Getting resin wheels, specially with a diamond pattern seems not too easy and therefore I measured all my German resin wheels. The closest was the Do-335 wheel wich has a diameter of 31 mm. The kit wheels don't look too bad, so I might use these after flattening them a little. Cheers Rob

-
Another masterpiece, thanks for letting us peek. Cheers Rob
-
1/18 P51C Mustang "Lopes Hope 3rd"
DocRob replied to airscale's topic in LSM 1/35 and Larger Work In Progress
Stunning, it looks like the real thing. Cheers Rob -
Wow, impressive work on you Sherman. Seeing yours being detailed superbly, I feel ashamed about starting mine oob . Cheers Rob
-
1/32 Connie Edwards Ha-1112 Buchon
DocRob replied to JeroenPeters's topic in LSM 1/35 and Larger Work In Progress
This is looking superb, nice scratching by the way. Cheers Rob -
What's your favourite Mk Spitfire?
DocRob replied to Sir Desmond Glazebrook's topic in General Discussion
Same with me here. The Spit to me had the worst 'landing gear down ugliness enhancement factor' of all planes. Looks elegant and sleek in the air, but looses all of it on the ground, because of that spidery, flimsy looking narrow undercarriage. Yeah I know, it was not built to please the eye. I have no 1/32 Spit in my stash, but two XVI's in 1/48 which will be displayed one on the ground and the other flying above. The one on the ground with visible Brassin engine, and cockpit and opened gun areas in camo, while the flying one will be a racer. I often thought about a XVI from Tamiya in 1/32, but resisted, since the 1/48 from Eduard is just great. Cheers Rob -
Your little kite looks great so far and benefits from your beautiful scratch work. I just started a Fly Arado 234 and have to say, good that there are not many tubular structures involved but you have to love Fly for their not so common portfolio. Cheers Rob
- 34 replies
-
- 5
-

-
- u-boat scout
- gyro glider
- (and 2 more)
-
I wish you luck and a steady hand with the Erbsentarn on the anoraks . Cheers Rob
-
Arado 234 Nachtigall on Speed
DocRob replied to DocRob's topic in LSM 1/35 and Larger Work In Progress
Muchas gracias Hombres, Yeah Ryan, it is a super cool plane and tres cool kit. Thanks Mike, I never looked for the MDC one, but will gather some information about it. Thanks Wumm, exactly doing the hard things first is my general approach on kits, specially mixed media kits. If something goes terribly wrong it is the way to the bin without wasting to much time and effort. Thanks Carl. The cockpit will be up next and I will dig in the books too. Definitely planned is wiring the instruments. Cheers Rob -
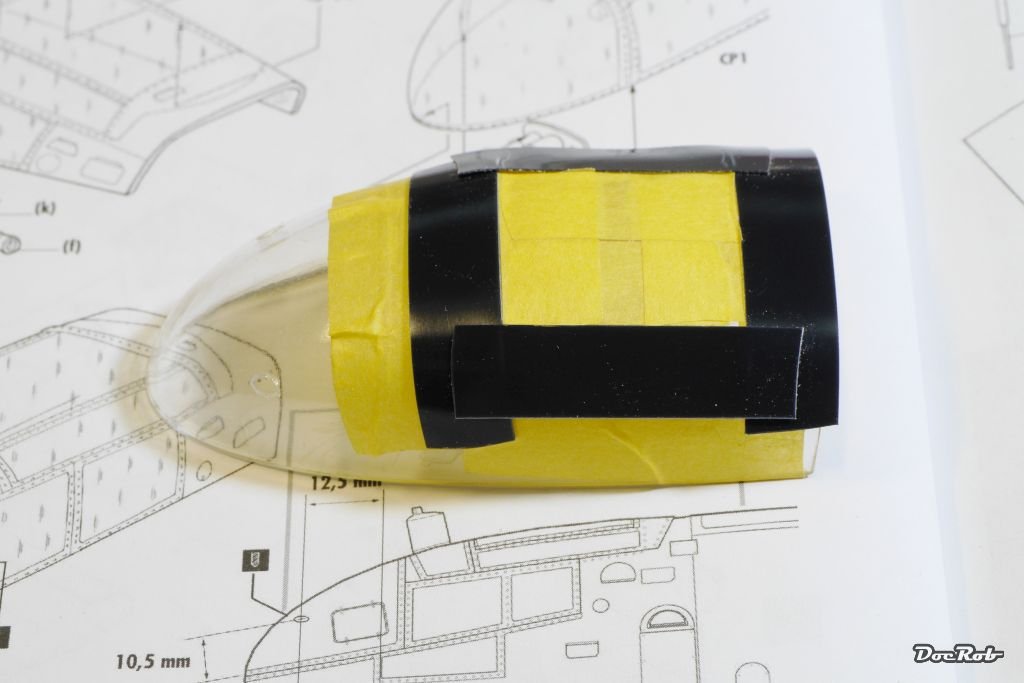
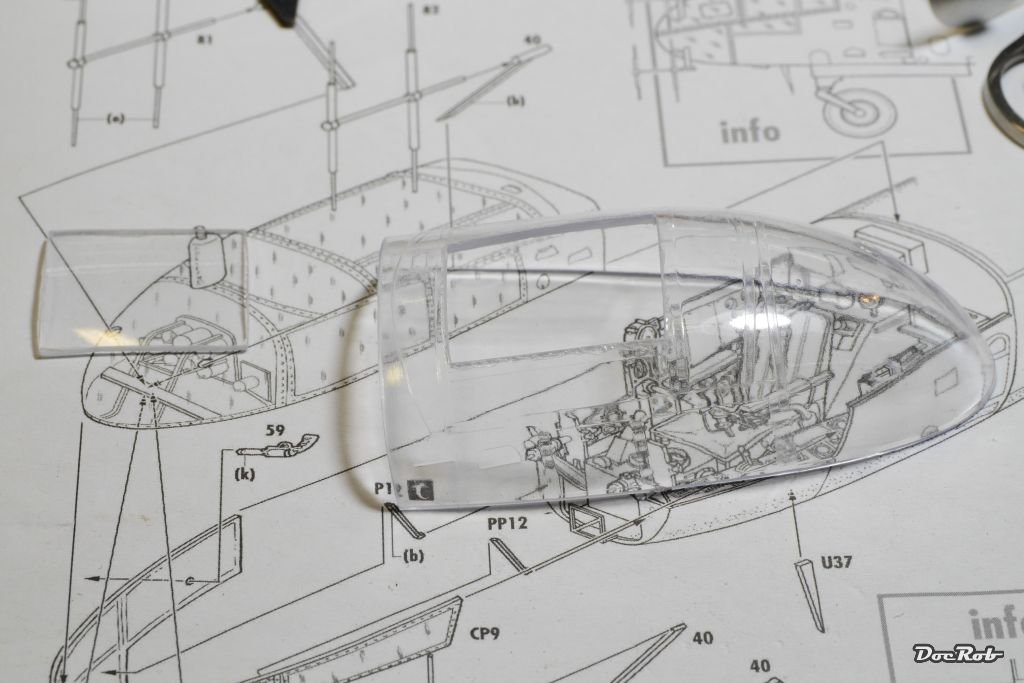
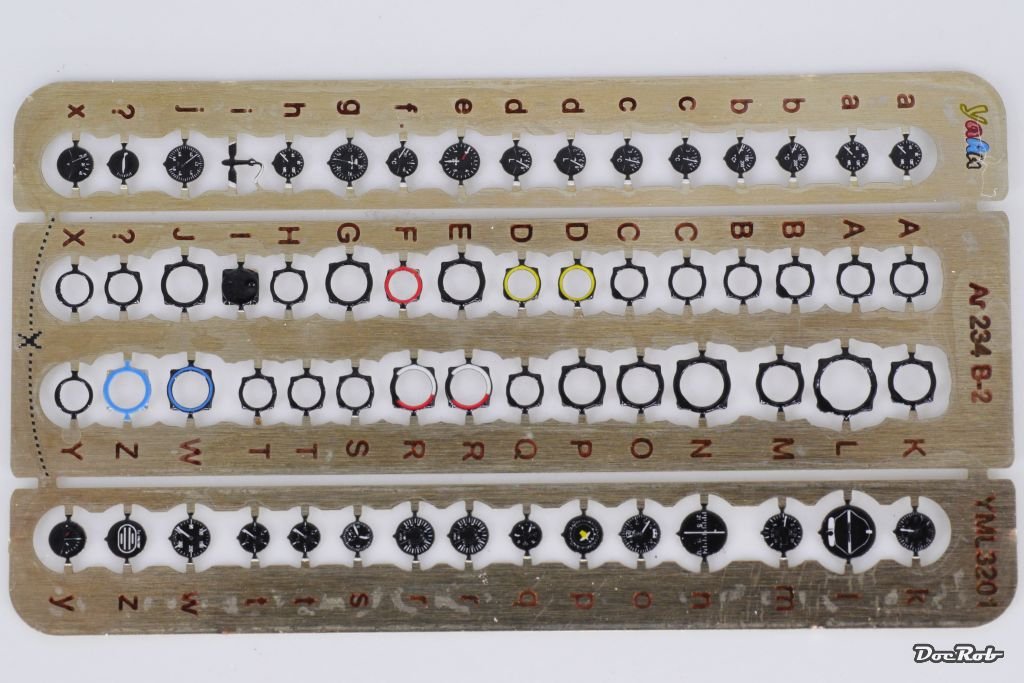
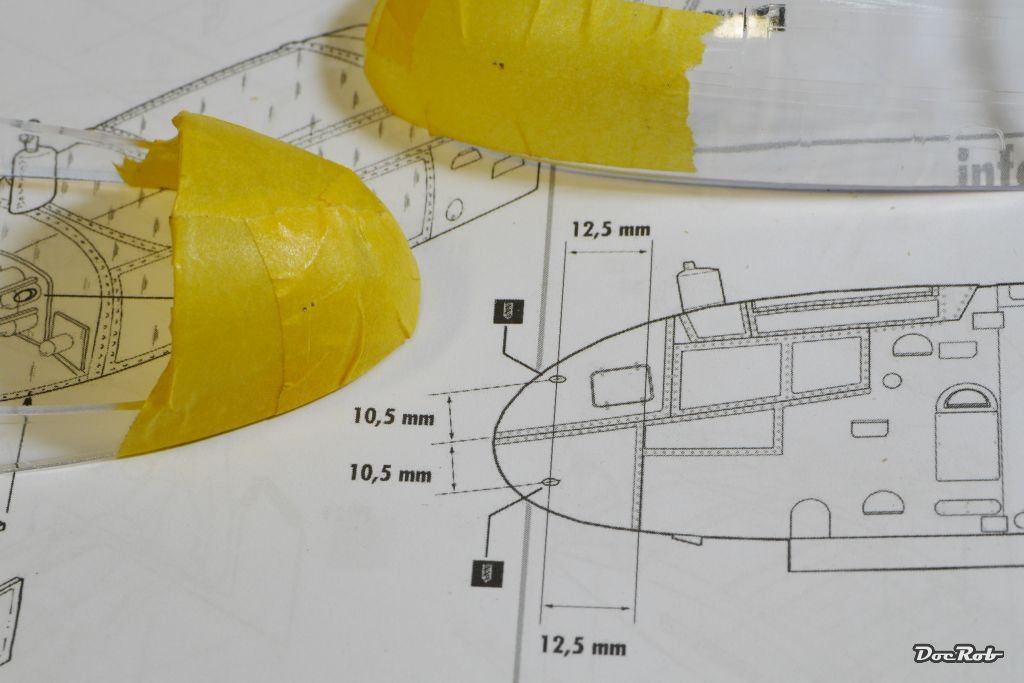
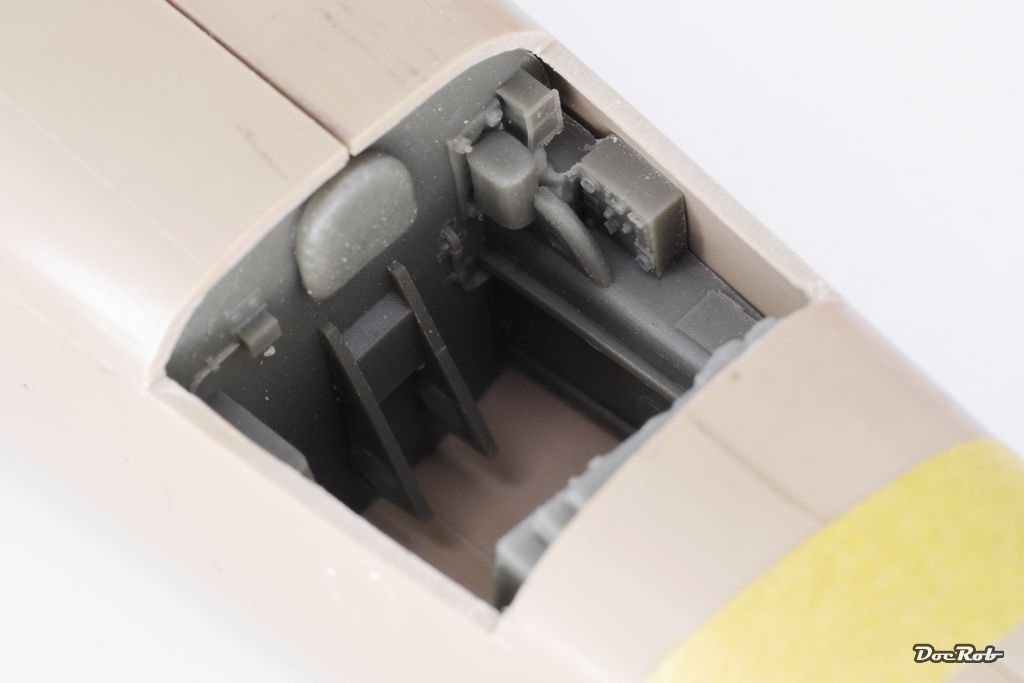
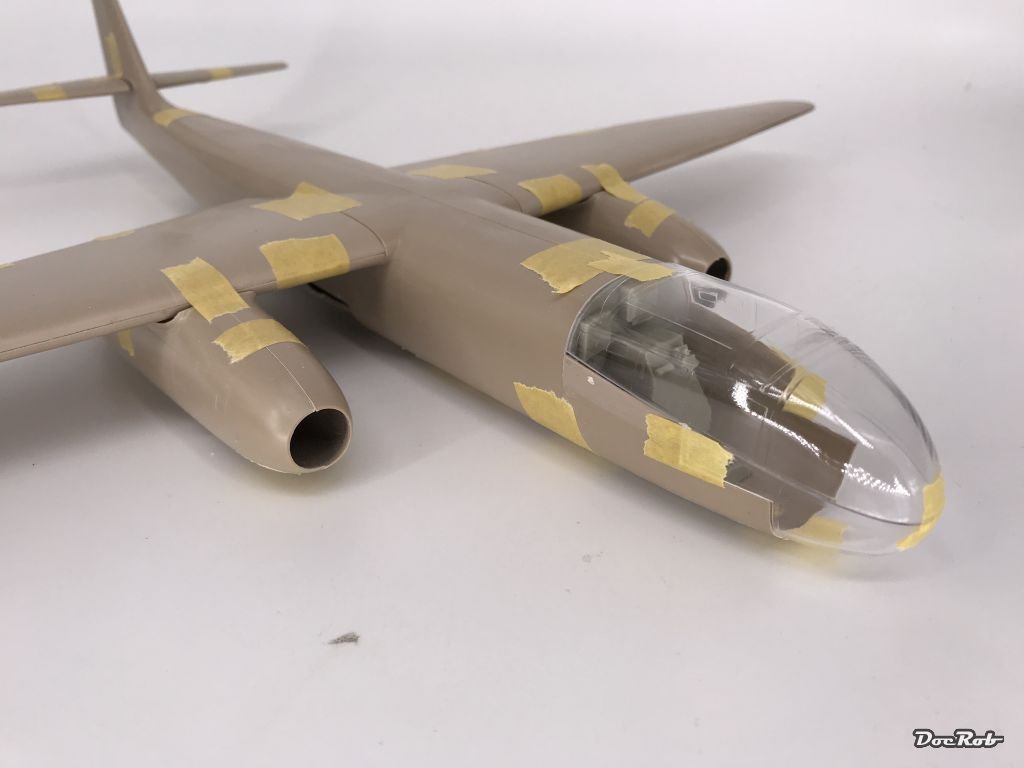
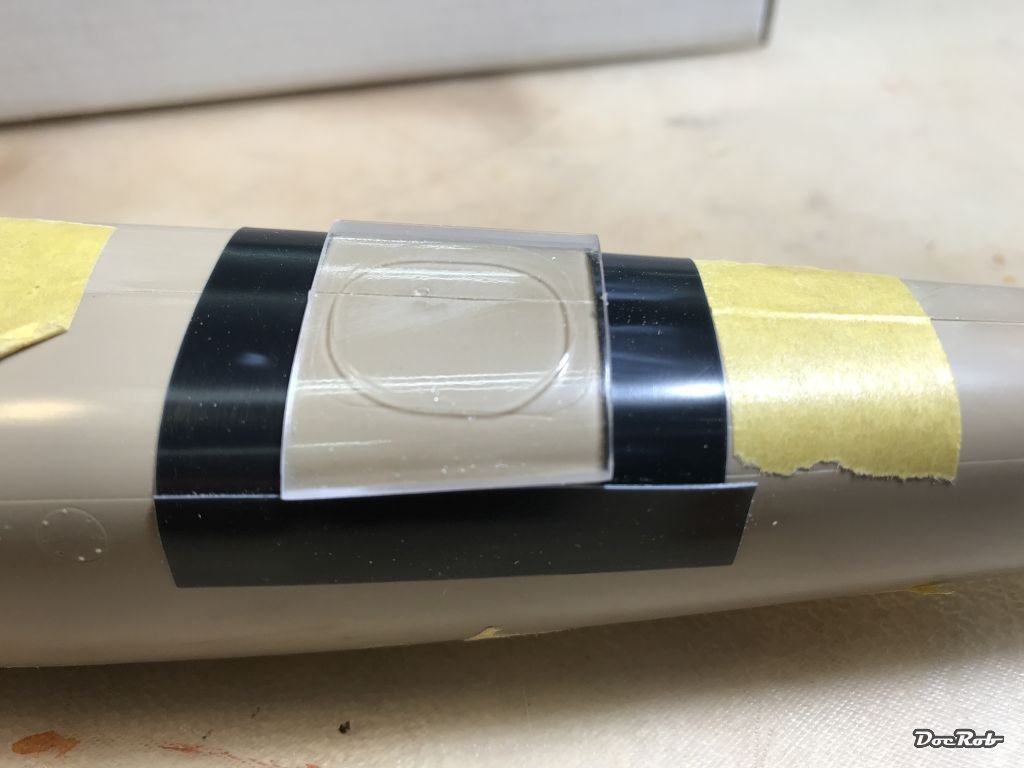
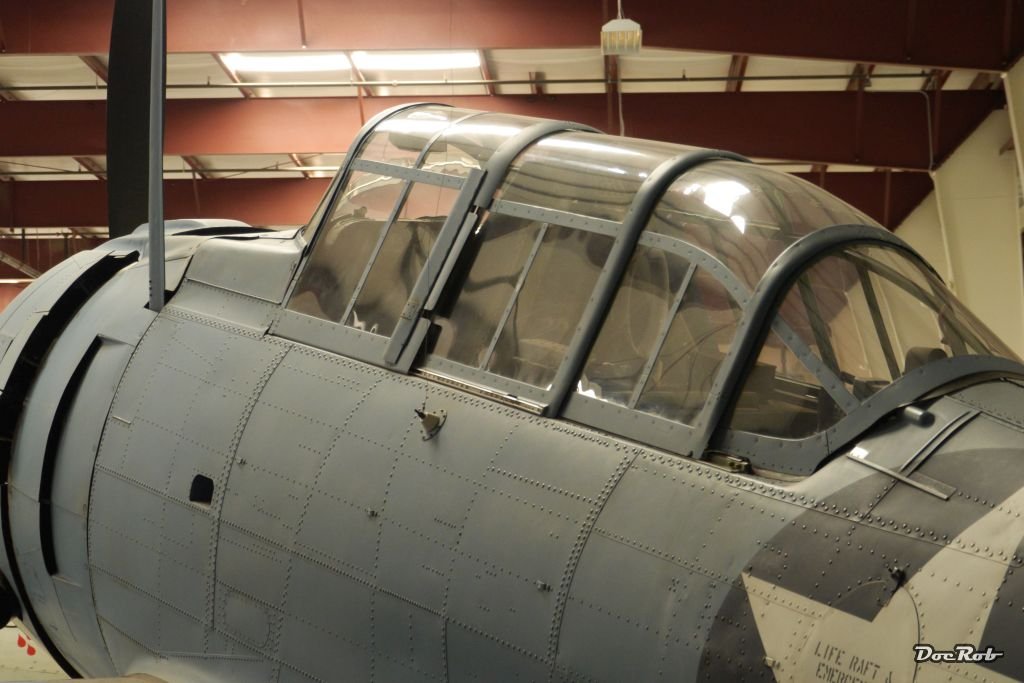
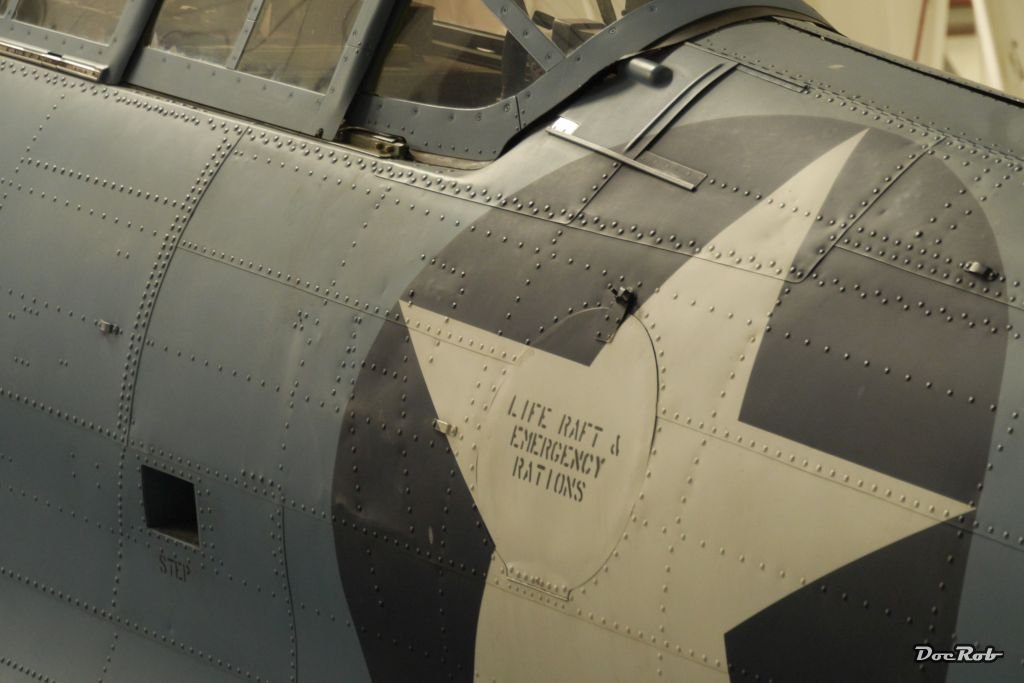
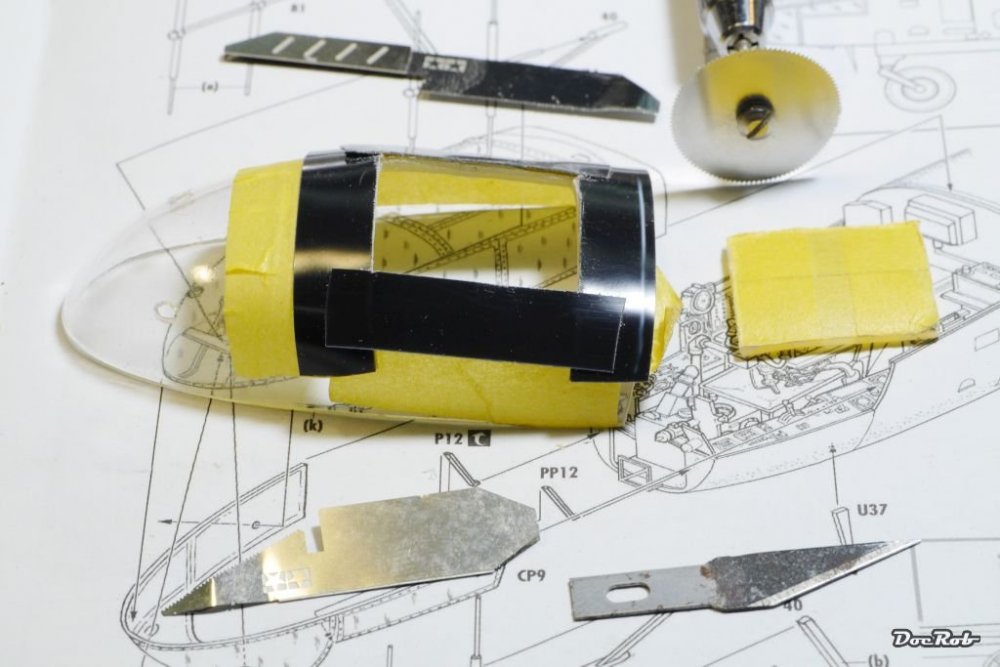
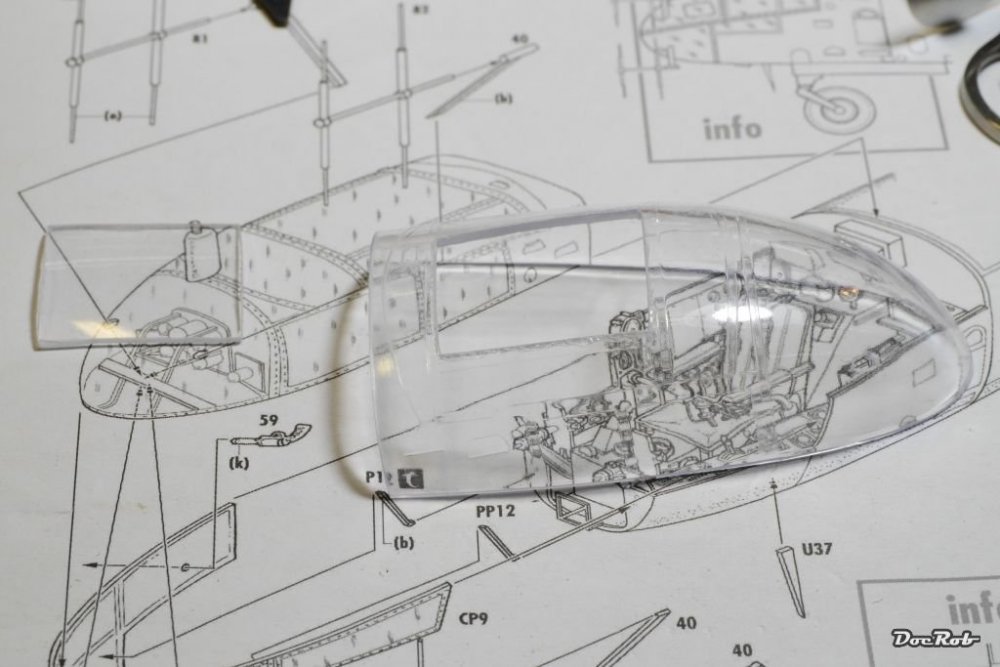
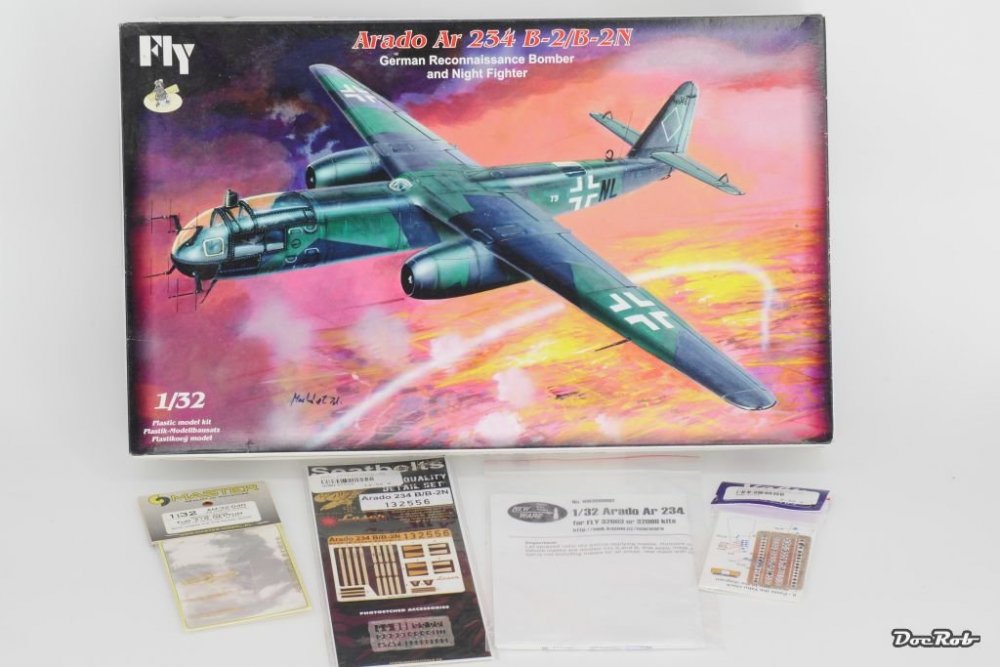
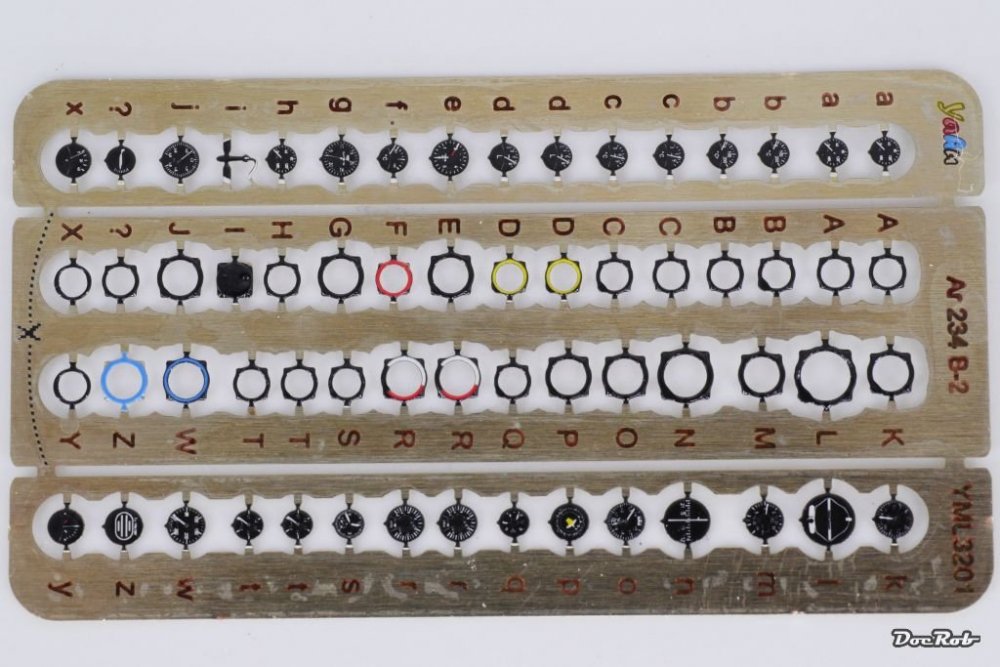
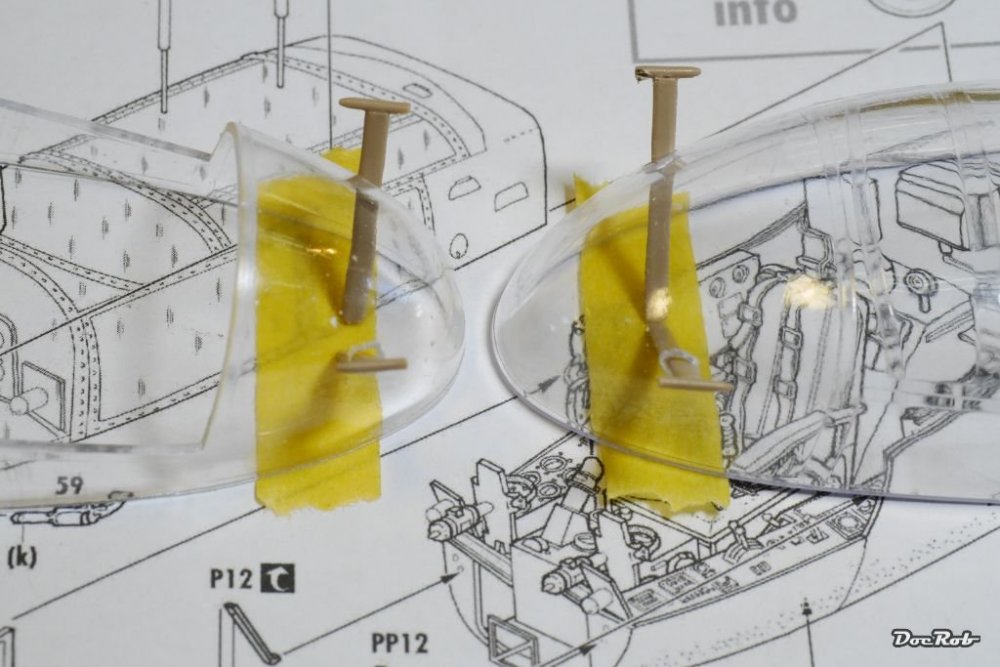
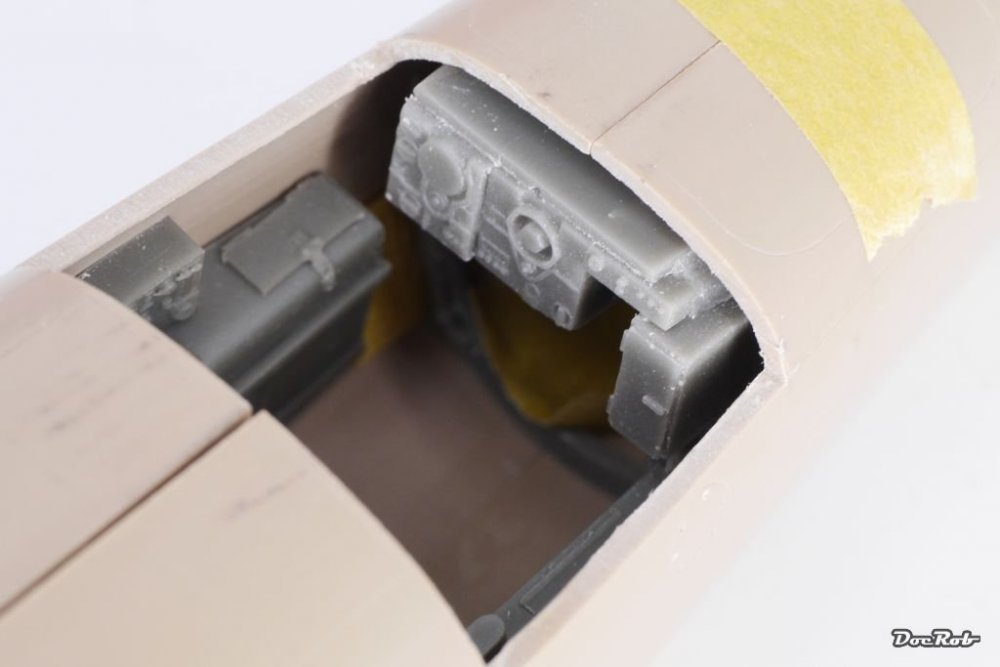
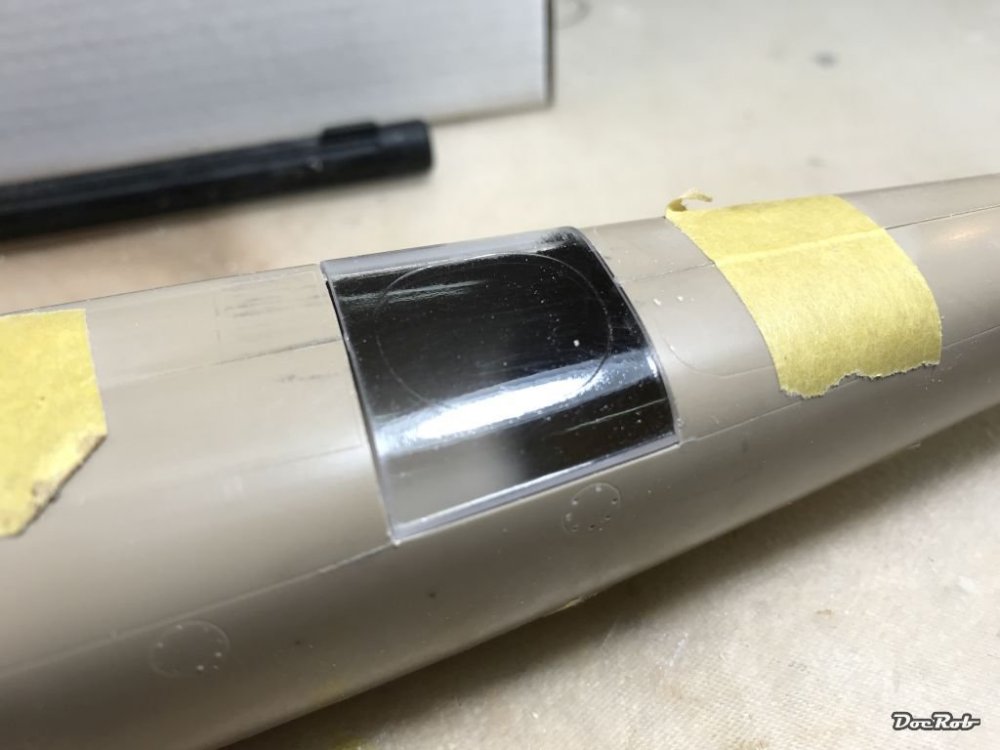
Hola fellow Modellistas, after some positive resonance in another thread, I will do a WIP about my build of the Fly Arado 234. I bought the kit some years ago and always had the itch to built it soon and as a nightfighter.B-2N version. Now, that ZM announced a new 234, I felt it is about time to build mine without being tempted to buy a new one. I call that, err, stash management . I always had a soft spot for the sleek and slender silhouetted Arado jet. It's technical advantages, design and engineering makes it a standout. Generally I don't really much enjoy to build German subjects, but some are so fascinating, that I make an exception. The kit looks great in the seemingly small box, the plastic is a little crude in spots and the amount of cleanup is a little higher, than with some of the usual suspects, but nothing to worry about. The resin parts are breathtaking in detail and seem to fit very good to the plastic. on some of the bigger parts it's not even necessary to remove the pouring stubs. I will not bore you with a review, because James made a brilliant one in our place in the web. This is a different version of the 234, but all the main components are the same. There is not a lot of AM around and I will use the masks from Fly, seatbelts from HGW, a Neptun antler from Master and last but not least the Yahu Cockpit set, which is not a PE IP-board, but single bezels with dials. This is clever, as the kit provided are good and very visible and the different panels which consist of instruments are in various different places in the cockpit. The dials and bezels are printed in Colour and in a very shiny finish, and the manual recommends, that you cover some flat base on the bezels and keep the dials like they are in high gloss finish. I also have the two Kagero monographs along, which show a lot of plans, renderings and pics, but unfortunately don't show the night fighter layout. An here is where the trouble starts. I have no idea, how the window of the operator in the back looks. Even the Fly boxart of two different issues show a rectangle window on mine and a oval window on the actual version. If somebody can enlighten me, I will be pleased. The Yahu set Being a short run kit without locator pins test fitting is a lot and so I cleant the mayor components and was positively surprise, be the seemingly good fit. I decided to start with the surgery of the fuselage and canopy, because if I would have had a mayor fail here, there would have been no WIP. First was the fuselage opening for the operator in the back. It is necessary to remove a rectangle part from the fuselage, to insert the provided clear part. I used dynotape for the borders and cut with a saw and scalpels. After a little sanding it looks like this. And here is a little preview of what's in the fuselage. The backward facing place of the operator is supplied in resin parts, which seem to fit without cutting and grinding, splendid. I only cut the cast block of the backward bulkhead, only to get the opening in it into the fuselage. The second area of surgery was the canopy and it proved to be not too easy. you have to drill elliptical holes for the struts which carry the Neptun radar. Boy, how I hate to drill, grind and cut into clear parts. I used the measurements in the manual and copied them onto Kabuki tape onto the canopy. Then I drilled and grinded. You have to be precise while doing it, anticipating the angle of the struts. The result looks like this. The upper struts are a bit to much to the back, but I hope, I can arrange the struts properly, because filling and drilling again is no option. I did all these surgeries, before applying a coat of Future to the cockpit, which hopefully enhances the clearness and makes applying the provided decals trouble free. Like James, I firstly wanted to open the front and rear canopy, but after the drilling job, I'm not that sure anymore. While cutting the fuselage with the dynotape, I noticed black residues after removing the tape, a killer for a clear canopy. So for now, the bird will stay closed up. That's where I am now, reading my books about the 234. Be warned, that will not be a fast build, because there are others in line and I will do it proper. Hasta pronto Cheers Rob


-
I'm not picky with the scale. For me it is about the 'WANT-factor'. If there is a kit which attracts my sensors, I add it to my stash, mostly with a more or less fixed idea of the finished build. Although I prefer 1/32, I'm not dogmatic about it. My size limit are twin engine planes in 1/32, so the announced B-17 in 1/48 scale is my go to option. I have lots of 1/48 planes and 1/35 armor and even a few 1/72 kits and Steam punk and Sci Fi stuff in 1/20 and 1/32, Cars in 1/24. About figures it has to be at least 1/48, better 1/32, 75mm or even some 1/10 busts. I have no fixed plan in buying stuff, like only allied planes in 1/32, I'm always in search of interesting subjects and love to be carried away by influences and ideas and sometimes influencers, like you . Cheers Rob
-
I never expected this , twin engine layout, 1/48 and definitely not a Corsair. Pity that they never built a twin Corsair . The Ventura though is a very interesting plane and I look forward to you doing some twin magic. Cheers Rob
-
What is on your bench right now ? Share a picture :)
DocRob replied to Martinnfb's topic in Modelling Discussion
Maybe this will be my next project. I always wanted to build the Arado 234, but why now. The answer is easy, I want to do the Fly kit before somebody (namely ZM) is tempting me with their version. I will do a nightfighter version, but am not decided if it will be mottled or splinter camoed. So far the kit looks great, the plastic is a little crude in some areas, but that's no real deal breaker. the numerous resin parts look great, finely detailed and on some you don't even have to remove the cast plugs. If you do a two seater version, you have to do some fuselage surgery,..... I'm going to far in this thread, maybe I do a WIP. Cheers Rob


-
FS numbers for SBD Dauntless 3? +other ??
DocRob replied to Sir Desmond Glazebrook's topic in Modelling Discussion
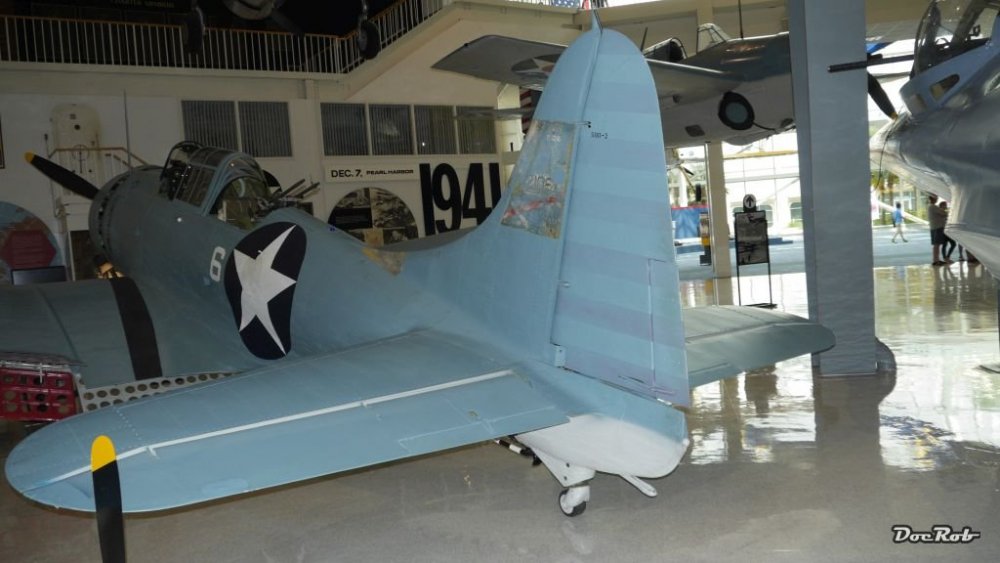
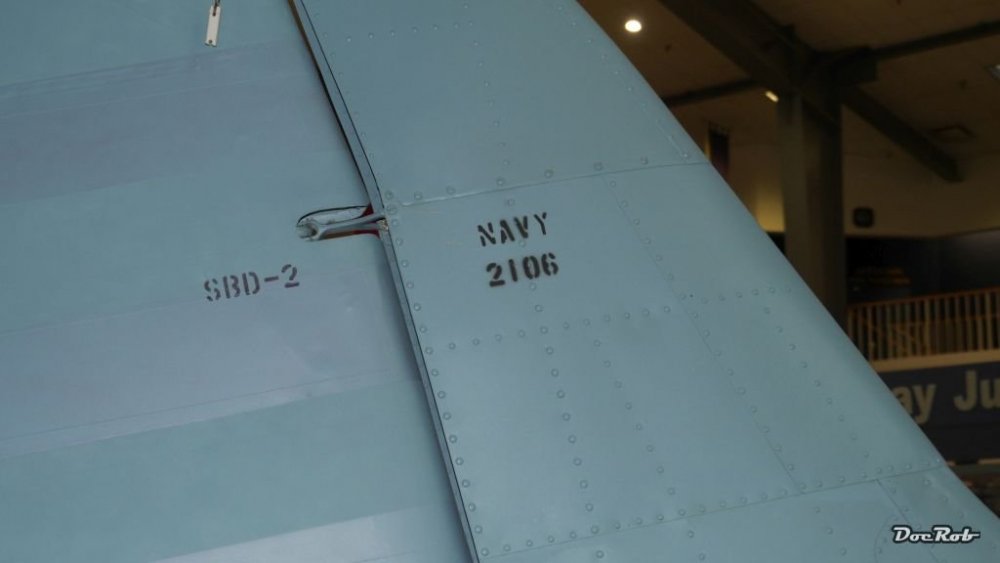
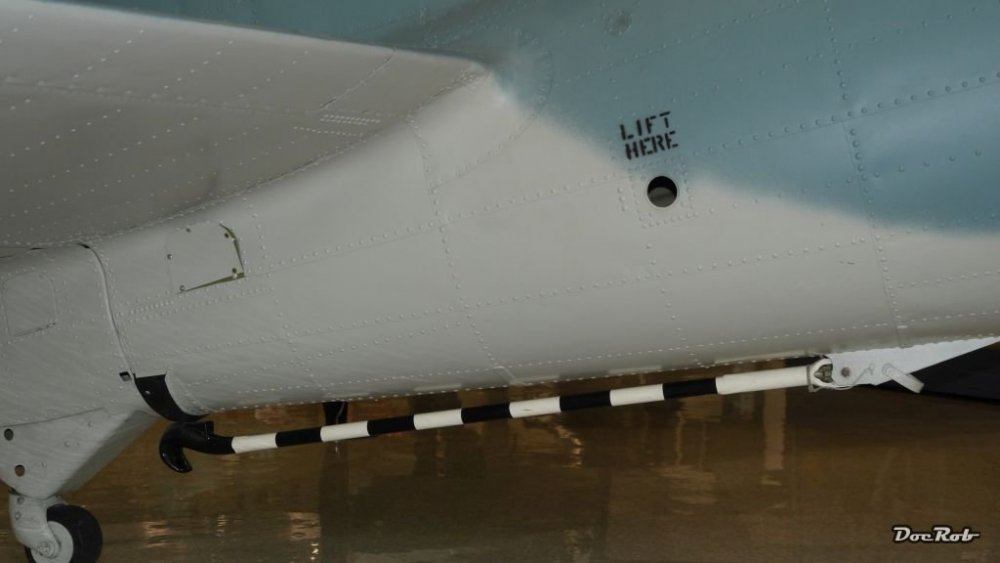
What I have are some subpar pics from Pensacola, showing a SBD-2 And a SBD-4 from Yanks Air Museum in Chino Belly is looking off white to me. Hope these pics help a little. Cheers Rob


-
FS numbers for SBD Dauntless 3? +other ??
DocRob replied to Sir Desmond Glazebrook's topic in Modelling Discussion
I'm leaning in, though I have no information to share, but the very same kit in stash, that might be one of my next builds. I'm all ears, gents. Cheers Rob -
1/35 Tiger 1 - Late Production.
DocRob replied to Bomber_County's topic in D-Day 75th Anniversary Group Build
Your Tiger is looking pretty cool in it's half metal appearance. I like the look of your fine PE work, and it's almost a shame to see it covered with paint. Will there be any dents and bruises, because PE is perfect to replicate that. Cheers Rob -
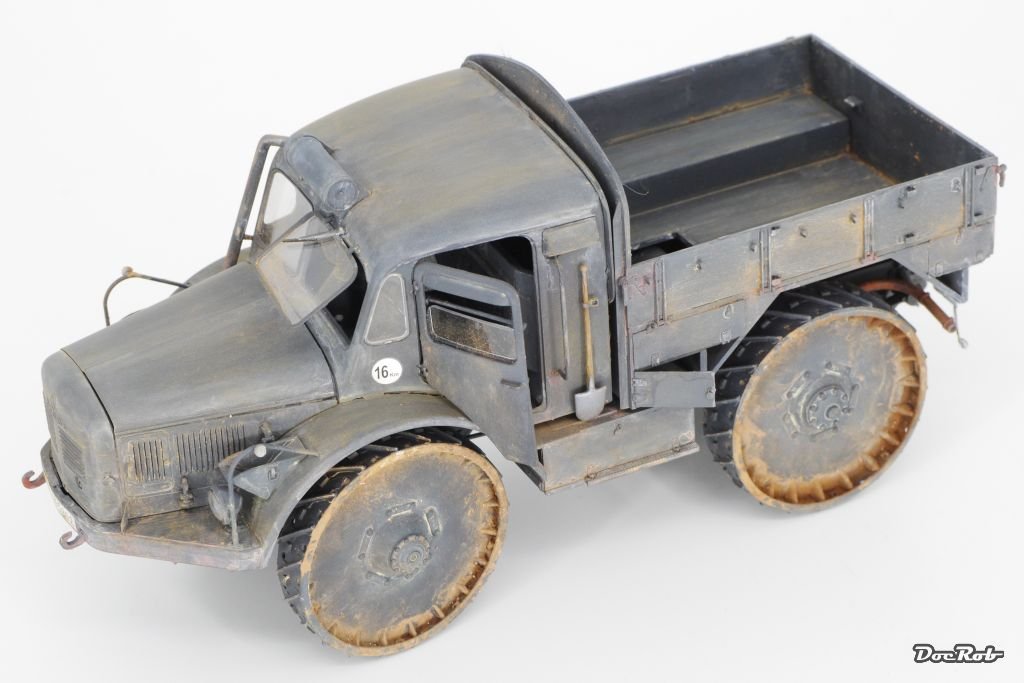
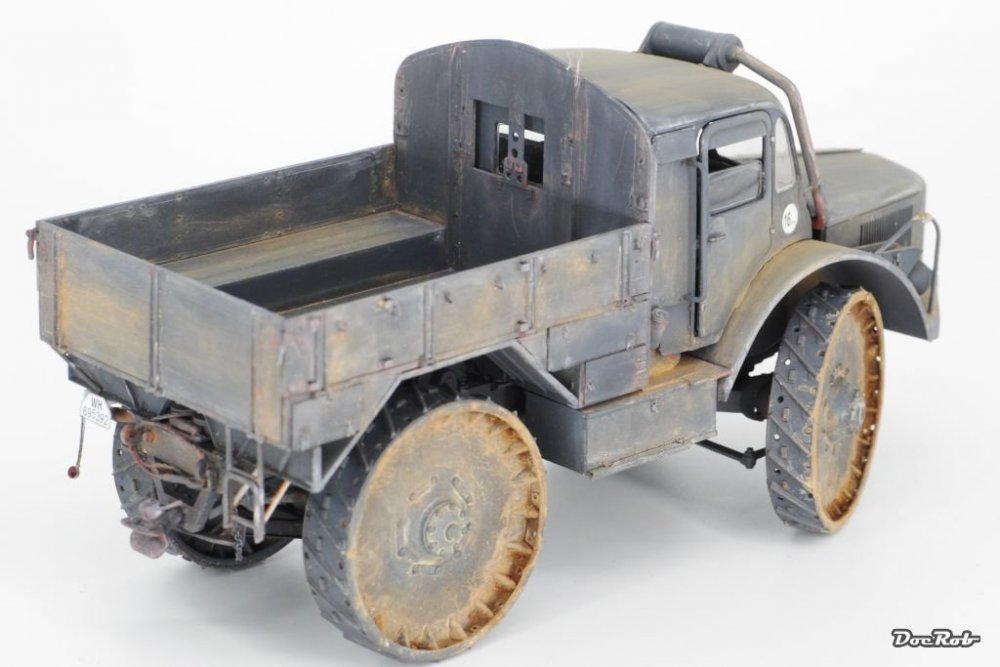
RSO Radschlepper Ost - Having a Break
DocRob replied to DocRob's topic in D-Day 75th Anniversary Group Build
Thanks Mike, my cave is the coolest part of the house, but with summer lurking outside the potential distractions raise to infinite. Cheers Rob -
Hobbycraft F6A D-Day - Ready for inspection!
DocRob replied to 1to1scale's topic in D-Day 75th Anniversary Group Build
Indeed, looks like a newborn invasion striped F6A in it's absolute clean state . Cheers Rob -
RSO Radschlepper Ost - Having a Break
DocRob replied to DocRob's topic in D-Day 75th Anniversary Group Build
Thanks Gaz, figure painting is not my strong side, but with these great Bravo 6 figures it's fun. The cast quality is outstanding and the poses are different from other producers like some of the boring 'stay erect but loose' types say from Alpine. It's so much more fun painting funny figures . Cheers Rob -
RSO Radschlepper Ost - Having a Break
DocRob replied to DocRob's topic in D-Day 75th Anniversary Group Build
Thanks Phil, but if that is your idea of restrained, I'd really like to see something seriously weathered . When I put the RSO into the dio, I will decide, if I will go further. By further I mean using very light pigments to enhance the impression of a sun baked vehicle. Cheers Rob -
RSO Radschlepper Ost - Having a Break
DocRob replied to DocRob's topic in D-Day 75th Anniversary Group Build
Summer can be cruel for modelling, but today it was so hot, that I managed to progress a little with the RSO and hid myself in my cool and dark mancave. I weathered the Behemoth to a dry and dusty worn look. everything has to dry now and after building my little scenery, I decide if further weathering steps are necessary. Some of you Sherlocks out there will notice that the treads are not weathered. That will be made after embedding the RSO into the dio. For the actual stages of weathering I used AK' weathering pencils in two different ways. A little bit more pronounced with a wet tip and on a pre dampened surface with blending with a wet brush afterwards. The dust effects where made with European Dust pigments from MIG. Cheers Rob


-
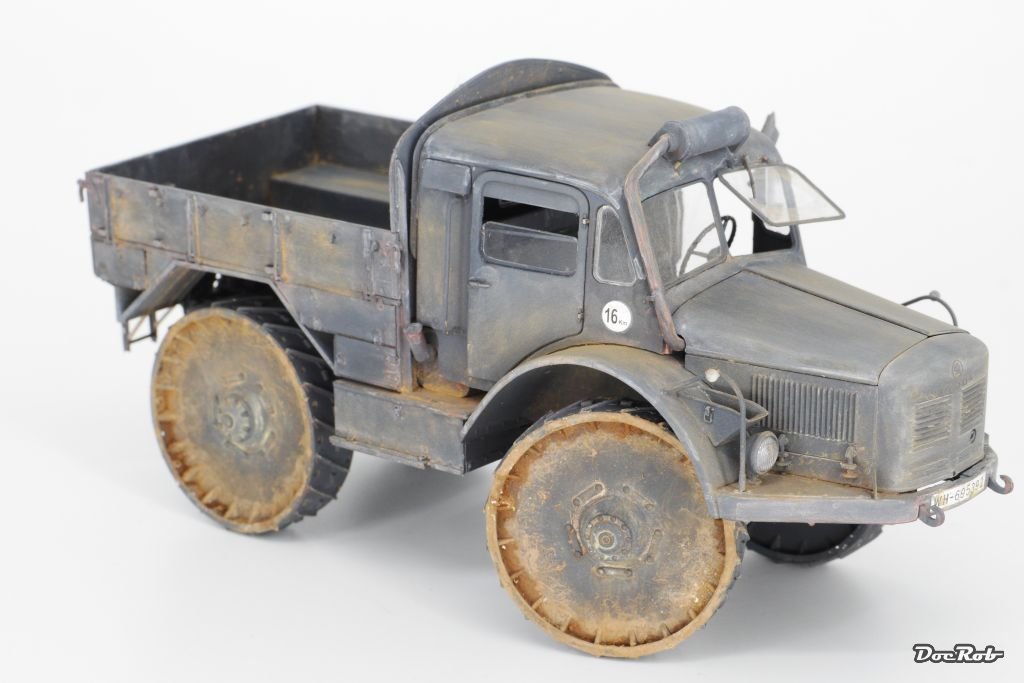
Looking great. Nice little tractor and beautiful aged. While scrolling through the pics I had to smile at #4, I had the picture of a vintage Alfa Romeo in my head . Cheers Rob
-
Yessir, I would like that. And for me a Grumman G-44 Gosling or a Loire 130 Cheers Rob
-
Special Hobby Tempest Mk.V
DocRob replied to rkranias's topic in LSM 1/32 and Larger Aircraft Ready for Inspection
Hi Rick, great that you had the energy to finish this beauty. Your Tempest looks beautiful in every aspect and the pics are well taken too. Never thought about using the Anyz stuff for brake lines, but they do look good with these connectors. Cheers Rob- 13 replies
-
- 2
-
-
- did you hear my screams?
- difficult build
- (and 1 more)
-
Your colour and marking preference?
DocRob replied to Sir Desmond Glazebrook's topic in General Discussion
By the way, the most unappealing single Colour to me is RLM-66, I guess it's the main reason the Germans experimented with ejection seats, to prevent pilots from depression. The most -hmm- interesting Colour is Russian cockpit turquoise. Clearly LSD was involved when they mixed it first. Cheers Rob