DocRob
-
Posts
7,054 -
Joined
-
Last visited
Content Type
Profiles
Forums
Events
Gallery
Everything posted by DocRob
-

Panther D Kursk 1943 [ Dragon 6299]
DocRob replied to PILOTE109's topic in LSM 1/35 and Larger Work In Progress
Nice PE and detailing work. The way you treat the steel surfaces is great, thanks for the tutorial. Cheers Rob -
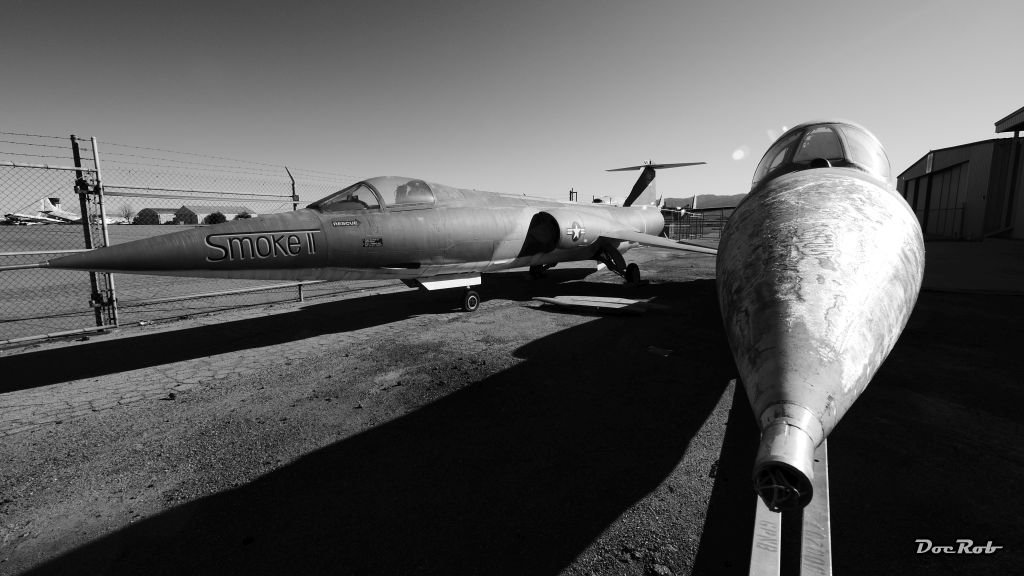
The world's most beautiful jet aeroplane?
DocRob replied to Sir Desmond Glazebrook's topic in General Discussion
Wrecked or not, Starfighter it is to me. Only small wings attached to separate it from a rocket, pure and undisturbed lines. There is only little material added to the powerful engine, an icon. Cheers Rob
-
What is on your bench right now ? Share a picture :)
DocRob replied to Martinnfb's topic in Modelling Discussion
Nice, a 1/1 scale Wild Cat and the paintjob is outstanding. Love the ginger Leo camo . I love that Industria Mechanika stuff. I have one of their steam punk submarine kits and of course Red Star 47 which hit my bench again after some time in the SOD. Cheers Rob -
Thanks Phil, without a turkey today, but hopefully with a Dallas Cowboys win. Cheers Rob
-
Yep https://www.scalemates.com/kits/aerobonus-320-064-raf-3-inch-60lb-rockets--944448 Cheers Rob
-
Great pics Carl, will store them for my build. I bought these rockets for my Mossie project. http://www.aires.cz/en/product/r-a-f-3-inch-60lb-rockets/3-2478/ Cheers Rob
-
Phew, glad that I'm not a modern jet guy. The few I own are 1/48 and to me this is completely ok for say a Mig-31. I feel your pain though, but am glad that there is a problem in modelling that I don't have . Cheers Rob
-
It's about time, that you discover the true nature of our place here . What your mind determines though, is more a reflection of your mindset, than your perception . Cheers Rob
-
Reduce to the max Carl , sometimes it's a good idea to step back a little from that overcomplicated and utterly challenging stuff and have a comfortable and relaxing build. The challenge here is in itself and in the end you will have a fine result and refreshed powers for the hard to build ones. Your D1 is looking good and more than once I was tempted to buy one. It is an important, but often overlooked plane, being full metal and single winged, in some aspects even ahead of some 30's designs. It should be a single build but a great canvas for worn Aluminium effects. Have fun with that little bird. Cheers Rob
- 31 replies
-
- 5
-

-

-
- wingnut wings
- junkers
- (and 1 more)
-
What is on your bench right now ? Share a picture :)
DocRob replied to Martinnfb's topic in Modelling Discussion
Phil here is confused, because he only nows chicas (girls) with mini skirts in camo Nice start with that complicated scheme. I never would make the GB deadline with that Splittertarn. There are some decals out there for the complicated German schemes, but I think applying these could prove also very complicated. Cheers Rob -
HPH B-36 Peacemaker A truly LARGE scale model.
DocRob replied to Clunkmeister's topic in LSM 1/35 and Larger Work In Progress
Look out, that's what I call a big bird. The casting blocks are of corresponding dimensions. Is that dust coat only from the resin or are there other substances involved. mind, always to wear an dust mask . Looking forward to your next steps with that cold war behemoth. Cheers Rob -
GUY ON A BUFFALO - I will be out for a while.
DocRob replied to Martinnfb's topic in General Discussion
Uhuh, mano negra, that's the way to handshake . Have fun out there and don't get bitten by squirrels or worse, beavers . BTW: Do you know the band Mano Negra, worth a try. Cheers Rob -
Amazing work on the interior. I hope you will find a way to show it, not only by peeking through the hatches. Cheers Rob
-
I use always two, with some colors like Model Air one would maybe sufficient, but others like Tamiya or Scale 75 definitely need two balls. Cheers Rob
-
This was the boxing I gave away without thinking about how my complete P-38ing will go crazy afterwards Cheers Rob
-
Thanks for letting us peek in, Phil. Nice pics and some really interesting stuff. My P-38 story is even worse. When I left Berlin some years ago I gave away the limited Eduard P-38 and since then regret it. Last year I bought a new Academy one with all the AM galore. Last week I ordered the Tamiya kit, I just had to. At least the Tamiya is a F or G and the Academy depicts a J or L with the cooler coolers . Maybe I do a double build, one in olive drab and one in NMF. Enjoy the show. Cheers Rob
-
Nice start Bill, I will buckle in, even though four engine birds are not my focus, because of their sheer size. 300 grams is a lot of weight to hide, but for security reasons I would add some grams, just to be sure, not that you got a tailsitter because of using brass barrels for the guns . Cheers Rob
-
Your 5 top favorite war films, and reasons why?
DocRob replied to Sir Desmond Glazebrook's topic in General Discussion
I don't like war movies that much, but there are some which I couldn't get out of my head. - 'Apocalypse Now' has that deeply sinister atmosphere - 'Komm und Sieh' or 'Come and See' is a Russian movie about the cruel war the Germans fought in Russia. It is one movie to get nightmares about. - Das Boot, a masterpiece even after nearly 40 years, intense, realistic and full of suspense. - 'To be or not to be' by Lubitsch, yeah I know not exactly a war movie, but utterly funny and making a joke of the Nazis in a screwball intelligent way. - Full Metal Jacket, even if it is a little worn with the time. - Special mentions to Alien and Aliens, where especially the latter is a reminiscence to the Vietnam War in many ways. Cheers Rob -
Your 5 top favorite war films, and reasons why?
DocRob replied to Sir Desmond Glazebrook's topic in General Discussion
Only if you build a large scale Death Star Cheers Rob -
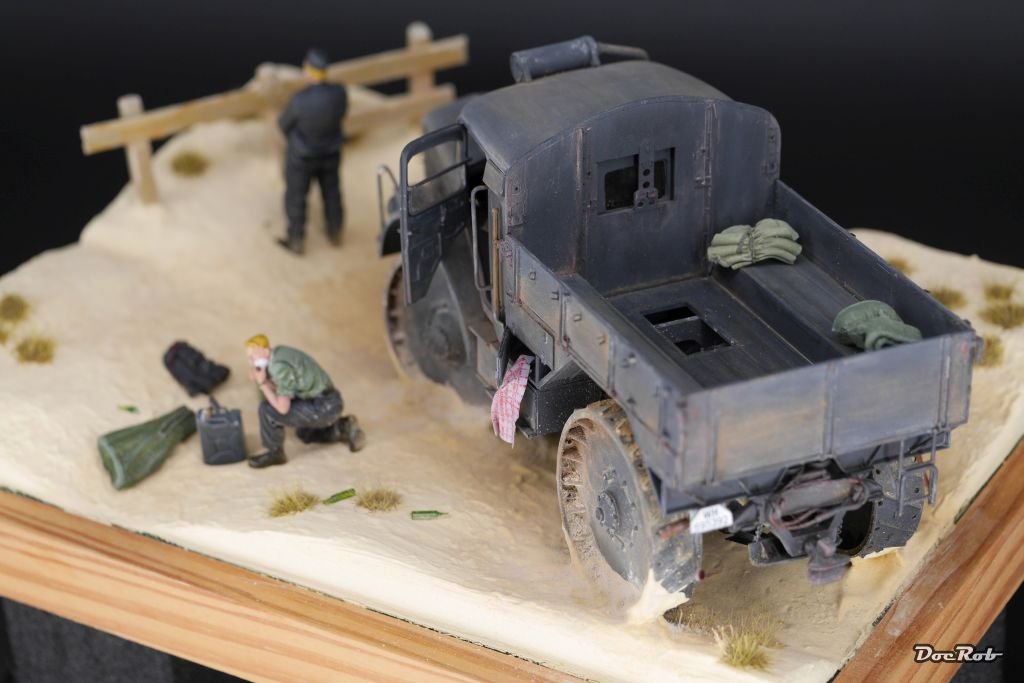
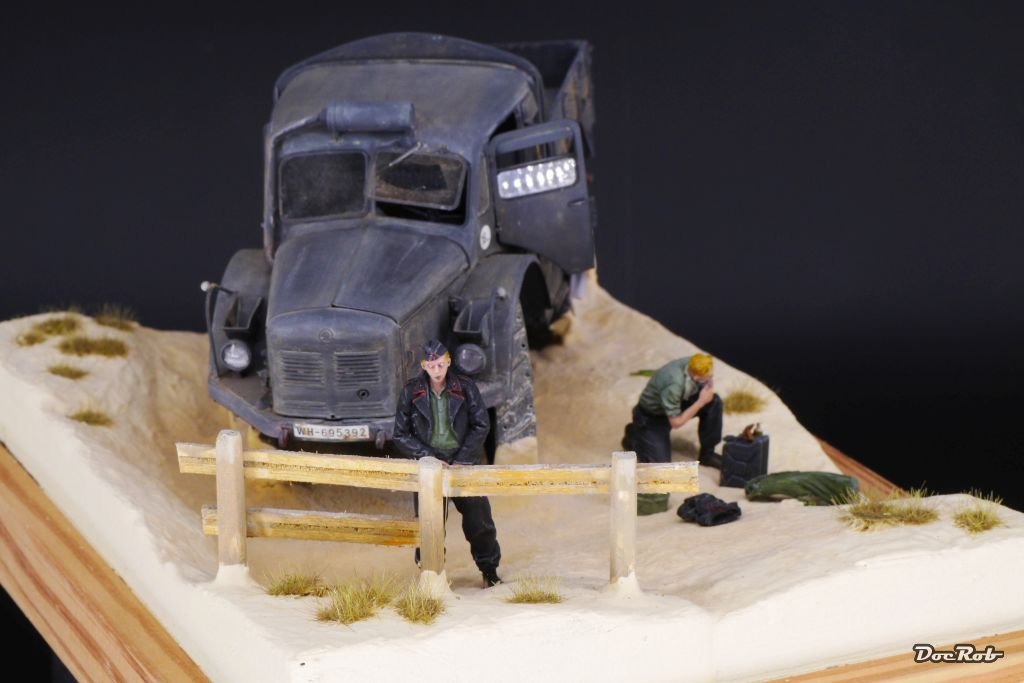
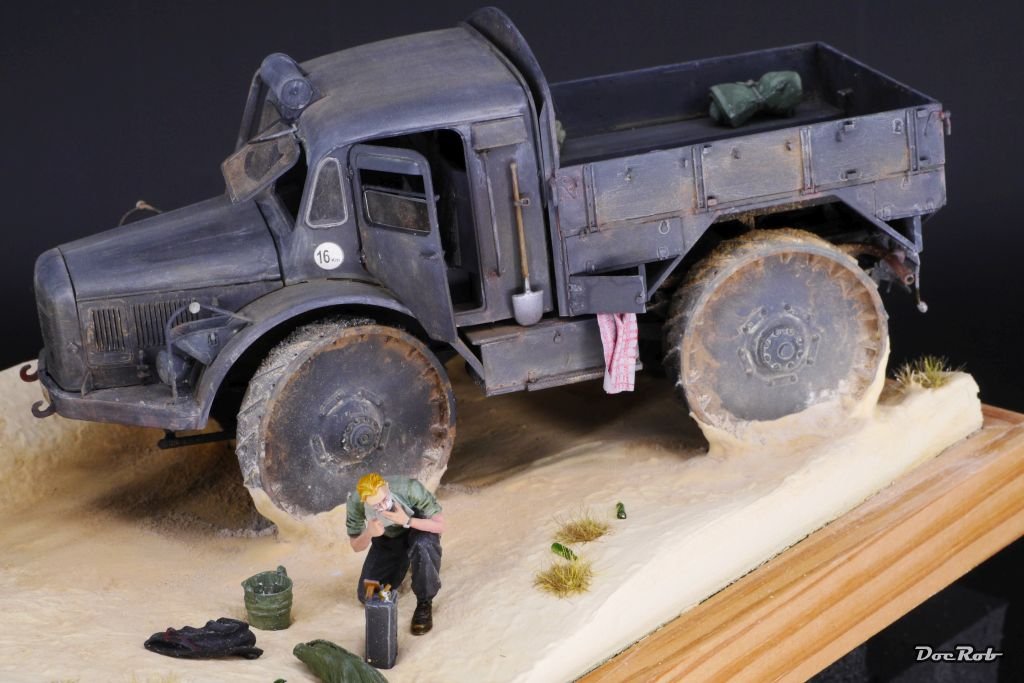
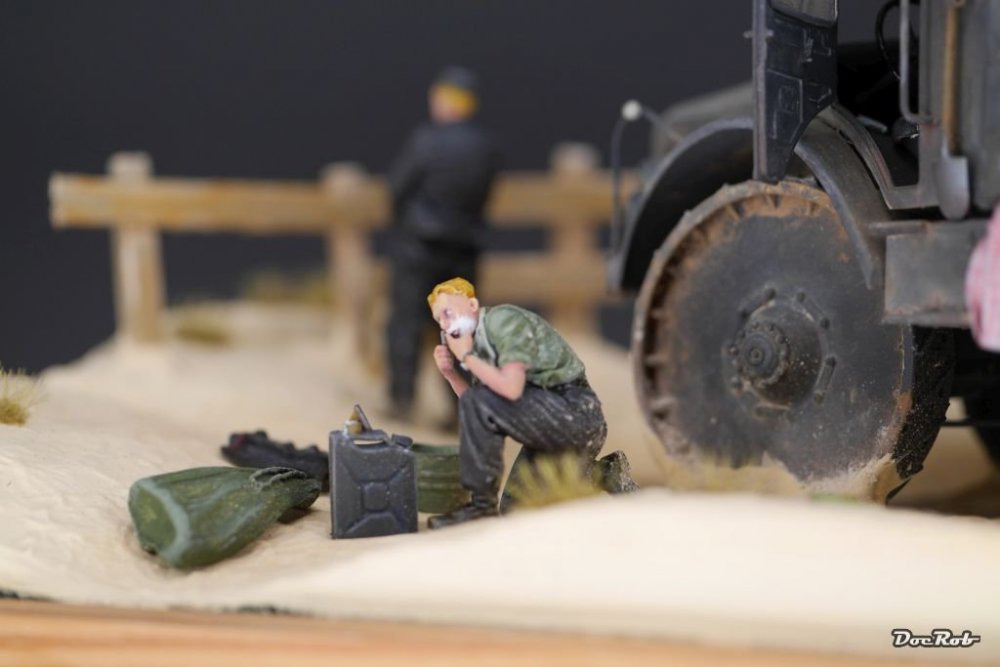
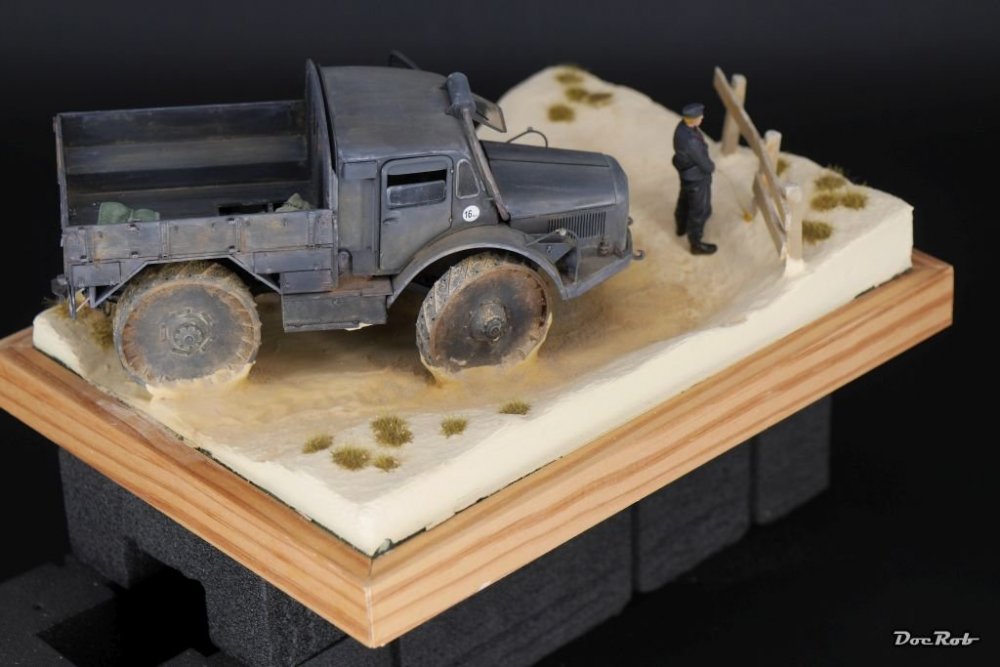
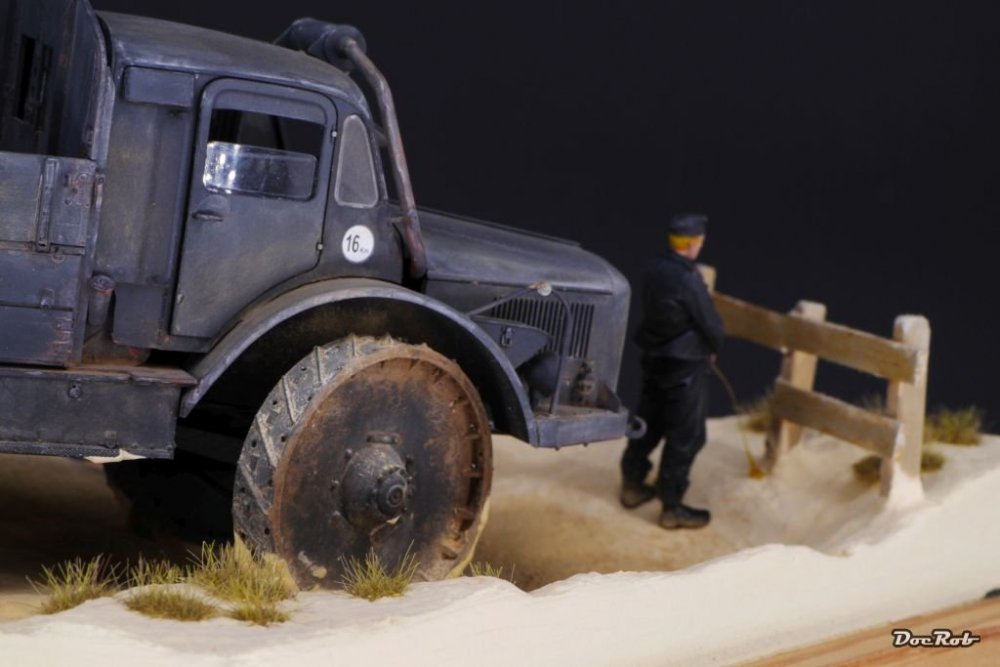
RSO Radschlepper Ost - Having a Break
DocRob replied to DocRob's topic in D-Day 75th Anniversary Group Build
Thanks Phil, I moved the final pics into the 'Display Case-Section' Cheers Rob -
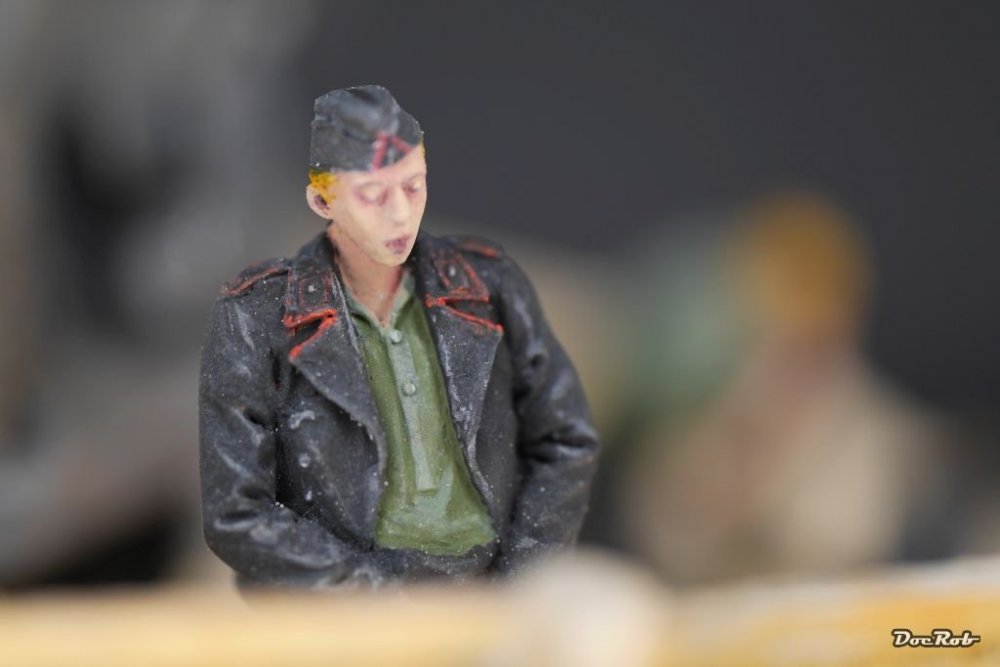
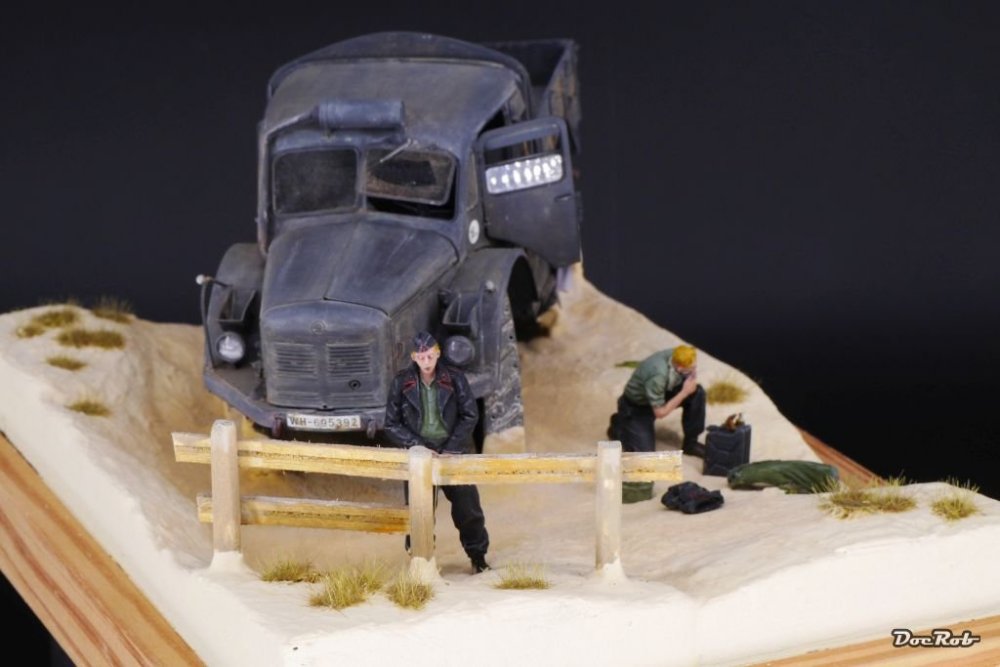
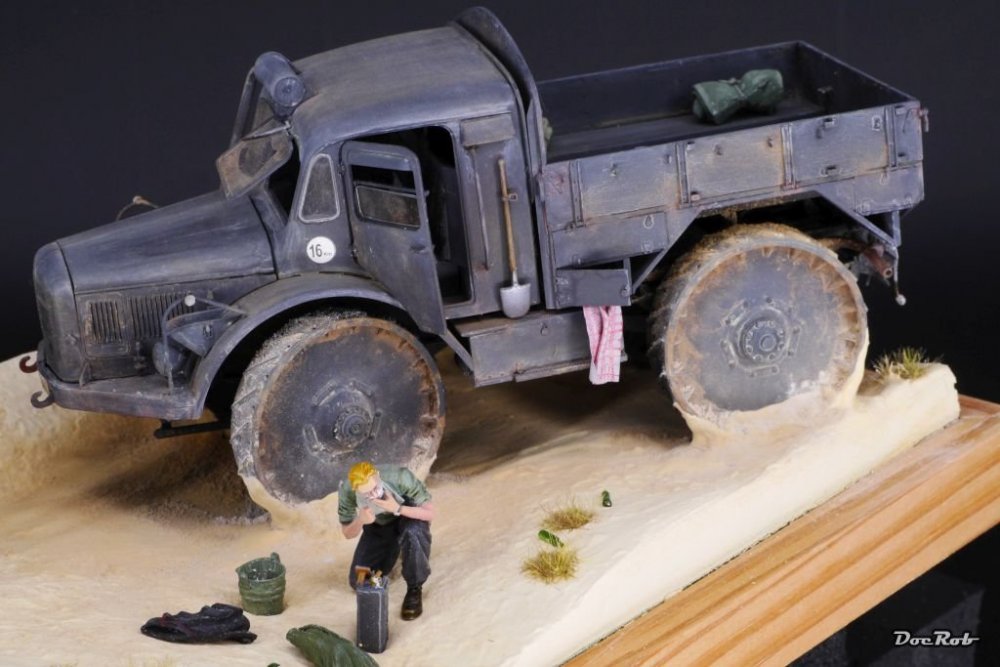
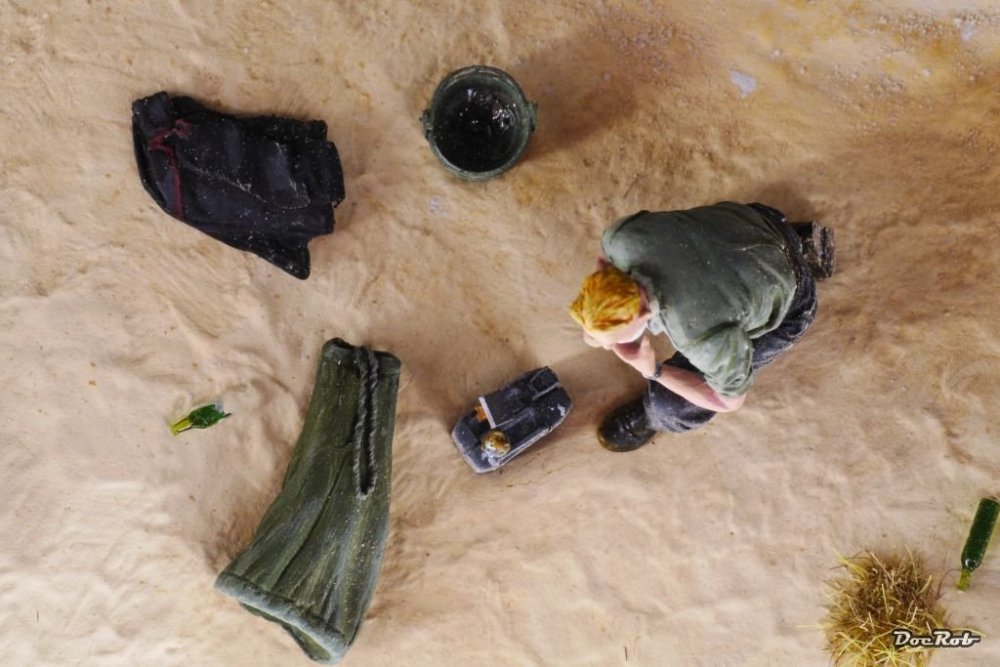
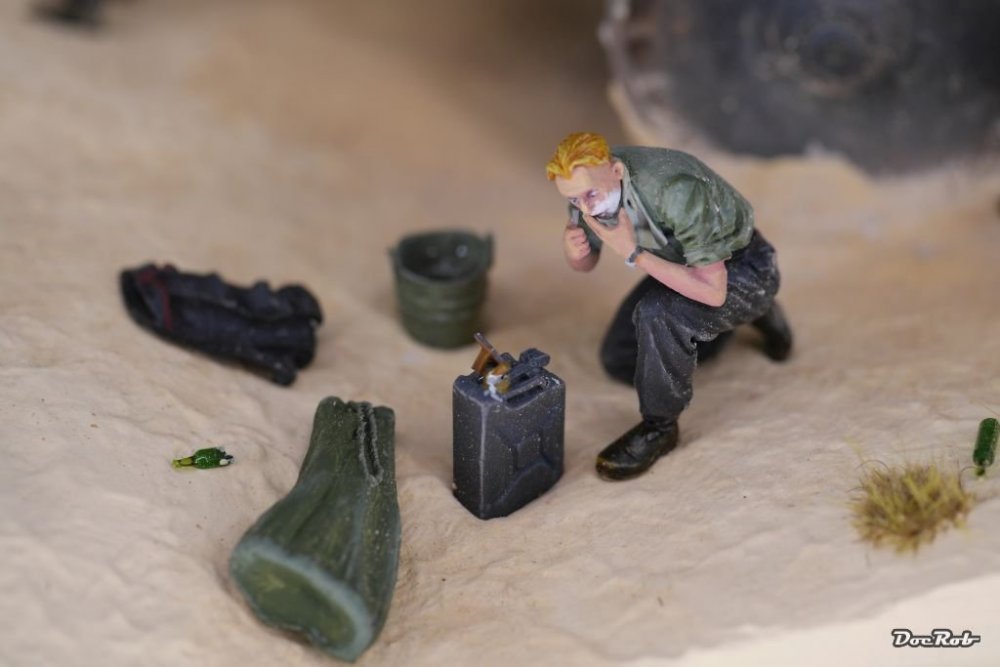
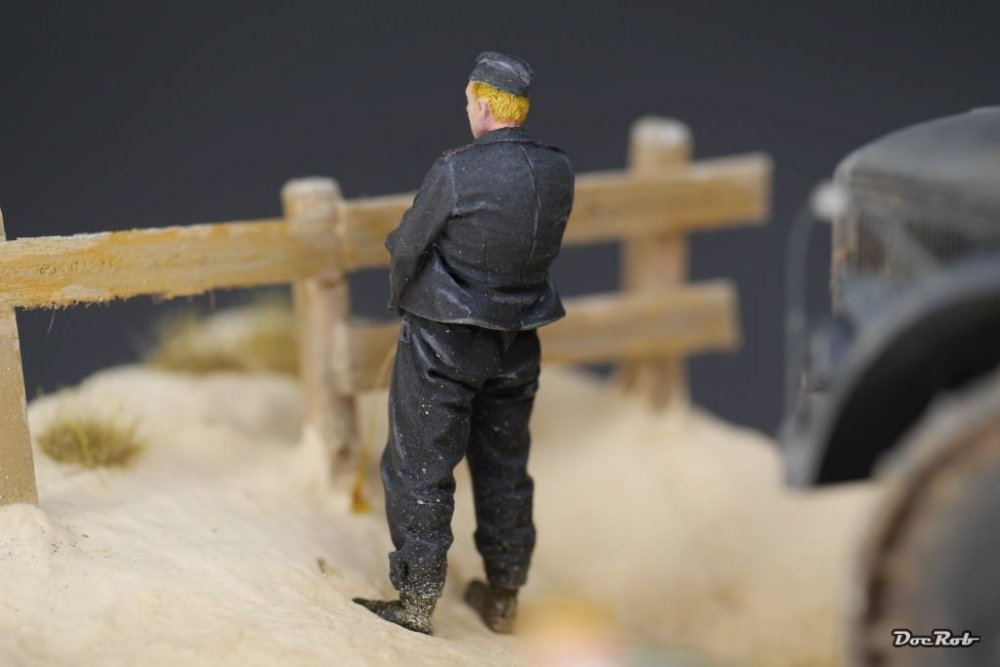
Here is my finished Radschlepper Ost with crew, somewhere in the dunes near Caen in the May of 44. The Dio is called 'Die Ruhe vor dem Sturm' or 'The quietness before the storm' Cheers Rob


-
I feel your pain Carl and won't tell you about my breakfast today Cheers Rob
-
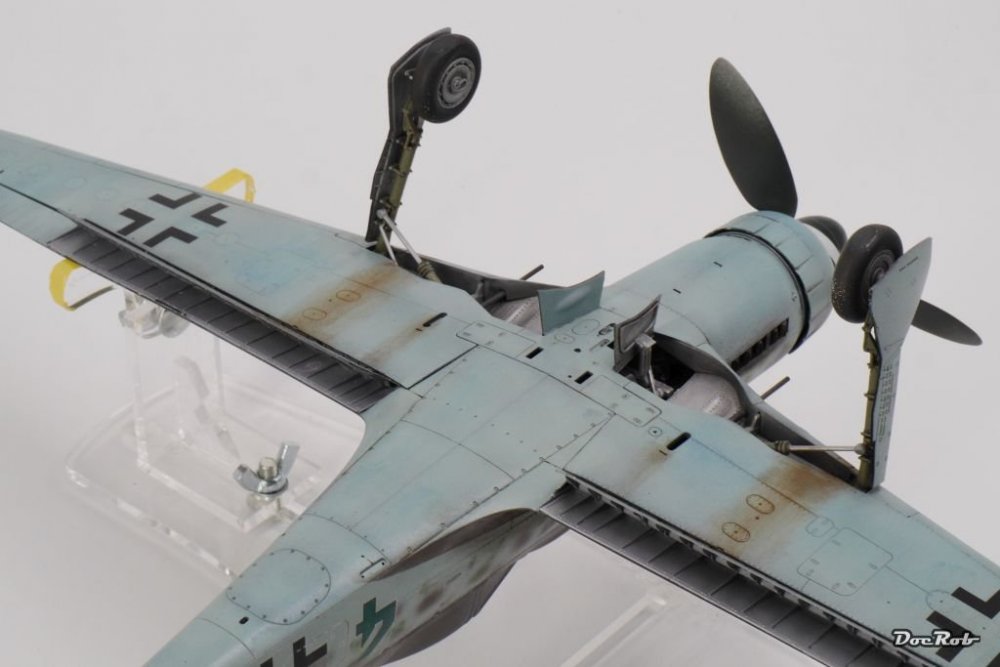
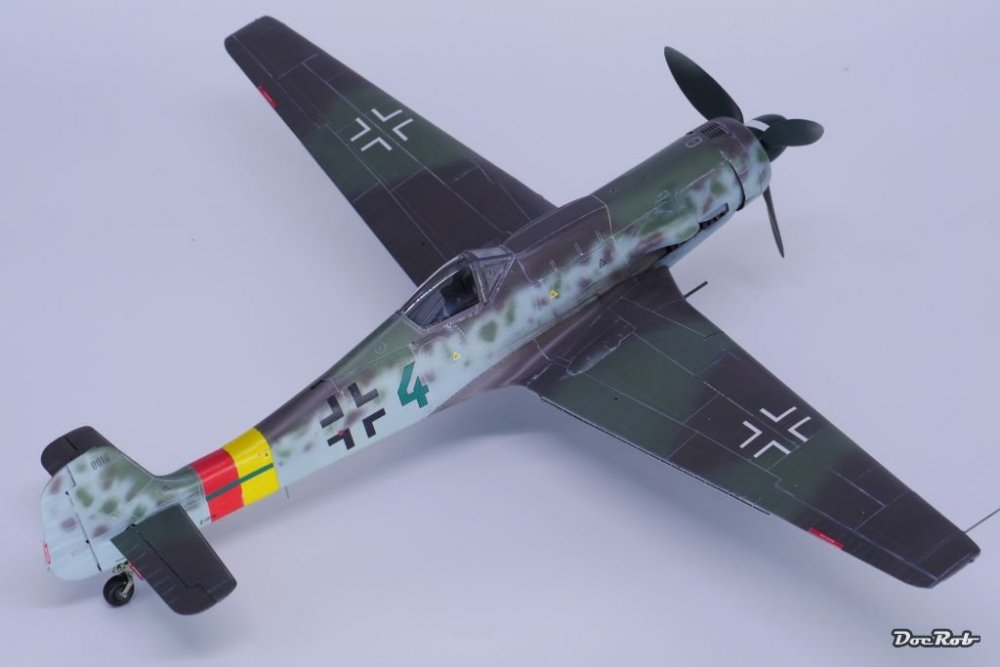
Little Spittie looks good, but I would've had a hard time to choose the wash. I might have used a brownish-grey one for both sides of the underside as I don't like using different wash Colours at one side of a kit. the capillary nature of the wash makes it hard to control the effect on the Colour borders. What I saw on the Spit as well as the Seiran is a pretty rough last coat, which makes subtle weathering very hard. Instead of micromeshing, you should play with your airbrush regarding pressure and/or thinning. I used different wash Colours only once on my TA-152 build, where I tried to emulate the icy conditions the bird might have been in, in early 45 and found the problem of bordering fuselage Colours not to easy to solve. I even considered to give the canopy a frosted look, but chickened out, because of the doom potential. Cheers Rob
-
Great build and even better paintjob. That translucent cobalt blue is nearly radiating. Cheers Rob
-
I have used the AK pencils lately on my RSO project for weathering and didn't run into your issues, but I didn't use another product as a wash. I don't know, if you blended the pencils in with water (it's almost usable like a wash, but with different Colours, if desired) or you used them with a dampened tip. The chalking might be an effect produced by the drying wash leaving some dried out pigments from the pencils. If that's the case you have to seal every step separately. Was there a different treatment or process at the lower side of the plane? What I notice on all your pictures, is a bit too much grain in the last layer of paint/varnish. I suspect the varnish, because it's noticeable in different Colours. That hinders a smooth weathering job, equal which media is used. Anyway, I think, the effect looks good in the end, even it is unwanted, like Hubert mentioned. Light washes are often overlooked on certain types of planes. On Japanese like yours, the emulate abrasion on the corners of panels and on others you ca use the effect for depicting a plane in icy conditions. Cheers Rob Here is a picture from my first go with the AK pencils and a damp brush to blend. For the dark grey, I used only light pencils in different grey, green and rust shades.