DocRob
-
Posts
7,127 -
Joined
-
Last visited
Content Type
Profiles
Forums
Events
Gallery
Everything posted by DocRob
-
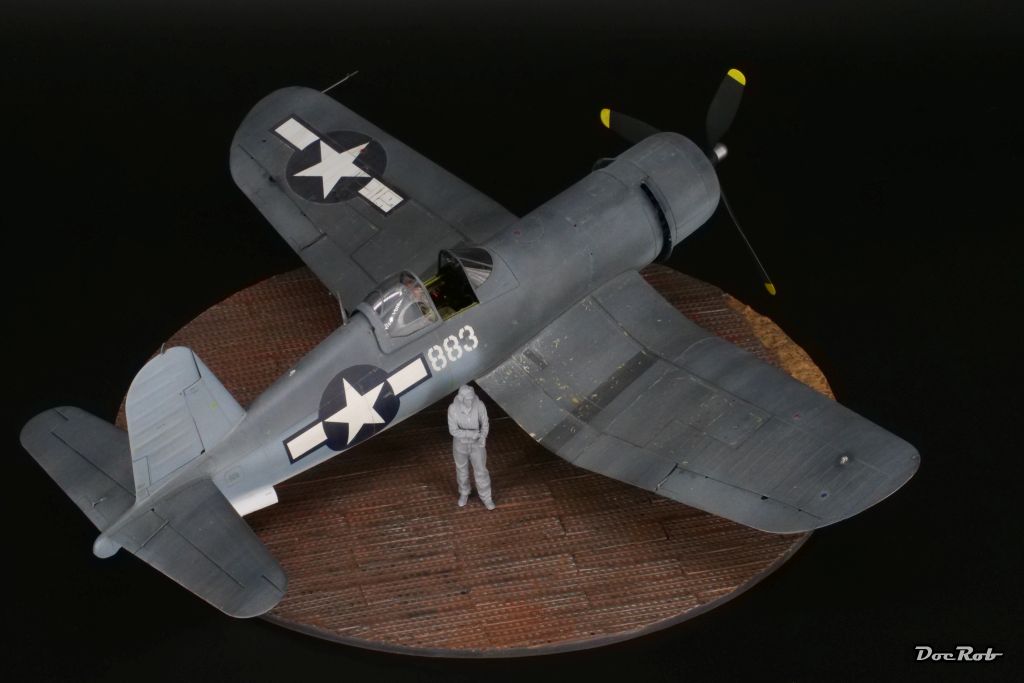
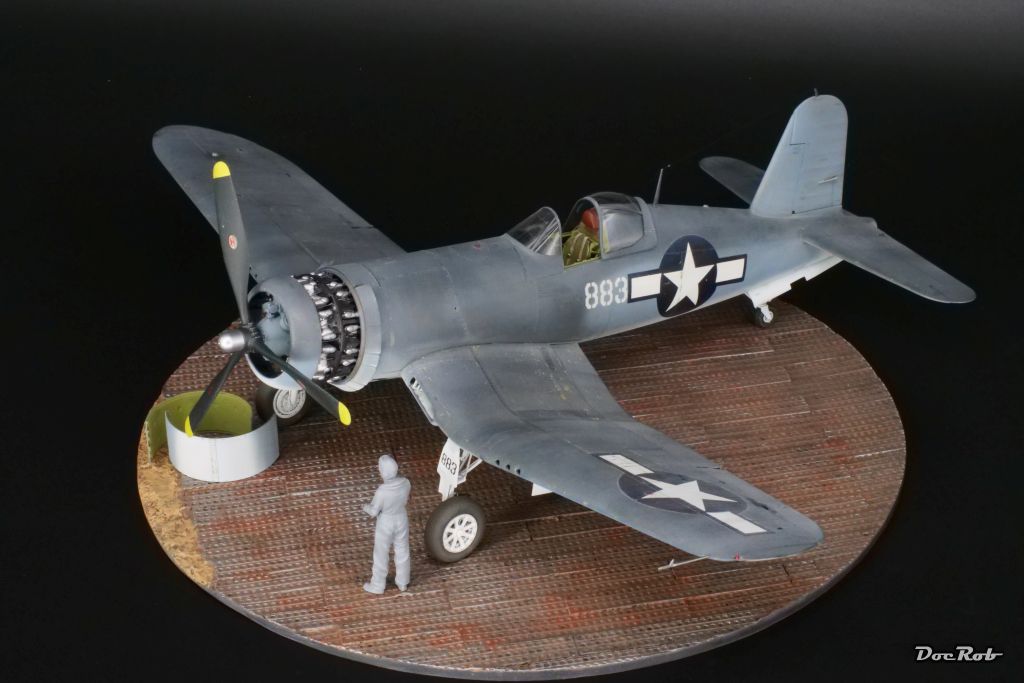
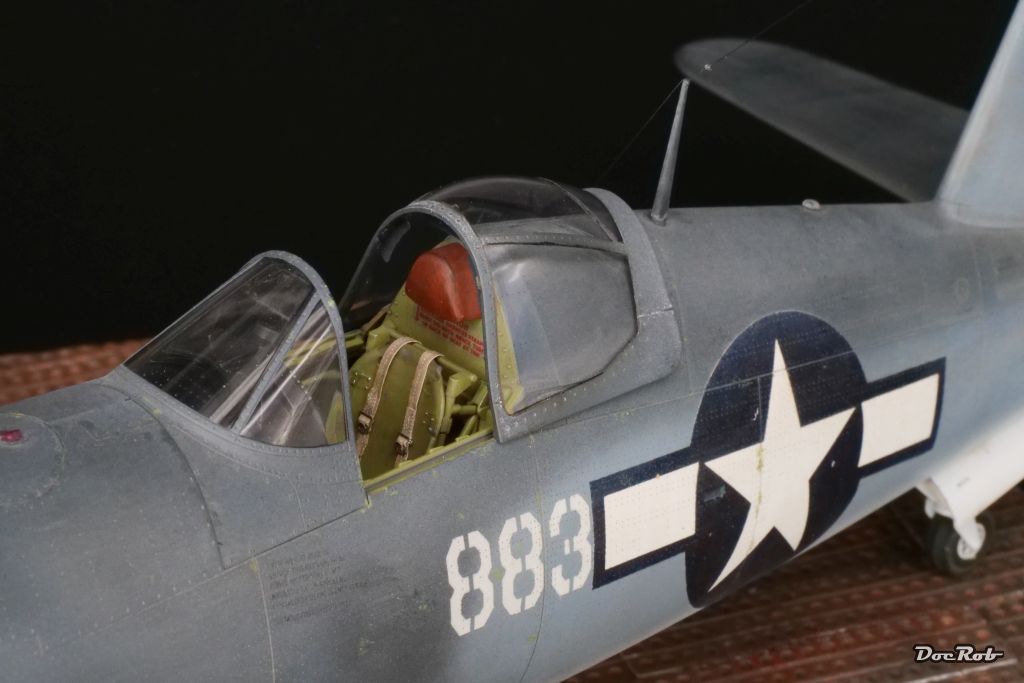
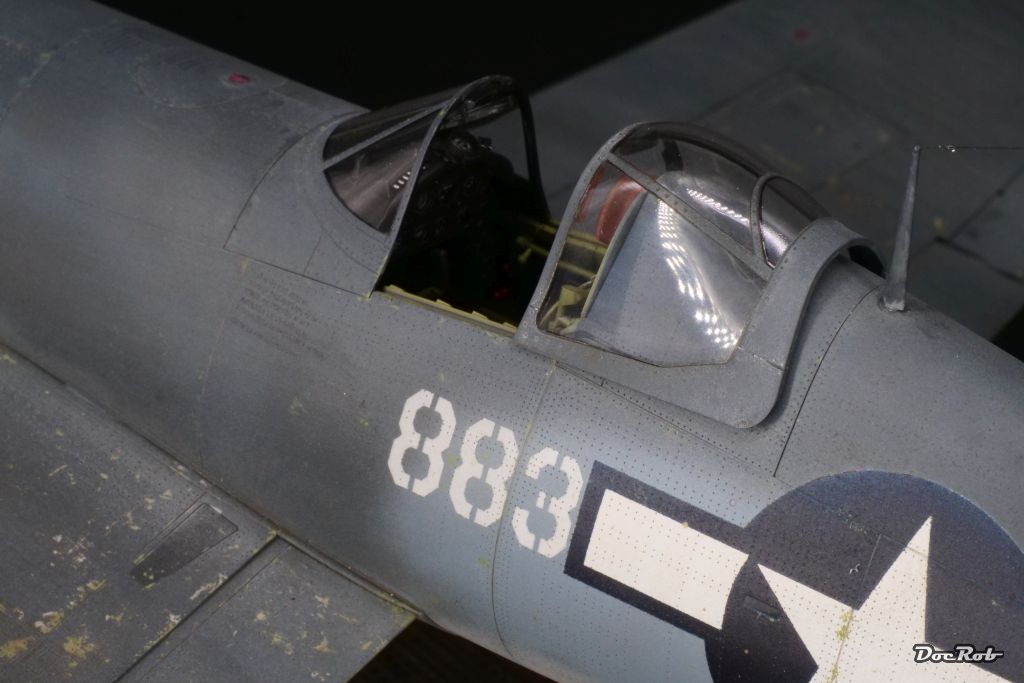
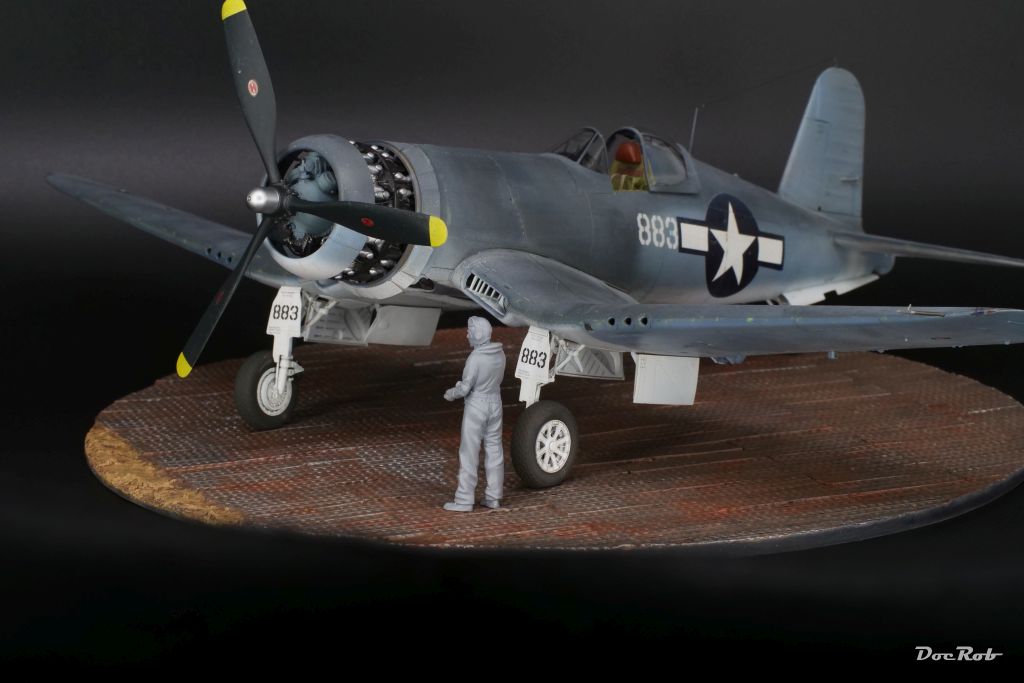
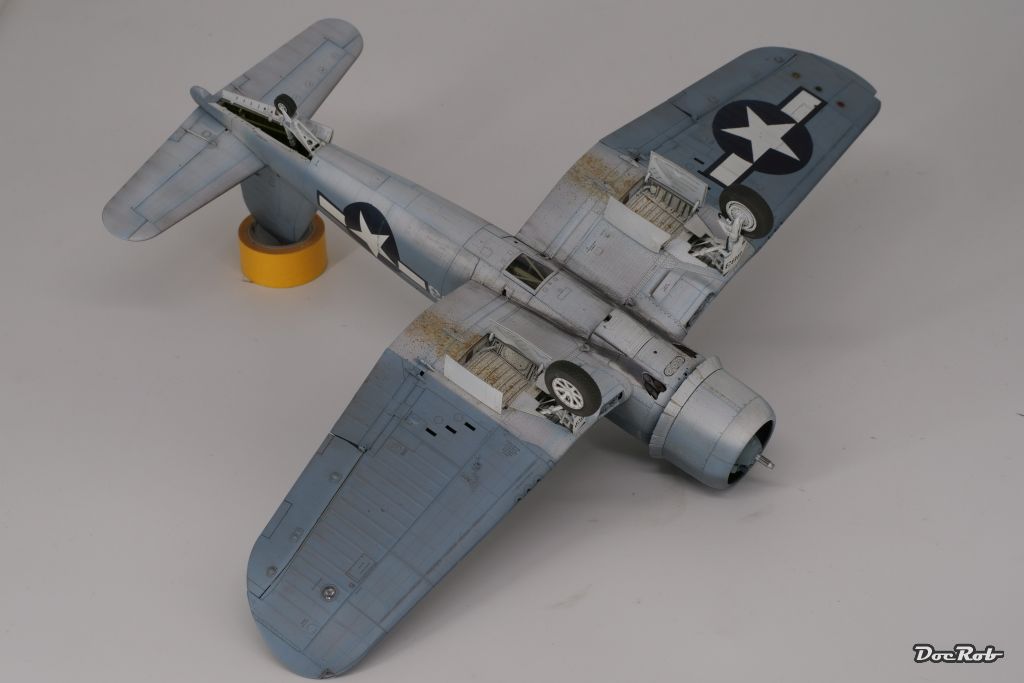
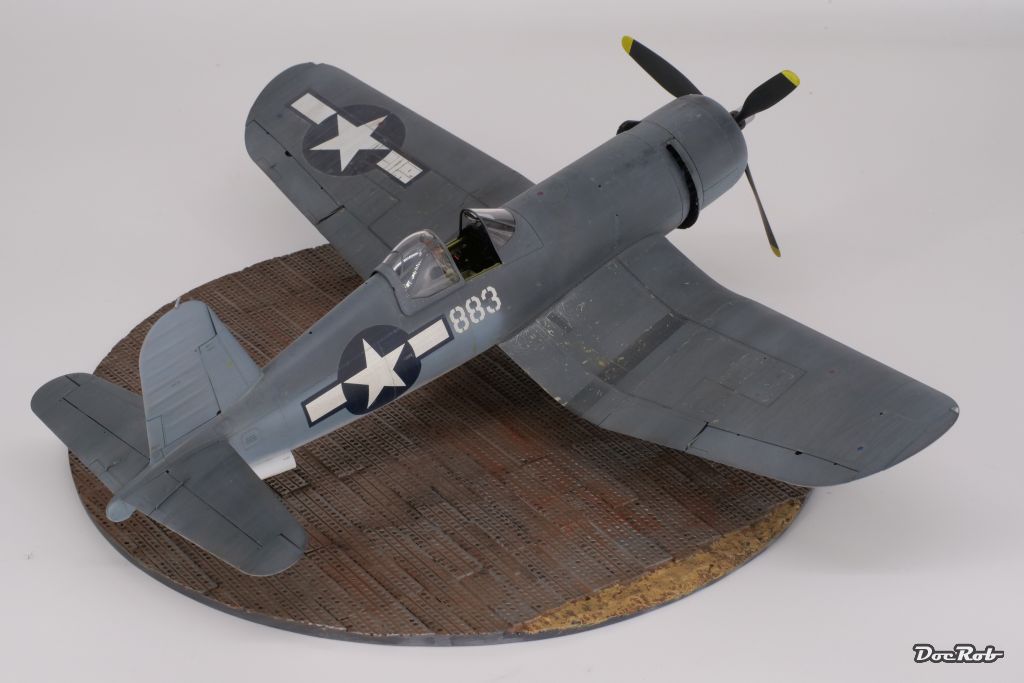
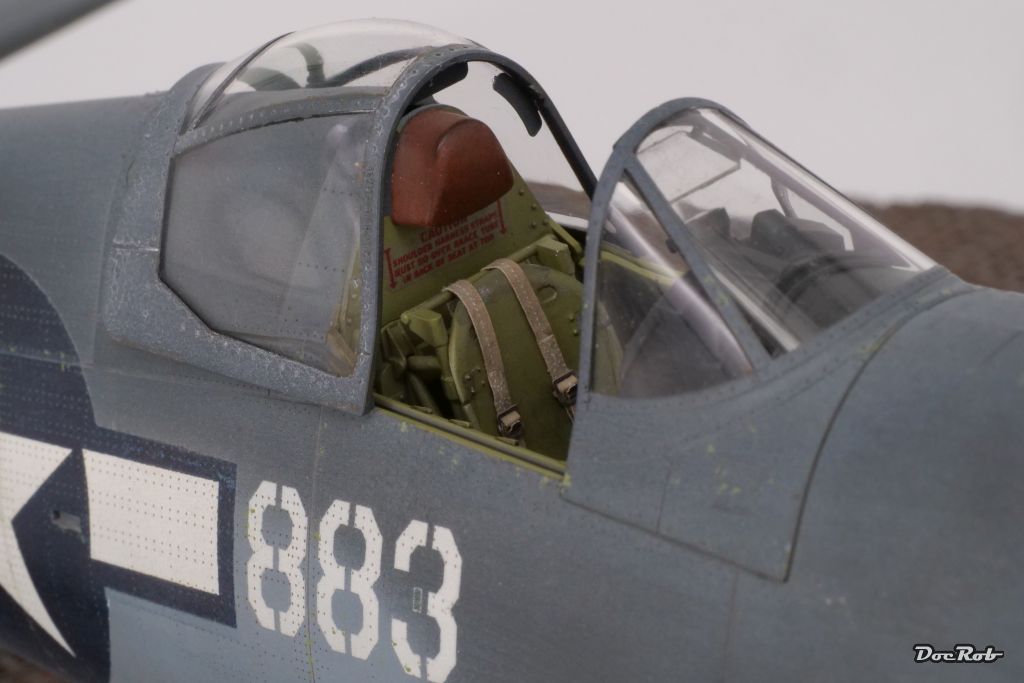
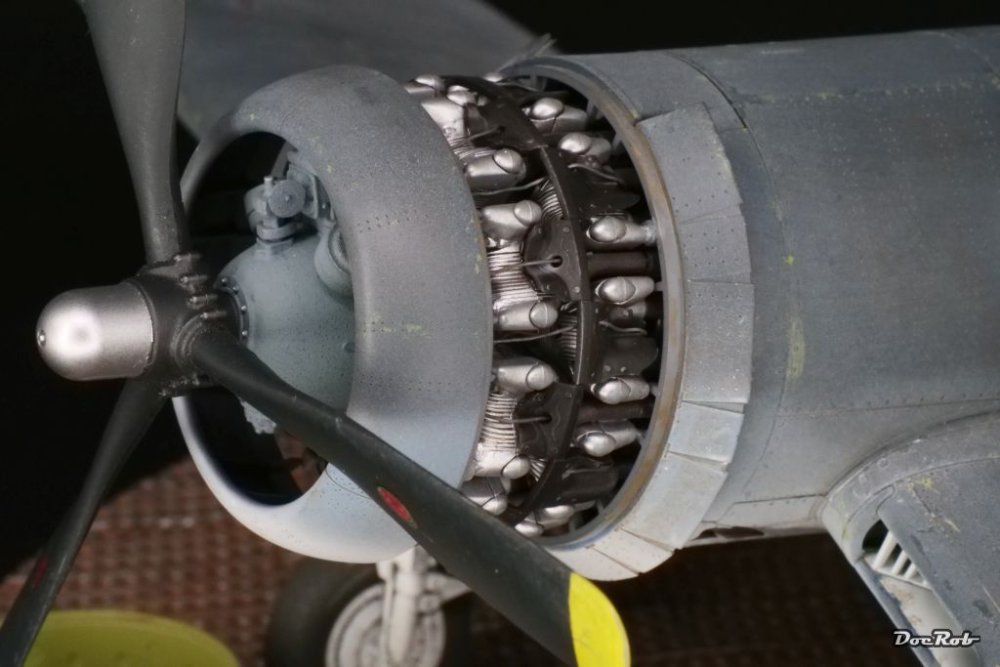
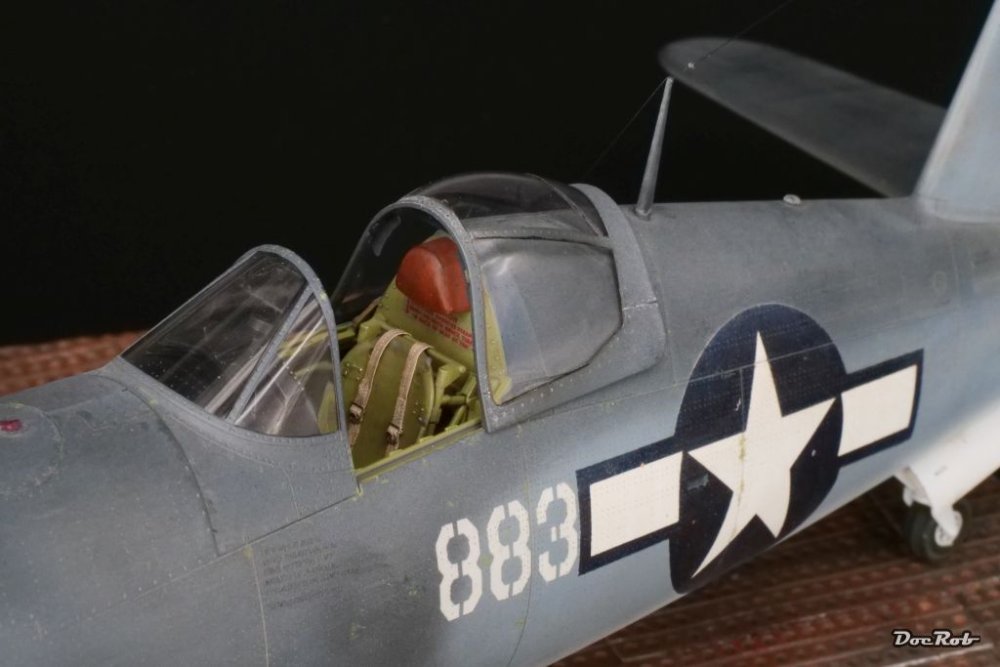
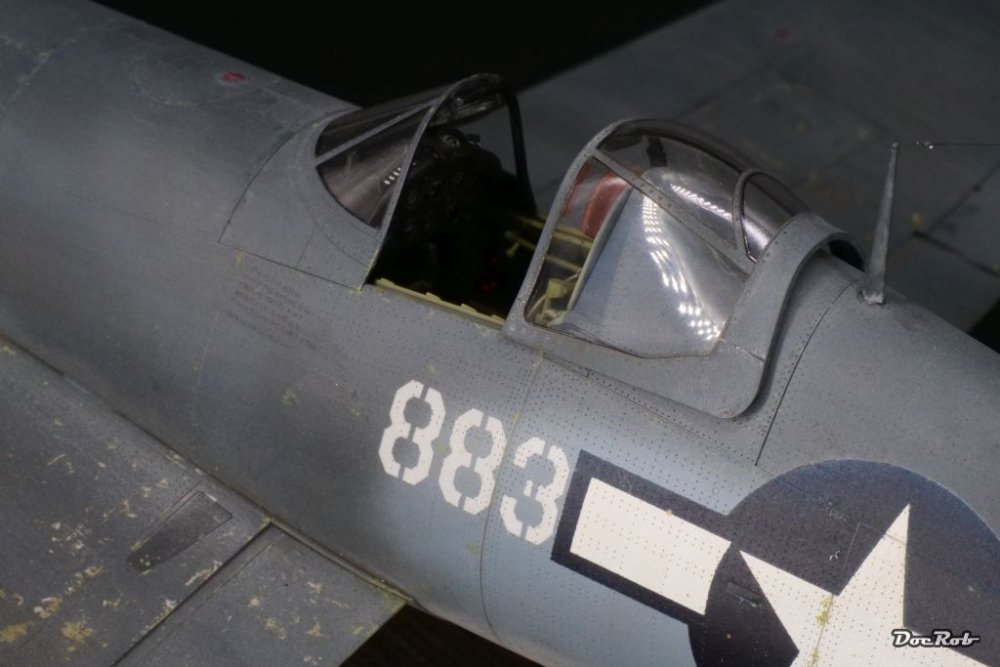
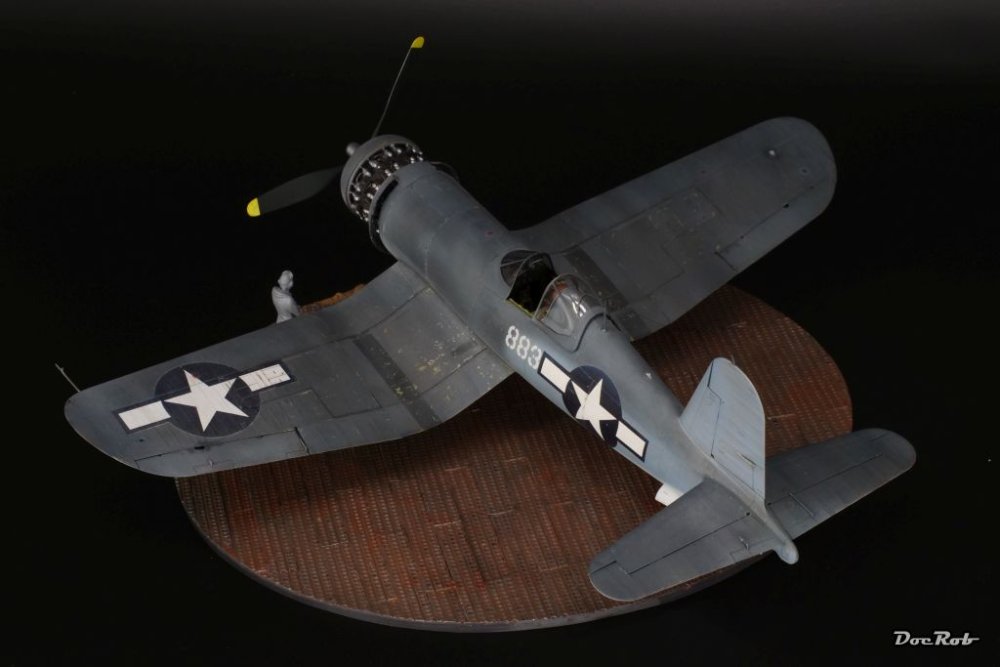
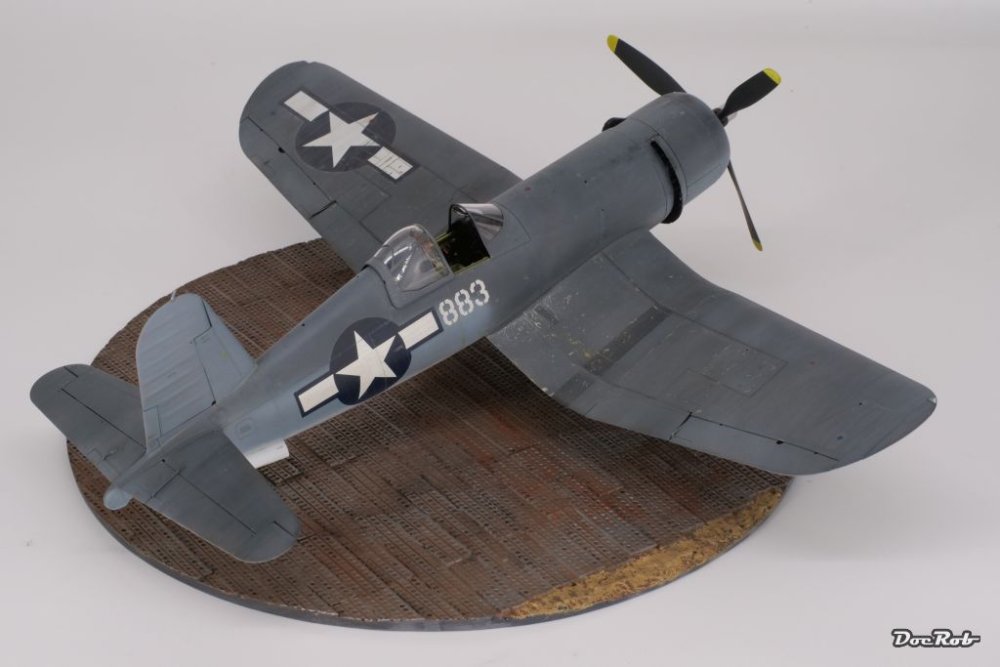
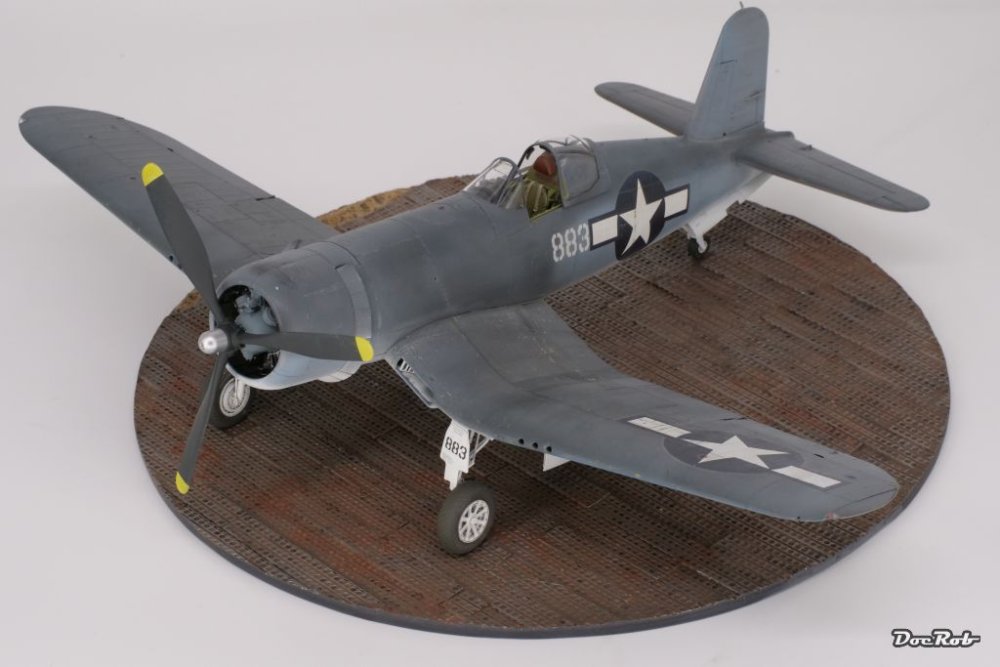
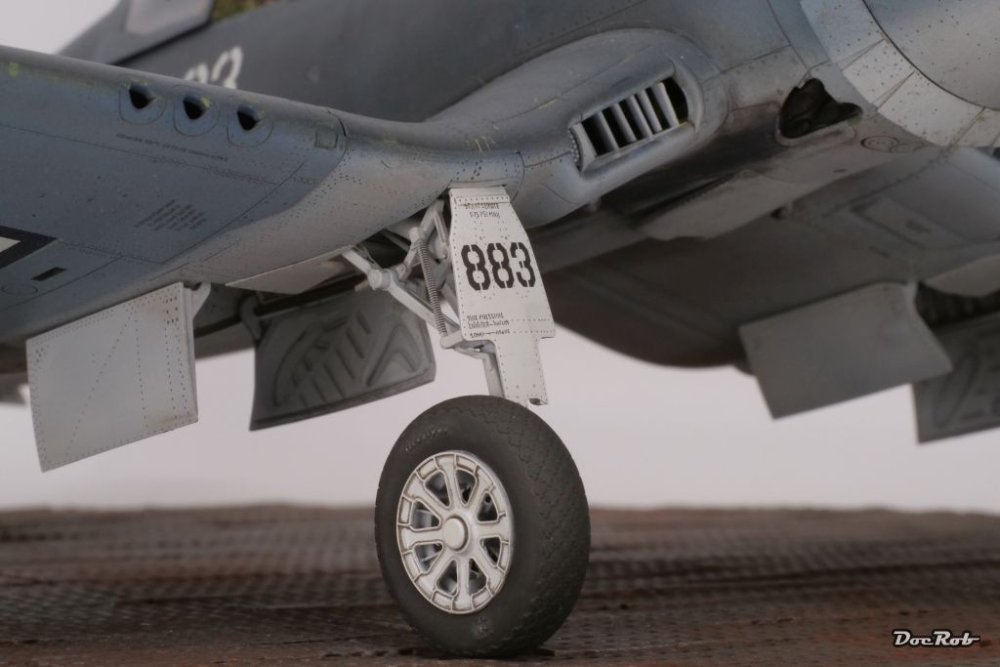
 Well, the Corsair is called finished and I'd like to thank you for your input and your encouragement. I could have done more weathering and finishing in the end, but I got a bit worn out. Not because of the build or the painting, which was especially fun, but with the latest steps of the build, like clear coating, adding bits and pieces, ... tried my patience, as a lot went wrong, in a phase of the build, where I hated it most, after painting. I want to end the modeling year on a good term though and have to say, I'm more or less pleased with the result. The planned painting scheme including double layer chipping and masking for markings and stencils all went well. The build itself was a no brainer, with the Tamiya quality and was more a time consuming obstacle to get to the painting stage. I have to raise my hat to the Tamiya engineers. This is maybe the best kit, ever made in plastic, being complex and full of innovative design ideas. The level of detail you get out of the box is impressive, except maybe for the rubber wheels. The non painted pilot next to the Corsair is a symbol for the ambivalent ending this build took and that's why he's there. Maybe I paint him later, but first I have to clean my workbench and get some distance. Cheers Rob
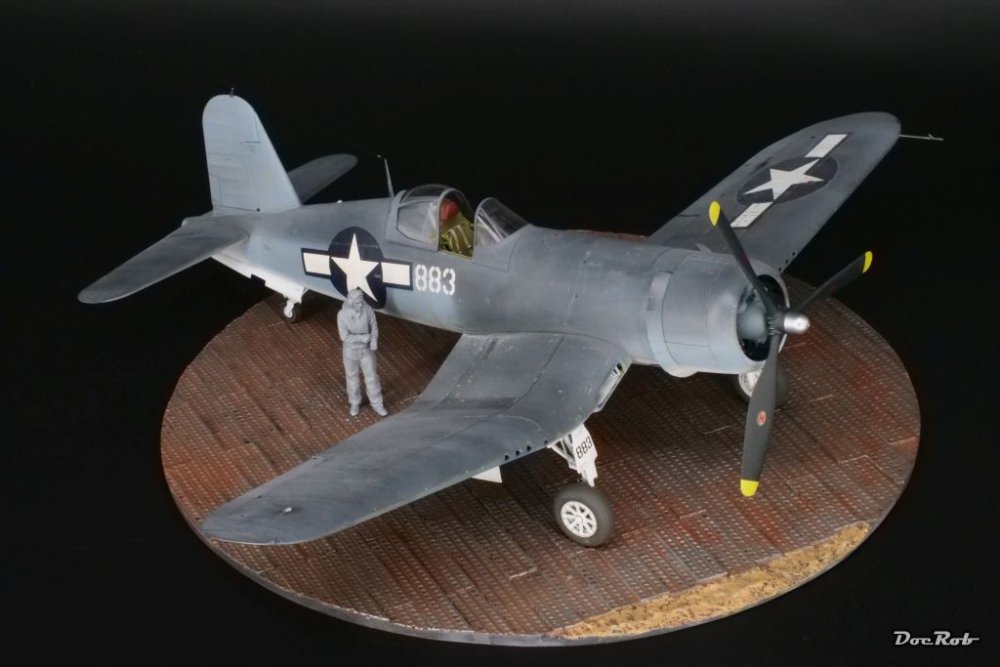


-
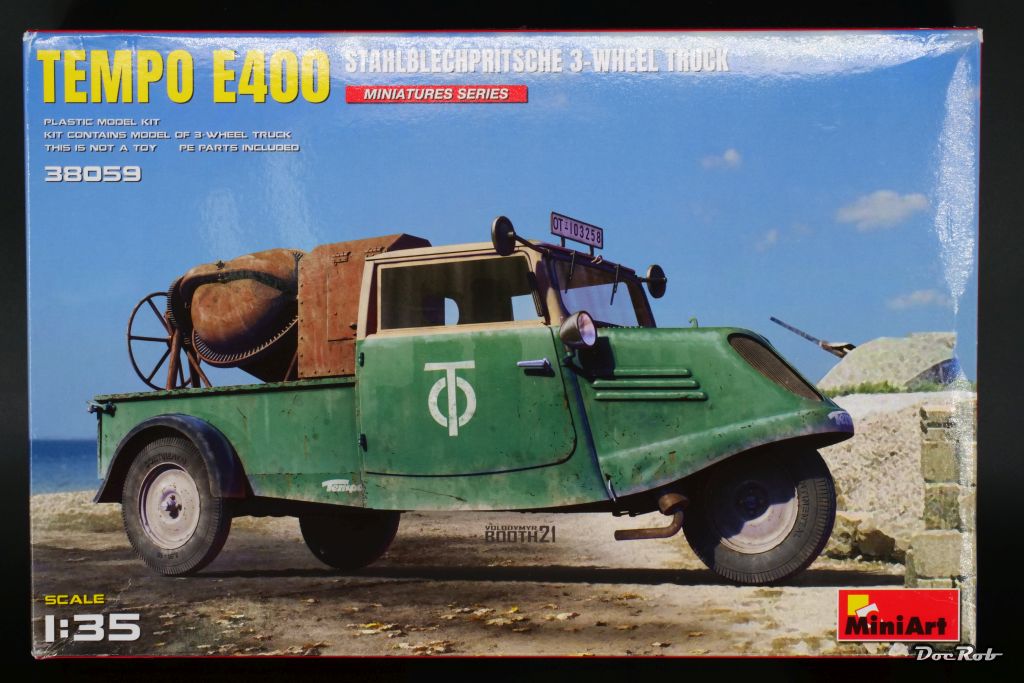
My last purchase of 2022 is a precious tiny jewel, despite being large scale. When I was a kid in West Berlin, there were still some of these quirky vehicles around, polluting the air with their two stroke engines, often used by coal dealers. I have a soft spot for unusual designs, and I couldn't let this one pass. Cheers Rob

-
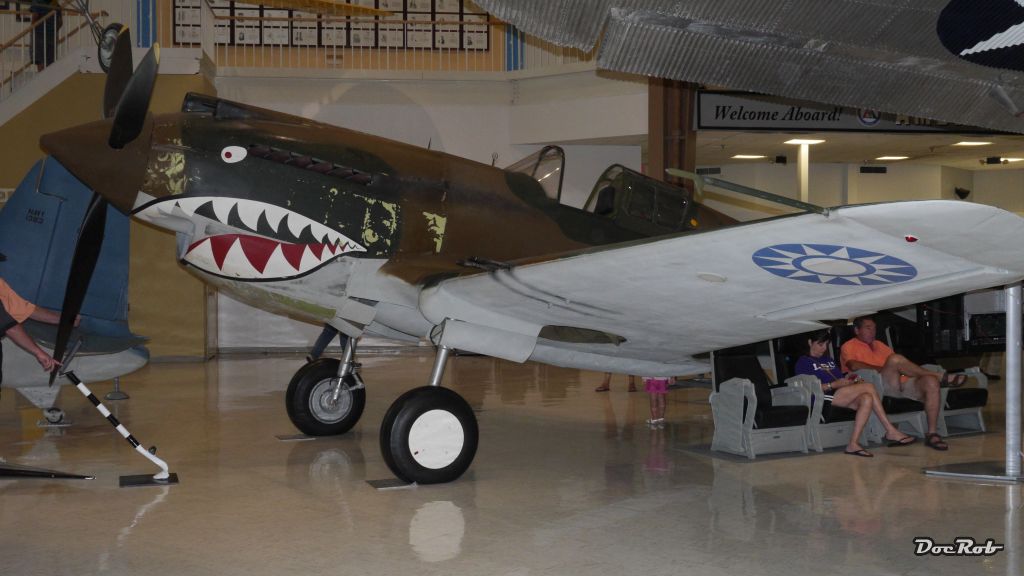
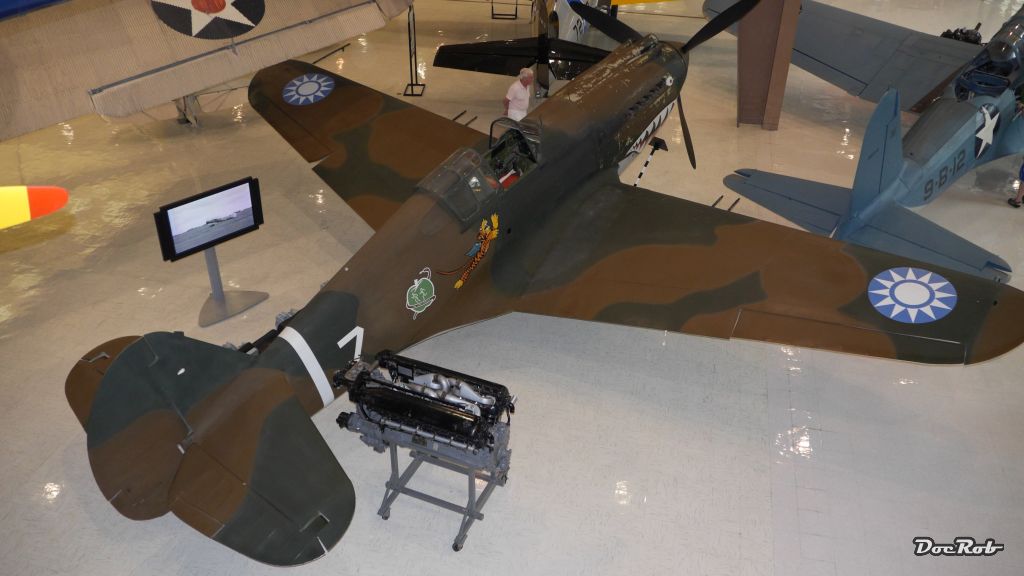
GWH Curtiss P-40B; The Flying Tigers
DocRob replied to Peterpools's topic in LSM 1/35 and Larger Work In Progress
Awesome result with the decaling on your P-40 comes to life. I'm glad to hear, that the quality of the decals is decent, but like Gary, I'm wondering about the light shade of the upper markings. I use the Tamiya LP clear as well and it also works great for me as I can't seem to handle Mr. Color GX 100 on a constant base. I'm a little disappointed with the Tamiya LP flat clear, which is not flat at all, maybe semi matte. Concerning the insignia decals, I went through my Pensacola and found some shots from above as well, as some of the underside of the wings. Some were made with and some without flash. Hard to tell, if there is a difference and yes, it's a restored bird. Cheers Rob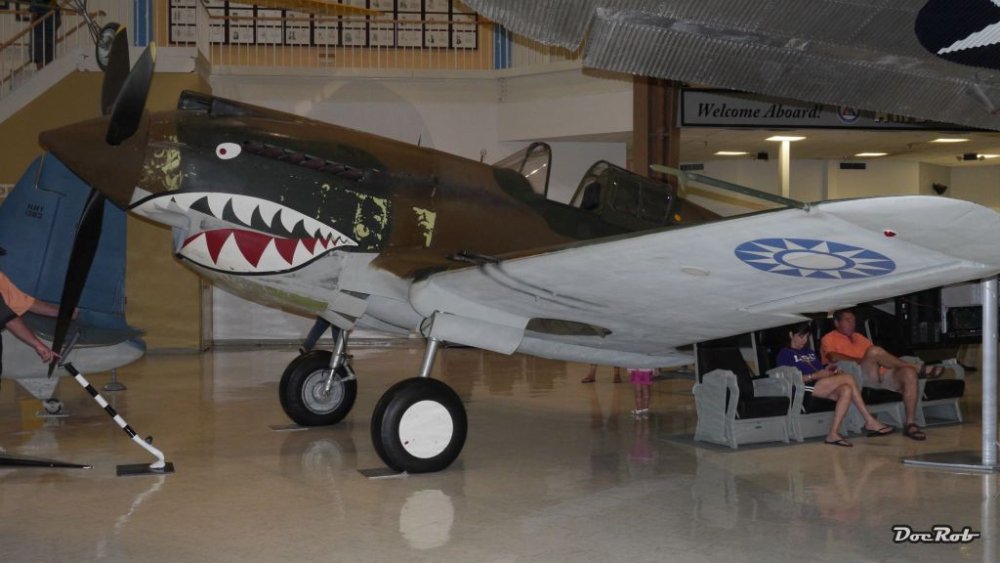


-
As the others mentioned, paintjob looks spot on, but the top wow goes to the flaps, absolutely the signature parts of the Helldiver and the extra detailing helps a lot. I have a SH 1/72 Helldiver with more PE for it than plastic, I am frightened of that build . Cheers Rob
-
Not so easy to call a specialist on my tiny island. You have to learn how to fix things yourself. Of course ,there are some helpful friends around and some professionals, but in the end, it helps to find your own solutions fast and reliable. Good to hear, that your issues were soled before Christmas holidays Peter. Cheers Rob
-
Thank you Bryan, I got the tip from others as well and it is really helpful with these fiddly belts. I never built them smaller than 32 scale and have no desire to do so . Cheers Rob
-
Thank you Gentlemen, I hope, I can finish the Corsair in the next days and start a new project, maybe the 'all wet GB'. Cheers Rob
-
Thank you Peter, I don't like bad surprises close to finishing a build, but plumbing surprises, I detest even more. There definitely is a hole in a tube, as the clock is running with no consumption at all. I could exclude the houses, but one of the houses is connected through the garden water circuit, which was the affected one and I had to cut the whole circuit. The garden is huge and has about twenty water taps. I used a stethoscope on each and found an are with higher noise levels. I dug out the closest of these to the house and cut the tube behind it and sealed the end. Now we have water in the houses and in 80% of the garden, better than nothing. Later, I will try to detect the tubes and substitute the part with the leak, hopefully. In the moment we have a storm as well accompanied by heavy rain, so this will be a subject for the next year, I guess. Cheers Rob
-
Your paintjob is looking great Sasha, uniform but not boring, so hard to achieve with monochrome schemes and the decals bring everything to life. Cheers Rob
-
Nice pit John, these Quinta sets are amazing. You already decided to not use the HGW transfers, but here are my . The process is well documented with Garys description, except, I would press them on properly with a piece of damp kitchen paper after removing the carrier film. Like Gary mentioned, they are hit and miss, I used them on several occasions and never all of them went on properly. Sometimes, there are lifts by the carrier film, even when the surface is prepared properly. For stencils, it mostly works, but I have my doubts with larger ones like the stars and bars. If you like a worn finish, you have immediate chipping with these , but for a newish looking plane . Cheers Rob
-
Nice haul Carl, have you used the Mr. Color GX 100 clear coat before? I tried it four times and it worked only once satisfactory. The other times it frosted like cotton candy and gooed in the airbrush. I thinned it with Mr. Leveling thinner on all occasions. I went to the Tamiya LP clear last time out of sheer desperation. Cheers Rob
-
Merry Christmas to all my friends and fellows here on LSM. Stay warm and safe and enjoy some good food and beverages with friends and family. Cheers Rob
-
Nice printing job, you could also try metal waxes from AK, sometimes they look even better than sprayed on color. Cheers Rob
-
We are a bit luckier, if you don't insist on a white Christmas, it's about 20 degrees Celsius and sunny and no wind at all since a week. Even the ocean is calm, but there will be rain on sunday. Keep yourself warm with a hot toddy and with your wives and family. Cheers Rob
-
GWH Curtiss P-40B; The Flying Tigers
DocRob replied to Peterpools's topic in LSM 1/35 and Larger Work In Progress
Some of the color borders look masked Peter, how could you spray them that well? Maybe I haven't understood your process. the sharp lined borders look final, on others, I still see some primer, right? Anyway, the P-40 will look great with the iconic paintjob. Cheers Rob -
1:32nd scale Nieuport XVII (17) C.1
DocRob replied to sandbagger's topic in LSM 1/35 and Larger Work In Progress
Again great work Mike. Like Hubert, I like the clear linen over silver color effect a lot. I will keep that in mind, for when time comes. Cheers Rob -
Thank you Harv and Peter, I think the worst was peeling off the gooed blue tack for more than two hours with some tiny residues still sitting in the crevices. Never again, I will mix blue tack with lacquers, other than superficial and only for short term coverings. I had some water related house issues too, the last days, but got them solved with the help of a stethoscope and a metal searching device and plumber stuff. Christmas time without having water in our second house wouldn't have been an option, so I had some 1/1 scale re-modeling . I wish you luck with your painting stage looming. This masking-lacquer issue is still nagging, but luckily was resolvable. Cheers Rob
-
Not a real fan Carl, I like the graphics, his style of painting, the stories, hmm, not so much, but I do own some of his books. Cheers Rob
-
You are as resourceful as Martin, with a slight bias tough, Gary . Cheers Rob
- 2,036 replies
-
- 5
-

-

-
- car related stuff
- anything about cars
- (and 6 more)
-
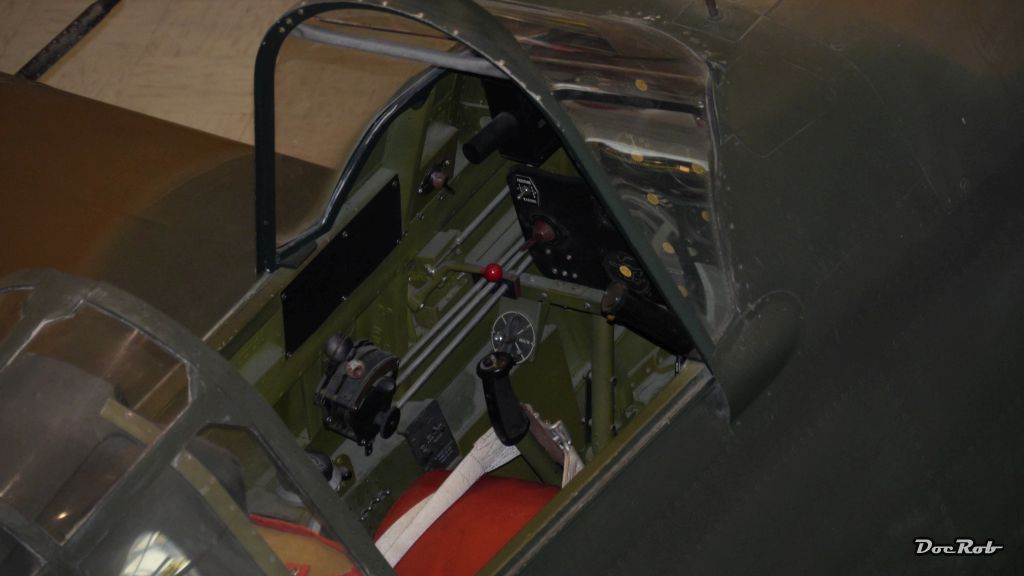
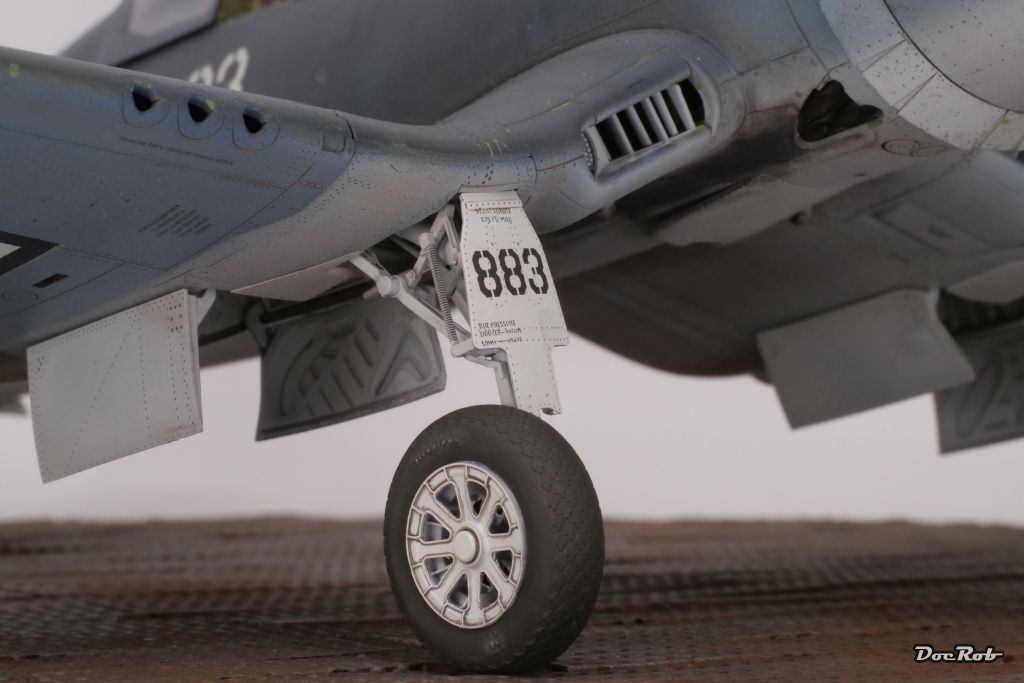
After a lot of swearing, cleaning up the gooey mess into which the blue tack turned, which I used for masking the cooling fairings, I finally finished with these issues and did something more productive. I added the landing gear, a trouble free affair and the landing gear doors, which still need a bit of weathering to fit in. Then I cleaned the clear parts and refitted them, luckily without any issues. ...and now it starts to look like a Corsair, but still a lot of things to do. Cheers Rob


-
It is Peter, but with the good results I had using lacquer paints, I'm not willing to give up easily. I will test a bit around with Pledge coatings and maybe, I will have some more ideas. Cheers Rob
-
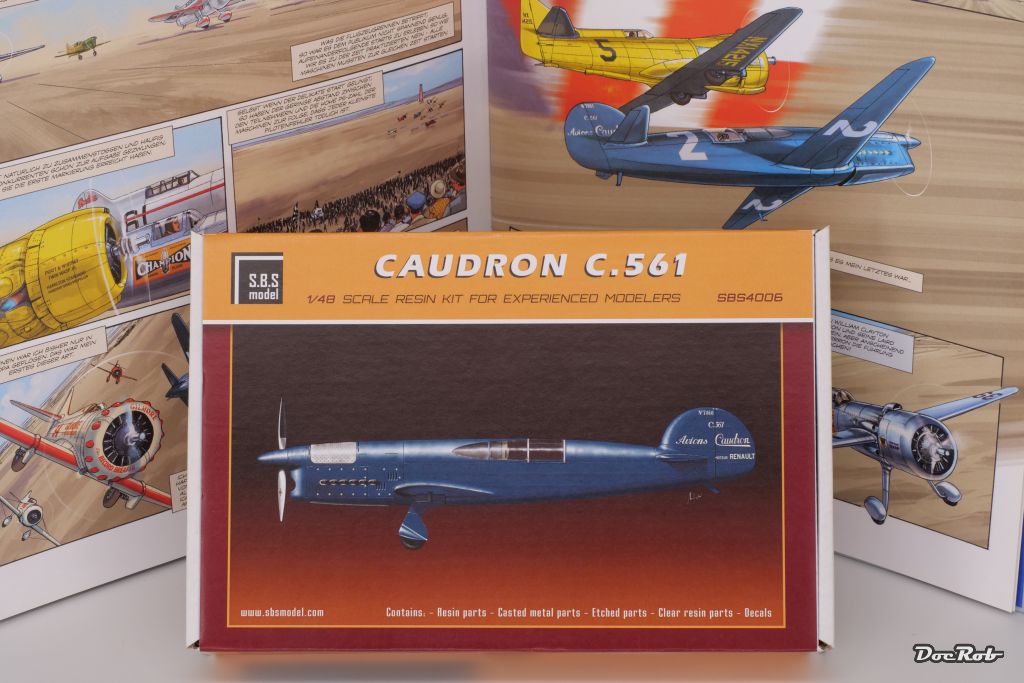
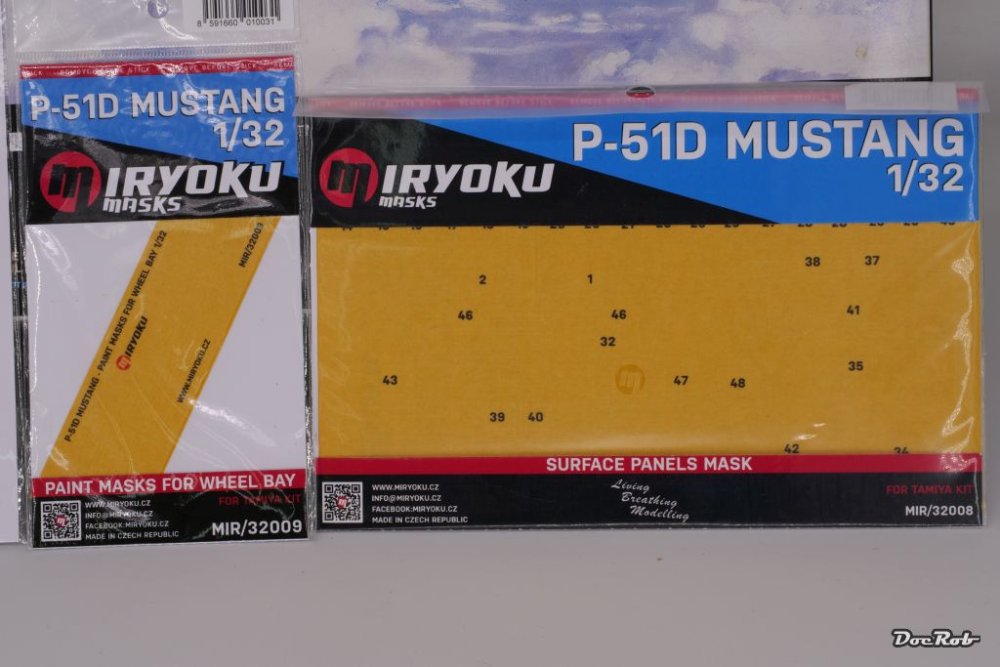
After one and a half month in the mail and through customs, I finally received my first full resin plane kit, a racer. The kit is a beauty, the resin cast looks extremely well made. You get brass cast wheel struts and the wheel fairings are made of PE, which has to be bend with supplied resin templates. This is one of my favorite race planes and I was really amazed to see, that S.B.S. model produces it in 1/72 and 1/48. As it took so long to get here, it's my modeling Christmas present. In the same parcel were some masks for my Tamiya P-51D, which I want to try for my planned NMF build. Surface panel masks and masks for the wheel wells. Cheers Rob

-
Thank you amigos, I still have to re glue the clear parts in place, without destroying the paintjob. To pry off the clear parts for cleaning and polishing was very difficult, as I like my glued parts to stay in place, normally. The main canopy was airbrushed off the plane and it was affected a lot, Phil. Cheers Rob
-
Hey Gary, I have a Jeep too. Cheers Rob
- 2,036 replies
-
- 5
-
-
-
- car related stuff
- anything about cars
- (and 6 more)
-
What is on your bench right now ? Share a picture :)
DocRob replied to Martinnfb's topic in Modelling Discussion
Nice little birdy, Kevin, I always wanted to do an orange Japanese plane. What's the orange color you used? Cheers Rob