HubertB
-
Posts
2,990 -
Joined
-
Last visited
Content Type
Profiles
Forums
Events
Gallery
Everything posted by HubertB
-
Zimi just bought the molds off, and are progressively releasing the line … Although not released the first, the P-39 was KH’s first kit design and it shows, in many areas … The first released, the T-6, had a few issues of its own as well, although not all of them as visible as the P-39. Things got better as they expanded the range. Although not outstanding, many later releases were good, like the T-28, the Kingfisher, the F5-E, the OV-10 or the Mirage 2000 … Hubert
-

Cobra Coupe - Le Mans - Model Factory Hiro 1/12
HubertB replied to DocRob's topic in LSM 1/35 and Larger Work In Progress
To be fair, even though GBs are labelled as « LSM competitions », I never took them as anything more than an opportunity to model with my buddies along a theme, a bit like an extended club meeting … And there was no promise of any gain in the last two GBs, but the finalisation of the previous two ones never took place either … From hearsay (because I am not - and will never be - on FB), it seems our friend Ernie is very busy on FB, but not for modelling issues … So be it … Everyone is entitled his « days off » from LSM, and there is no reason why we should expect anything else from our moderators … Hubert -
What is on your bench right now ? Share a picture :)
HubertB replied to Martinnfb's topic in Modelling Discussion
Hubert
-
Cobra Coupe - Le Mans - Model Factory Hiro 1/12
HubertB replied to DocRob's topic in LSM 1/35 and Larger Work In Progress
I love your progress, Rob, even with the hiccups, which I’m sure you’ll overcome. The kit is challenging, but most likely, given MFH’s reputation, it has been designed to be doable … After my own hiccup with my compressor blowing a connecting hose, I have resumed the painting of my Cutlass. I have chosen a NMF finish of VA-83, with a blue and white chevron on the fuselage, and blue wing tips and fins’ leading edges. It is a lot of masking, and re-masking, so nothing secret, but nothing spectacular to show, yet … Soon, though … Hubert -
Another P-40E to P-40K build!
HubertB replied to ScottsGT's topic in LSM 1/35 and Larger Work In Progress
🌭 Hubert -
What is on your bench right now ? Share a picture :)
HubertB replied to Martinnfb's topic in Modelling Discussion
Yes. The famous parallax has hit again … 😂 Hubert -
What is on your bench right now ? Share a picture :)
HubertB replied to Martinnfb's topic in Modelling Discussion
Are you sure about the angle of the landing gear, Carl ? I thought it was more slanted forward … Hubert -
1/32 Curtiss SC-1 Seahawk
HubertB replied to BlrwestSiR's topic in LSM 1/35 and Larger Work In Progress
Yep, looks like it 👍 Hubert -
1/32 Curtiss SC-1 Seahawk
HubertB replied to BlrwestSiR's topic in LSM 1/35 and Larger Work In Progress
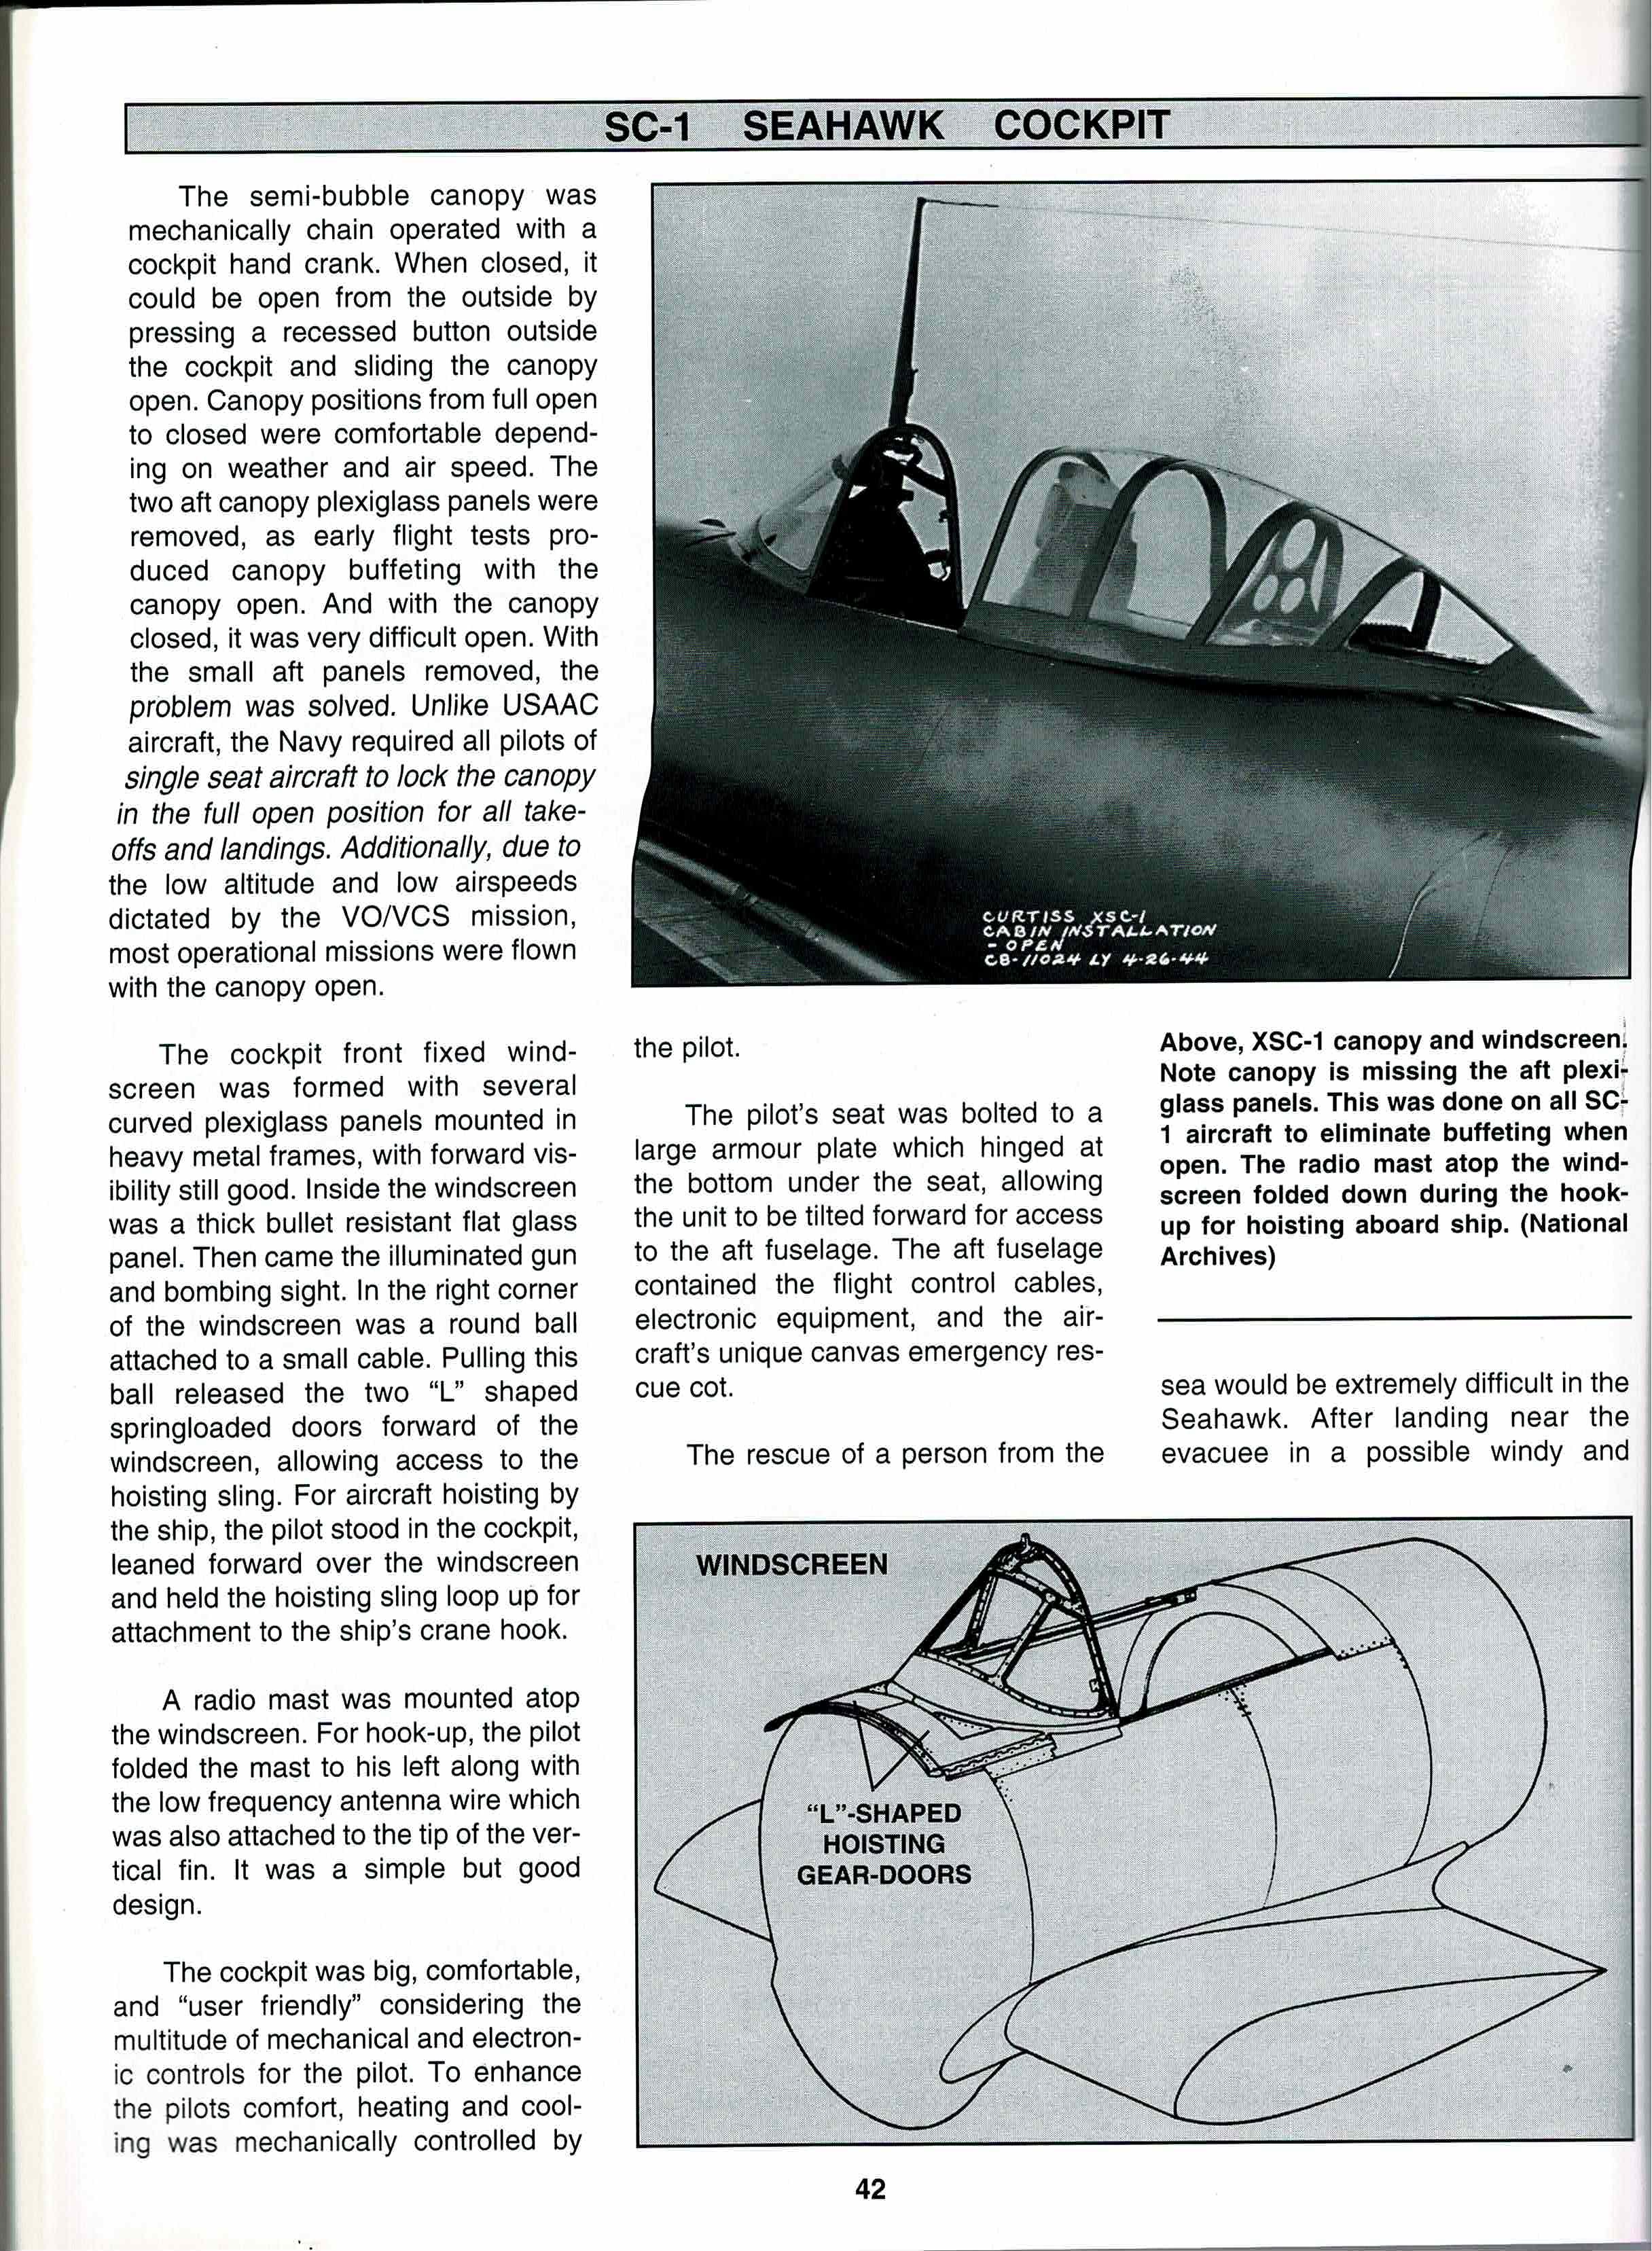
Ok. I did some fact-checking followed by some forensic introspection. To summarize : regarding what seems like a fabric cover of the removed perspex panes of the canopy, I WAS WRONG, and what I stated pure BS. This is an interesting illustration of the frailty of human testimonies. When skimming though the pages of the Naval Fighters book I saw two pages headlined « Curtiss SC-1 Seahawk prototype ». Then, the next page, pics of a Seahawk with the cover on the canopy. I just needed a brain fart to connect the two in my memory and assume it was also pics of the prototype, not repeated elsewhere. When in fact they were headlined as pics of the landplane version (of a production aircraft). Sorry for the wrong statement I proferred. Then I managed to find a pic of a postwar lineup of Seahawks, some with the said « cover ». Which proves it was not unique. As for what this cover was, I could not find specific comments, but I would tend to line up with the hypothesis of Martin and Carl, that it was a protective cover, probably only when the aircraft as on the ground. As for your pics, Martin, sorry, I am probably dumb - this has just been proven 😂 - but I cannot see the canvas you are referring to, at least in so far I am expecting a dark-colored one. Can you enlighten me more ? Hubert -
1/32 Curtiss SC-1 Seahawk
HubertB replied to BlrwestSiR's topic in LSM 1/35 and Larger Work In Progress
You may be right, Martin, and me wrong. I have not reread the book in full, just skimmed through it yesterday looking for the references on the canopy, and stumbled on the pics you had posted. I may have misinterpreted the caption. Lemme check again, just for the sake of accuracy. Hubert -
1/32 Curtiss SC-1 Seahawk
HubertB replied to BlrwestSiR's topic in LSM 1/35 and Larger Work In Progress
According to photos on the Naval Fighters book, this seems like a one-off trial on a pre-series aircraft, Carl. Hubert -
1/32 Curtiss SC-1 Seahawk
HubertB replied to BlrwestSiR's topic in LSM 1/35 and Larger Work In Progress
Granted I should have done that earlier. Sorry. But then, it would have been like a tennis match with just aces. So much more boooooooooring 🥱 than a lively exchange 😉 Hubert -
1/32 Curtiss SC-1 Seahawk
HubertB replied to BlrwestSiR's topic in LSM 1/35 and Larger Work In Progress
And also repeated in the text left of the captioned picture … Call me Dr Watson, Rob 😂 Hubert -
1/32 Curtiss SC-1 Seahawk
HubertB replied to BlrwestSiR's topic in LSM 1/35 and Larger Work In Progress
Hubert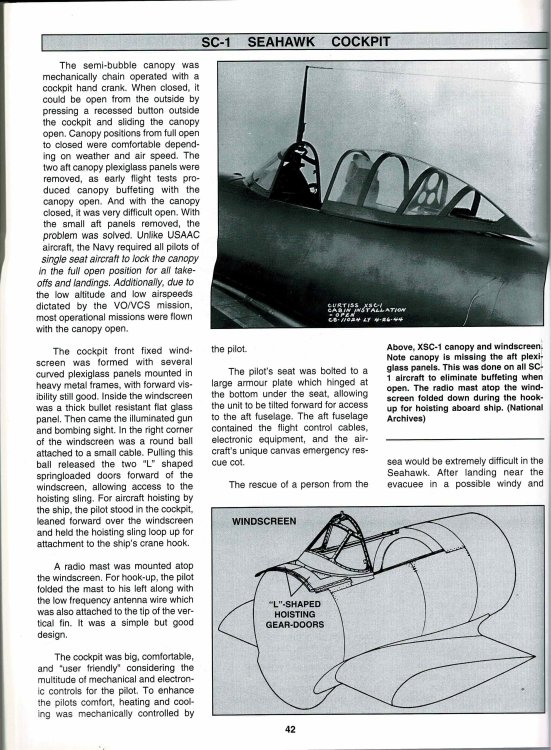
-
1/32 Curtiss SC-1 Seahawk
HubertB replied to BlrwestSiR's topic in LSM 1/35 and Larger Work In Progress
Martin, You know me enough now to know when I make conjectures - which I then state as such - or when I relay information and knowledge gained from others’ expertise. And when I do not know about a subject, I just either say so, or just simply shut up. I’ll post the relevant scan of the « Naval Fighters » book when I have more time. Hubert -
1/32 Curtiss SC-1 Seahawk
HubertB replied to BlrwestSiR's topic in LSM 1/35 and Larger Work In Progress
Martin, it was standard, and approved, and even recommended, by the Navy, practice to take off with the canopy open. Just, besides the « old » tradition of flying open cockpit biplanes - which endured for some time -, because pilots wanted to be able to escape quickly an aircraft that had missed its take-off - or experienced a power failure in this critical moment - and chosen to play watercraft rather than aircraft. And they did not trust that much the capacity of a latched canopy to be jettisoned easily in case of an inadvertent ditching. The practice endured until the early jets; the last being able to fly with an open canopy was the F9F-8T, the famous Twogar. At take-off and landing speeds of these propeller aircrafts, an open canopy did not create that extra drag. Just like the windscreen of a convertible protects its occupants from the relative wind. And without significant turbulences for close to one meter after the windscreen, or more when you add some special aerodynamic devices behind them, like « anti-turbulence nets ». I can testify having run a Porsche Boxster with an open top at 230 kph without any special buffeting (but with some significant noise ). The bubble canopy was only possible after the Brits found a way of forming thick perspex, and that was during WWII (around 1943 IIRC). Before that, you had to have a framed structure with panels, like on the SC-1, whereas the SC-2 could benefit from the technological advance. But the SC-2 canopy had a slightly different profile and plan view than the SC-1, simply because it was possible when the SC-2 was developed. Plus it was certainly « cleaner » from an aerodynamic standpoint than one with protruding frames and rivets. As for the SC-1 canopy, the issue, it was found, was some significant turbulences and buffeting, created by aerodynamic interactions. It was also found that removing the rear panels solved the issue, and this was an easy field implementation. Really, I insist, nothing to do with maintenance of the life-raft, which had, on the SC-1 as any other aircraft, to be extracted from its location for this operation. Hubert -
Average time in US Customs? UPDATE: PayPal is refunding.
HubertB replied to ScottsGT's topic in General Discussion
Sorry to read that. The Portuguese administration is generally efficient with good, fairly integrated, systems, but, unfortunately, when things go sideways, it’s nearly impossible to get any answer from them. I have had this happen more than once. It’s then about finding the right connections, which is completely the opposite of the integrated systems efficiency principle … Hubert -
1/32 Curtiss SC-1 Seahawk
HubertB replied to BlrwestSiR's topic in LSM 1/35 and Larger Work In Progress
I assure you that the rear canopy windows were removed for aerodynamic reasons, because of some vibrations and turbulences, Martin. Not to access the raft, when the canopy would have been jettisoned anyway if the raft was needed. Hubert -
1/32 Curtiss SC-1 Seahawk
HubertB replied to BlrwestSiR's topic in LSM 1/35 and Larger Work In Progress
You have two different compound surfaces, furthermore in an airstream influenced by the big propeller wash. My guess is that the junction of the canopy to fuselage was creating boundary layer turbulences, which were actually removed by the slight depression the missing windows was creating … Aerodynamics are sometimes strange, like when seemingly drag-inducing protuberances actually improve the airflow and reduce the drag … Hubert -
Beware that Peddinghaus’ decals accuracy is sometimes … dubious. For instance, I was at a time interested in their sheet for « YIPEE » the famous 5000th P-38. Then I saw the decal sheet, compared to the pic of the real one … and decided to pass, with no regrets. The « Yipee » name, so prominent, was not even close to the original on the decal sheet, using some VERY distant, standard, font … Hubert
-
1/32 Curtiss SC-1 Seahawk
HubertB replied to BlrwestSiR's topic in LSM 1/35 and Larger Work In Progress
The rear glazing of the canopy was removed to reduce aerodynamic turbulences. Simple and effective … and not a big issue at times when pilots were still used to keep canopies open. Hubert -
Average time in US Customs? UPDATE: PayPal is refunding.
HubertB replied to ScottsGT's topic in General Discussion
You actually should get a notification for clearing the parcel through Customs (although if you have not done anything by now, it’s probably been sent back to the sender). What you need to do, if you received the said notification : 1) go to the CTT.pt website (there is an english version of the site) 2) choose « receber / desalfandegar » 3) this is where you need a) the tracking number of the parcel you want to clear through Customs b) to have created (or create) an account with CTT, with your particulars, including the Portuguese NIF number 4) go through the Customs’ clearance process (mostly filling forms that specify whether it’s a gift or commercial transaction, the nature of the goods, the sender’s particulars, the good statistic code in the European nomenclature - there are links to sites which will help you find them, the value of the good. etc. ) 5) at the end of the process, you will be told how much to pay in tariffs and handling fees. You can pay in multiple ways, the easiest and fastest ones being MBWay or Multibanco payment. Once you went through this, after between a few hours and two days (that depends on how you paid - for me using MBWay, it’s hours - ), you will get an email telling you the parcel has been cleared through Customs. It takes another week to physically receive it. You normally receive a Registered letter from CTT telling you you have a parcel waiting for clearance - with its tracking number - or a SMS, if you gave the sender your phone number and it is a Portuguese one. If you did not get one (and it happened to me for an amazon.com parcel coming from the US a few years ago), then it either was sent back to the sender after some time (assuming the proper box was ticked by him) or .. you’re screwed, unfortunately The process seems daunting at first, and the first time can be frustrating, but the learning curve is a short one. Once you get the knack of it, it’s fairly easy. Having done it many times, it’s now a breeze for me. HTH Hubert -
Another P-40E to P-40K build!
HubertB replied to ScottsGT's topic in LSM 1/35 and Larger Work In Progress
My experience with Tamiya white putty is that it dissolves the primer and results in a gooey mess. But maybe it is juts operator’s error. Hubert -
Cobra Coupe - Le Mans - Model Factory Hiro 1/12
HubertB replied to DocRob's topic in LSM 1/35 and Larger Work In Progress
Bummer ! You’ve gone too far to bin it now, Rob. I’d try to lightly sand away the dots (maybe with a fiberglass pen), then, if they are gone away, go for a polishing round … Hubert -
1/32 Westland Whirlwind
HubertB replied to JeroenPeters's topic in LSM 1/35 and Larger Work In Progress
Brilliant … Hubert