


DocRob
-
Posts
7,127 -
Joined
-
Last visited
Content Type
Profiles
Forums
Events
Gallery
Everything posted by DocRob
-
Do you remember the hairspray? I covered the chipped primer with a coat of clear and applied hairspray onto it, before I airbrushed the wing color, walkways, insignia and stencils. Now was the exiting moment to see, if it still works after so many layers of paint. I dampened the areas with water and a drop of soap and let it soak for half an hour. The paint was a bit more resistant, than the primer chipping, but it worked. Using different tools, like toothpicks, a stiff brushes and some tweezers, I got what I wanted. Now the whole plane was covered with a clear coat as preparation for further weathering. Cheers Rob

-
Thank you guys, stenciling with masks is a lot of work, but as you mentioned, rewarding and free of the typical decal issues. If you thin the color properly and spray thin layers, to prevent bleeding, after pushing on the masks, you will have decent results. Placement needs some patience. On most of the stencils I used my odd eyeballs for placement. It helps to keep some distance to the plane, to see the alignment better. Where placement proved difficult, I used some tape as reference. Cheers Rob
-

GWH Curtiss P-40B; The Flying Tigers
DocRob replied to Peterpools's topic in LSM 1/35 and Larger Work In Progress
The P-40 looks 'dirty' for your usual extremely clean work Peter. That's no critique, only a sign, how hard you had to fight against the fit issues. Luckily the problematic area got solved and I can hear from your reporting, you are still really in it. It looks more and more like the original and the hard work is seemingly close to an end and than the fun begins . Cheers Rob -
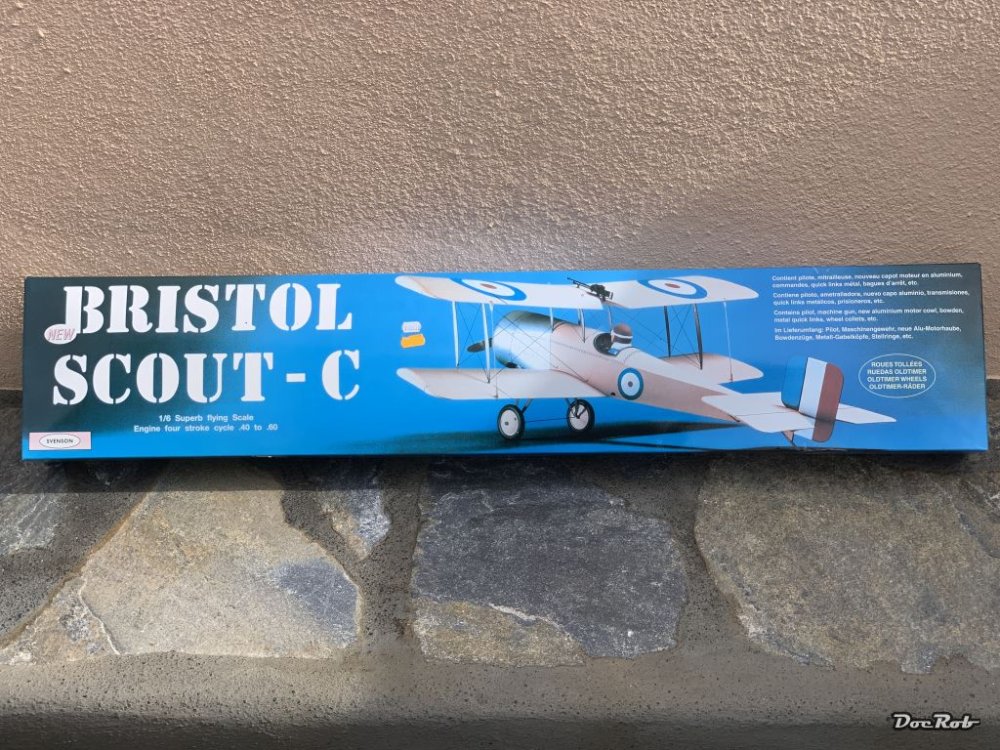
... and now to something completely different, but firs a short story. Two years ago, I entered a toy shop on my little island, I guess the only one in the search for kits and stuff. I found a miniature section of plastic kits there, Airfix starter kits, some obscure Chinese Jets from trumpeter, in all maybe ten kits. When I left the shop, I saw some more wooden model planes in the corner of my eye but took no further notice. Today I reentered the shop and found the plastic model section even smaller . Interesting to see, that the models changed, there had been buyers . When I inspected the wooden kits, I found two Occre ship kits and some plane kits , mainly gliders and a few RC-planes. To my further astonishment, the owner showed me some tools, glues, even an airbrush and a little stock of wood and RC-equipment. On top of the planes stood one large box from the modelling company Svenson. I think the company is now defunct, after some production in Belgium. My interest arose, a huge biplane, A Bristol Scout in 1/6 scale, man that's LS. I checked the box and there were lots of pre- cut balsa and plywood, aluminum cowlings, a vac formed pilot figure, steel rod struts for the wheels and wings, relatively detailed plastic hubs with rubber tyres and a lot more. This thing is huge, the wingspan is 125 cm and it's prepared for RC. Somehow, I felt in love with the kit and the owner made a good price and I left the store with a huge smile on my face. I have not decided, If it will be a decorative model, or if I build the Scout to fly, lets see. Sidenote: I have always complained not to have a LHS near me. Now I have one, yeah, with only a tiny bit of stock, but better than none .

-
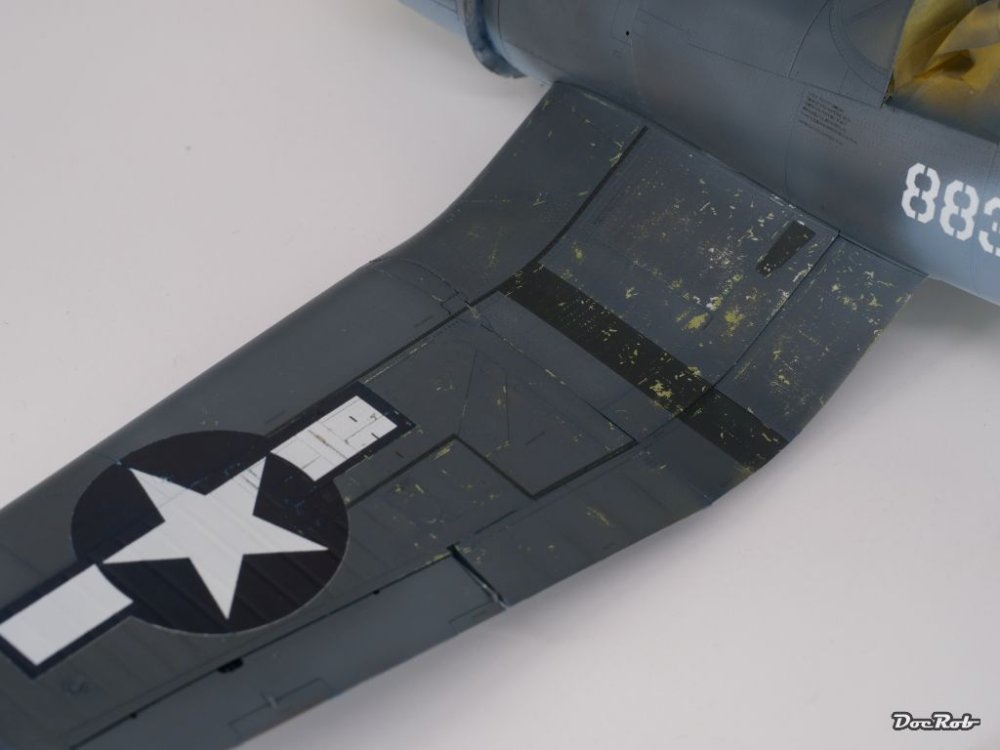
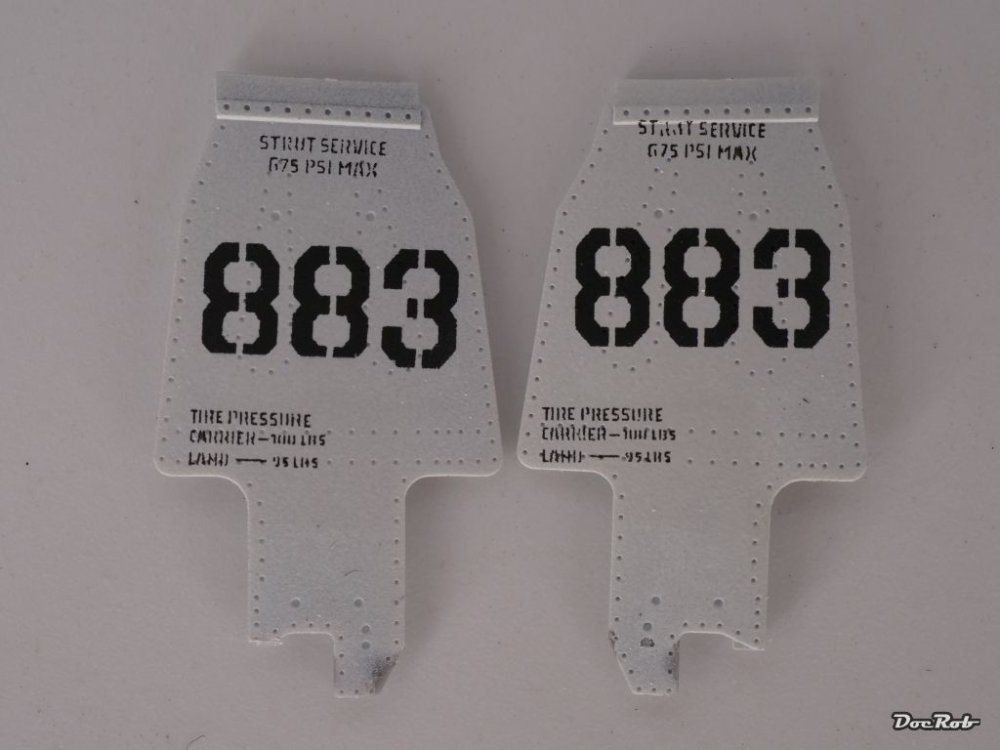
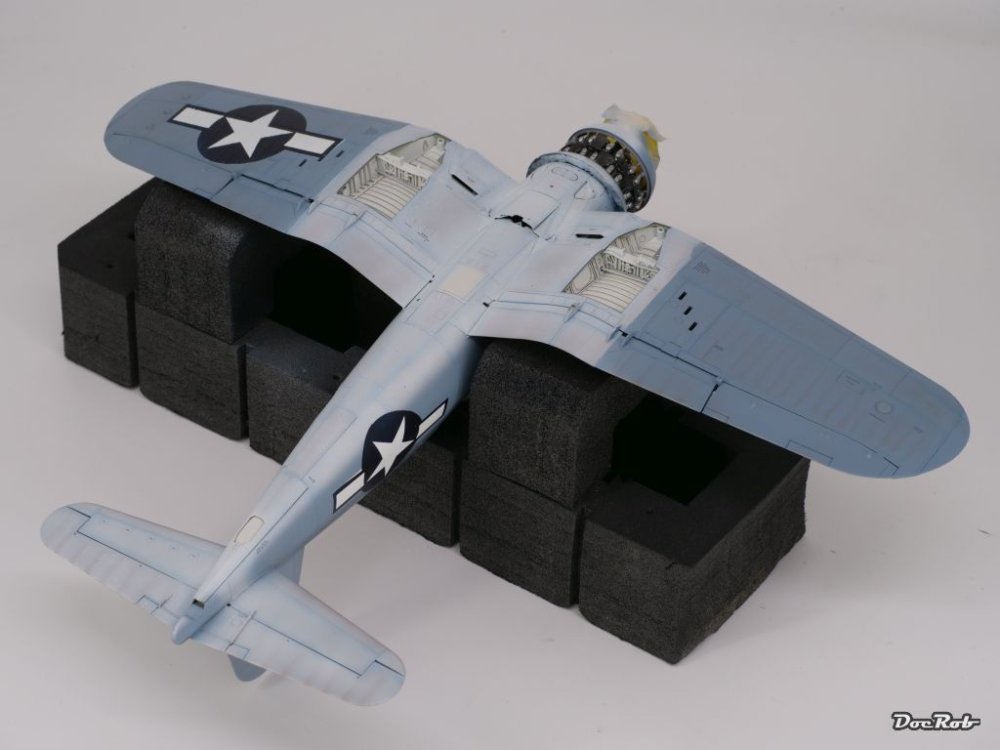
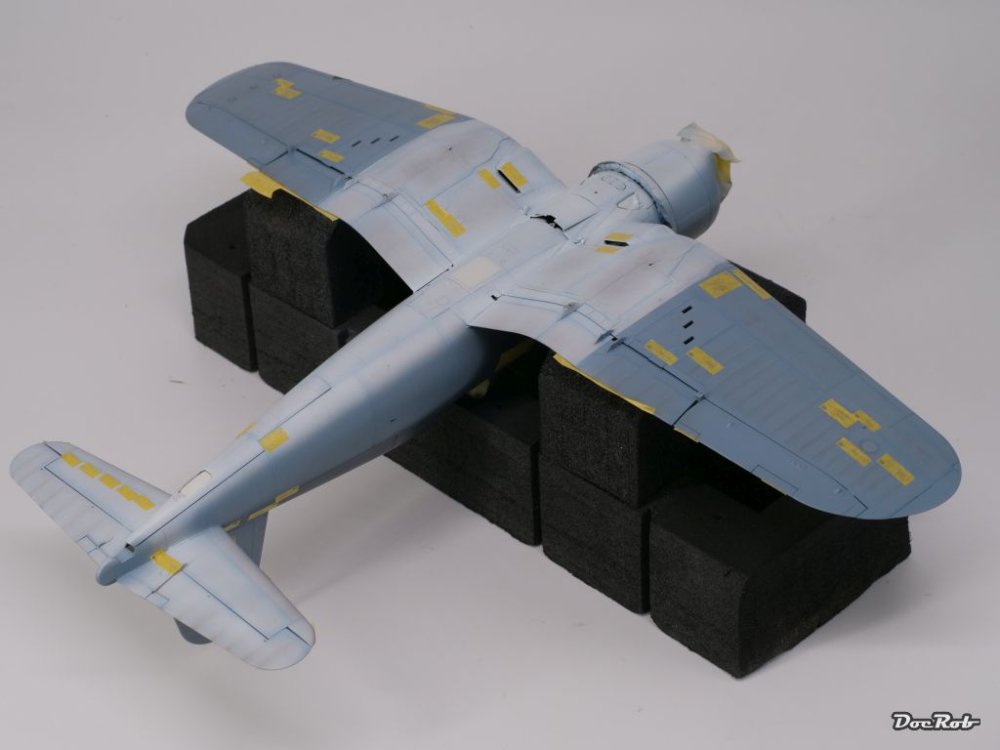
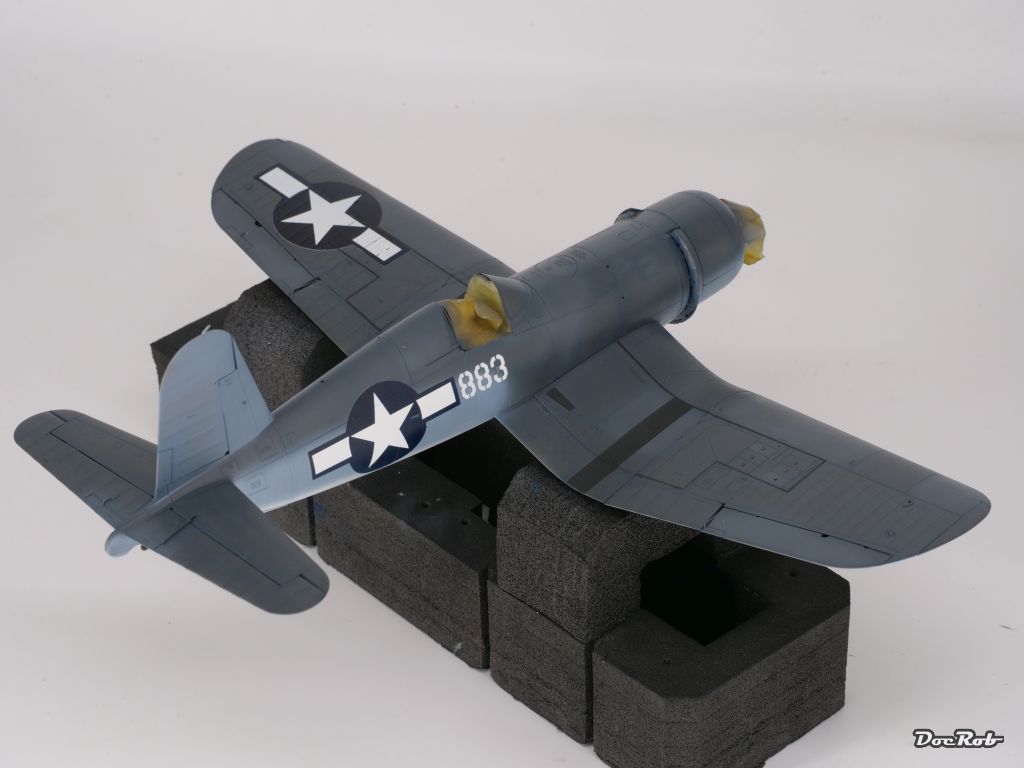
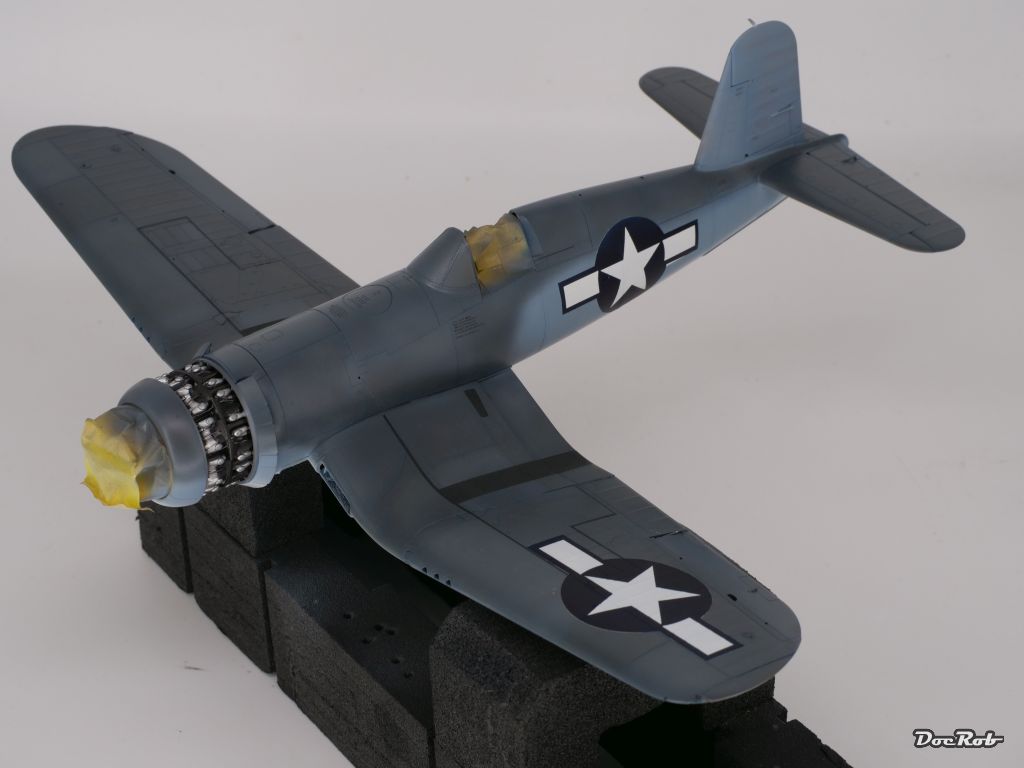
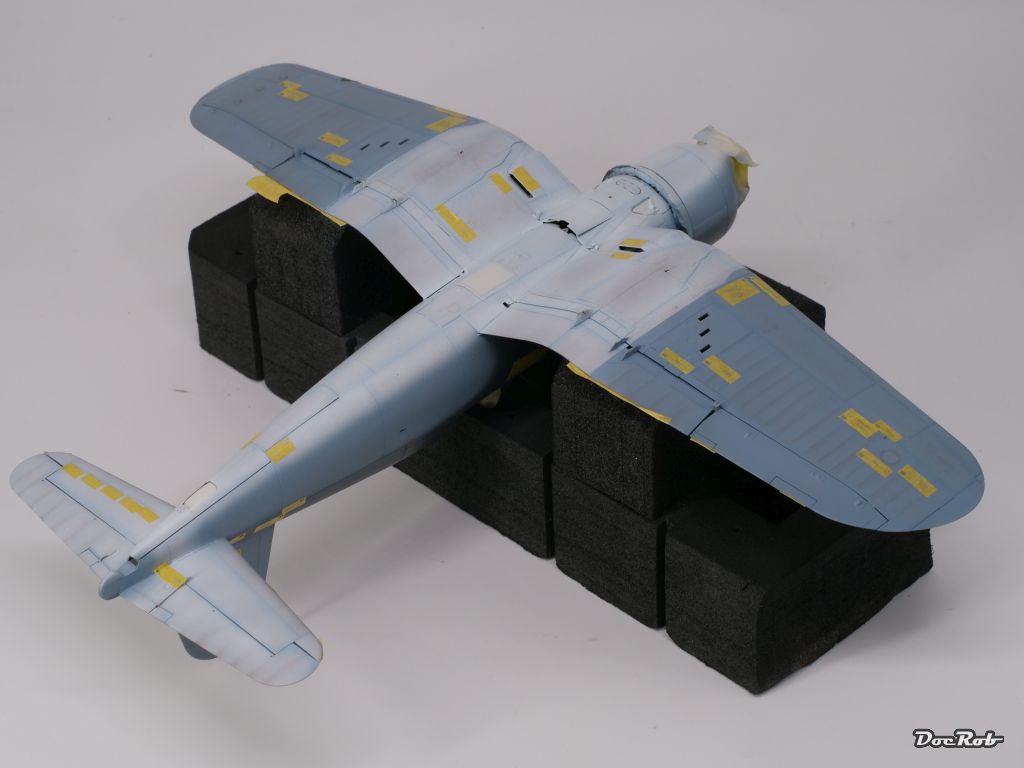
Yesterday, I finished to apply all the stencils on the wings, that were covered by other masks before. ...and while having the Nato black in the airbrush, I added the stencils on the wheel covers. ... and then I realised, my god, I had completely forgotten to apply the 883's to the side of the fuselage. No big deal, except for covering the whole plane again, with different materials, in case of some white color bubbling somewhere unwanted. I also made the corrections to the stars and bars, while being on it. I think, the airbrushing phase is done so far, except for clear coats. Cheers Rob

-
Thank you John, it's a great compliment to hear it from his Corsairness himself . The kit is of so great quality, that you can fully concentrate on painting and weathering. Cheers Rob
-
How true, the first insignia, I tried to get the star aligned properly into the outline mask and gave up after a while and used the tape method, as I never have gotten it on along the bars mask. It's only fractions of a millimeter, but with parallel lines or stars inside circles, you see every fault.. I will buy some of this transfer film for future projects. I had a roll back in Berlin, where I started to airbrush on paper and made my own masks out of it. Cheers Rob
-
Thank you friend, the stencils look like the scale rendition of the real thing, easily, because they are . The path is challenging, but the results speak for themselves. I would have wished for a bit better, error free application of the strs and bars. I sealed them under a coat of flat in the morning, to make the corrections. This was all my fault in not taking the manual too serious about mask placement. Cheers Rob
-
Zoukei Moura Bf 109G-14
DocRob replied to GazzaS's topic in LSM 1/32 and Larger Aircraft Ready for Inspection
Proof provided, Gary, this kit is buildable and you have done wonders with the painting and finishing. There are not so many builds, where you have the 'everything clicks' feeling. Painting and riveting blend perfectly, as do the figures. The recliner will be your signature item soon . Cheers Rob -
GWH Curtiss P-40B; The Flying Tigers
DocRob replied to Peterpools's topic in LSM 1/35 and Larger Work In Progress
Nice progress Peter, and yes, the cowling to fuselage fit seems to be a complicated area. It's a bit pronounced now with the primer and filler, but I wonder if this will smooth out in the end. This to me is a defining point of the airframe and therefore crucial. I hope, you can master that area. I like the extra detail, where have you got fuel line fairings. You can show these in a maintenance dio. A hundred times better and more usable, than ZM's single pistons . Cheers Rob -
It's a good thing to reach a feelgood point in a demanding build, helps amping up the motivation. In a way, I like what you said about builders vs. assemblers. I'm both, sometimes I feel a deep satisfaction with grinding through sub-par plastic, finding solutions, and sometimes it's about assembling fast and easy, because the goal of the build is to achieve something new or special painting- or weathering wise. The big thing starts to look Helldiver poco a poco, but I'm with you, detesting bomb racks and the build of these explosive things with it's boring redundance. Fit of the glass looks great with the resin parts, what had HPH in mind, designing the IP ones, when having the others already made, mayor f***-up, I'd say. One more question if I'm allowed, is the 'we' in your log something to do with me, myself and I? Cheers Rob
-
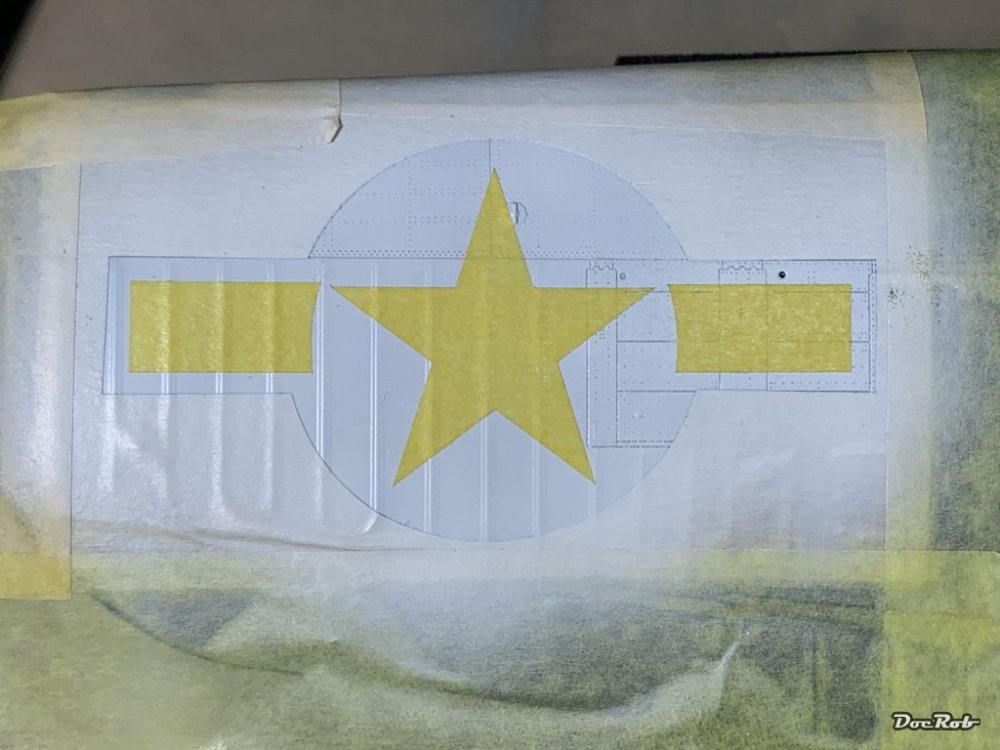
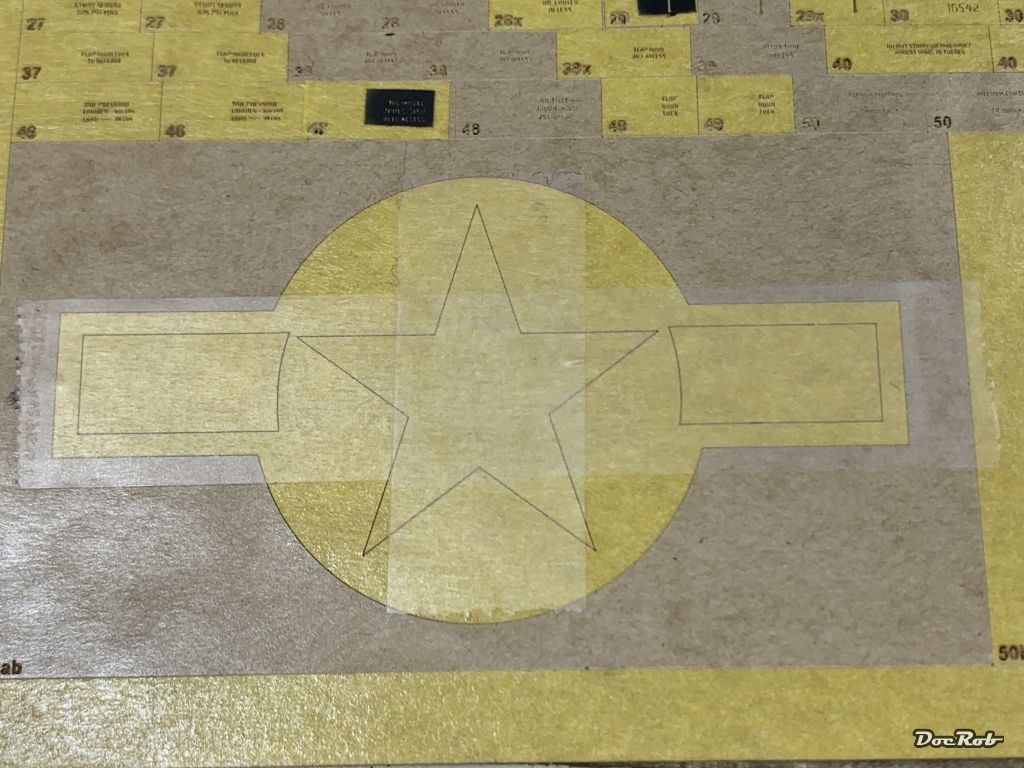
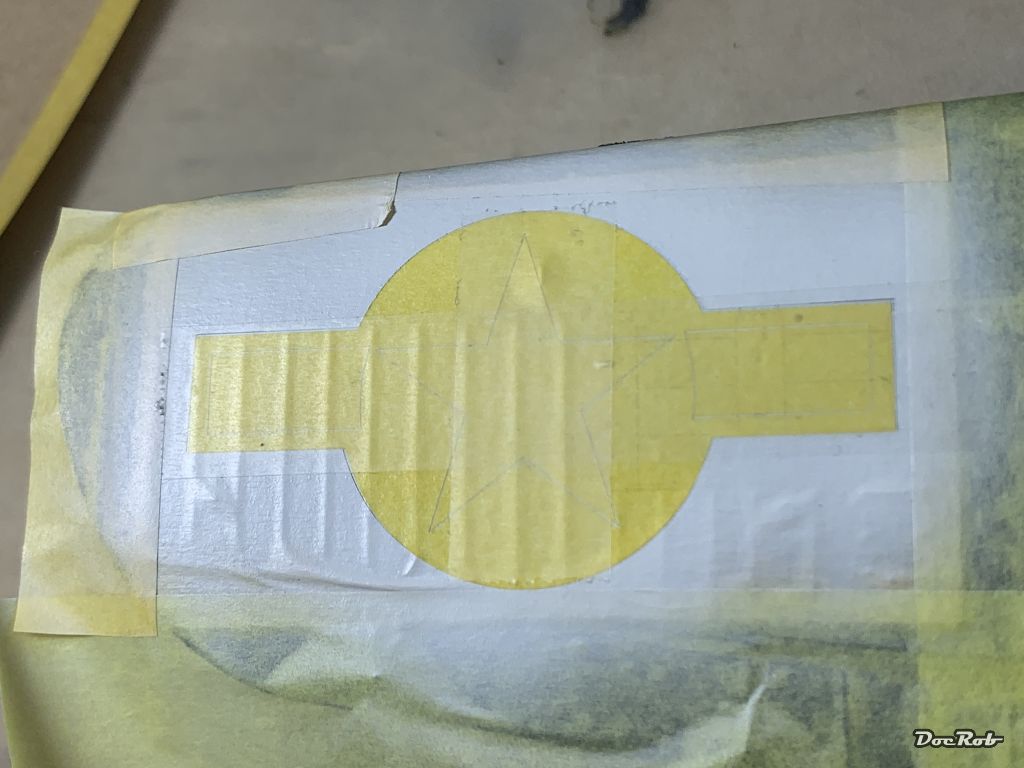
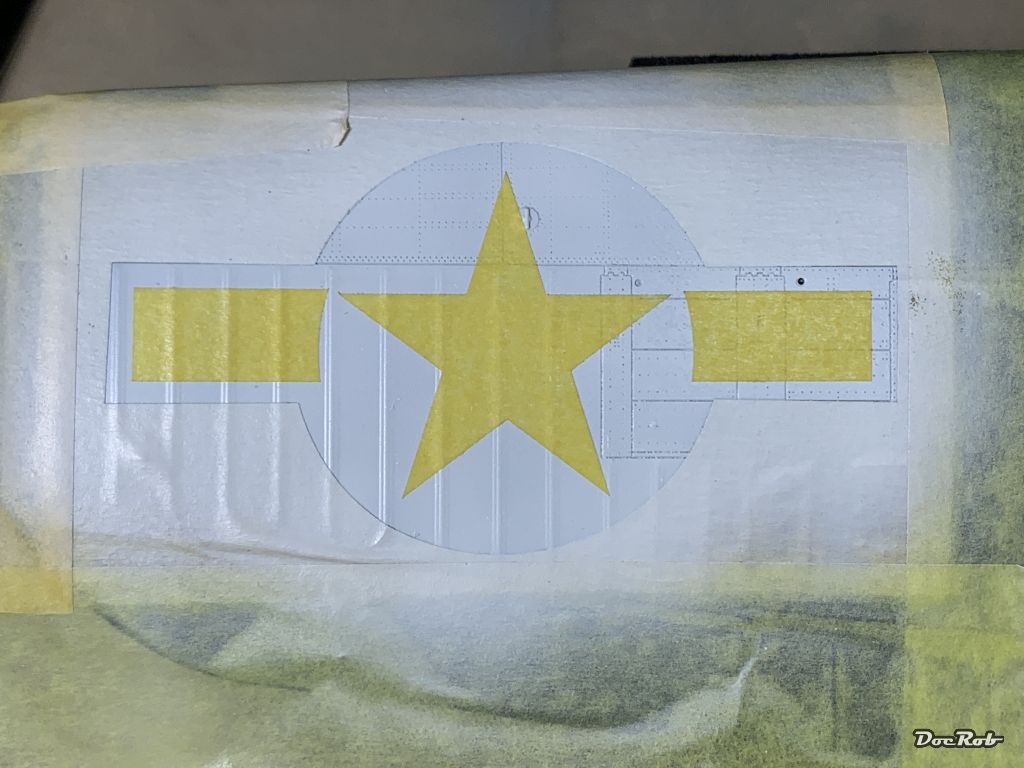
It is Peter, and a kind of work you shouldn't rush to not commit stupid mistakes. I sprayed the insignia on, not without issues. As said in the last post, I applied the outline masks first and then covered all the surrounding areas properly. I did this without first to put some transparent adhesive foil onto the masks, like the manual suggests. An idea, I should have followed, as the masks on the fuselage sides stretched a bit, which was not noticeable to my blind eye. After spraying, I had two bad spots, which need to be corrected, because of this. I tried to place the stars by hand and found it nearly impossible, so I took out my transparent Tesa film (Scotch tape) and applied strips over the masks to fill into the outline mask. Now placement was a lot easier, means not only RTFM, but also follow it . Scotch tape on inner masks. Applied onto the plane into the outside masks. After removing the unnecessary ones. The background color was AK's Real Color Insignia White and for the blue, I used Vallejo's Model Air Insignia Blue, which I luckily found in my stash. The blue seems to be very fragile, so I will save the markings with a clear coat, before I mask of the corrections and some stencils, which go onto the insignia. ... and for Peter Cheers Rob


-
1:32nd scale Sopwith 5F.1 'Dolphin'
DocRob replied to sandbagger's topic in WW1 1/48 and larger Ready for Inspection
Fantastic result Mike, I love the finish. I will save your log again, as I have the Dolphin on backorder along with my last desired WNW kit, the Albatros B.II. Thank you for document your great work to us followers. Cheers Rob -
Today, I managed to airbrush all the stencils on the underside and started with the stars and bars. 1ManArmy supplies these as masks in their set. They recommend to apply them with the help of transparent low tack frisk foil, to make placement easier. I didn't have this type of foil at hand, so I placed the outside masks by hand and hope the star and bar masks fit, after the white color has dried. I used Insignia white, which is a bit off white and sprayed it a tiny bit translucent, to not look too uniform. Cheers Rob

-
Thank you Gentlemen, these masks are very good indeed and the results are awesome, but the process needs definitely more time than decaling. I wouldn't have liked doing the same on my Kai Phantom build . I mixed masking techniques, Gary. The harder to reach stencils were completely masked, the others were surrounded by the templates. So far no fails, except one stencil, which should have been gone over the stars and bars . Cheers Rob
-
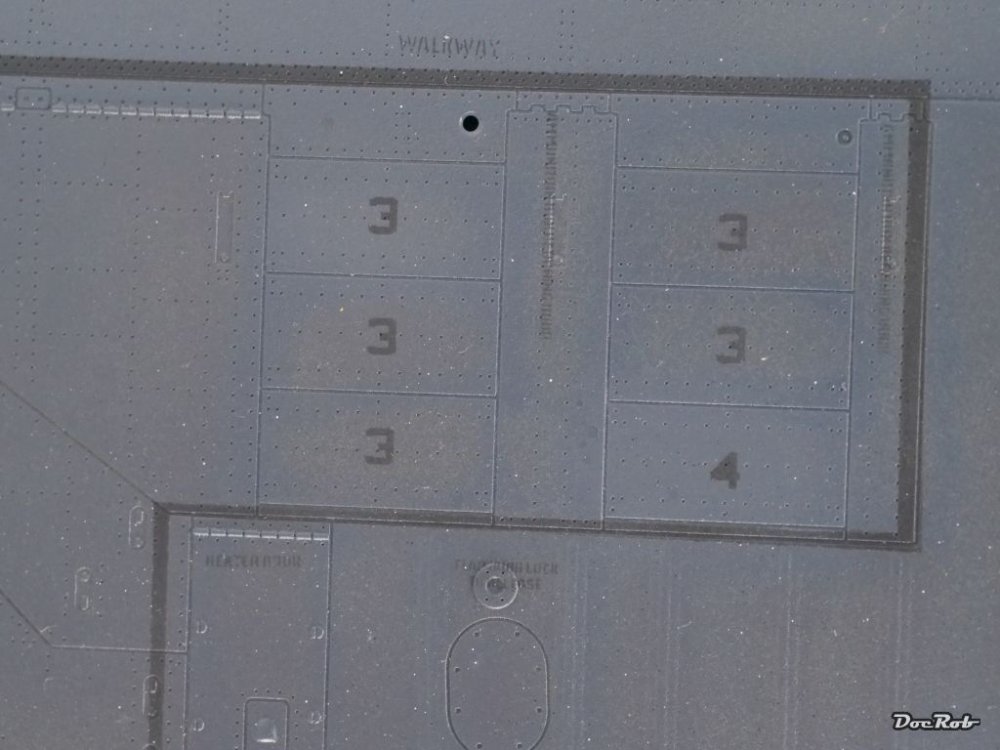
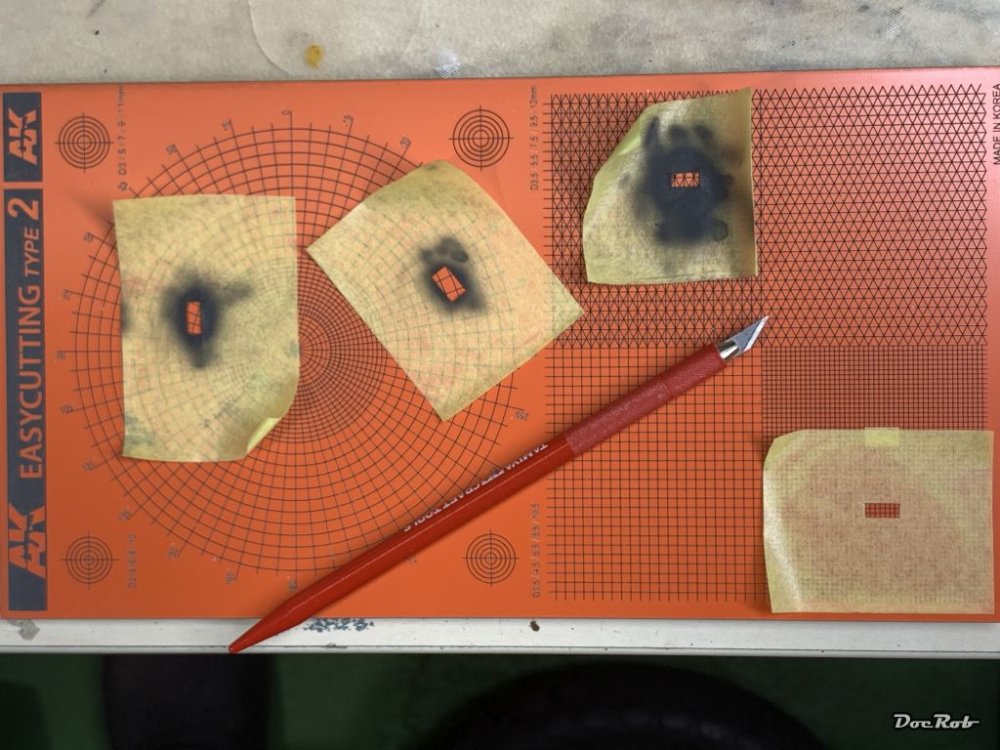
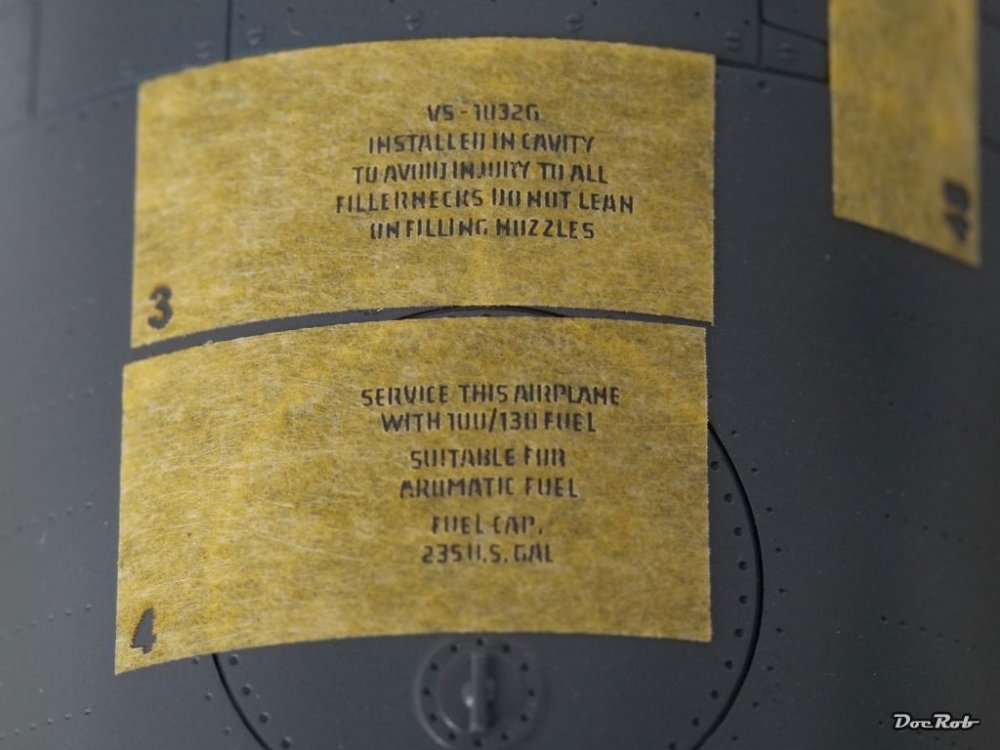
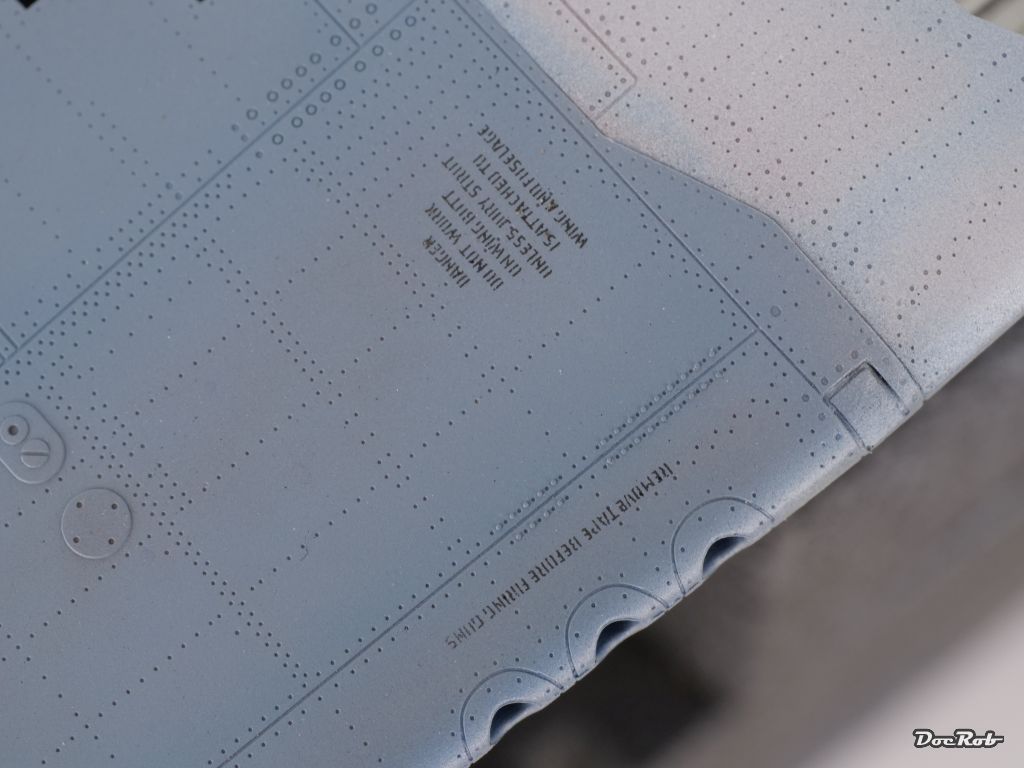
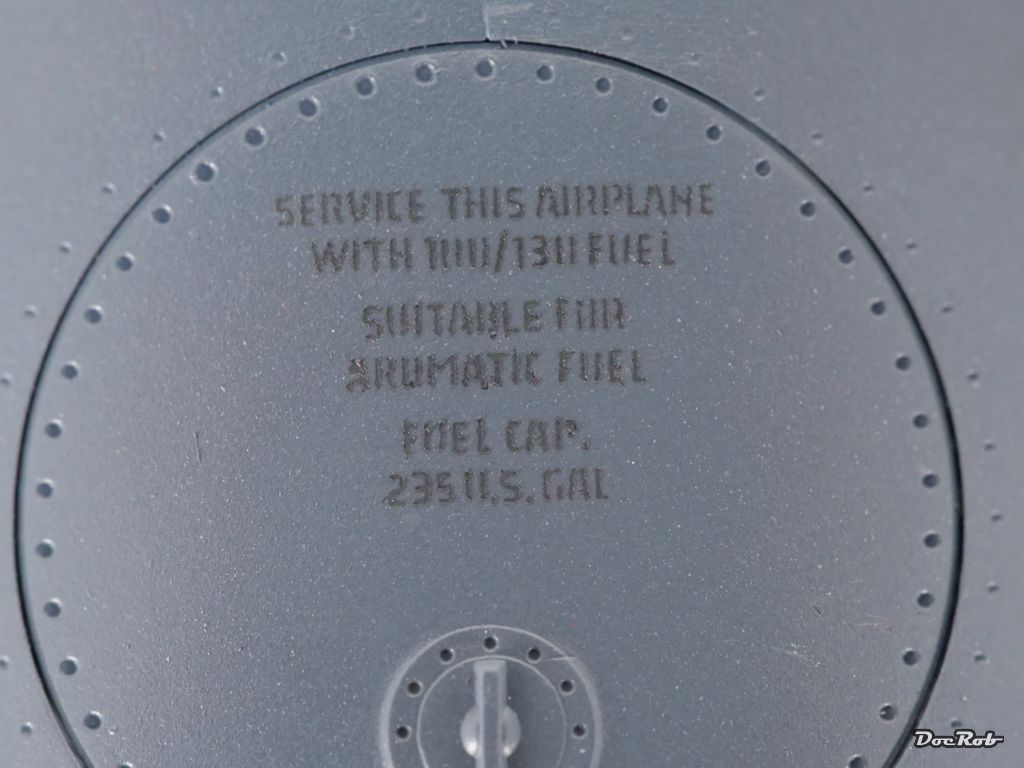
Thank you @Jbert27, @Peterpools Peter and @BlrwestSiR Carl, The walking areas got sprayed along with the black stencils on the top side of the wings and the fuselage. I used Tamiya NATO black acrylic mixed with Mr. Leveling thinner and carefully applied the very thin mix with low pressure and in thin layers onto the masks. The manual suggest not to use pure black, which I never considered and spray the layers until you can't see the yellow of the masks anymore. That was exactly what I did and I was fearless enough, to make the first try directly on the tail wing. I have to say, I'm really amazed, how the results look. The masking is tedious and consumes lots of Kabuki tape, but the stencils look like tattooed into the surface color. I still cannot believe, how fine they are cut. That's the Corsair with the walkways and stencils, which are hard to spot in this view. This is the area from the previous post after spraying, even heavier macroed. Some more on the tail I didn't want to mask all of the stencils completely and cut some templates from 40mm wide Tesa Professional (much cheaper than Tamiya Kabuki tape and nearly as good) onto my cutting template with differently sized cutoffs. I de tacked the template, because I didn't want them to lift the masks when removing them. I'm very pleased with the outcome and the results make the tedious masking work nearly forgotten. Hasta la vista silvering . Cheers Rob
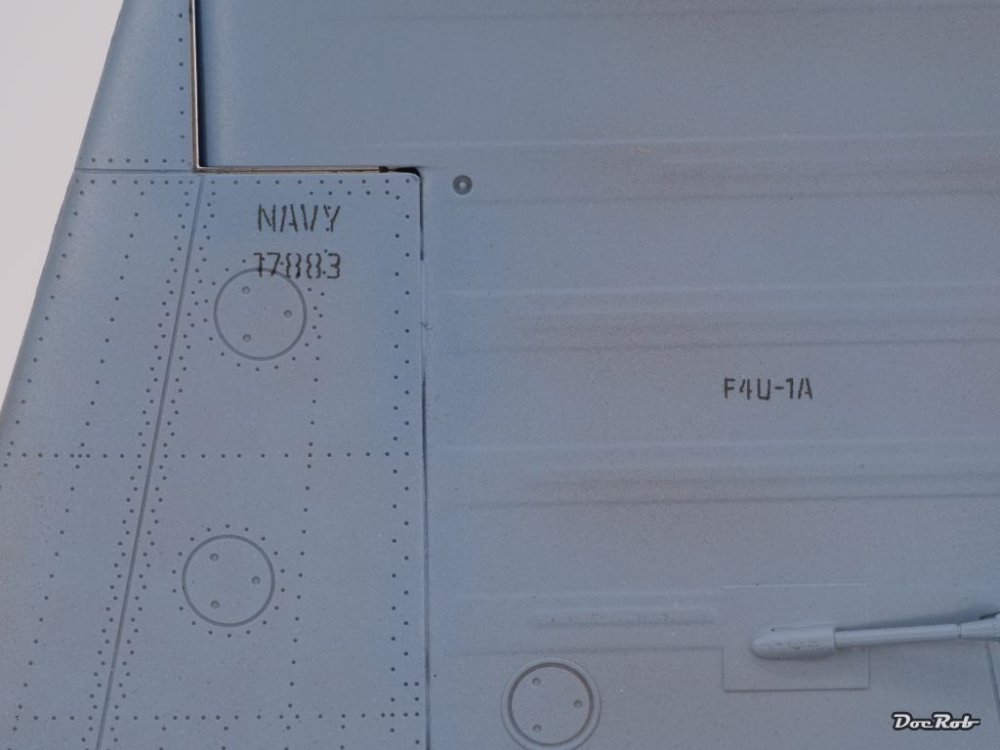

-
My Corsair got the mad stenciling disease . I applied the fitted strips of tape for the wing walk areas and then added all the black stencil masks, which are not covered in these areas. The OneManArmy masks are very sharply cut into Kabuki tape and the manual shows very well, where to place them. There are differences to the decal placing suggested by Tamiya, but I decided to ignore these. I gave some thought, about how to spray the stencils, without having to mask the entire plane. I will try to use a template cut into 40mm wide de tacked Kabuki tape for masking off every single stencil, one after the other, lets see, how this works. I used a rubber brush, to push down the masks around the letters properly and will use NATO black for the stenciling. Cheers Rob

-
You are your worst critique, Gary. I like the figures and I envy your skills, but have to say, they are well earned, the way you train and progress with nearly every build, adding figures. I think they came out beautiful to the non macroed natural eye. Cheers Rob Is it pink now? Cheers Rob
-
GWH Curtiss P-40B; The Flying Tigers
DocRob replied to Peterpools's topic in LSM 1/35 and Larger Work In Progress
Test fitting is part of the game Peter. The more dubious a producer, the more test fitting is required, but what I see on your pics looks like a P-40 and that's what counts. GWH could have done better, but in your description, I still hear no frustration. Seems to be a challenging kit, but this is sometimes what you need. Everybody can do Tamiya . Cheers Rob -
Thank you Kevin, this is looking good, like the Tamiya Royal blue. The downside, it takes at least two weeks, to get stuff to my island, by which time, I plan to have the Corsair finished. At least, I will try to mix something adequate. Cheers Rob
-
Thank you Gentlemen, concerning the approach, I was thinking about chipping next, but I think I will skip it for now and continue with spraying on the stencils and stars and bars. I searched my zillions of color jars and found none fitting for the dark blue of the insignia. I may have to mix my own. BTW, which color do you use for the blue around the stars? Cheers Rob
-
GWH Curtiss P-40B; The Flying Tigers
DocRob replied to Peterpools's topic in LSM 1/35 and Larger Work In Progress
You are mastering the delicate beast, Peter. I would have imagined, that the kit would be of higher quality, but you're doing great and like Gary said, crisp and clean paintjob. Cheers Rob -
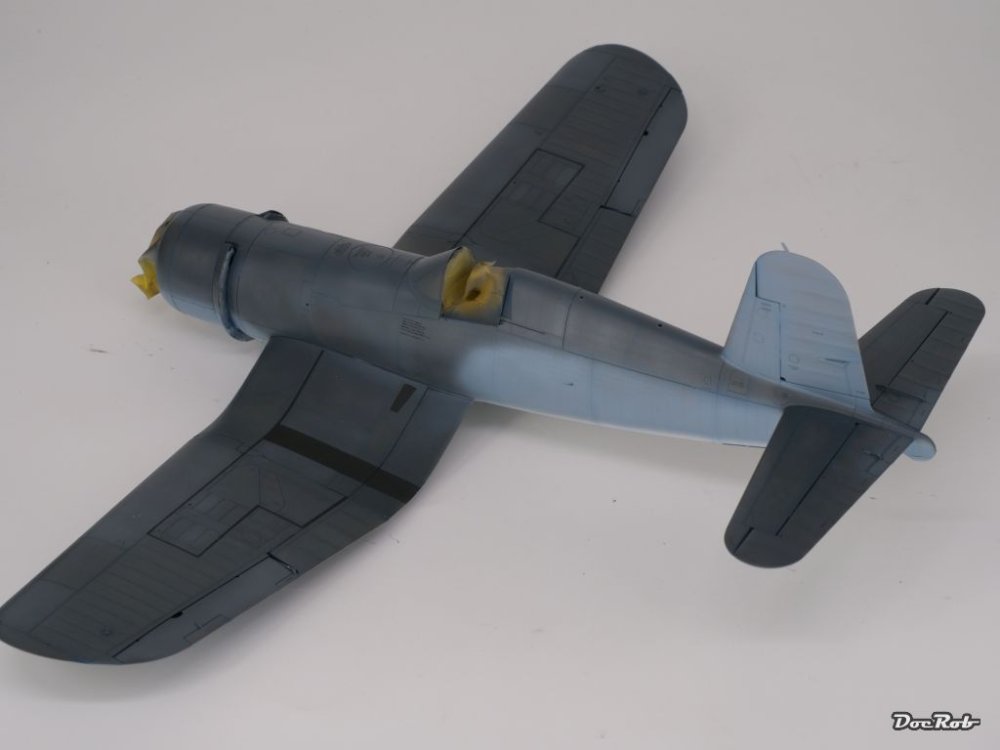
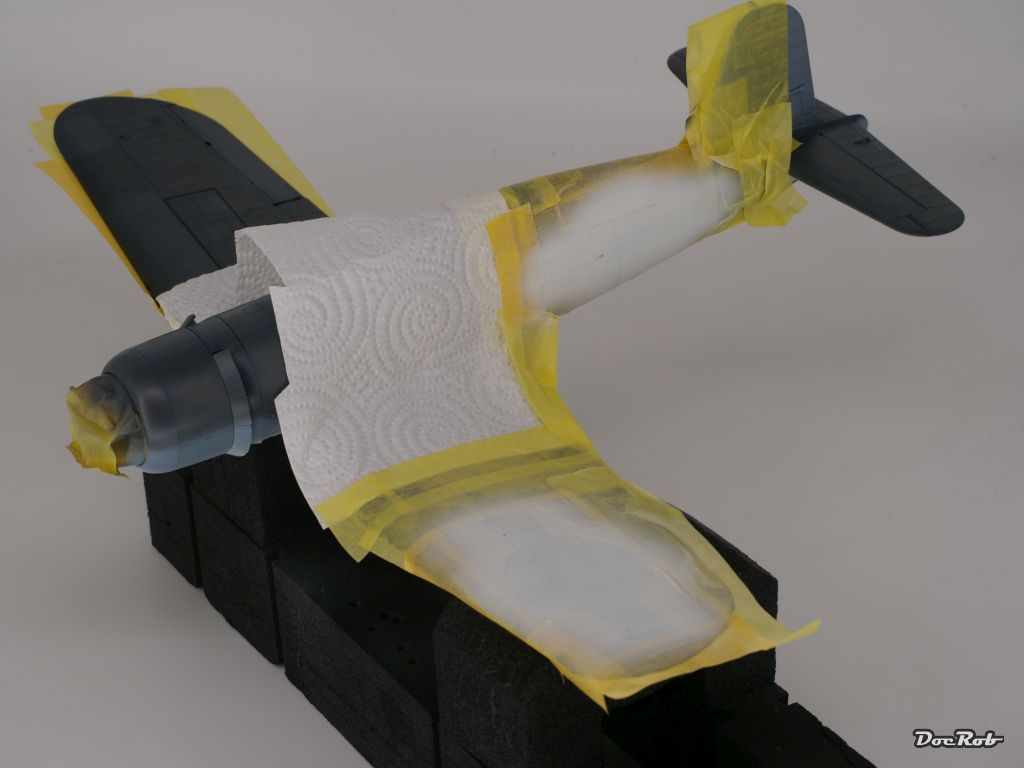
I reworked all the camo colors, until I liked the effect and color rendition, starting with the intermediate blue, then white and then sea blue. I enhanced some panel contrasts, using some drops of white in the mix. Plane 883 has a distinctive streak on the front side area of the fuselage, which I slightly painted on. I also modulated the sea blue, to let it look a bit sun bleached on the top areas. This is all preliminary and will be enhanced in the weathering stage. The first walkway markings where masked and airbrushed, using Nato black. The propeller was also sprayed with Nato black, after receiving a dose of hairspray over an aluminum base coat, which will allow some chipping, later. Cheers Rob
.thumb.JPG.d6dafcbe29fd31e6ed1edd12ac187d46.JPG)
.thumb.JPG.bfe796dcd42443dd93fa1cea056257b8.JPG)
-
The Taifun is coming together nicely, love the paintjob, but the star of the show to me is the Citroen, sweet. Cheers Rob
-
Thank you Kevin and Gary, I consider the upper sea blue done, but have to rework the insignia white as planned and maybe a bit of touch up on the intermediate blue. I was indeed a bit astonished about the relatively glossy finish of the sea blue and found it very difficult to photograph. A matte coat will improve this, but until then, there's a lot left to be done, walkway markings, chipping and the stars and bars at last, maybe the stencils as well. Cheers Rob


.JPG.e240f5ad580d4d20281fc7000cb76eff.JPG)
.JPG.11556c15c2625be4bdfe65ba19ed83dd.JPG)