DocRob
-
Posts
7,043 -
Joined
-
Last visited
Content Type
Profiles
Forums
Events
Gallery
Everything posted by DocRob
-
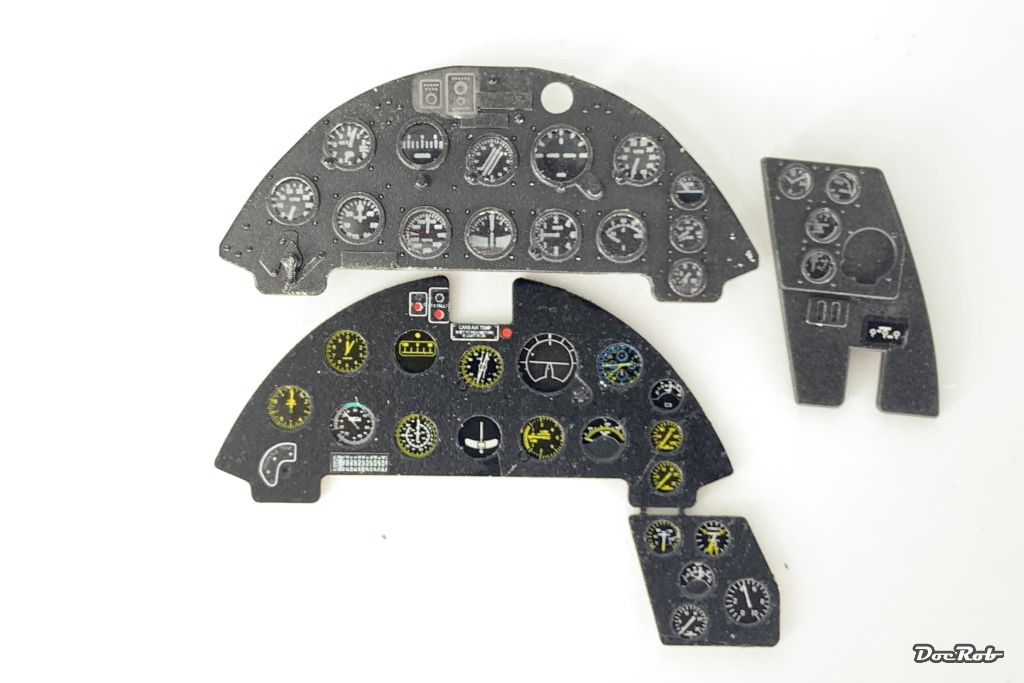
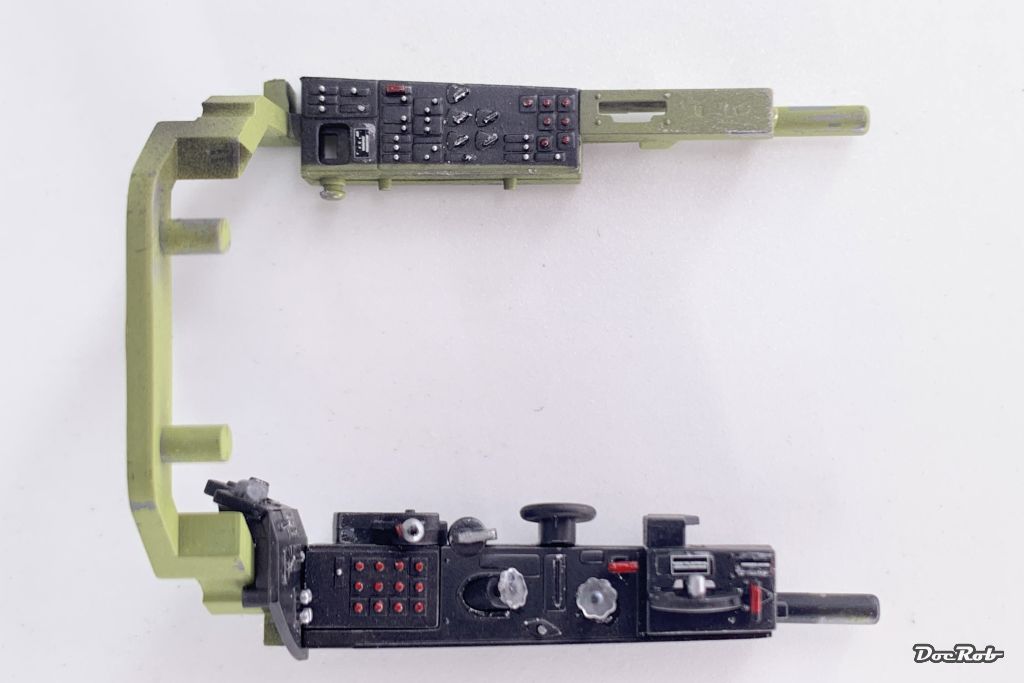
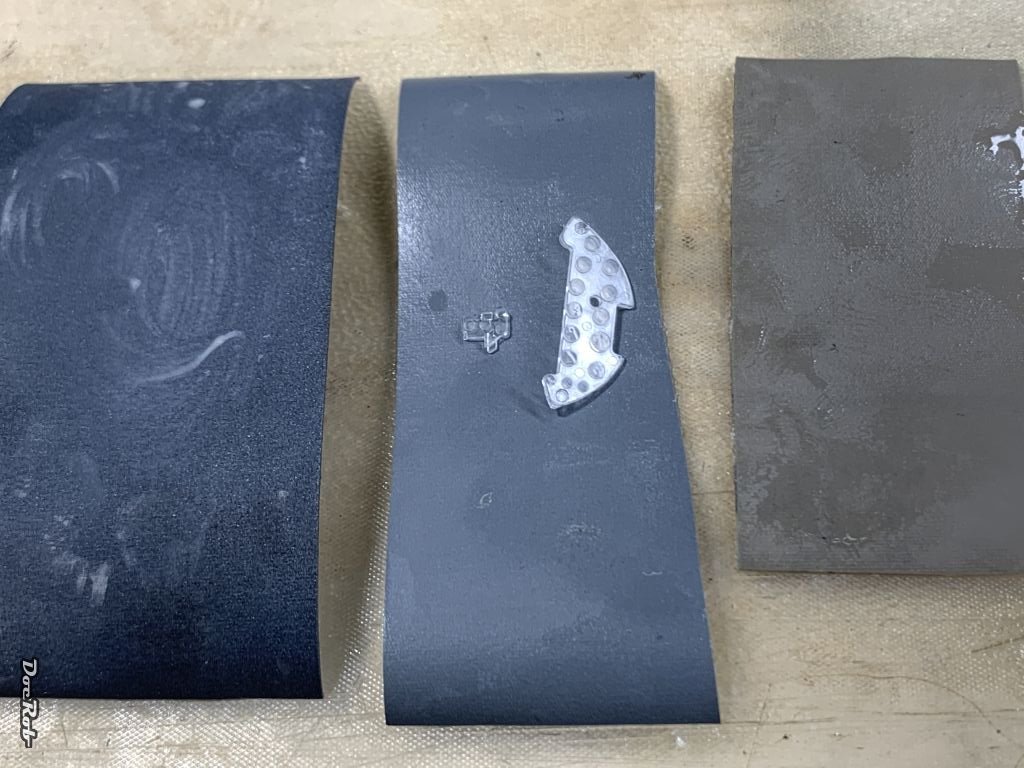
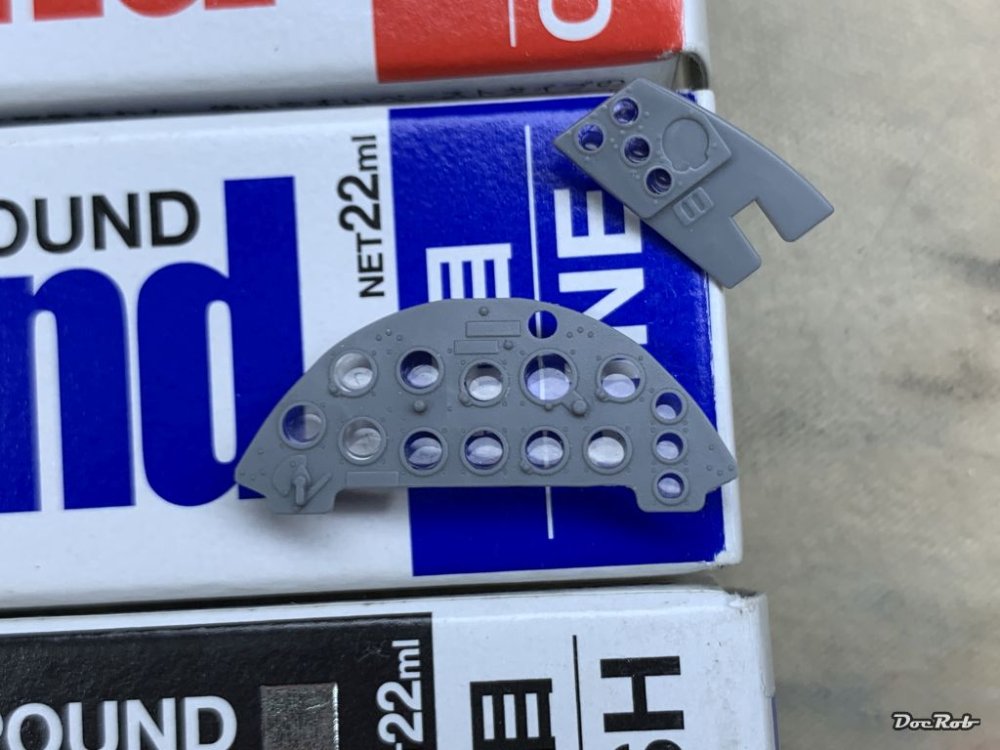
You have to hand it to Tamiya, the breakdown of the complicate cockpit is a masterpiece and I don't know, why I used the Brassin substitute on my last Corsair build. This incarnation is well detailed and broke down, that it's easy to paint. That's exactly what I did, painting. All the cockpit parts were sprayed in their base colors, mainly AK' interior green and Tamiya's LP semi gloss black and then detail painted, mostly by brush. There are tons of little knobs and switches, where my sable brushes worked very well. All black parts received a treatment with iron pigment, applied with a large dry brush and then rubbed with pigments on the fingers, followed be AK dark aluminum True wax, applied with a toothpick for a light chipping. The IP looks now like this and I will use my painted one, because it integrates better and I found no yellow bezels on my reference pics. Sanding and polishing the clear part, helped to reduce the magnifying effect to an acceptable level. Below is the Yahu IP for comparison. Parts airbrushed in interior green got a brown panel liner treatment, followed by highlighting with a brush and then some of Usch van der Rosten's iron pigments. Again the last step was to apply some scratches and tear with True Metal wax, rubbed in by hand or cotton swab. On to the consoles with lots of masking and then detail painting, These multi part affairs are designed utterly genius by Tamiya. Next will be some touch ups, the assembly of the prepared parts, to finish the cockpit and applying a final integrating coat of near flat finish. Cheers Rob


-
Good find, thanks for posting. This is right down my alley. I thought about getting the HK nose, but will now wait for Bordernuts. Cheers Rob
-
I was not lazy over the last days and cleaned all the cockpit and tail section parts, prepared them for painting and got the first interior colors on. I used interior green from AK's Real Color range and added Tamiya LP semi gloss black. Now it's about detail painting all the tiny bits, knobs and levers. I bought a Yahu IP, but will build up the kit version too and will compare, which one I will use. I thought the magnifying effect of the clear part is a bit to strong and therefore sanded down the bulged front side of the clear part with 2000, 4000 and 8000 grid sand paper. And then used the Tamiya polishing pastes to get the glass nice and shiny. After painting the IP itself, I will show you the comparison between this and the Yahu IP. Cheers Rob

-
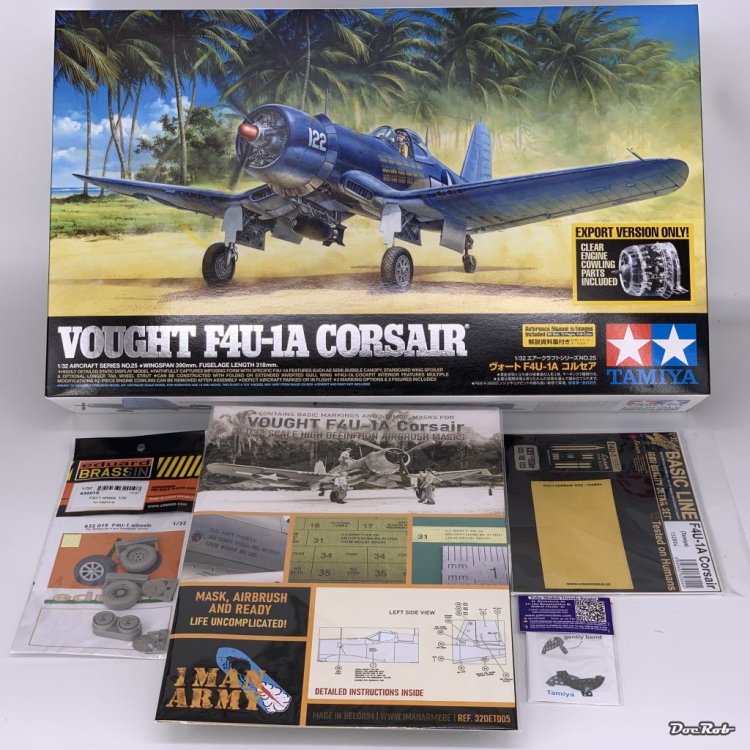
I asked about it, some of you said yes, so here it starts, I will bore you with another build of Tamiya's well famed Corsair. You think easy peasy, but no, having maybe the closest to perfection plastic kit at hands, I'm not allowed to fail. Subpar kits are where you can shine, but with this it's expected. Being like it is, I just felt the urge to build another Corsair, after having built the Birdcage one as my first plane kit, re-entering the hobby, when it came out. I had so much fun with the F4U-1 by the time, that I knew, there had to be another. The Birdcage was enhanced with Brassin cockpit engine and wheels, lots of PE, SAC undercarriage and Maketar masks for the markings. The F4U-1 will be mostly oob, with the exception of HGW belts, Brassin wheels and maybe a Yahu dashboard. I will use AK real colors and markings and stencils masked with 1ManArmy masks. Cheers Rob
-
 Geez, Gary, I feel with you. I can imagine your anticipation on building a new great designed kit and now it's chop chop time. Your experiences have very similar aspects, I had with their TA-152. ZM doesn't seem to improve their engineering over time with these multi part hull birds in 32 scale. Where they stay conventional, like with the 48 scale Phantoms, they almost hit the Tamiya mark. I like your tough nosed approach to finish this wretched 109 build and I'm sure, in the end, it will be a looker. I'm glad, I'm not a 109 nut and can let this kit pass without feeling troubled. Cheers Rob
 -
Kitty Hawk Texan done!
DocRob replied to ScottsGT's topic in LSM 1/32 and Larger Aircraft Ready for Inspection
The best yellow bird I've seen in a long time. Perfect paintjob Scott, love it. I feel the urge to start mine, when I see your great result. Cheers Rob -
Nice and clean preparations are always a key t success. Your basecoat looks perfect Carland it's probably a good idea, to paint the nose before the NMF. Cheers Rob
-
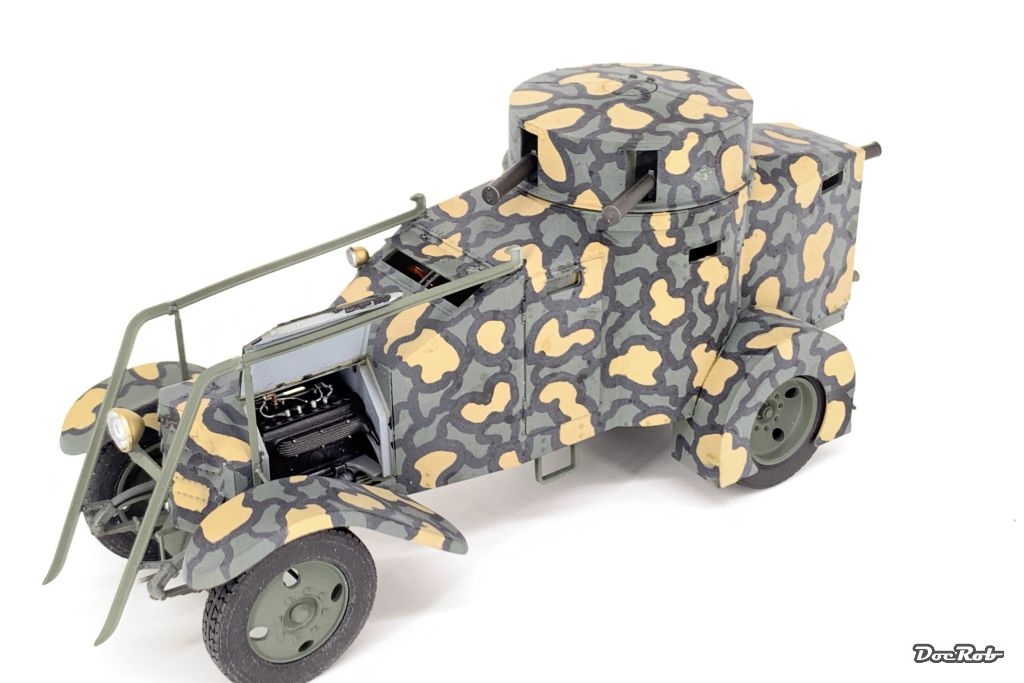
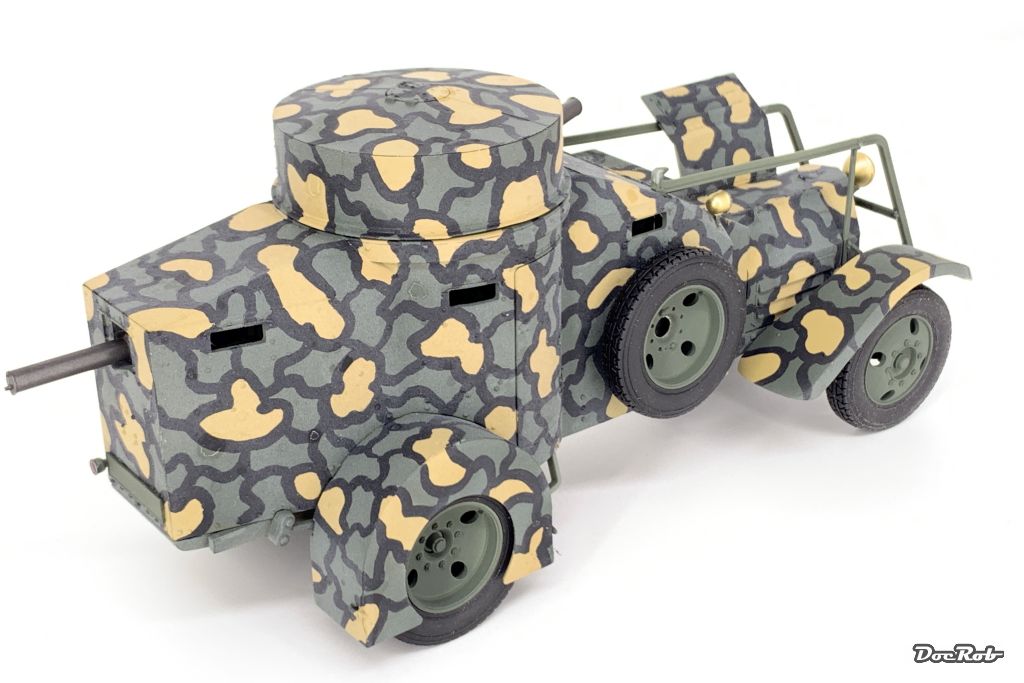
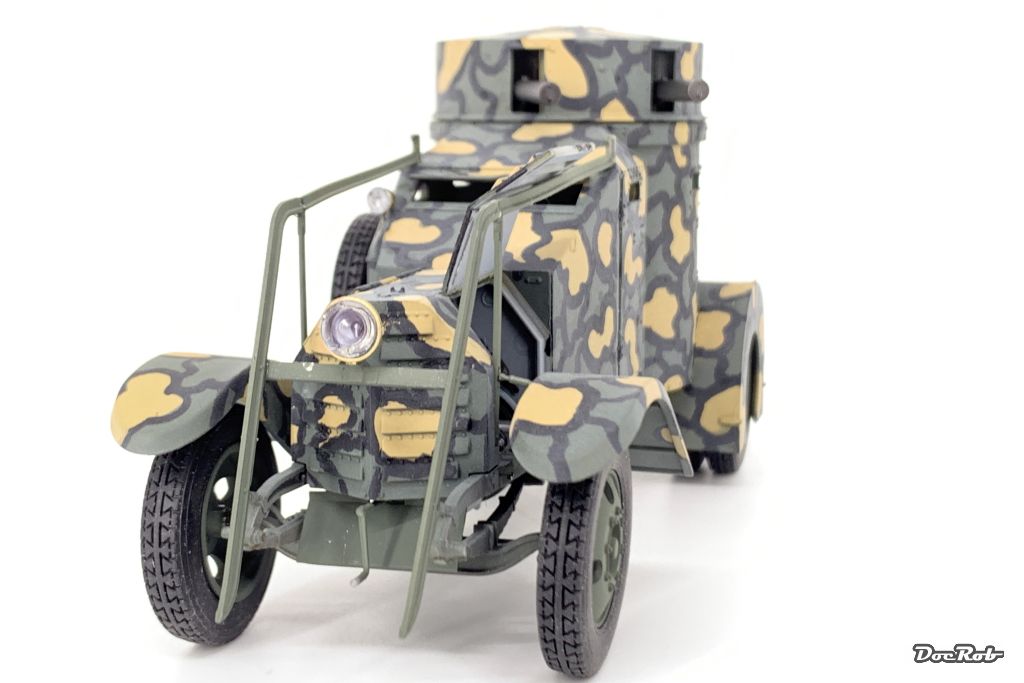
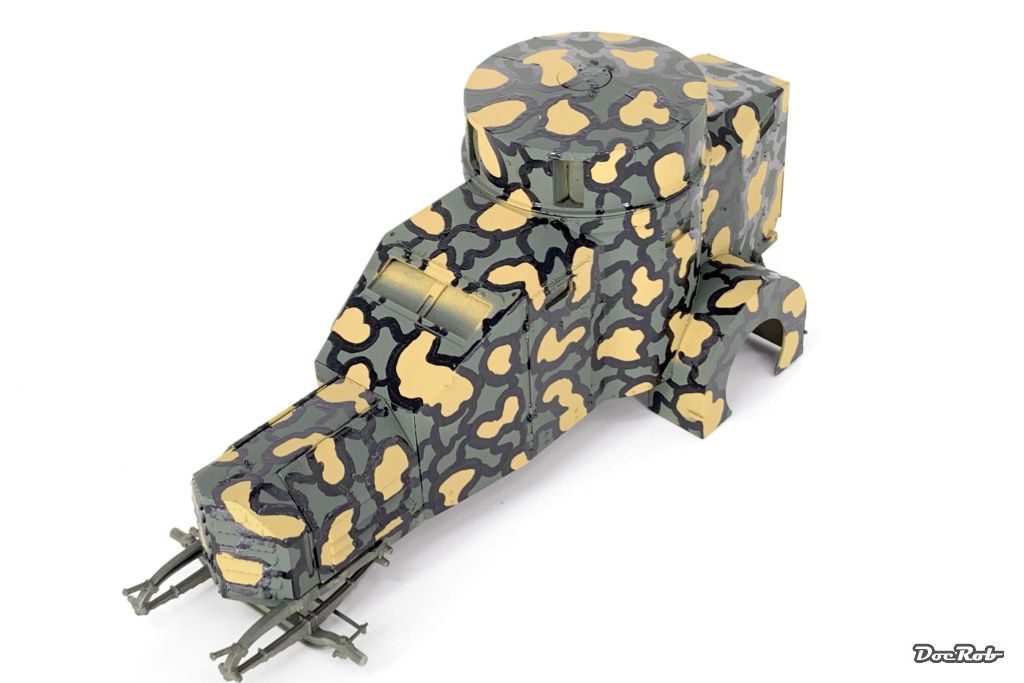
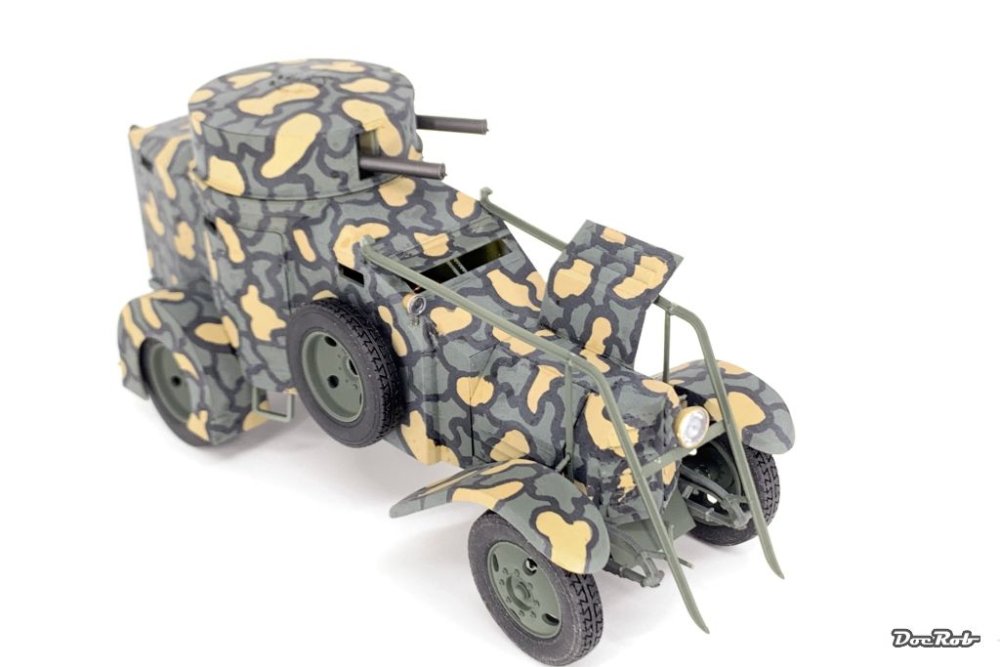
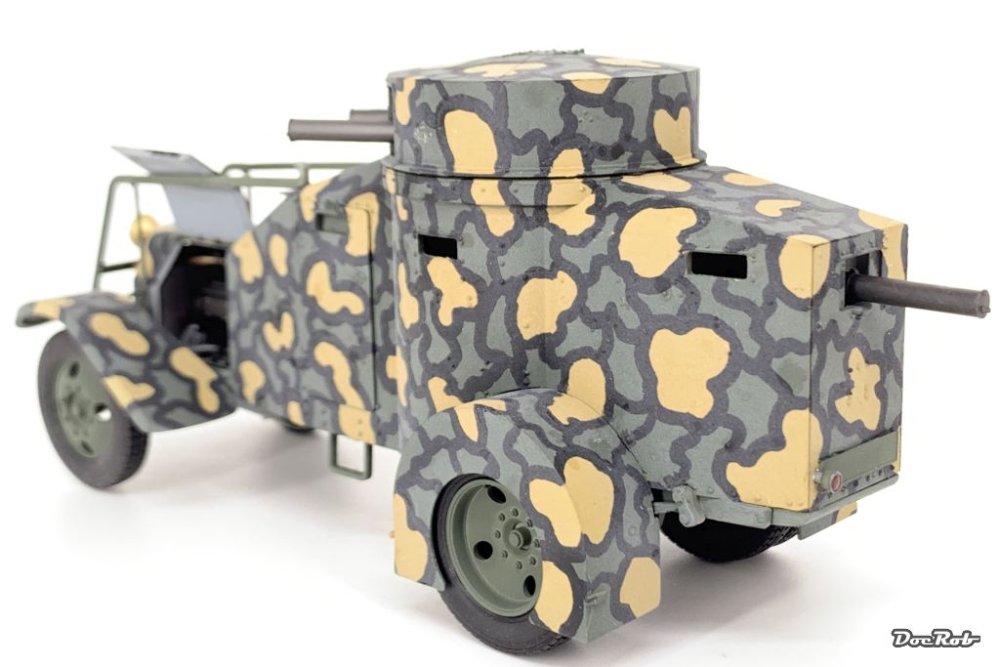
Muchas gracias amigos, I'm almost happy with the result, but there is some touch up to be done along with a unifying matte coat. I will decide, If I use a filter, to blend the camo in a bit more and I will apply some weathering later. The cabin door will be opened then, it's only held by adhesive tape. I wanted to take some photos of the semi finished Lancia on a cobblestone dio base, but it was hard to see the shape of the car onto it. This camo works . Cheers Rob
-
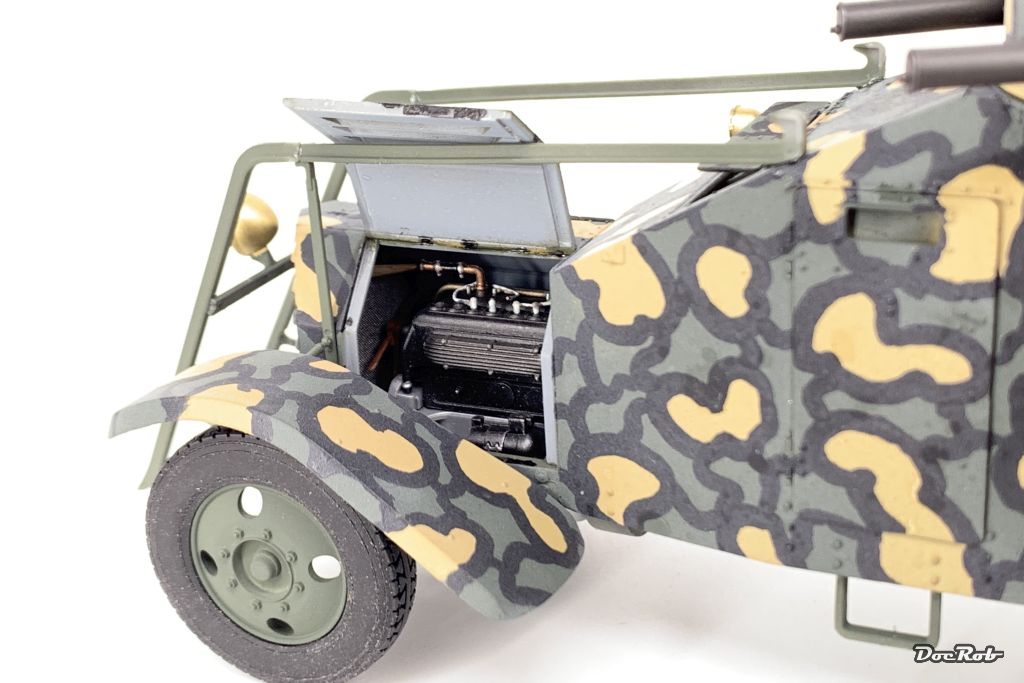
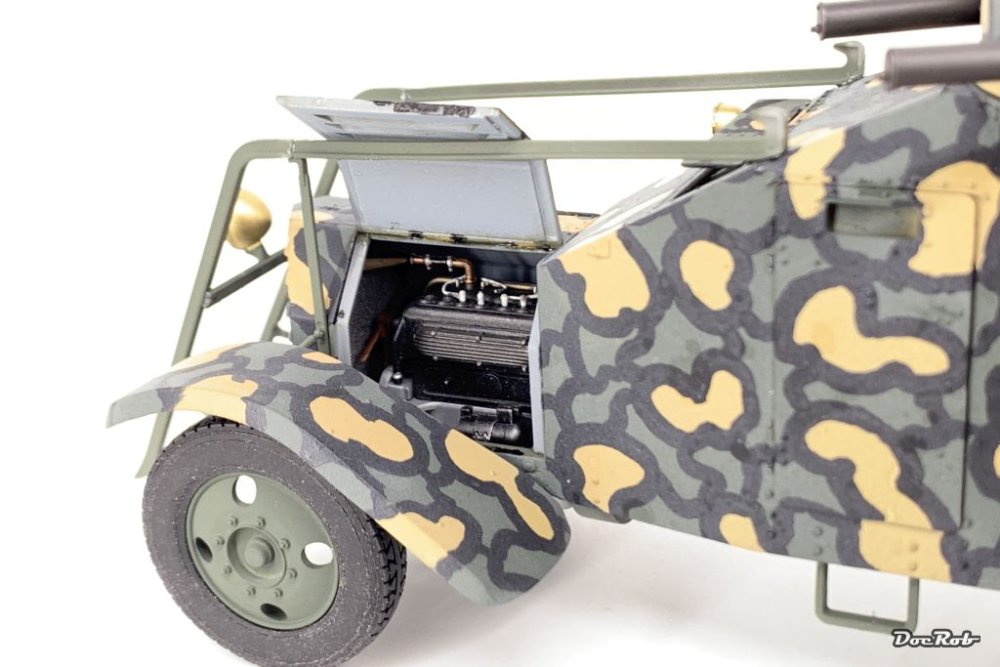
Three days of continuous heavy rainstorm, without leaving the house lead to some bench time and the Lancia IZM got nearly finished. I nonetheless decided to put it into this category with some detail work and weathering pending, because there are too many pics for the 'What is on your bench' section and the Lancia itself is finished. When I first saw the paintjob of the Lancia I was immediately persuaded, that I had to build it. I bought the kit and I have to say, it's a gem all around. Fit and layout is excellent and so is the manual, which even shows the wiring of the engine. detail is crisp and the plastic good to work with. This edition of the kit includes rubber tires, where the other version has plastic ones. These are well detailed without nasty seams. After this positive evaluation, there is no wonder, there will be more CSM builds done by me. I have their Romfell and Minerva armored cars in stash, as well as the 1/32 Caudron G.III and Nieuport XXIII RFC and a Sopwith Dolphin and a Armstrong-Whitworth F.K.8 in 48 scale. First I have thought, the Lancia I depicted was used by the Spanish Republicans in 1936, which I had preferred, but read in the very educational manual, that it was used by Italian expeditionary forces, supporting Franco in the Spanish Civil War. It had to be an abandoned vehicle then. The Lancia IZM itself was a dinosaur by then. It saw first service in the Great War in 1917 and was used well into the 40's in Italy, North Africa, Spain and other countries. The camouflage was a bit of a challenge and it took two approaches to get it halfway right. For complicated paintjobs, I prefer well designed kits, which don't hinder rigid handling and masking through weak constructions and hard to integrate subassemblies. With CSM's kit, it was made easier in a lot of ways and I enjoyed the built a lot. Cheers Rob


- 11 replies
-
- 12
-

-

-
The tail starts to look like it should have been first place, nice surgery Gary. I hope this will be the last hair in ZM's soup. Cheers Rob
-
Very nice Kriss, the camo came out great, you seem to have steady hands with the airbrush, chapeau. The Italians had a soft spot for delicate camo schemes. I'm actually building a WWI Lancia, used in Spain with an also weird camo pattern. Cheers Rob
-
A true workhorse and not a small one. God to see the Helldiver going together and showing her shape. I have only a tiny 1/72 version in stash , made by Special Hobby, with more brass than plastic, as I've bought an Eduard big set for it. Cheers Rob
-
Wow Carl, what a story. You can be a hero even in your own hood it seems, nice save with the guy and the fire. Pit and canopy of the 104 look great and after attending the warping issues everything looks bueno and luuckily there was nor Italeri cuss. Cheers Rob
-
What is on your bench right now ? Share a picture :)
DocRob replied to Martinnfb's topic in Modelling Discussion
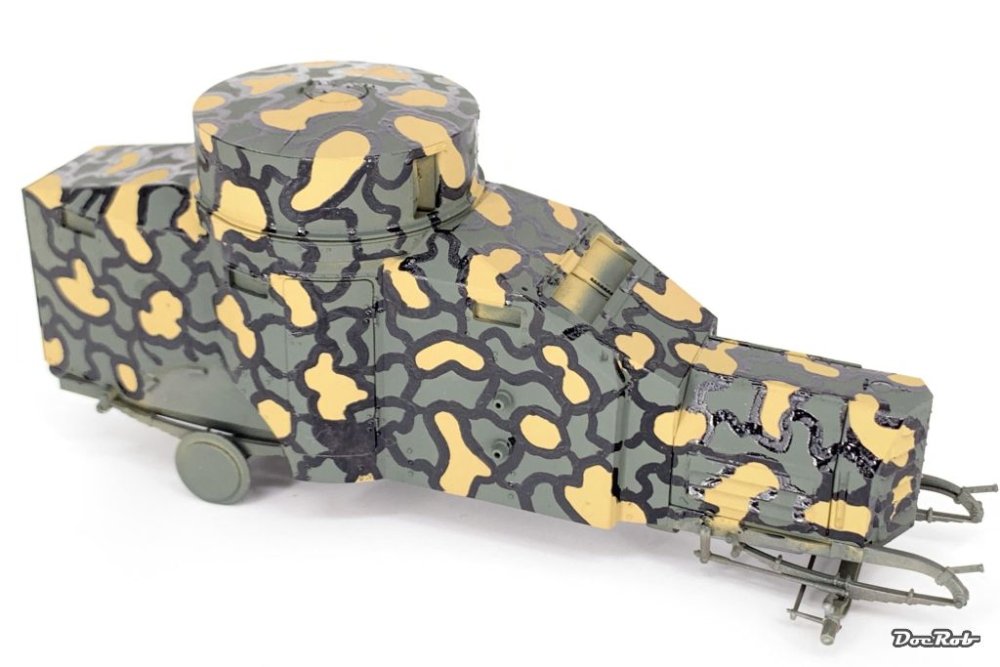
Thank you Gentlemen, the Lancia is starting to get the wanted looks. I made lots of corrections with a brush and Tamiya gloss black to the lining and then flat coated the vehicle with my trusty mix of two third Pledge and one third Tamiya flat base. This tied the camo together somehow and removed 99% of the markers gloss. I also airbrushed the wheel hubs, wire cutters and other clutter for the final assembly. Cheers Rob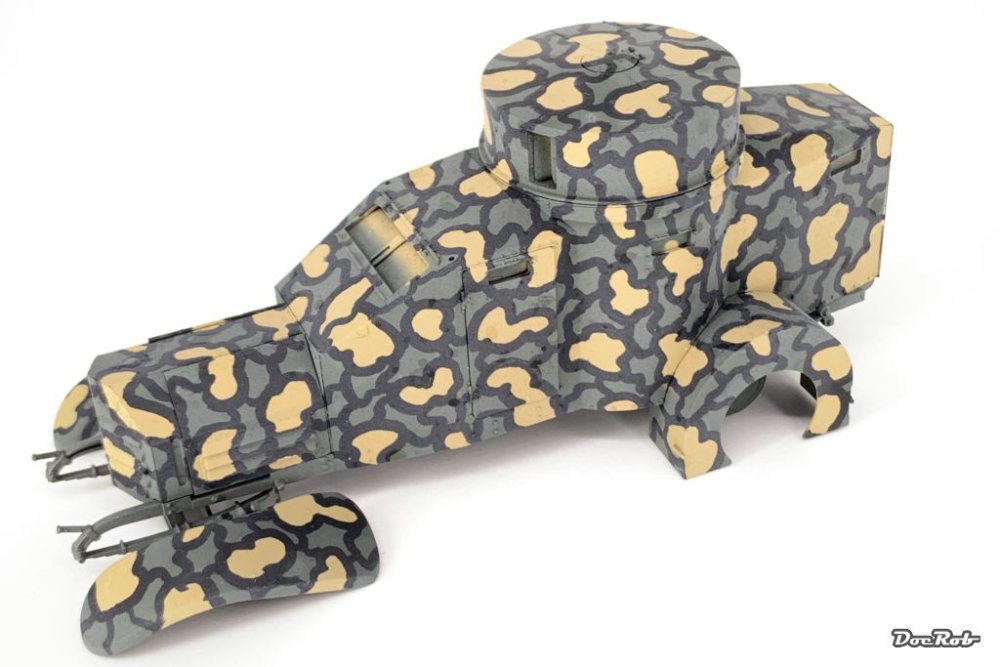
-
Special Hobby Whirlwind
DocRob replied to Peterpools's topic in LSM 1/35 and Larger Work In Progress
I think I will start one soon, but am a little afraid to bore you all with that near perfect kit, built by the dozens. Cheers Rob -
What is on your bench right now ? Share a picture :)
DocRob replied to Martinnfb's topic in Modelling Discussion
Thanks Peter, unfortunately I have no idea, as to how long it takes for the marker to completely dry. Yesterday, I tried it on the front fender and after six hours I applied a coat of Tamiya's LP flat clear without problems while spraying or now after 24 hours of curing. I first sprayed a very thin coat, let it dry to not affect the dye of the marker strongly. I don't think the marker is oil based, but don't now for sure. It's a normal Edding paint marker, not one of these specialized Gundam markers, which might have been the better choice. Cheers Rob -
Special Hobby Whirlwind
DocRob replied to Peterpools's topic in LSM 1/35 and Larger Work In Progress
I start to get the same feeling with the Real Colors. I used them successfully on some tiny projects and just last week started my Corsair build, where I used RC and liked them a lot. I thinned them with Mr. Color Self Leveling Thinner too and was very thrilled with the results. Cheers Rob -
What is on your bench right now ? Share a picture :)
DocRob replied to Martinnfb's topic in Modelling Discussion
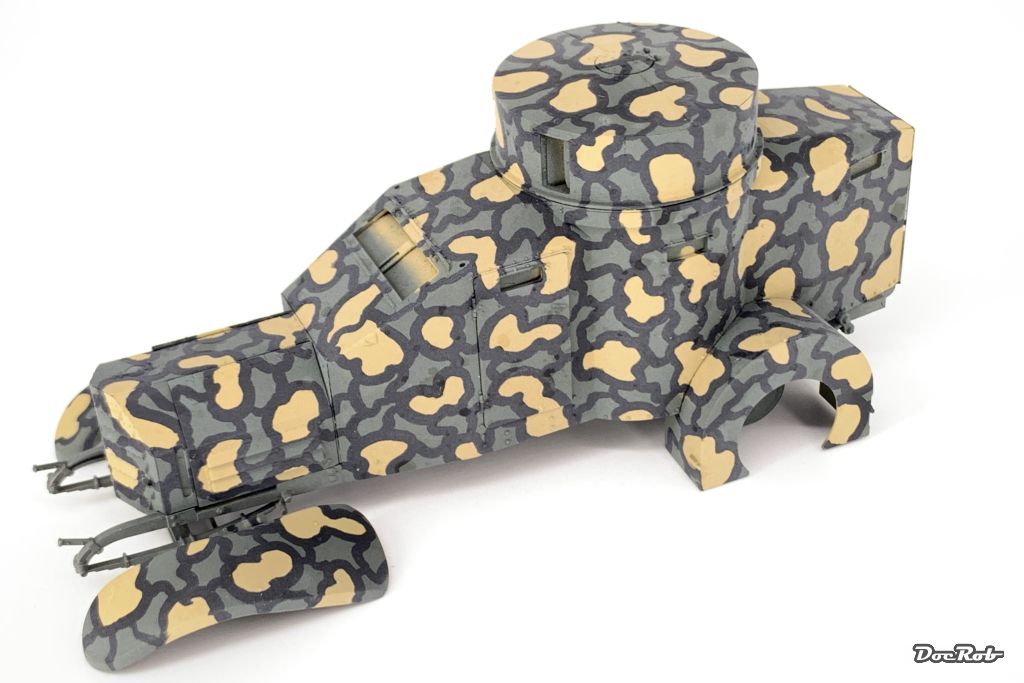
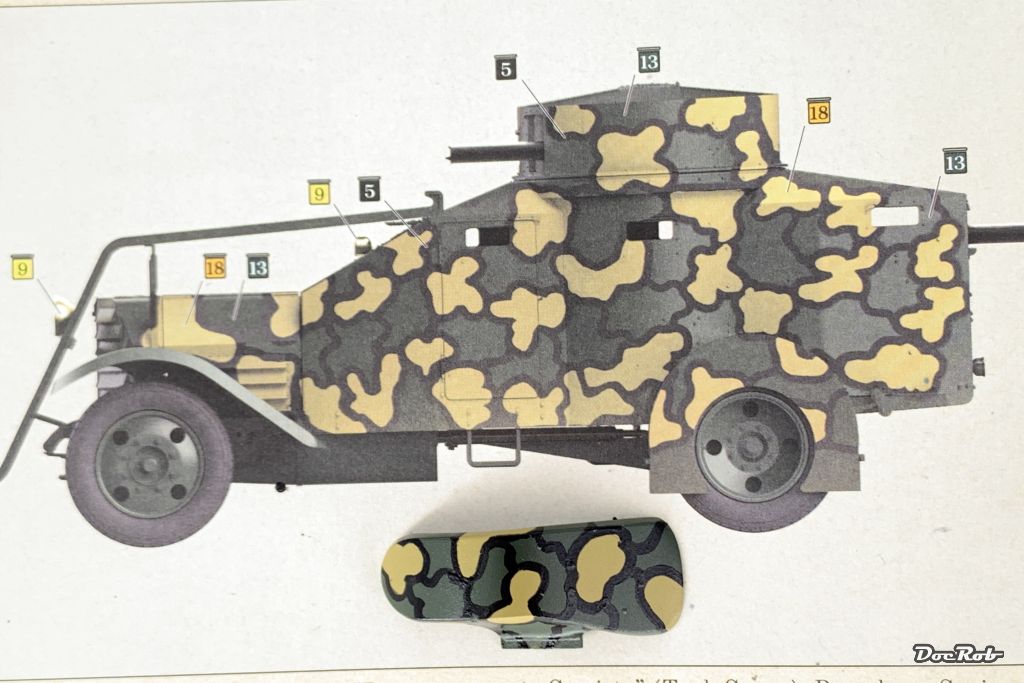
I wonder, how this camo is supposed to work in the scrubs of Catalunya, but it disguises the contours of the Lancia for sure. I applied all the marker borders in black and now have to wait for it to dry thoroughly. Before matte coating, I will have to make some touch ups with a brush and a larger correction on the right side, where the marker was bleeding. painting the camo was a test for the eye , but I tried to distribute the pattern equally on all sides, concerning the flow of the border lining and the size and shape of the blobs. Cheers Rob
-
What is on your bench right now ? Share a picture :)
DocRob replied to Martinnfb's topic in Modelling Discussion
Thanks Peter, I'm not sure about the marker, because it has a nasty oilish shine, which I hope to get rid of with matte coats and a bit of filtering. After trying, brushing the lines was no more an option, so I have to take on with the marker. Cheers Rob -
Special Hobby Whirlwind
DocRob replied to Peterpools's topic in LSM 1/35 and Larger Work In Progress
Nice paint job Peter. These Real Colors go down smooth as silk, like on your Whirlwind. Sky color will make a great contrast and then the finish line is in sight. Cheers Rob -
What is on your bench right now ? Share a picture :)
DocRob replied to Martinnfb's topic in Modelling Discussion
Should have done a WIP about the Lancia, but thought, I would not have enough time, so I will continue here. I tried two options with the black bordering. The first, although it was my favorite got skipped. Brush painting was too delicate to get right with even lining width all around. I would have liked to use Nato black instead of pure black. The option shown on the pic was made with a marker, let dry and oversprayed with Tamiya LP flat clear, which luckily didn't alter the marker, but wasn't flat at all. I will use matted Future / Pledge for the rest of the vehicle, but found the general look of the camo promising. It has to be toned down a bit in the end. The drawing and the test fender part are not the same scale, so the pattern should be near to the real thing. Cheers Rob
-
Exactly Ernie, with all these issues, the resin kit seems to be the better and I guess cheaper Helldiver kit. Maybe HPH made a mistake boxing clear parts for a planned 1/24 version of the Helldiver , spoiler alert. Cheers Rob
-
What is on your bench right now ? Share a picture :)
DocRob replied to Martinnfb's topic in Modelling Discussion
I think it's the same stuff Phil. Lucky you, that it worked to your advantage, I had to redo the blobs from the day before, as they were tearing badly. Cheers Rob -
A very nice and interesting video about a great build, thanks for posting. Having built the kit, I liked to re-see it been done. I started my build, because I liked the shape of the plane and I wanted to use it as a testbed for a brush painted oil color camo, but had so much fun with the build, that I enjoyed it a lot. The kit itself is near perfect, with great detailing and fit and great engineering, even in the tricky bits. Cheers Rob
-
Valentine MK.II/IV Tamiya 1/35
DocRob replied to belugawhaleman's topic in LSM 1/35 and Larger Work In Progress
Nice progress on the Valentine Paul. I like your cast texture. Under some paint it will blend perfectly. I was on and off for a Valentine build lots of times. It's a weird vehicle with that extremely space consuming drive parts. It's like the designer said 'make the hull as narrow as possible', strange. Cheers Rob