DocRob
-
Posts
6,780 -
Joined
-
Last visited
Content Type
Profiles
Forums
Events
Gallery
Everything posted by DocRob
-
The cockpit looks great, nice paintjob Mark. Cheers Rob
-

PZL P.11c - Polish Fighter - IBG - 1/32
DocRob replied to DocRob's topic in LSM 1/35 and Larger Work In Progress
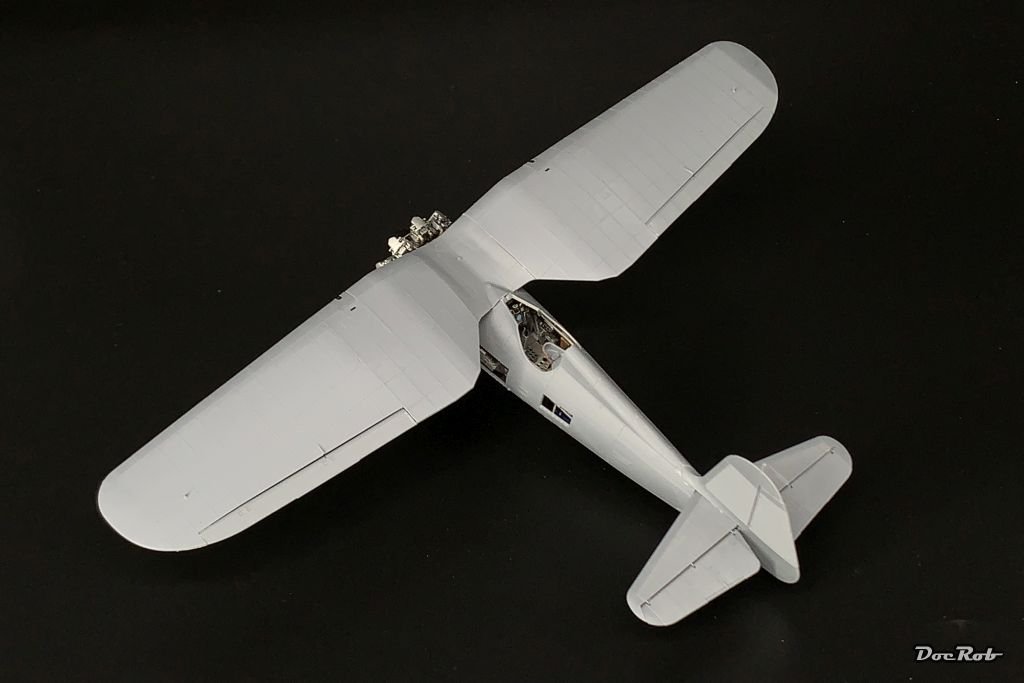
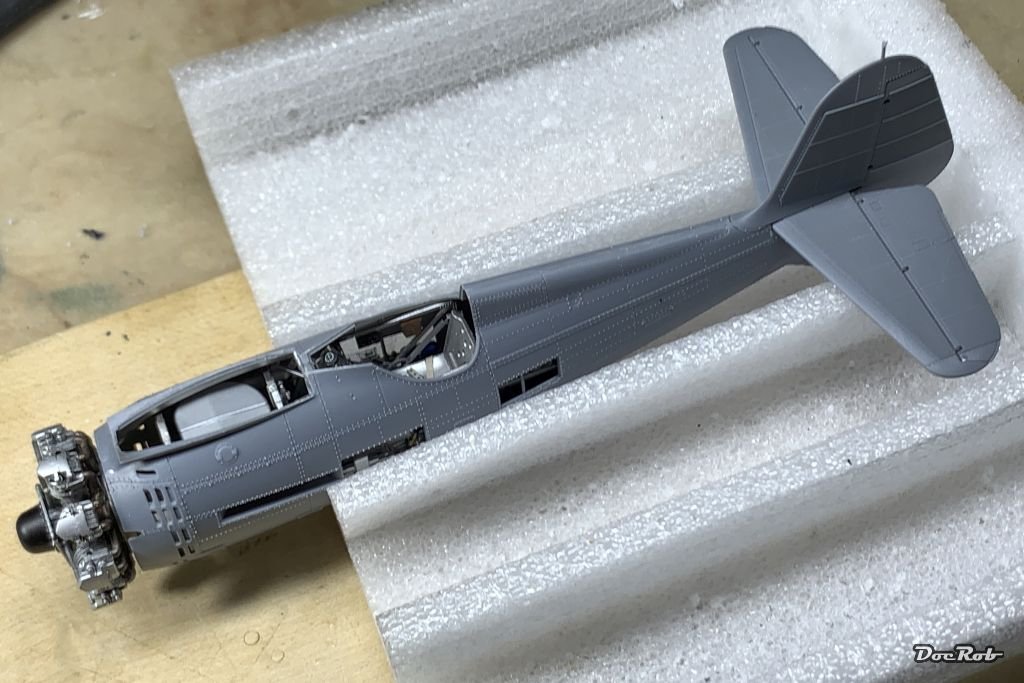
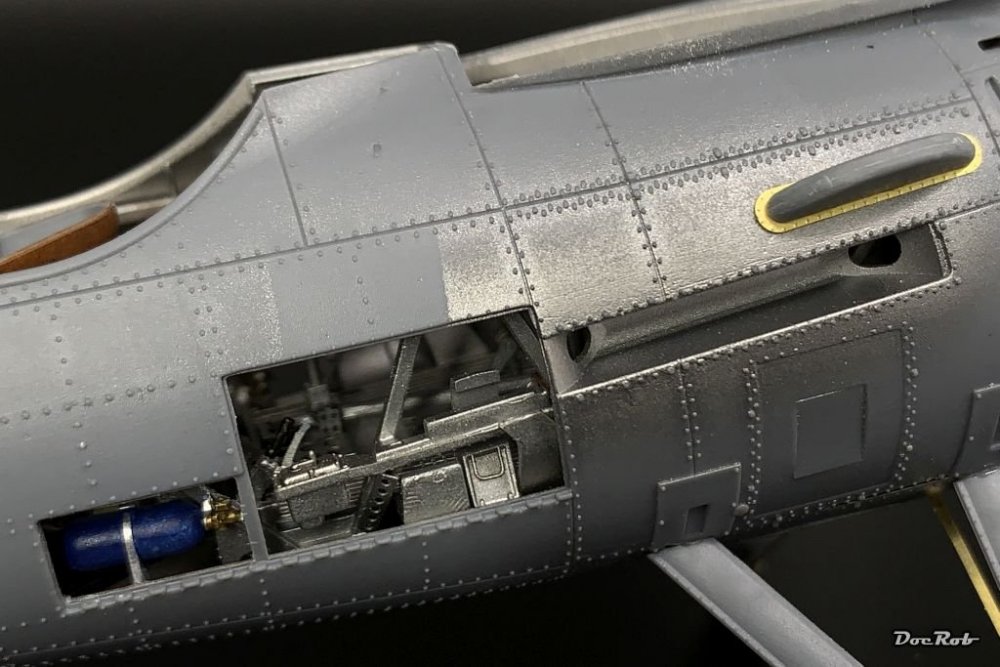
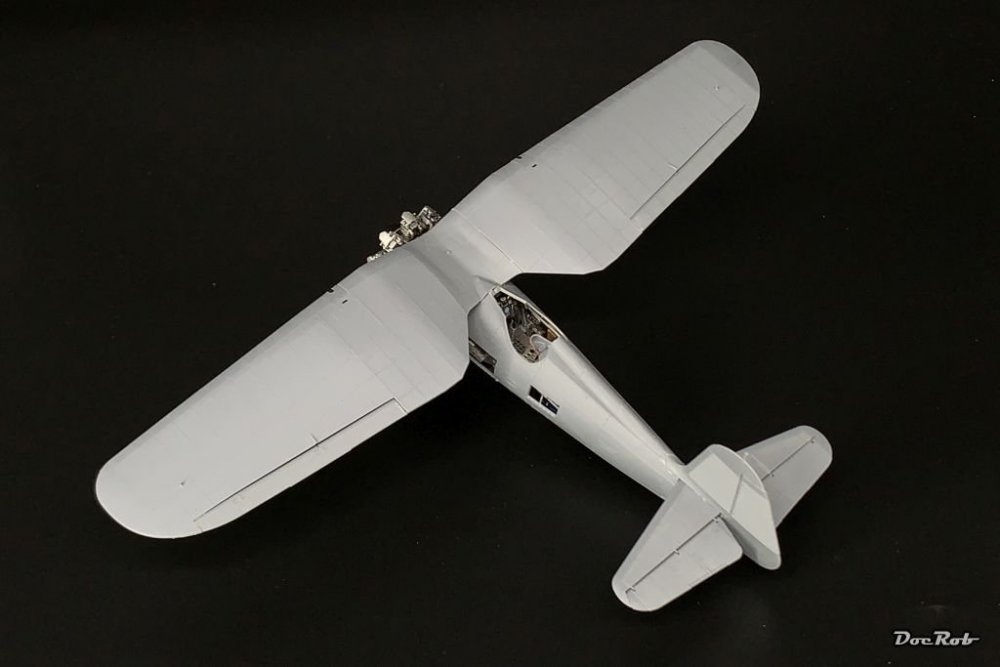
Today I added the wheel struts, which are reinforced with a PE strip, to get the angle right, easy, after the CA settled, I glued the plastic struts into their holes in the fuselage and let the weight of the kit taught the PE strips. I installed the wing guns, which were fixed into a bent PE bracket and pre-painted. Before gluing in the guns, I removed their barrels and drilled a 0,5 mm hole instead to mount the burnished brass barrels after painting. Next was gluing the wing parts together, no problems here, but you have to be careful, not to destroy surface details with gluey fingerprints, as they are not easy to replicate with the corrugated structure. For a while, this will be the last view into the fuselage. I plan to show the panels in open position finally, but will glue them in place temporally with a tiny amount of white glue (They fit like a glove). The machine guns will be added later, along with some detail painting. This is only a mock up pic, with the wings only dry fitted onto the fuselage. I plan to paint fuselage and wings separately and join them after decaling. Cheers Rob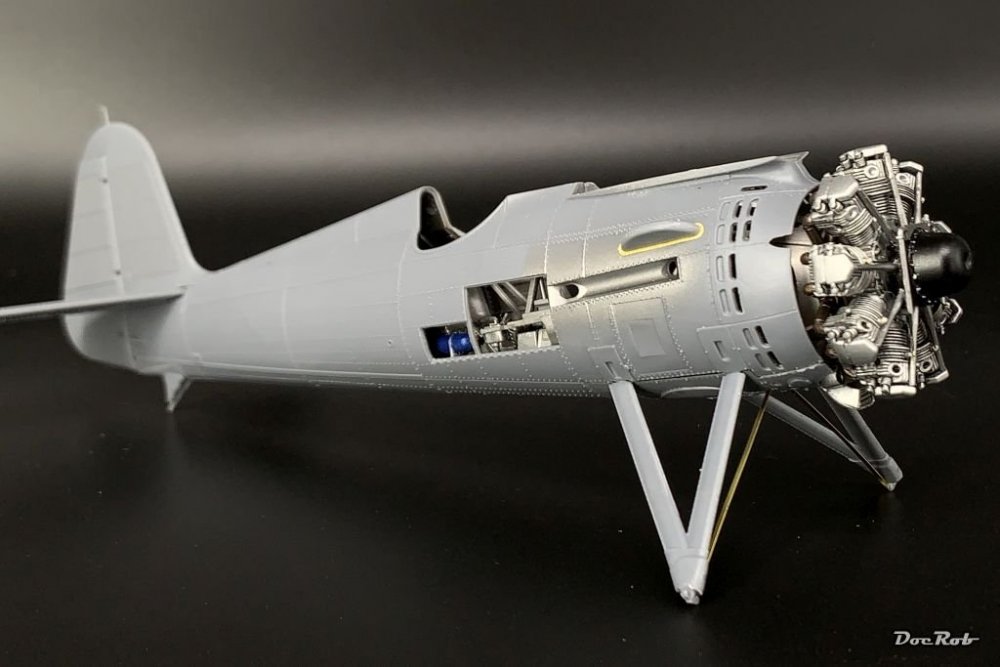

-
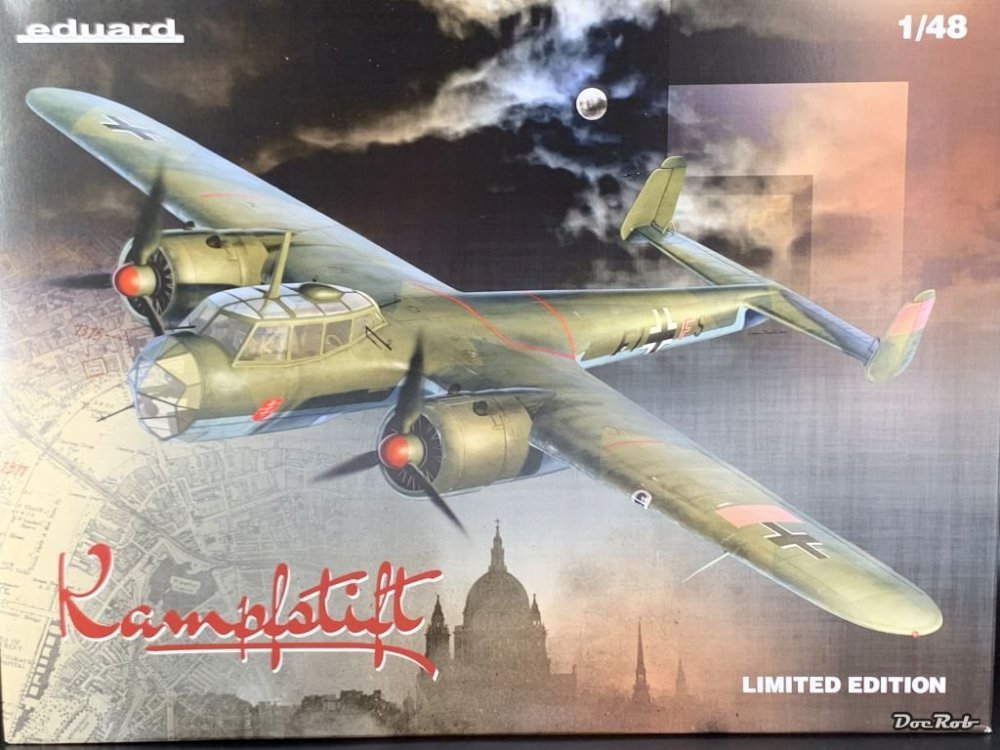
Hola Señhores, today I received my Do-17 kit in 48 scale. It's the ICM plastic for a Z1, Z2, Z3 or Z5 and includes masks, phew, resin wheels and floating device and colored PE for the pit along some new decals for eight planes. There wer to many tasty Do-17 / Do-217 builds around to let it pass. The only letdown is the 'Kampfstift' title of the boxing. To my knowledge the Do-17 was never named like this. The typical nick was 'Fliegender Bleistift' (flying pencil). Cheers Rob
-
PZL P.11c - Polish Fighter - IBG - 1/32
DocRob replied to DocRob's topic in LSM 1/35 and Larger Work In Progress
Thanks Hubert, the smoke clears more and more. Cheers Rob -
PZL P.11c - Polish Fighter - IBG - 1/32
DocRob replied to DocRob's topic in LSM 1/35 and Larger Work In Progress
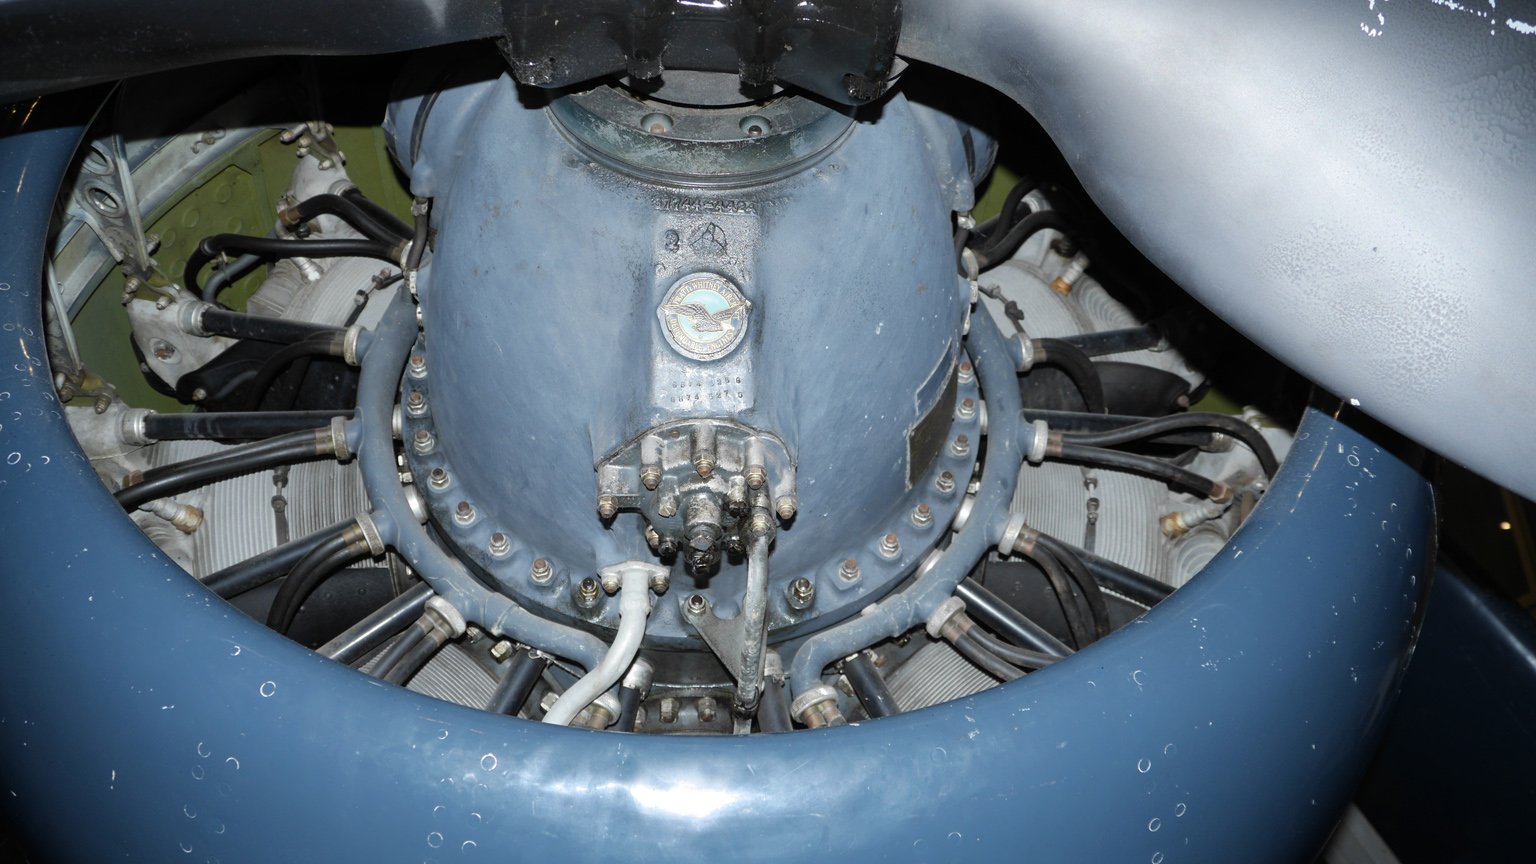
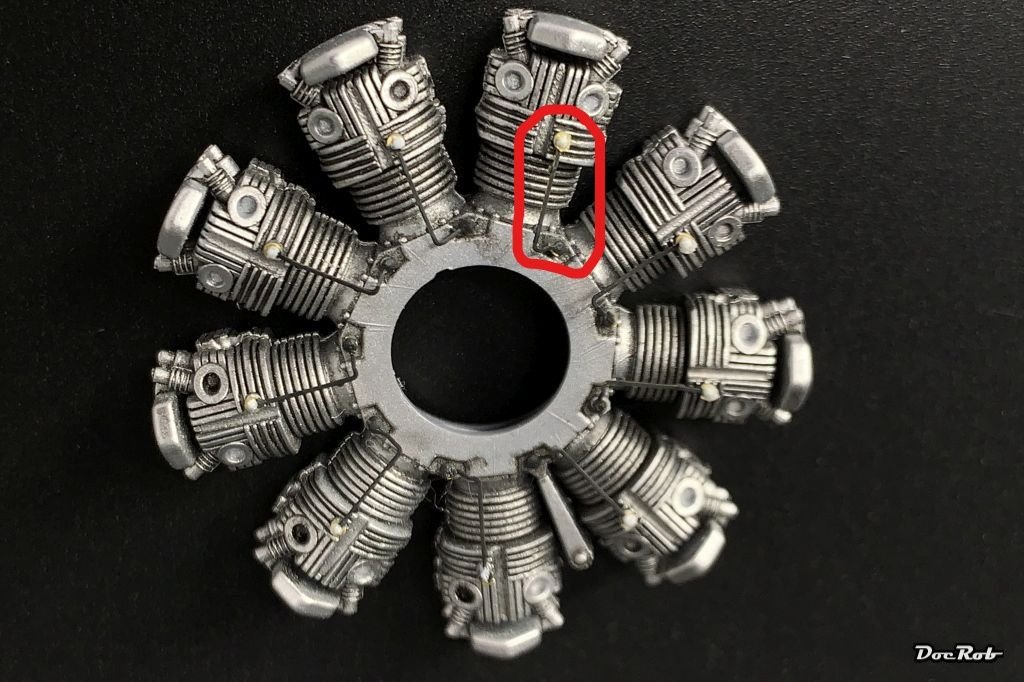
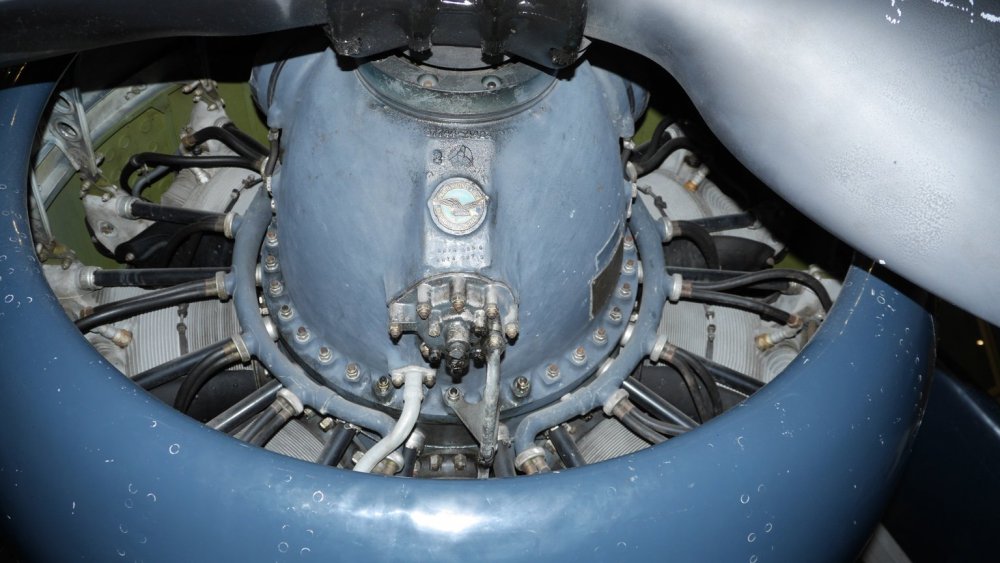
Thank you Hubert, for passing the information of the repainting and your detailed and beautiful pictures. The layout of the ignition is completely clear now, but I wonder, what IBG molded onto the front side of their cylinders, looking like a spark plug and being connected to a screw in the crank case with the PE-wire. There is no trace of that in your picture. I cropped one picture of the Bitskrieg resin engine, which featured the same thingy on the front side near the casing for the rocker arm, but they also seem to show the spark plug placement on both sides of the cylinder. Cheers Rob I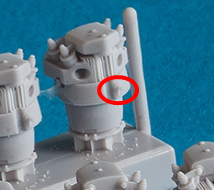
-
Tiger I Mid - Otto Carius, Malinovka
DocRob replied to Rodolfo Torres Vazquez's topic in LSM Armour Finished Work
Your Tiger looks great, heavy but convincingly weathered, which adds to the nice camo paint job. Cheers Rob -
PZL P.11c - Polish Fighter - IBG - 1/32
DocRob replied to DocRob's topic in LSM 1/35 and Larger Work In Progress
Thanks for the pics Martin. It almost seems as if the IBG kit has more surface details than the one in your photos. They must have got the original wrong for sure . The stressed skin effect looks great with the harsh lighting, IBG didn't care about that. Other pictures of the Krakow Museum PZL show a very glossy paintjob, but in your pictures it looks more realistic matte. Does anybody know, if they repainted the PZL or was the gloss only photoshop magic? The volcano is indeed threatening here too. After I removed ash for some hours yesterday, today I awoke in the middle of the night with itchy eyes and the feeling, I could only breath with half of my lungs and had some bad headaches . The eruption doesn't seem to stop soon and I never looked so often for the wind prognosis. Cheers Rob -
Nicely detailed sub assemblies you built there Phil, Can't wait to see the cockpit develop. Cheers Rob
-
What is on your bench right now ? Share a picture :)
DocRob replied to Martinnfb's topic in Modelling Discussion
Nice, I like those cars with their needless opulence. That's maybe, because I don't have to drive them . Cheers Rob -
Superclean and super detailed work on the engine Peter, your ignition wiring looks phenomenal. I was about to write, that there is no need for a resin engine, when I saw, that Tamiya may have missed the black metal fairings around the lower parts of each cylinder. I remember these well, because I built mine with the Brassin engine and they where a pain to mask and paint. Cheers Rob
-
Hasegawa P-40M/Kittyhawk III next up
DocRob replied to JohnB's topic in LSM 1/35 and Larger Work In Progress
The cockpit looks great John, albeit the seat seems to be a bit thick casted, which is relatively prominent due to the aluminum color. Cheers Rob -
PZL P.11c - Polish Fighter - IBG - 1/32
DocRob replied to DocRob's topic in LSM 1/35 and Larger Work In Progress
@harv, @Peterpools, @GazzaS, @Kaireckstadt: Muchas gracias Amigos. @HubertB, I knew, I should have looked deeper into some source material . Now I know, that my engine lacks the ignition wiring. I will spend a lot of work on the fairings, to distract from my failures with the engine. I ordered an ICM Gloster Gladiator MK.1 kit yesterday, so I will have a second chance with the Bristol Mercury. Cheers Rob -
PZL P.11c - Polish Fighter - IBG - 1/32
DocRob replied to DocRob's topic in LSM 1/35 and Larger Work In Progress
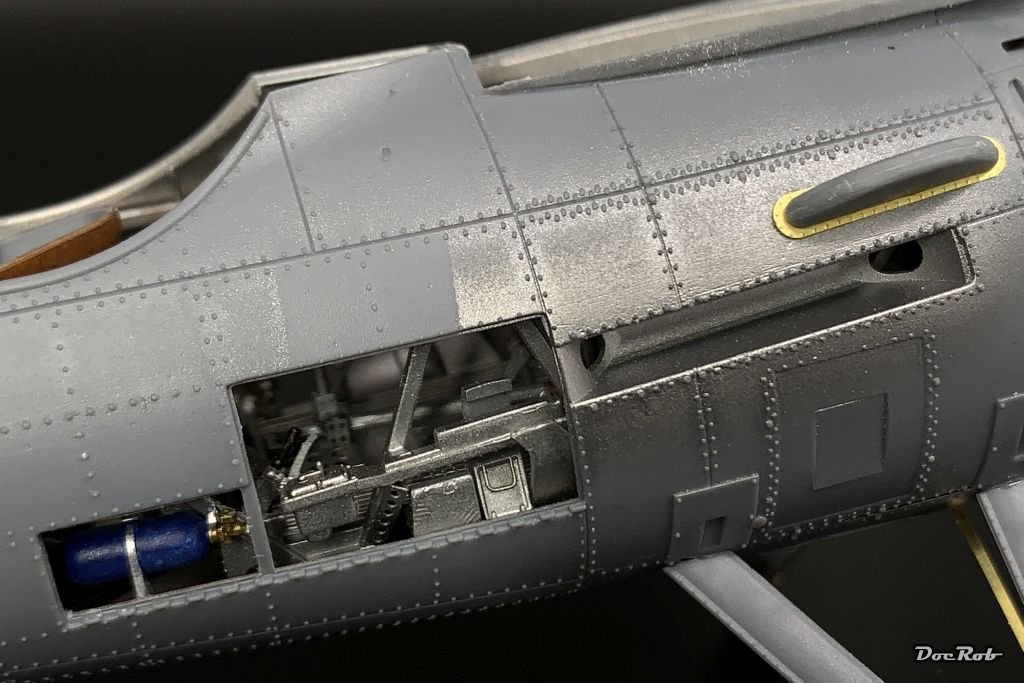
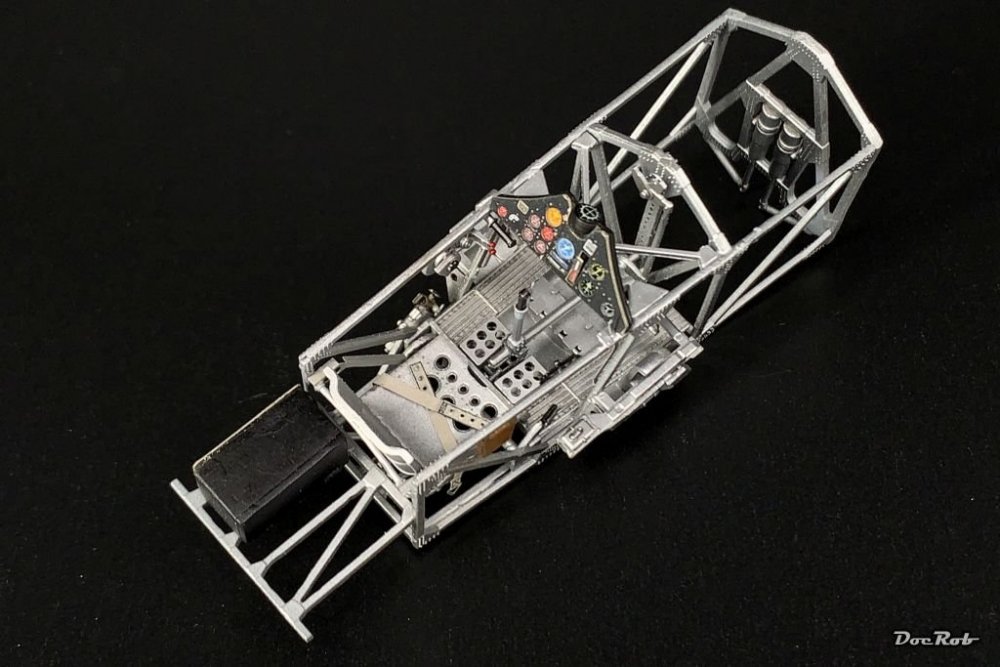
The last days, were full of distractions from the volcano thing, which nags always in the back of the head, as you can do nothing about it, a strange feeling. These distractions were mostly not modelling related, but I managed to close the fuselage and attach the tail. I glued the fuselage firs on the bottom side, because I noticed a small, but closable gap on the upper side. After curing, the upper side was glued without troubles with the help of some rubber bands. The rudders are a bit strange designed and you should test fit and open the holes for the rudders with a 1mm drill bit. Cheers Rob Waiting for the glue to cure. The surface detail of the kit is absolutely top notch. Like most times, not to much of the cockpit area remains in vicinity, but the silver color helps a bit.

- 127 replies
-
- 12
-

-
PZL P.11c - Polish Fighter - IBG - 1/32
DocRob replied to DocRob's topic in LSM 1/35 and Larger Work In Progress
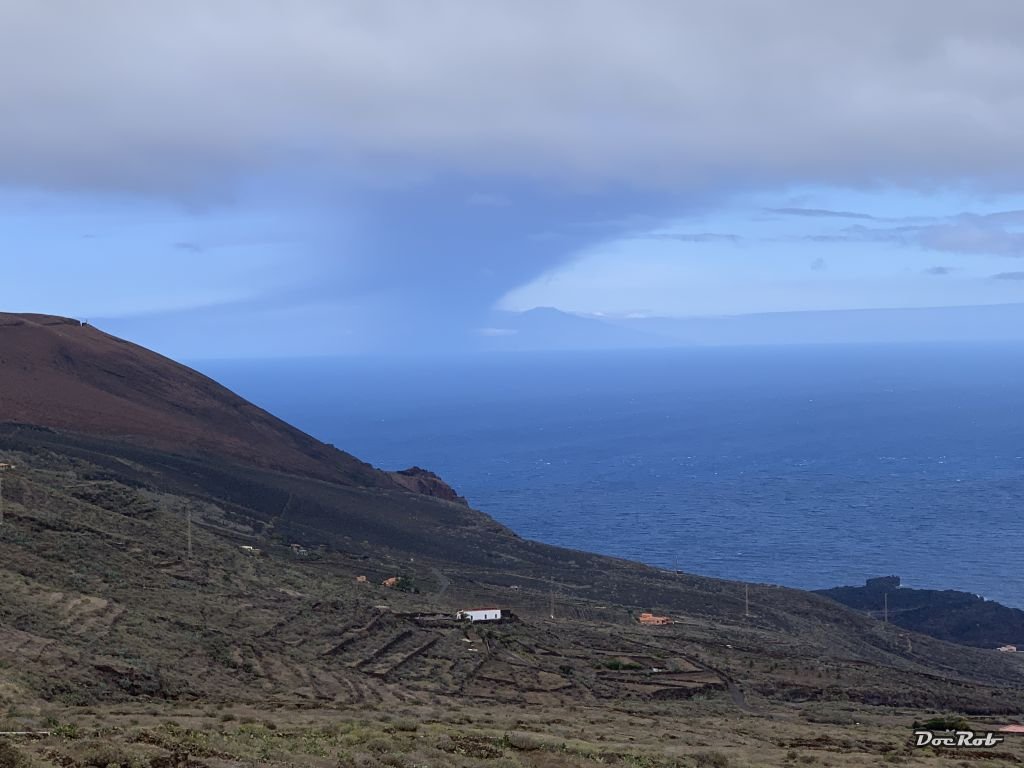
Thank you Peter, since today we were hit by the ashes of the volcano as the win is now from the north. Nothing compared to what the people of La Palma are going through, but here things are turning black now, literally. I was surfing in the morning and on my way back home, I snapped this shot of the ash clouds. Cheers Rob
-
That's a big gun for a tiny tank. With the armor shields applied, you can clearly see the improvisation, construction wise. Must have been very cramped inside and behind the shields. I like the weathering on the lower part and gun. Cheers Rob
-
Nice choice Gaz, I was thinking about buying one more than once. With the kits which IBG and ICM, maybe Roden offered in the last time, there maybe is a chance of a LS-version. If it would be the better choice, I don't know, as the Gaspatch kit looks muy bueno. Cheers Rob
-
Thanks for the pics Martin and congrats on the wins. Some impressive build, paintjobs and presentation in the contest. Cheers Rob
-
This seems to be a nicely detailed kit and your fine work does it justice. I'm like you not very comfortable of painting and weathering in confined spaces, but had to learn it on my last two build. With a bit of pre planning some of the problem areas mostly are sorted out easily, the res,... Cheers Rob
-
PZL P.11c - Polish Fighter - IBG - 1/32
DocRob replied to DocRob's topic in LSM 1/35 and Larger Work In Progress
Thank you Gaz, in the moment we are fine here and have no influences from the volcano other than some headaches and a bad taste, because of the ash and gases. The situation on La Palma is worse though, with more than 1000 houses destroyed and there is no end in sight, as the volcano opens new blowholes. The lava entered the sea and besides forming a new half isle, there are developing acid gases, which we hope will not be blown in our direction. Today, we had some waves and I had a refreshing and exhausting long surf session, which freed my mind and felt good, because bad thoughts accumulate over time, with that eruption in the background. One of the worst aspects with the volcano is, that nearly all forecasts by the scientists proved wrong. Sure, there is no exact predicting an eruption like this, but it feels like a total fail to me. It teaches us to prepare a bit more, as we are living on a volcano as well. I'm not a prepper, but we will at least keep our important documents in reach. The PZL build is another good medicine for unrest souls like me, which make it hard to leave it on the bench. Today though, I will relax and probably not build any further with the aching muscles of my arms and Tomorrow, it's NFL's early game with my fav Cowboys on the screen. Cheers Rob -
PZL P.11c - Polish Fighter - IBG - 1/32
DocRob replied to DocRob's topic in LSM 1/35 and Larger Work In Progress
Thank you Hubert, I'm definitely not an expert with the license build Mercury engine and haven't cared very much about historical correctness of the coloring. The pictures I viewed, showed different layouts and coloring. The cylinder heads sometimes are silver, sometimes half black,... . You are absolutely right about the push rod fairings and rocker covers, which seem to be black on the original engines. This to me looks like an ignition harness, albeit on some pictures, I saw spark plugs on the side of the cylinder head, but some seem to show this layout. Like you said, most of the engines features will be hidden behind the fairings and I often do modelling with the sense of making it look right to me personal. I do not claim to build historical correct and like my bit of free styling, but nonetheless, I' am very interested in your facts and opinions, as I like to learn from you all. I know, you spent some time with these type of engines, even doing CAD-drawings for 3D printing, so I can understand, when my approach lets your toa nails curl Thanks for letting me know Hubert Cheers Rob
-
PZL P.11c - Polish Fighter - IBG - 1/32
DocRob replied to DocRob's topic in LSM 1/35 and Larger Work In Progress
Thanks Kai, normally I'm not very fast, while building my models, but this one got me hooked. I had some stressful days, the last weeks, so it's a relief to find some distraction free time for the PZL. This plane to me stands for the brave resistance, Polish people put up against the fascist hordes, invading their homeland. Cheers Rob -
PZL P.11c - Polish Fighter - IBG - 1/32
DocRob replied to DocRob's topic in LSM 1/35 and Larger Work In Progress
Thanks a lot, I like to wander off the trotten pathes a lot. This kit draws you in, you don't want to stop and I haven't expected it that way. Cheers Rob -
PZL P.11c - Polish Fighter - IBG - 1/32
DocRob replied to DocRob's topic in LSM 1/35 and Larger Work In Progress
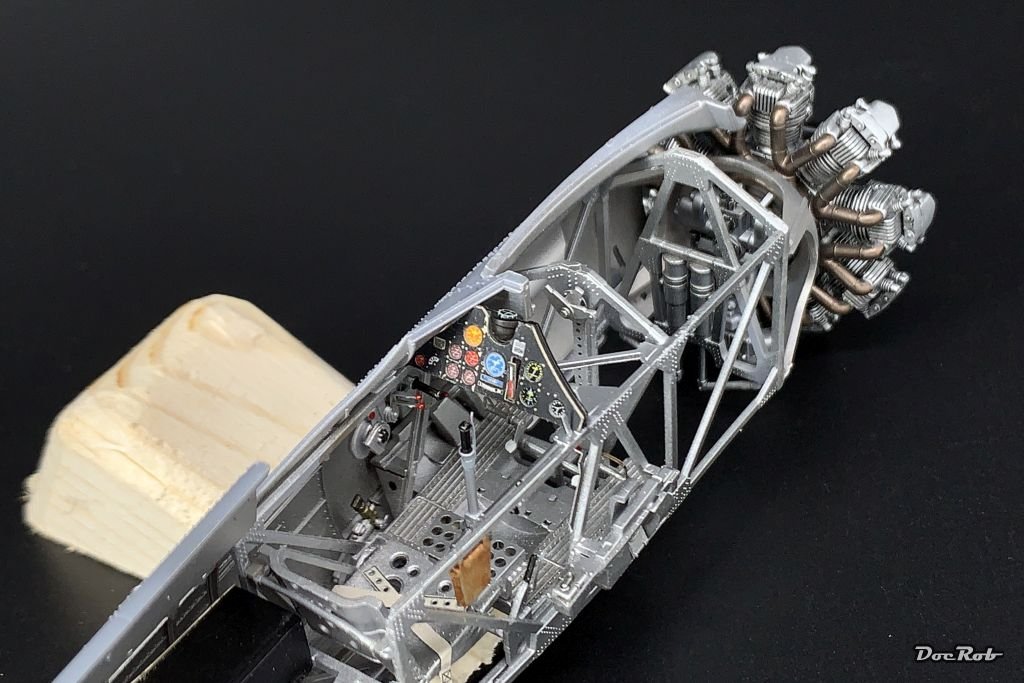
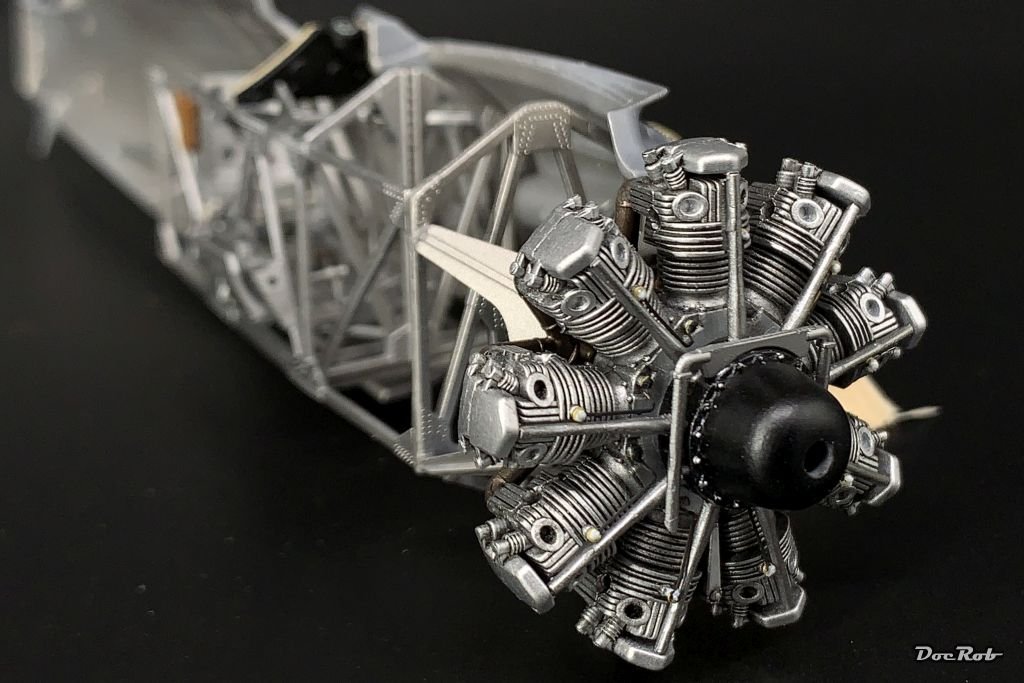
Quite a productive day today, I started to close the fuselage after finishing the engine and engine struts and glued first the cockpit framing and then the engine in one fuselage half. The engine is fixed on only four tiny attachment points, I hope that will hold up. Closing the fuselage, I started to glue only the underside and let it cure and then I close the tiny gap on the upper side with a bit of force applied with rubber bands. Cheers Rob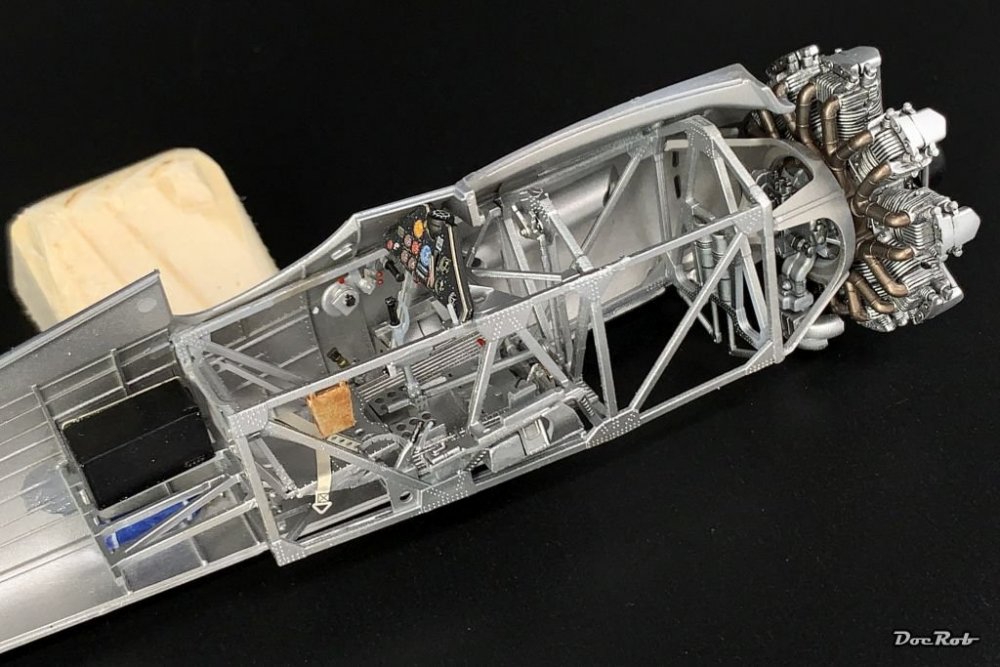


-
PZL P.11c - Polish Fighter - IBG - 1/32
DocRob replied to DocRob's topic in LSM 1/35 and Larger Work In Progress
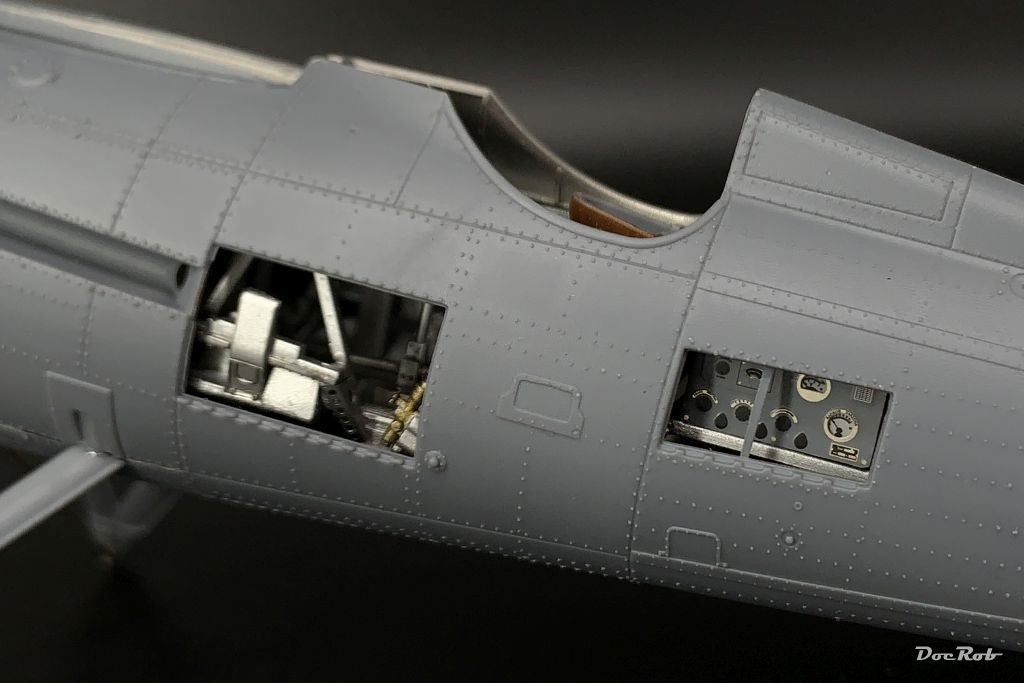
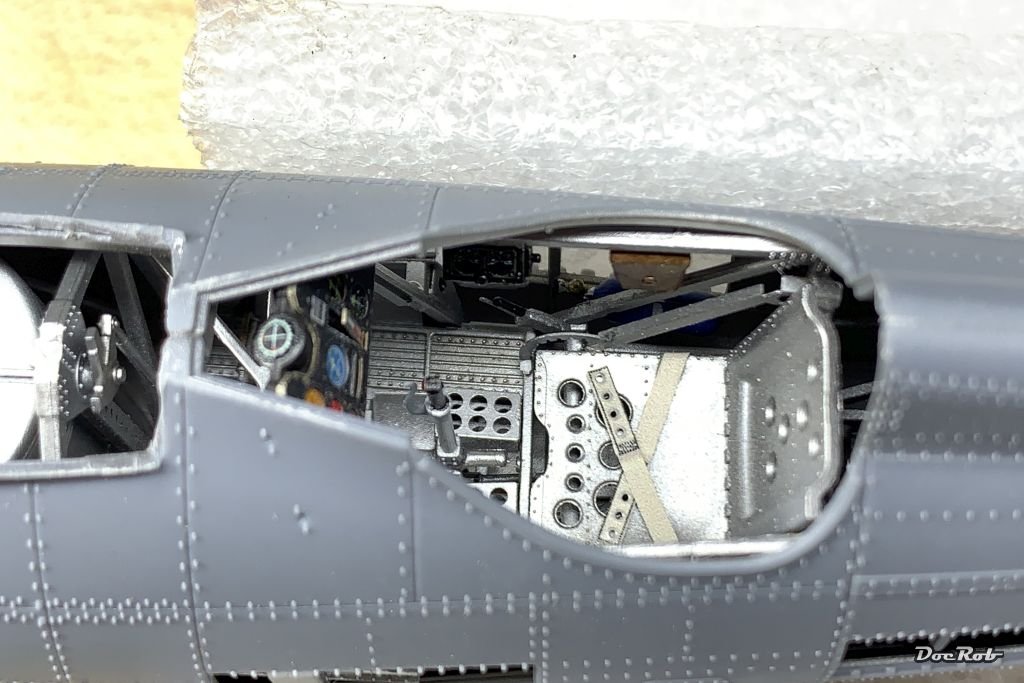
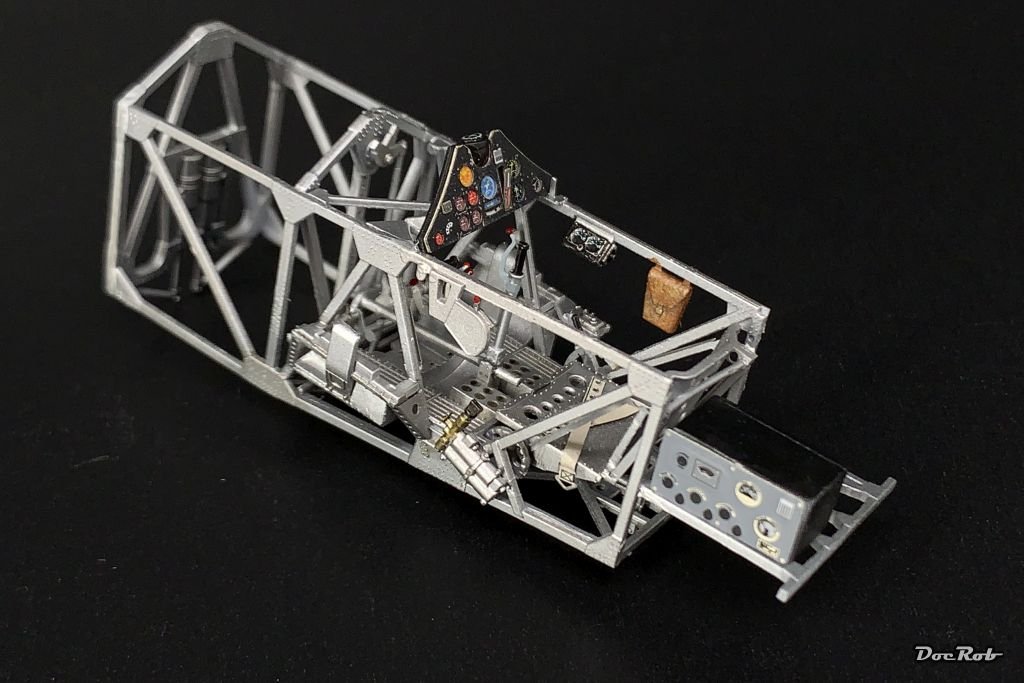
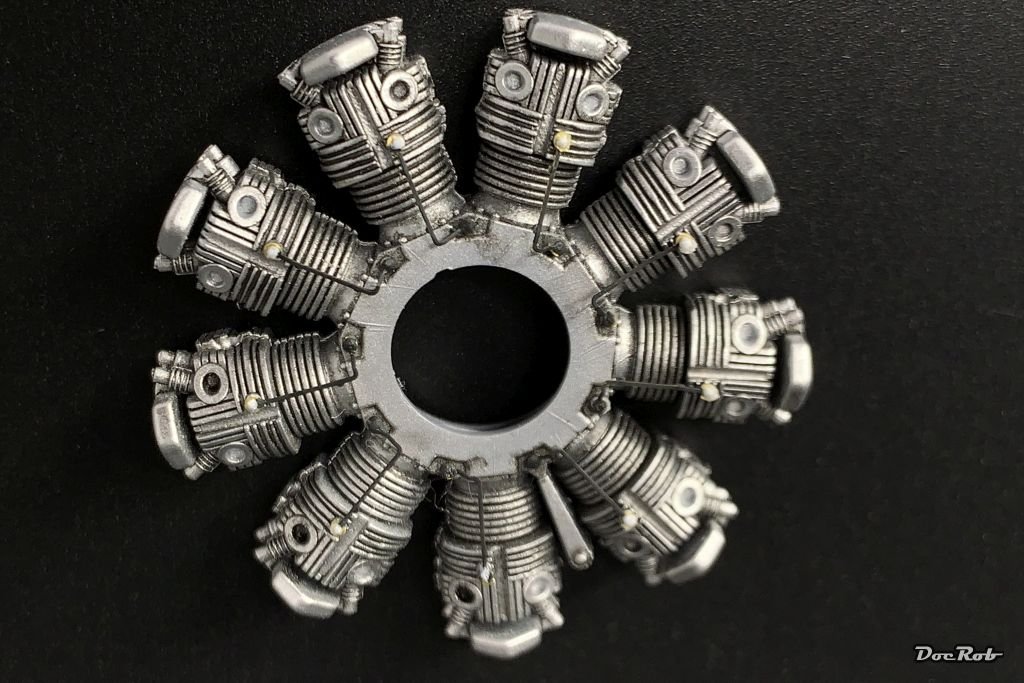
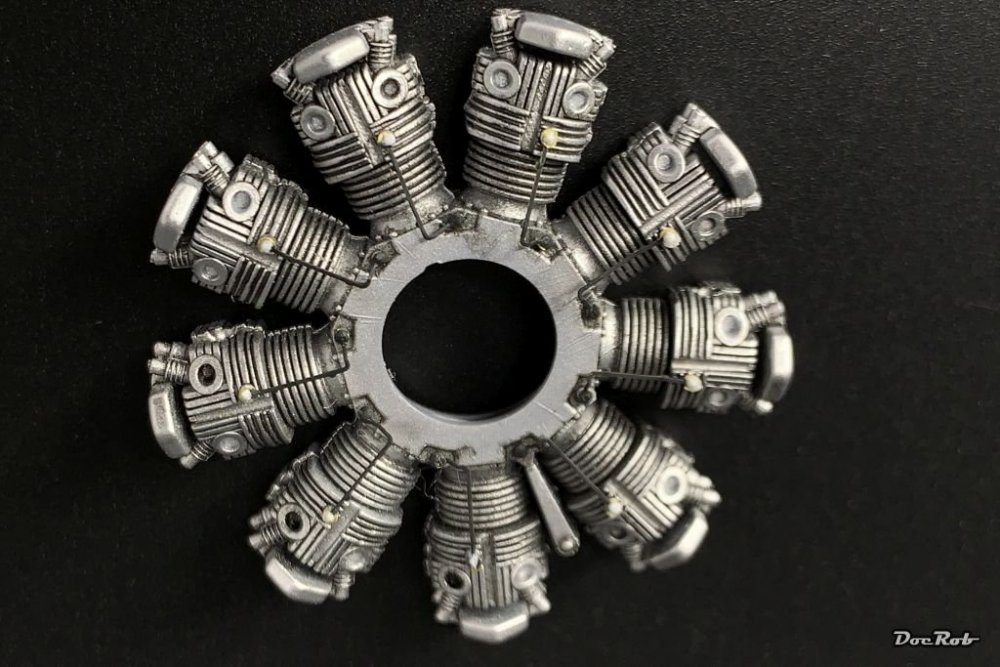
The cockpit is almost done with painting, maybe some more pigments to apply. I added the Yahu dashboard and radio panel, which do look great, but especially the radio would have benefited from painting the plastic, to maintain the knobs. The seat belts are printed PE from Eduard and the main harness will be added later with the headrest. The headrest and leather bag in the pit, where painted with oils for effect. Cockpit floor and some other parts were treated with a brown panel wash. The compass on top of the IP and the side instruments on the cockpit framing got Airscale decals applied, because there were no decals in the kit. The engine block was sprayed dark aluminum and received to layers of black panel wash. Next I painted the spark plugs white and bent and glued the nine provided PE ignition harnesses in place and painted them Nato black. I sometimes ranted about the IBG manual, but there is also some shine. All PE parts are separately shown in 1/1 scale with pointing out the exact angles to bend, a great idea. Cheers Rob
-
PZL P.11c - Polish Fighter - IBG - 1/32
DocRob replied to DocRob's topic in LSM 1/35 and Larger Work In Progress
Thank you Kai, I love to work with metal colors and this kit is so inviting in this aspect and generally is very detailed out of the box, a pleasure build . Cheers Rob