DocRob
-
Posts
7,048 -
Joined
-
Last visited
Content Type
Profiles
Forums
Events
Gallery
Everything posted by DocRob
-

Mengnut Wings Fokker Dr. 1
DocRob replied to Wolf Buddee's topic in LSM 1/35 and Larger Work In Progress
The engine is looking great, with the beautiful metal shades and added detail. I have only the Roden kit in stash along with some goodies. I may buy a second Lukgraph engine for the DR I, the first was used in the Mikro Mir Fokker D.VIII and it's a splendid piece of 3D printing. The Mingweng engine doesn't need a substitute it seems, just the updates you added. Cheers Rob -
RFM Panzer IV Ausf H (Early)
DocRob replied to Bomber_County's topic in LSM 1/35 and Larger Work In Progress
That's why I always liked the Panzer III variants better, shorter chassis, less track links. Only 180 to go . Cheers Rob -
Atlas Cheetah E Scaleworx Conversion
DocRob replied to GusMac's topic in LSM 1/35 and Larger Work In Progress
This will be a bright scheme Gus, love it. If the white underlayed yellow is bordering against the other colors, you may can sand this back a little, carefully. This will look stunning in the end. Cheers Rob -
Eduard F6F-3 Hellcat, USS Princeton, flown by Gordon Arthur Stanley in 1/48
DocRob replied to DocRob's topic in Non LSM 'WIP
Thanks Phil, you should be tempted, it's a pure fun project and I guess, the 1/48 Eduard Hellcat is the best H-cat in any scale. It is an easy build and a great canvas for painting and weathering, with lots of schemes to choose and last but not least, it can be build out of the box, if you get a Profi Pack, with the PE included. Cheers Rob -
Takom Panzerkampfwagen I 1/16 scale... with figure
DocRob replied to GazzaS's topic in LSM 1/35 and Larger Work In Progress
Great work on the commander, I like the skin- and black tones in their variations. On the tank, I especially like the wheels and rims and the different dust tones enhancing depth of the undercarriage. Cheers Rob -
Eduard F6F-3 Hellcat, USS Princeton, flown by Gordon Arthur Stanley in 1/48
DocRob replied to DocRob's topic in Non LSM 'WIP
Thank you Peter, the Hellcat was a pure pleasure project, aside from the wet transfers problems, which made it easier to focus on painting and finish. Cheers Rob -
Takom Panzerkampfwagen I 1/16 scale... with figure
DocRob replied to GazzaS's topic in LSM 1/35 and Larger Work In Progress
Great detail painting with the comannders face. I don't see, why the given position of the commander would not be suitable, only because there are no existing photos. Seeing the guys on the river picture, I can't imagine, sitting upright unsupported in a shaking tank would use up a lot of energy to maintain the body tension. Interesting thought, put in a short phrase, I haven't layed that out to myself that clear. Now, that you set me on the track, I have to admit, being more of an artsy interpreter, or to use other words, mildly freestylin' . On the other hand, I think it's really difficult to judge from historic pics in general. I'm a photographer since 45 years and lots of things changed only in this period. I will figure some of the points, I think have influence. - B&W pics taken with an analog camera are not comparable to digital B&W pics, at least not with basic settings. There is a completely different kind of contrast, with analoge film tending to have dark areas darker. - Photographers often used filters for B&W analoge film, like Peter said, to further enhance contrast, or reduce light exposure, ..., which often leads to changing color saturations and hues. - You often have only hints about the circumstances the picture was taken, concerning light, exposure time, reflection,... - Often, not enough is known, about the pictured materials, like how reflective was a coating to the bare eye. - If you go further back in history, there were even different materials and processes to develop film material, with their individual footstep. - You can not now, if older pictures were post processed, they often are. I just named a few aspects here, which came to mind first, but there is a wide array of possibilities, which have an influence on the image of reality. The basic story is, every picture is a lie, intended or not. Photography seems so objective, but in fact is not, because of technical aspects or artificial aspects. Basically, that is, why I'm freestylin', I form a picture in my head, which is a combination of seen pictures and imagination or to use other words, an educated guess. Cheers Rob -
Eduard F6F-3 Hellcat, USS Princeton, flown by Gordon Arthur Stanley in 1/48
DocRob replied to DocRob's topic in Non LSM 'WIP
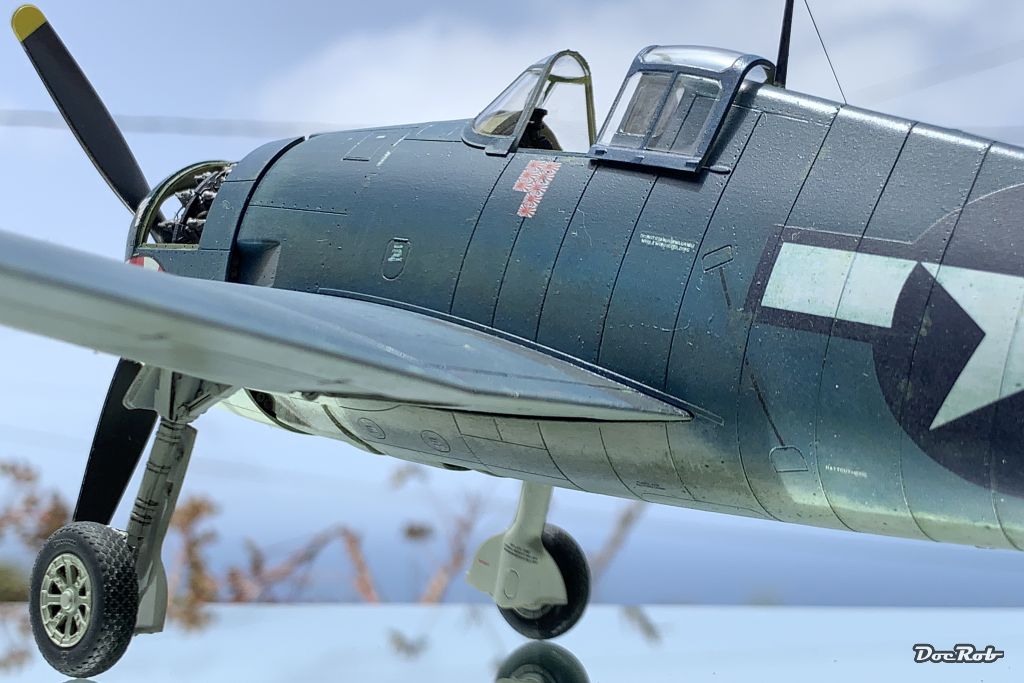
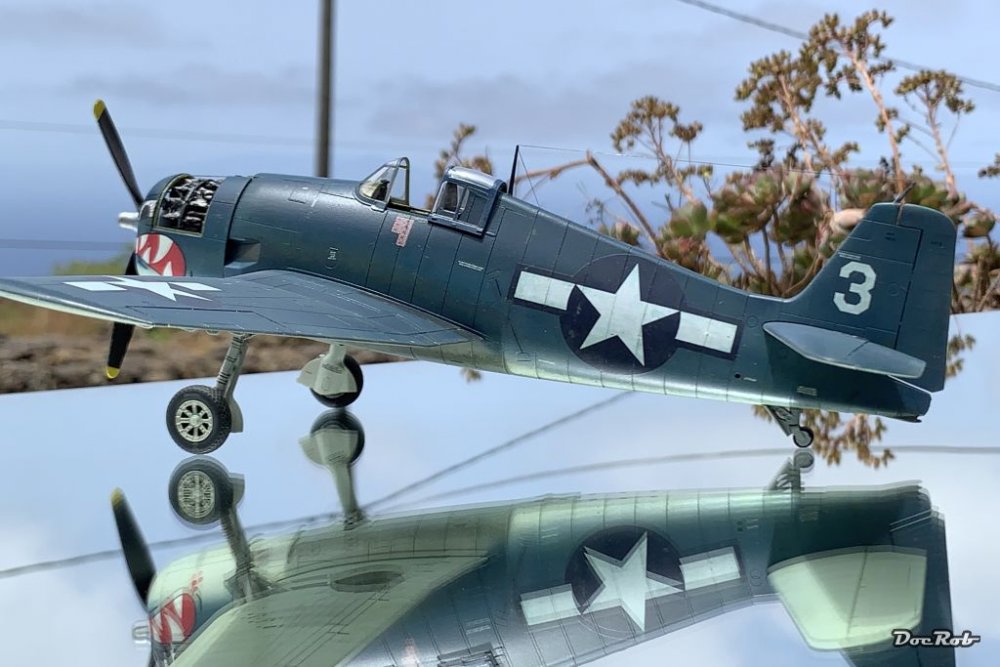
Thank you Kev, seeing the pictures I noticed, that the stencils in the area of the exhaust stain shouldn't be white, as freshly painted on . I will dust them with some pigments. Cheers Rob -
Takom Panzerkampfwagen I 1/16 scale... with figure
DocRob replied to GazzaS's topic in LSM 1/35 and Larger Work In Progress
Nice detailing Gaz, bummer with the missing binoculars. Cheers Rob -
Eduard F6F-3 Hellcat, USS Princeton, flown by Gordon Arthur Stanley in 1/48
DocRob replied to DocRob's topic in Non LSM 'WIP
Thank you Martin, exactly my thinking, I like the early three tone schemes better, than the later all over GSB. If I would do another one, it might be British or Australian. Vielen Dank mein Herr , I forgot to mention, that I used the great brass made Master barrels, which were blackened chemically. Cheers Rob -
Israeli Mirage III C with Atar9C
DocRob replied to Kaireckstadt's topic in LSM 1/35 and Larger Work In Progress
What an elegant plane, and it finally shows under the smooth primer coat. Let the fun begin . Cheers Rob -
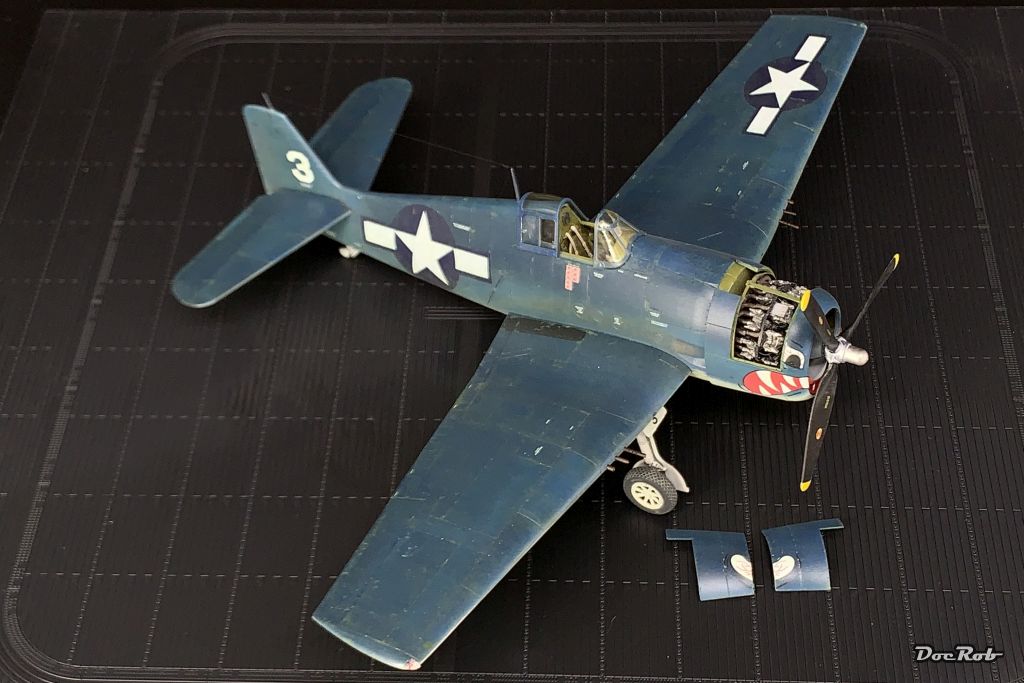
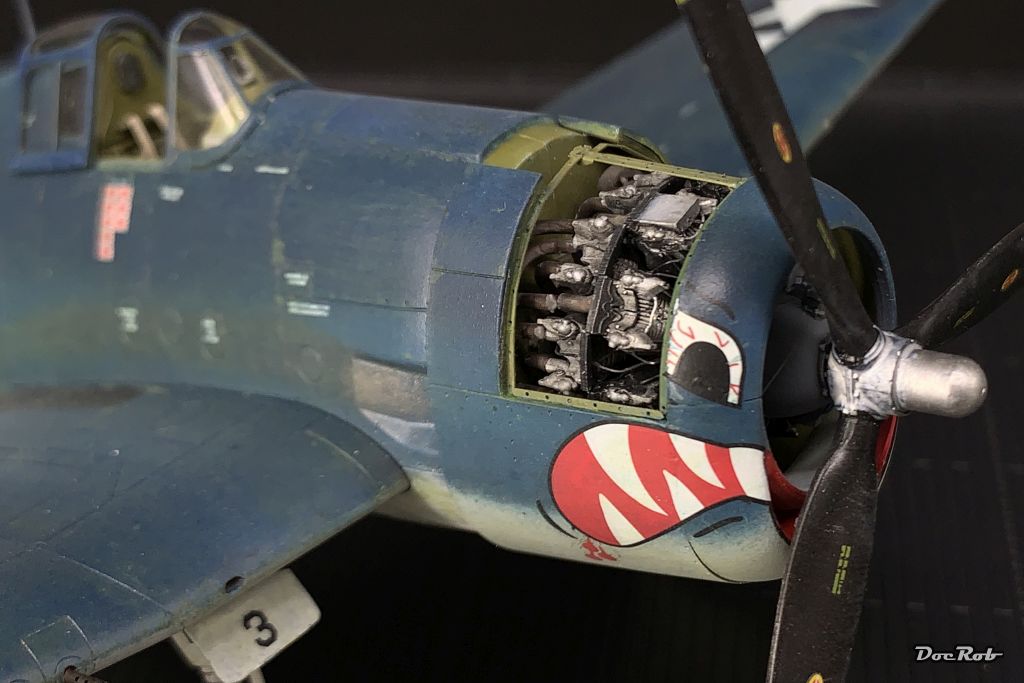
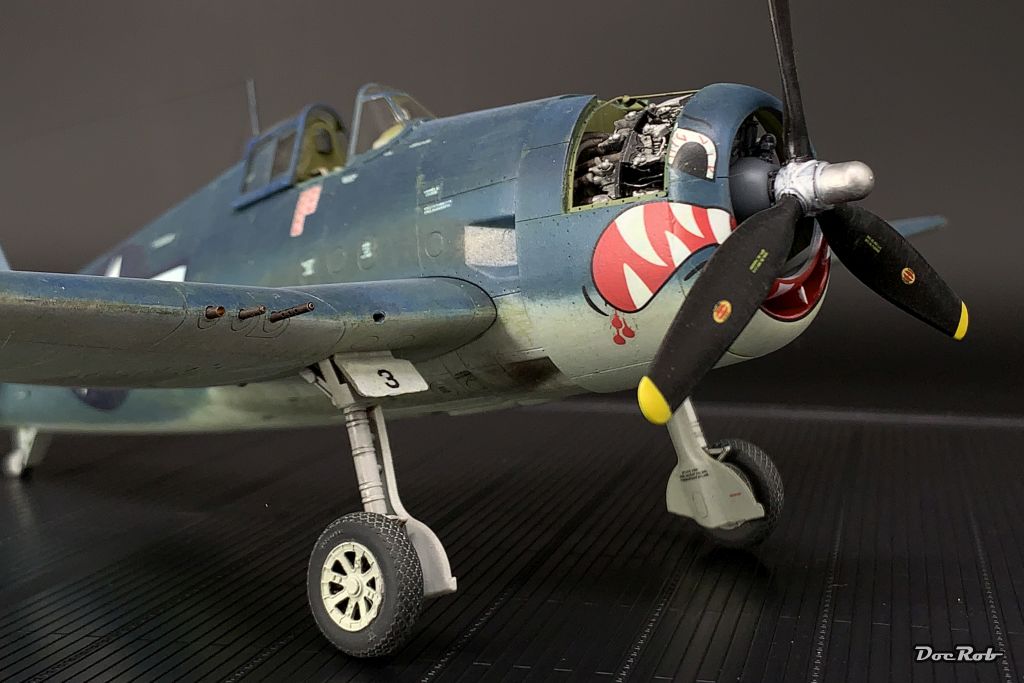
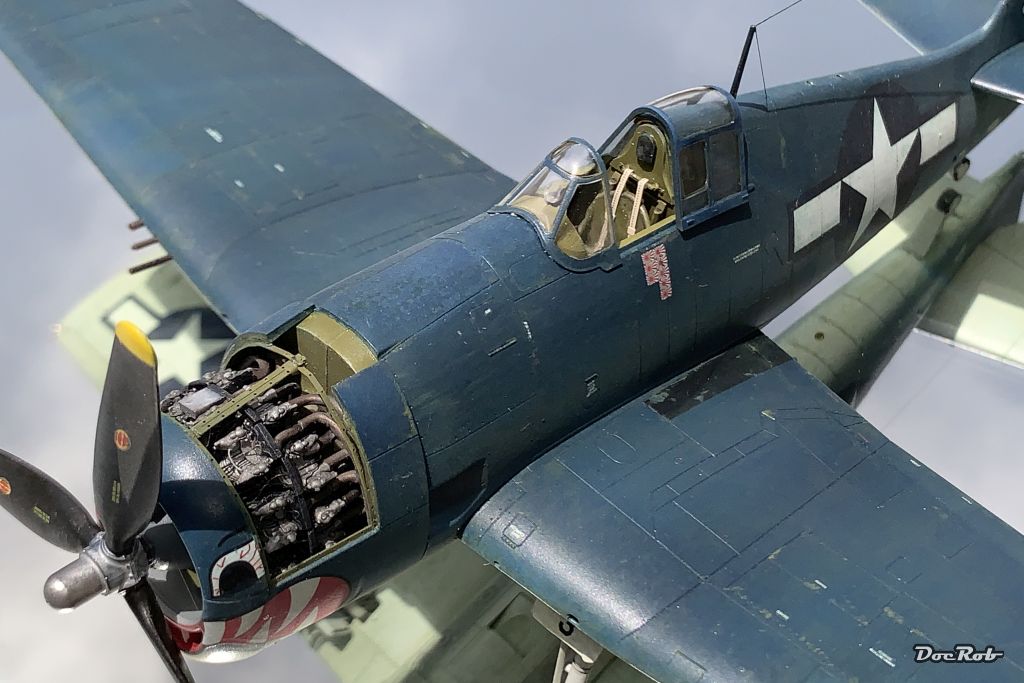
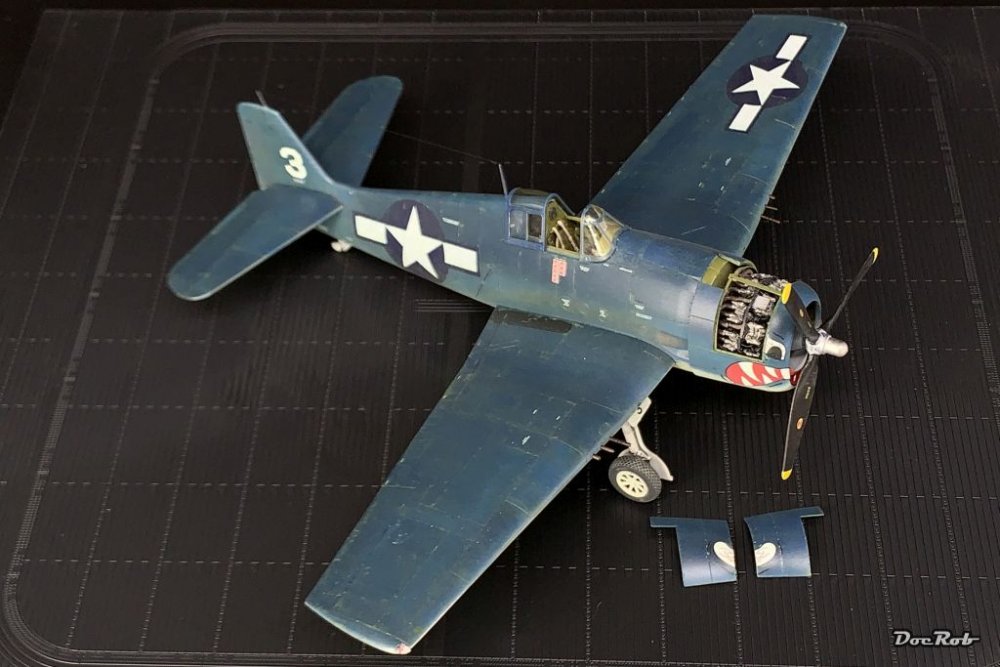
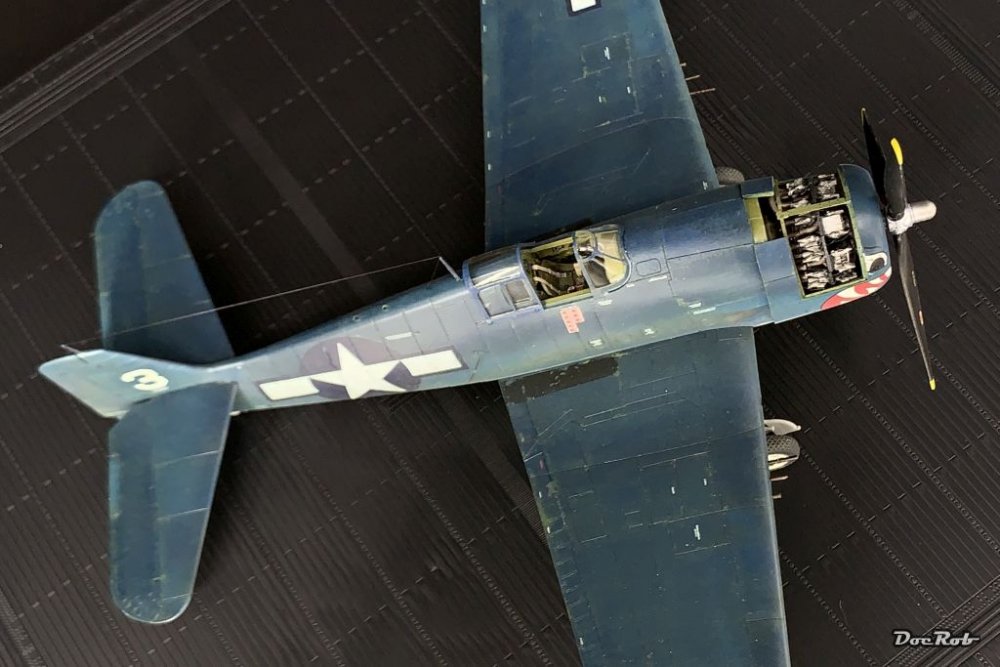
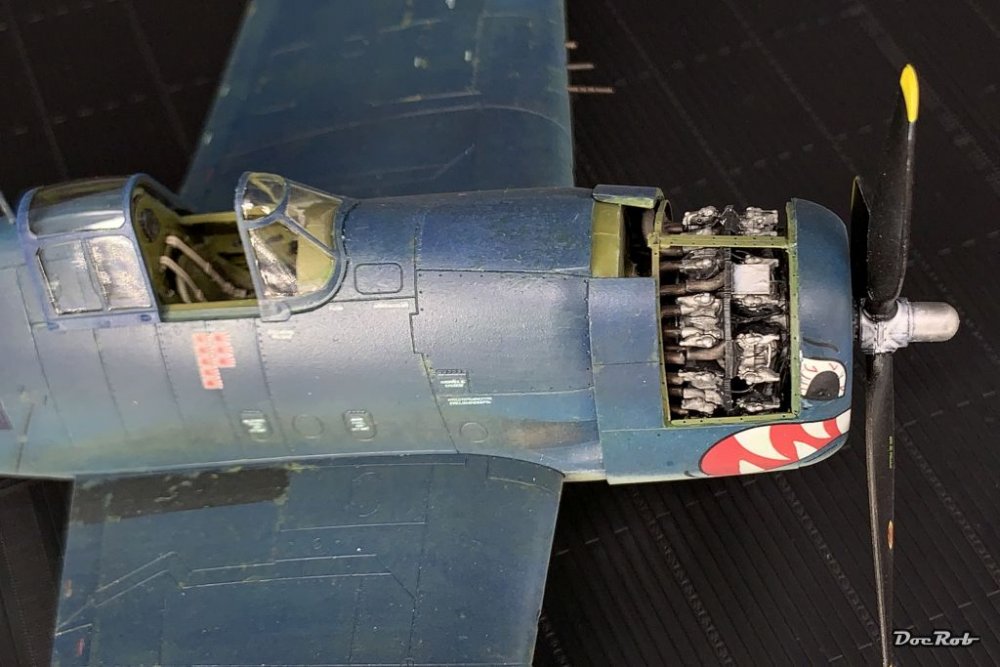
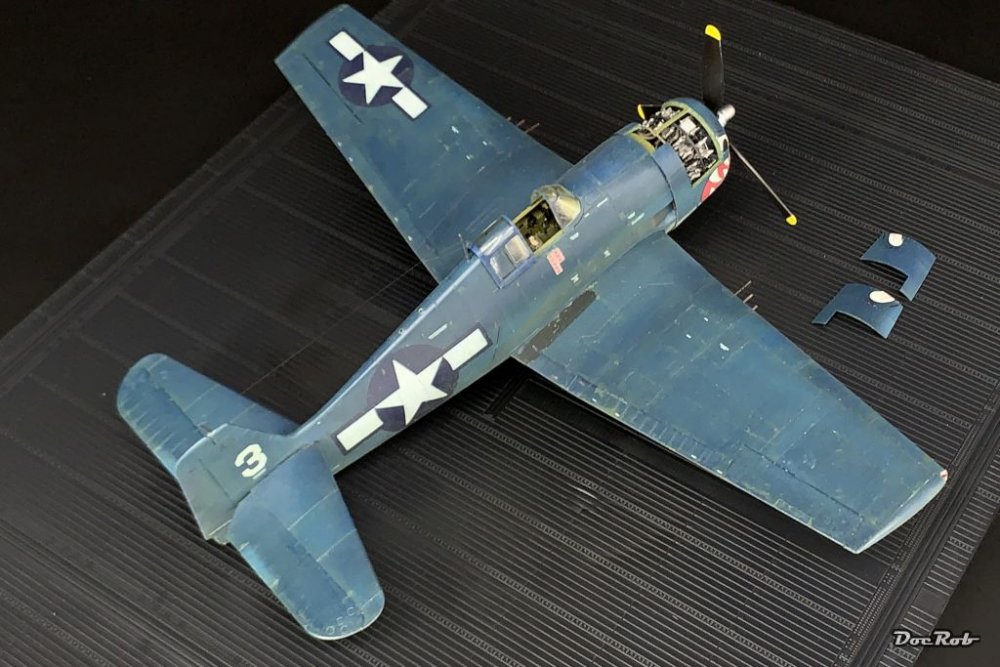
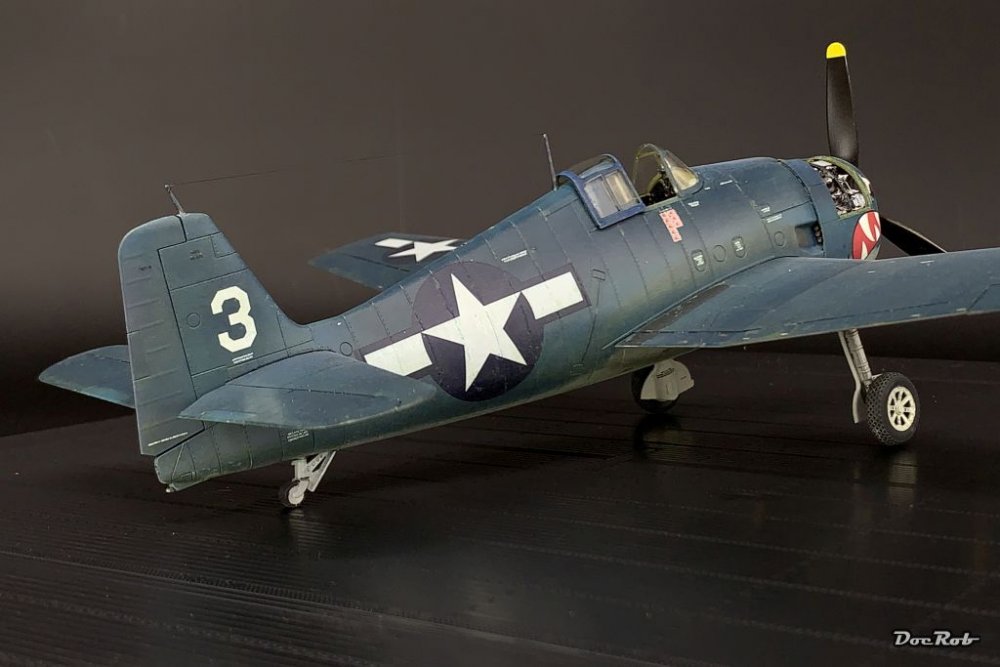
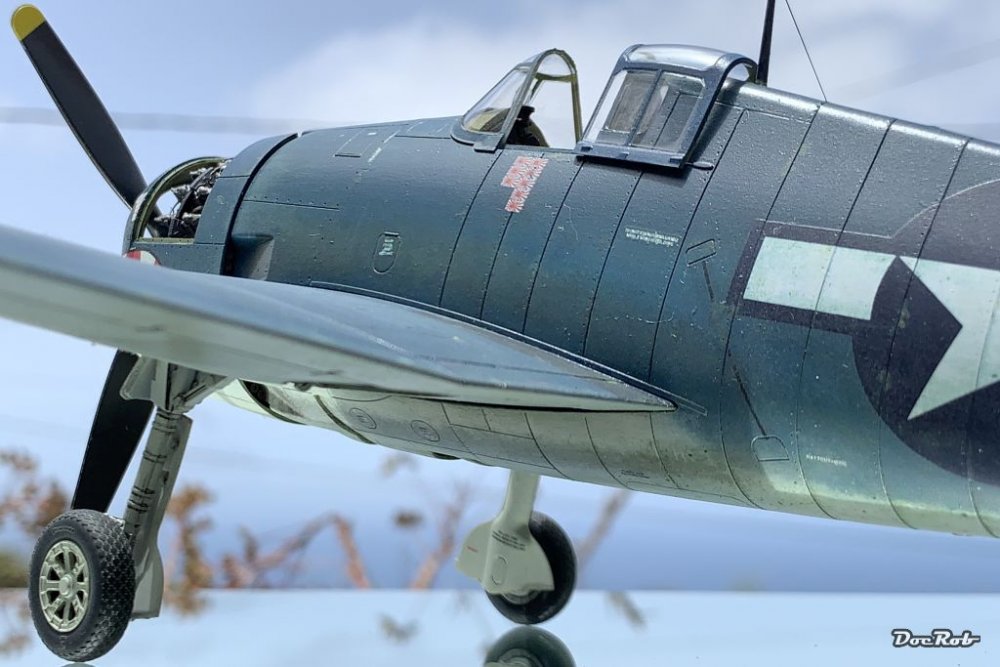
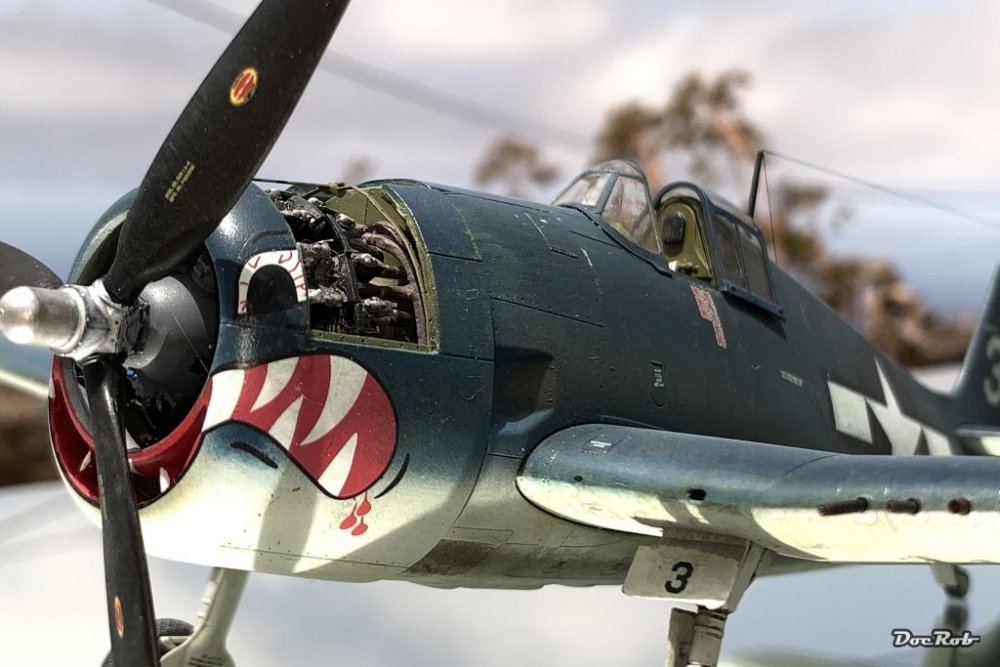
Hola Señhoras y Señhores, finally the Hellcat is done. It was thought as an in between project, but took longer than expected, what I should have been expecting, knowing me . The kit is very good, but if you would be interested in, there could be a bit more cockpit detail. I was going for painting and finish with this build and left it as it was with the supplied PE detailing. I added the Brassin PW-2800 engine, which is a kit in the kit and an absolute gem. A little surgery was needed, to saw away the engine cowling panels, which are to be substituted with resin ones and a PE-framing. Painting was primarily done with Gunze acrylics and a heavy dose of multiple layering coats of oil colors for different effects. Chipping was done by brush in different colors too. The only real trouble was caused by the HGW wet transfers, I intended to use as a substitute for the supplied decals. They are incredibly fragile, when it comes to removing the carrier film, and I destroyed some of them, specially the eyes and fangs. After some repairs, I switched to the supplied Cartograph decals, which worked fine, phew. So here she is, the Hellcat with the cat mouth of VF-27 Cheers Rob


- 16 replies
-
- 13
-

-
You can still get some in Germany from Modellbau König, they claim to have more than five. I got mine from them. F-4 Phantom III E / J KAI - Phantom Forever2 (modellbau-koenig.de) Cheers Rob
-
Takom Panzerkampfwagen I 1/16 scale... with figure
DocRob replied to GazzaS's topic in LSM 1/35 and Larger Work In Progress
From far, it seems like Stan Laurel in DAK livery is inspecting the progress, Sons of the Desert . Great progress Gaz, the size comparison is interesting, this Tank is tiny. Cheers Rob -
The surgery and extra effort payed well off, the Fokkker is a beauty. Always good to see an oldie turned into a goldie. Cheers Rob
-
Bronco 1/35 Type XXIII U-boot
DocRob replied to BlrwestSiR's topic in LSM 1/35 and Larger Work In Progress
Is that the one which followed you, without you noticing ? I'll be interested to see, what you gonna do with it. At least, it will drain your paint rack, given the size. Cheers Rob -
Your surface is so smooth, the real one would have gone 50km/h faster with that type of finish. Cheers Rob
-
Wingnut wings Hansa Brandenburg w.12 1/32
DocRob replied to Mihailo1994's topic in LSM 1/35 and Larger Work In Progress
It seems, like you found your 'real' art, keep it coming, we are patient spectators . Cheers Rob -
I've seen yours and it raised my interest. I'm aware of the more plain future boxing, but it was the disco glitter livery, which sealed the deal. It seems like you have to adopt to a new role , LSM Head of Advanced Influence or HAI in short, reads nice on a business card. Actually I like being influenced and got my purse drained, at least model wise . The F-4 could easily be my next build, lets see. Cheers Rob
-
1:32nd scale Hansa-Brandenburg W.20
DocRob replied to sandbagger's topic in LSM 1/32 and Larger Aircraft Ready for Inspection
You created a beauty and the setting with the figures fits nicely. Hard to imagine, to assemble that plane in rolling waves onto an U-boat. I would prefer to assemble the resin version, instead of being seasick, while putting the wings into place. Cheers Rob -
Takom Panzerkampfwagen I 1/16 scale... with figure
DocRob replied to GazzaS's topic in LSM 1/35 and Larger Work In Progress
Thanks for the how-to, the result is great, Takom could have designed that a bit better, though. Two millimeter are a lot. Cheers Rob -
lead Lead wire (various shapes/sizes)
DocRob replied to JayDee's topic in LSM-Related Reviews (military figures etc)
Thanks for showing the product. I have lead wire from Plusmodel in different diameters, which is fine too. It's round shaped, but when I needed it rectangular, I flattened it easily using flat pliers or a piece of flat metal. I use that method for producing levers for WNW dashboards, which are flat and angled and for one side flattened cables, works great. Cheers Rob -
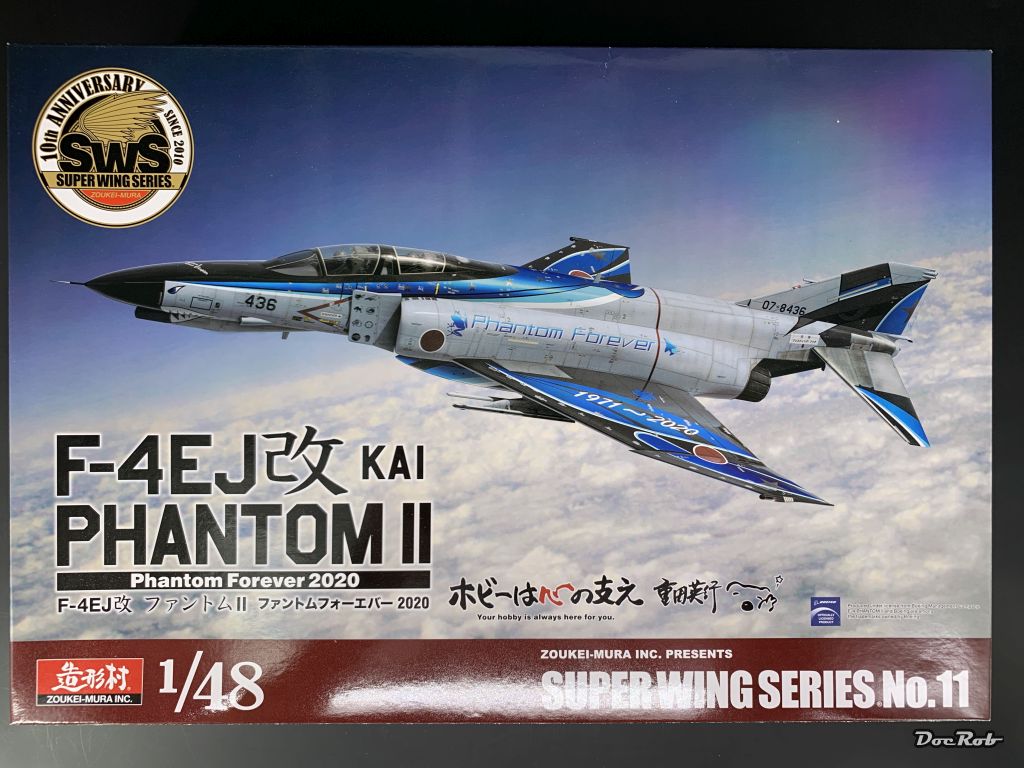
Today, among some long awaited vinyls, the postwoman brought me that beauty, a Japanese version of the F-4E in it's final livery from the Japanese Airforce in 2020. Why, some of you might ask, will you buy a ZM F-4 with the Tamiya one on the shelves soon. I got three reasons: - First and most important, I couldn't resist the disco inferno paintjob with glitter decals, luckily printed by Cartograph - I wanted a long nose Phantom, because I have a F-4B boxing from Eduard with all AM and who knows, if and when Tamiya decides to produce one. - Lastly, because the kit got a lot of praise, not the least here from Phil here. All that turned out enough to counter the arising stencil drama, where at least, I wouldn't discover if they are wrongly orientated, being Japanese . Cheers Rob

-
Israeli Mirage III C with Atar9C
DocRob replied to Kaireckstadt's topic in LSM 1/35 and Larger Work In Progress
BTW, I had no fogging issues with the water based Mr. Masking fluid (not Neo) on my futurized Hellcat canopy. I just wanted to add the impression, because it was my first use of the stuff and it works safely. Cheers Rob -
It's the Lancia Stratos of fighter airplanes, that simple . Cheers Rob