DocRob
-
Posts
7,048 -
Joined
-
Last visited
Content Type
Profiles
Forums
Events
Gallery
Everything posted by DocRob
-
If there is no proof, how the skull looked and if it was there at all, then it's up to your liking. It should be 'Die grüne Maus', maybe this helps searching. Cheers Rob
-

Fw190A-8 3/JG1 crash Vreeland
DocRob replied to JeroenPeters's topic in LSM 1/35 and Larger Work In Progress
I love the shine of brass in the morning. Nice work Jeroen. When I made PE flaps, the most important thing was to plan ahead the bending sequence, to not corner yourself. You mastered yours obviously. Cheers Rob -
You have twenty seconds to start a WIP, Carl,.... Cheers Rob
-
Whoa, nice haul, I had a vinyl ED-209 back in the days in 1/9 scale, but lost it somehow (maybe a party incident ). I've seen the Moderoid kit and was VERY tempted for sentimental reasons. The stop motion scene with ED-209 on the stairs in Robocop 1 is one of my favorite bot scenes in the movies. I'm still undecided, because 90€ is lot of dough for some plastic, but yeah the old times... Cheers Rob
-
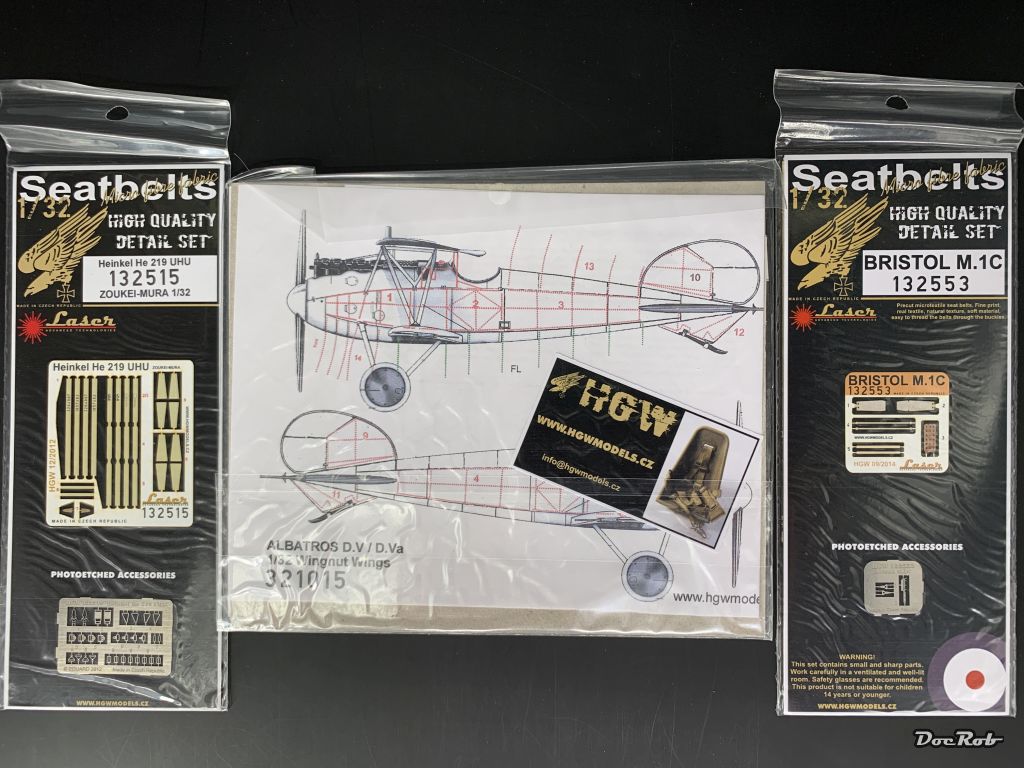
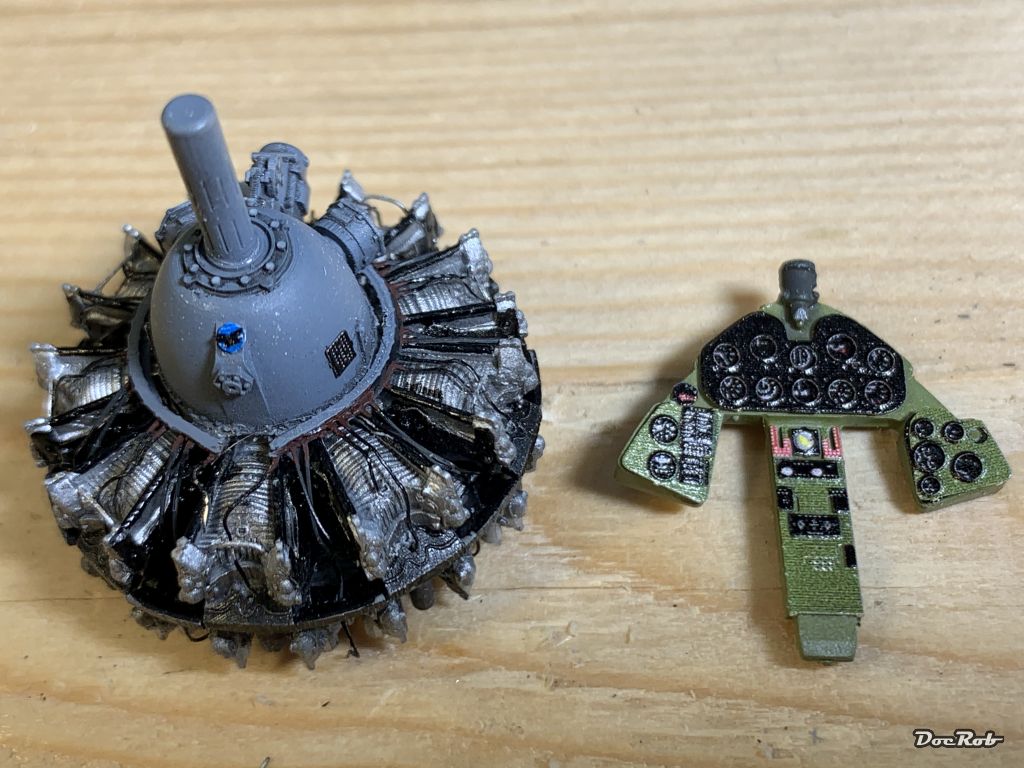
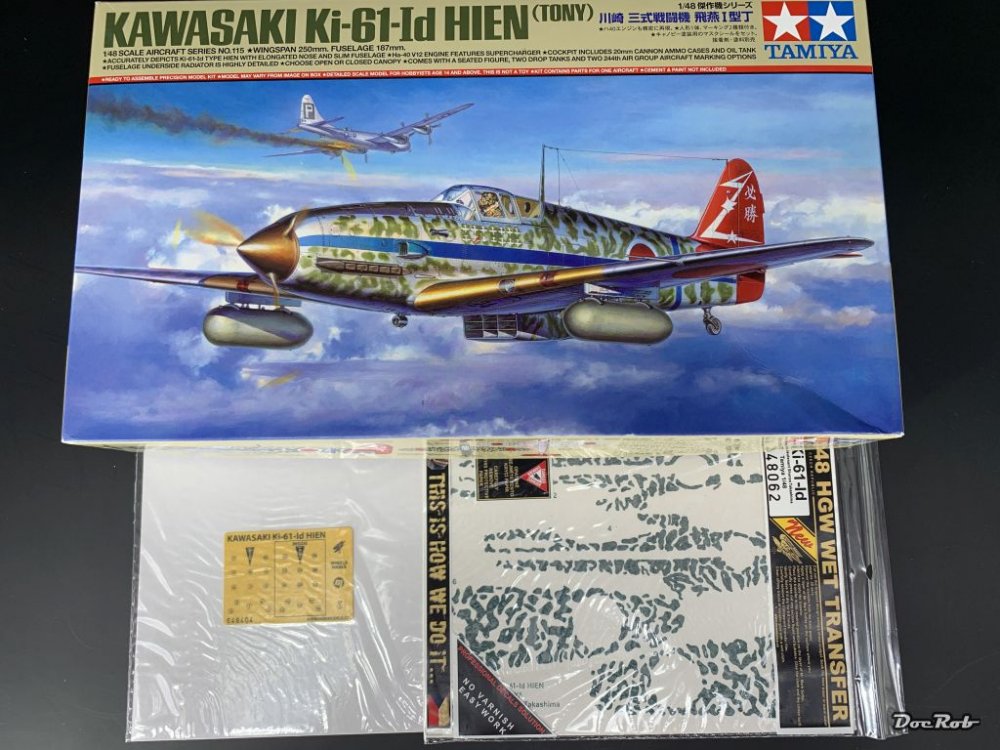
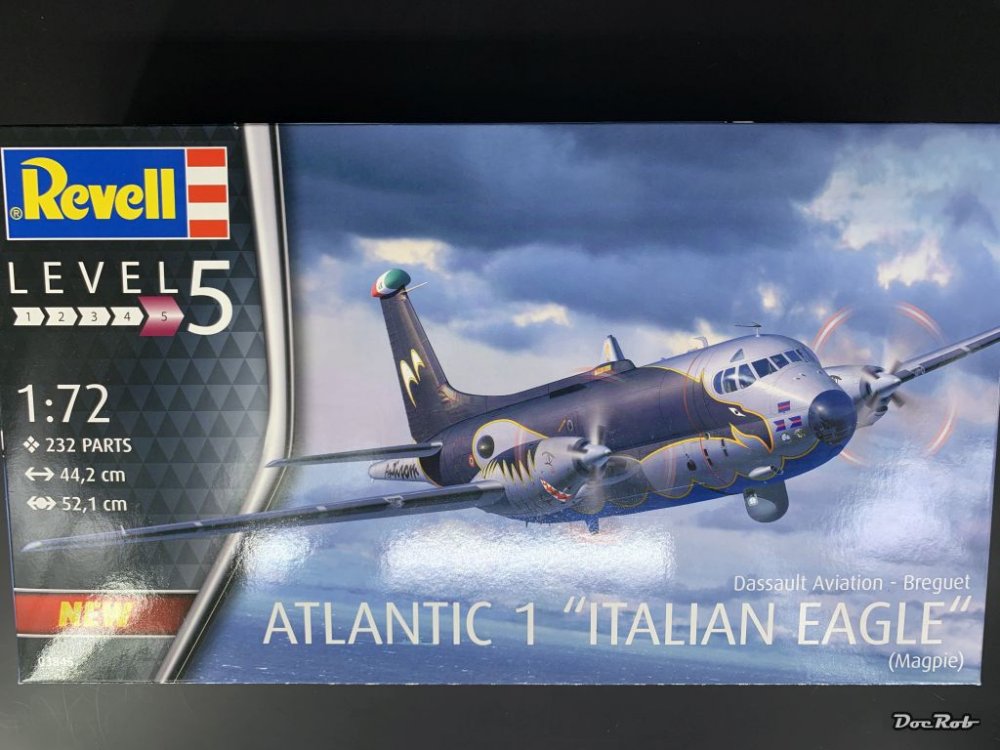
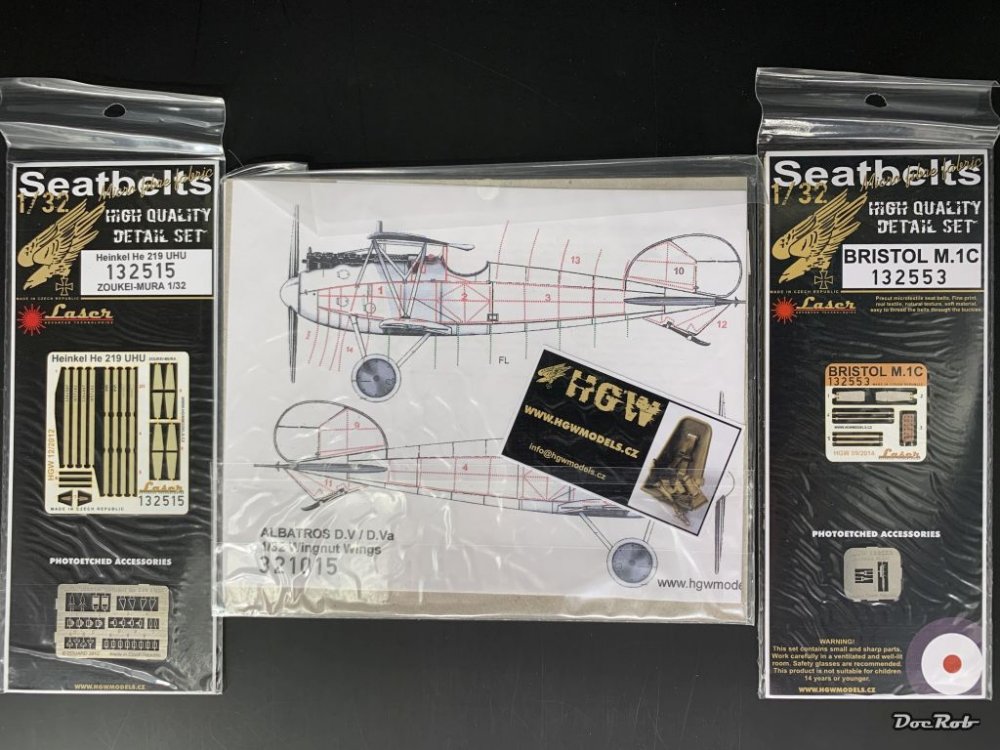
My postwoman was busy today. After a long wait, I received some goodies. 1/32: Nails for my Albatros, seatbelts for my Uhu an d Bristol M.1C, which are especially important, as the PE ones from the Special Hobby kit are wrong, all from HGW 1/48: A Tamiya KI-64, which will be a relaxed in between build, were I want to test the HGW wet transfer camo on NMF. !/72 I never knew, that I would be interested into the big Breguet Atlantic 1, until I saw that scheme. I was immediately sold and had to order one. The plastic looks good for a Revell kit, but the paintjob will be hard to realize. Wide areas of the near black eagle are to be airbrushed, with the help of 1:1 stencils in the manual, which will be used to cut my own masks and then the decals are to be added. The decals are beautifully printed, but it will be difficult to match the color. Cheers Rob
-
And what a nice addition this is. All the detail work combined with the interesting and not often seen paint scheme, make her a real stunner. Cheers Rob
-
Tamiya Spit IX JE-J finished
DocRob replied to JohnB's topic in LSM 1/32 and Larger Aircraft Ready for Inspection
Definitely John, you created another beauty. The Spit looks great all around. I like your clean work with the airbrush specially, not to easy with the invasion stripes and freehand camo. Cheers Rob -
Nice progress Peter, with all the shiny brass galore. I hope the overall fit of the kit is ok enough, to have fun with the build. The seat should be rigid enough, without soldering, there is no 100kg pilot sitting in, CA should be fine . I have a Special Hobby P-39 in stash, which I pulled out of the shelf several times in the last weeks, which could possibly mean... Cheers Rob
-
I love Massive Attack, the music is great and they appeal the vinyl junky in me, as they have so many rare and special pressings. I have an issue of Heligoland with a hand printed cover and other rare stuff issued by them. But as always in my collection , it's about hearing the vinyl. I would never sell one of my records or leave it sealed to raise the value. I bought them for their main purpose, which is generating vibrations in the air, which will hit my ear with MUSIC. Cheers Rob
-
Fw190A-8 3/JG1 crash Vreeland
DocRob replied to JeroenPeters's topic in LSM 1/35 and Larger Work In Progress
They look like they actually might work. Great attention to detail, Jeroen Cheers Rob -
What is on your bench right now ? Share a picture :)
DocRob replied to Martinnfb's topic in Modelling Discussion
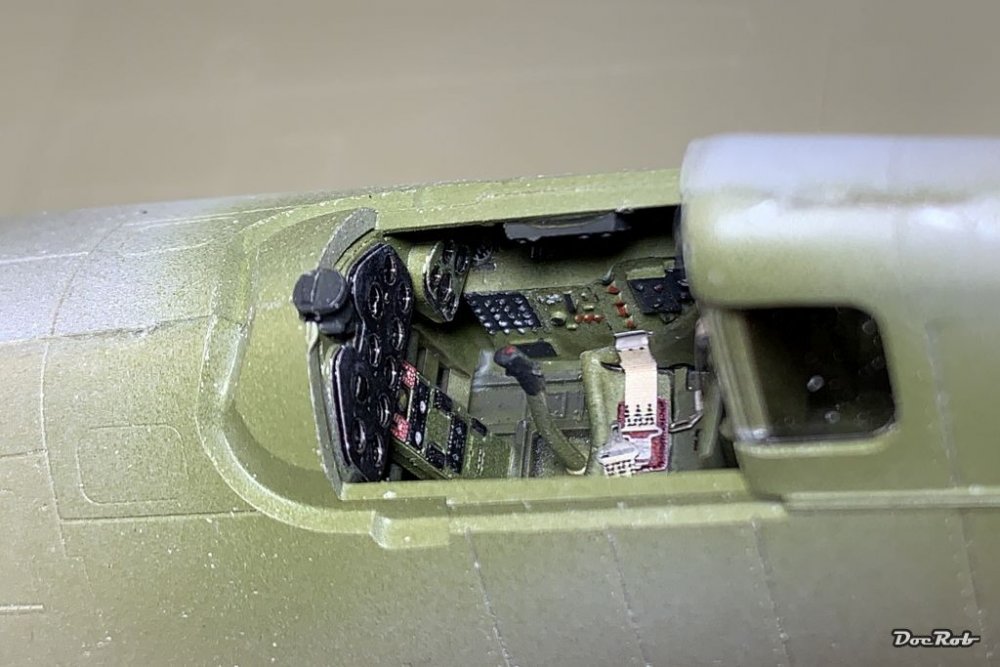
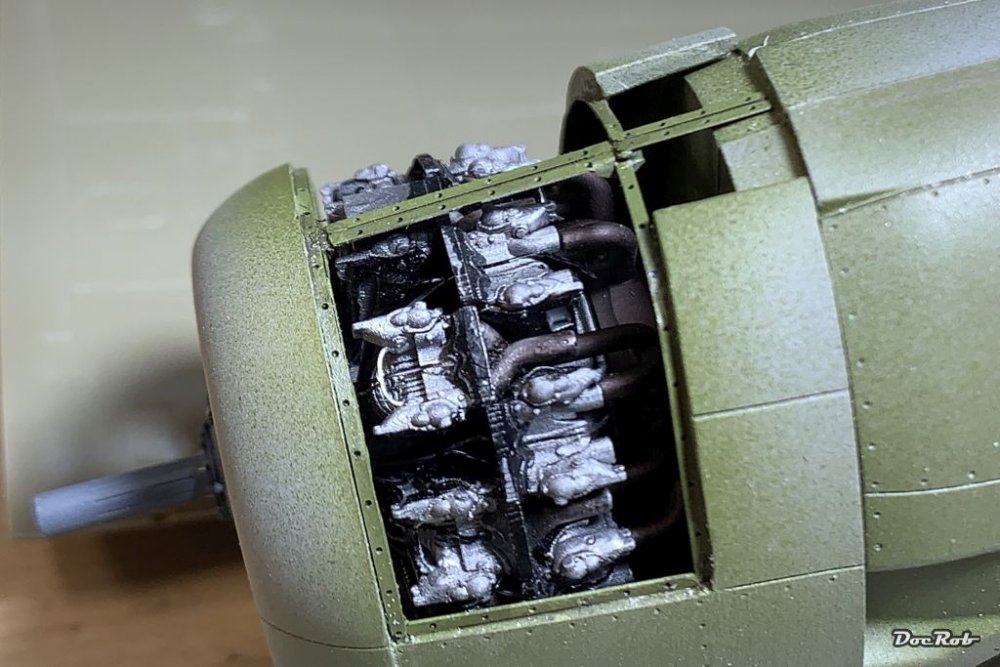
Gracias Amigos, I closed the fuselage on the mediocre cockpit, but I didn't want to spend more time on it. The engine is only loosely fitted by now, lacking some of the exhausts. Cheers Rob
-
Splendid looking paintjob Gaz, the Alb will look great with some oils, blending everything together. Cheers Rob
-
Thanks for your thoughts Gaz, reading them, makes me even more sure about painting the prop like you did, next time and maybe when time comes, I mean like having the deep desire to build an Italeri Mirage, then skip that for a self made wooden prop . Cheers Rob
-
Israeli Mirage III C with Atar9C
DocRob replied to Kaireckstadt's topic in LSM 1/35 and Larger Work In Progress
Stunning details on the landing gear Kai. The tubing looks perfect to me, well worth the effort. Cheers Rob -
I had the same thought, but thought about trying to carve one myself next time. I could steel some planks from my wooden ship model and laminate them, before carving. But I try your method first, because I didn't like my last try with masks too much. Cheers Rob
-
You should feed your dog once in a while. Cheers Rob
-
SBD-3 clear Edition Trumpeter OOB
DocRob replied to Martinnfb's topic in LSM 1/35 and Larger Work In Progress
Bummer Martin, but you quoted falsely. They said, get a LITTLE dog, mine can't reach the bench luckily. Cheers Rob -
Noice Gaz, if I would be a wood worm, I would choose your prop for dinner. I have to try this hand painting technique of yours, it looks great. BTW. do you use acrylics or/and pencils for the job? Cheers Rob
-
What's the focus and who are 'we'? Interesting to see the detailed outcome. I have the ZM MK.IV boxing and hope for a trouble less buttoned up build soon. Cheers Rob
-
Count yourself lucky, you have only to think about shipping costs from Hannants. Since the end of last year, I'm not able to purchase from them, first because of Brexit and now, because they need to enhance their systems to include the necessary tax number for Spain. Cheers Rob
-
Like Kai said, you are breezing through your Albatros build. I've never used Roden decals, but read about their reputation. Nice job on the masking which looks great. Makes me thinking about a mask cutter for myself. Cheers Rob
-
Can't be long John, that the Helldiver hits the US-Stores. It's available in some European shops as well as one of my favorite German retailers. Cheers Rob
-
What is on your bench right now ? Share a picture :)
DocRob replied to Martinnfb's topic in Modelling Discussion
I continued with the 48 scale Hellcat and built up the Brassin engine. It has lots of parts, Resin and fiddly PE. Not all went well, but in the end it will be ok enough. I also started with some painting and PE-ing in the cockpit area. The printed PE does not look to good, but seen through the tiny canopy it will work. I want to emphasize on the paintjob with the Hellcat and not so much on the pit. Cheers Rob
-
Nice and tidy with a great adjustment of the canopy fit. My builds never look as clean as yours in the pre painting stage. You could produce step by step build documentations with that clean style. Cheers Rob
-
Love the silk thread work, Gaz. I consider shaving away the chord on my next WNW build and use your method as it looks more real. Cheers Rob