BevanBrooks Posted May 7, 2014 Posted May 7, 2014 Revell's rather large 32nd scale 219 finished pretty much from the box with only minor enhancements and scratch. Looking at photos of end of war 219's they looked pretty beaten and weathered so this was what I was trying to replicate to some degree. Anyone who was following my wip thread will know about my methods of weathering and what not but I've seem to of accidently erased the photos clearing some room in my photobucket account, to which I'm a little embarrassed not to mention angry with myself. It's a mistake I wont make again. My apologies. So I guess a quick run down is in order:- Paints used throughout the build were pretty much Gunze aquarious thinned with gp thinner. Weathered with oils, sharp Derwent coloured pencils, Prisma colour watercolour pencils and pastel dust. Flat coat was Testors Model Master Acrylic thinned with water. Aerial wire is smoke coloured invisible mending thread. Added was some wiring in the cockpit, removed then replaced levers with fine wire and white glue for knobs as well as HGW's textile seat harness set. The pitot tube is made from brass tube and plastic rod. Sorry for ALL these photos hopefully I haven't bored you too much with them. The photos were taken outside on a slightly overcast day as apposed to artificial light at night in the "tin shed" As a side note the nav lights in the wing tips DO NOT FIT. I suggest to fit these during assembly sand, polish, mask then paint. All in all a pleasurable kit to build, I hope I've done it justice but jeez I'm glad it's done!! Thanks for looking cheers Bevan 13
morley bill Posted May 7, 2014 Posted May 7, 2014 Brilliant paint job hope mine comes out near it regards Bill..... 1
rkranias Posted May 7, 2014 Posted May 7, 2014 beautiful effort, especially the "squiggly" camo. clearly shows the Revell He219 can look just as good as the ZM offering. Your WIP photos... are they gone for good? 1
RalphSarc Posted May 7, 2014 Posted May 7, 2014 I love this aircraft and a big fan og you modelling skills! Really like the panel lines, exhaust manifolds, camouflage and cockpit detail. Fantastic job!! Ralph. 1
BevanBrooks Posted May 7, 2014 Author Posted May 7, 2014 Thanks guy's appreciate the comments. Rick...Wip photos are still in my folder in the computer just didn't realise that deleting them out of photobucket would delete them from here as well. You live and learn I guess. I was flipp'n out when I realised what I'd done, all that work and I went and ruined it. I guess you could say there was a bit of a following on the wip and I feel I've let them all down in some way. Cheers Bevan
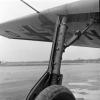
Daywalker Posted May 7, 2014 Posted May 7, 2014 Love your weathering style Bevan, I think you have really captured that dingy look you were after. Especially the photos showing the landing gear doors and the exhaust area, brilliant work! 2
rieser Posted May 8, 2014 Posted May 8, 2014 Congrats Bevan. Glad to hear that you enjoyed the project. Bet it looks a treat "in the flesh". Cheers, Ralph. 1
Spitfire Posted May 8, 2014 Posted May 8, 2014 Great job of one of my favorite kits, I really like the weathering, especially as it is something that I don't do very well ! Cheers Dennis 1
Steve Scanlon Posted May 9, 2014 Posted May 9, 2014 Stunning job looks great, really like the finis and the weathering. 1
BevanBrooks Posted May 13, 2014 Author Posted May 13, 2014 Thankyou everyone for your kind words much appreciated
repeater Posted May 14, 2014 Posted May 14, 2014 Excellent work.. looks superb. Love the work on the exhaust stains, wheels, undercarriage etc! wohoo!! 1
mikec Posted May 26, 2014 Posted May 26, 2014 . . . Greetings Bevan; A very nicely built and painted Revell He-219........ :D Mike 1
TeWika Posted January 13, 2015 Posted January 13, 2015 Bevan, This is serious business- the more I look the more the more your skills impress me. I 've warched this several times and find new things to marvell at ever time!! Beautiful... you're a master of paint and shades... like Darius Khondi of modelleling, hat of! Cheers Ted
CruZz Posted January 13, 2015 Posted January 13, 2015 Really great job. Some things are very inspirational. Thumbs Up.

Recommended Posts
Create an account or sign in to comment
You need to be a member in order to leave a comment
Create an account
Sign up for a new account in our community. It's easy!
Register a new accountSign in
Already have an account? Sign in here.
Sign In Now