DocRob
-
Posts
7,048 -
Joined
-
Last visited
Content Type
Profiles
Forums
Events
Gallery
Everything posted by DocRob
-

PCM Focke Wulf FW 190 A-1/A-2/A-3
DocRob replied to GazzaS's topic in LSM 1/35 and Larger Work In Progress
Great effect with the rib tape. I wouldn't have thought, that the thin decals show through the paint that much. The mottling is muy bueno too. Cheers Rob -
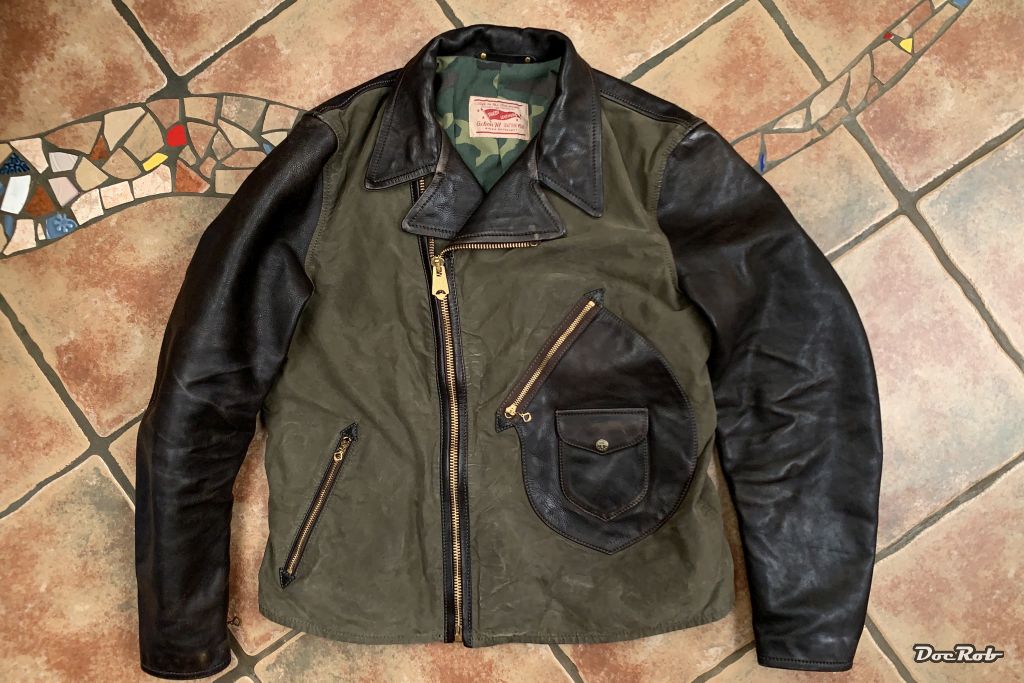
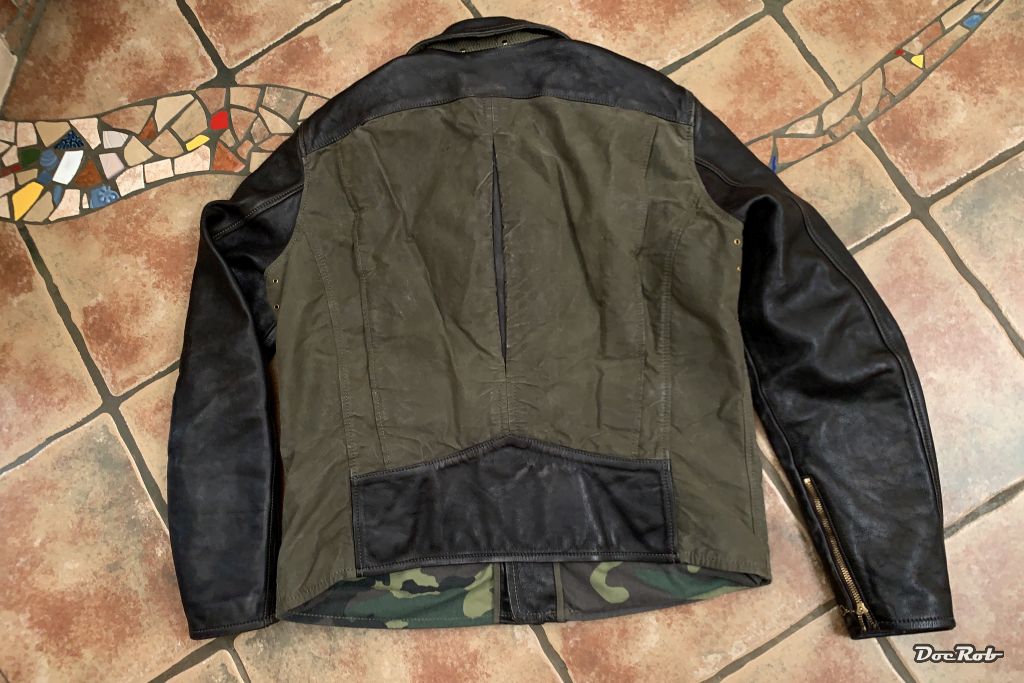
Also not model related, but I'm so freaked about it, that I has to share. Today arrived my custom made leather jacket from Greece. It's made from distressed Italian cow leather and from old US-Army tents from the 1940's. The cut is leaned on old motorcycle dispatch riders jackets. I know, LSM is no fashion mag, but I had to... . Cheers Rob


-
Fokker D.VIII Razor Wing Jasta 6
DocRob replied to DocRob's topic in LSM 1/32 and Larger Aircraft Ready for Inspection
Danke Kai, I appreciate it. I had so much fun with the project, that I have to find a good fit as a next build. I think the 1/72 sidekick of the Fokker will be first, as most of the painting work, like the wings is already done. Other possibilities are, to build and paint my recently started 1/20 Ammoknight along with the 1/20 Ma.K Küster or to finish my Fly Arado-234. I'm also tempted to start either the 1/48 Gotha G.V or the WNW AEG G.IV and there is also a wooden ship, the Vanguard Duchess of Kingston on the way somewhere between the UK and my tiny island,... Cheers Rob -
Fokker E.V / D.VIII Parasol Mikro Mir 1/32
DocRob replied to DocRob's topic in LSM 1/35 and Larger Work In Progress
Thanks Gaz, there are some projects, which challenge me with all the needed input, but never frustrated me like this one. Sometimes a build like the Fokker is better than a shake and bake kit to gain confidence. It also helped to envision a detailed picture of the finished Fokker in my head, including solutions for what I considered the biggest challenges. Cheers Rob -
Zoukei-Mura P51D Mustang SWS No 4.
DocRob replied to Bomber_County's topic in LSM 1/35 and Larger Work In Progress
You are speeding now with the P-51 and it looks great. Sorry to hear about the cowling issues. As Kai says, on the Ta-152 this was pure horror. I couldn't find a solution for openable cowlings even with PE bent hinges. It was a nightmare. It seems like most of the ZM kits are better left open for good fit. When cowlings come into into play, it gets interesting. Cheers Rob -
Fokker D.VIII Razor Wing Jasta 6
DocRob replied to DocRob's topic in LSM 1/32 and Larger Aircraft Ready for Inspection
Gracias Señhores, today I worked a little more on the 1/72 twin of this one, but it will sport a Polish livery. Man, is 72 scale small. I haven't built one since I was a kid. Cheers Rob -
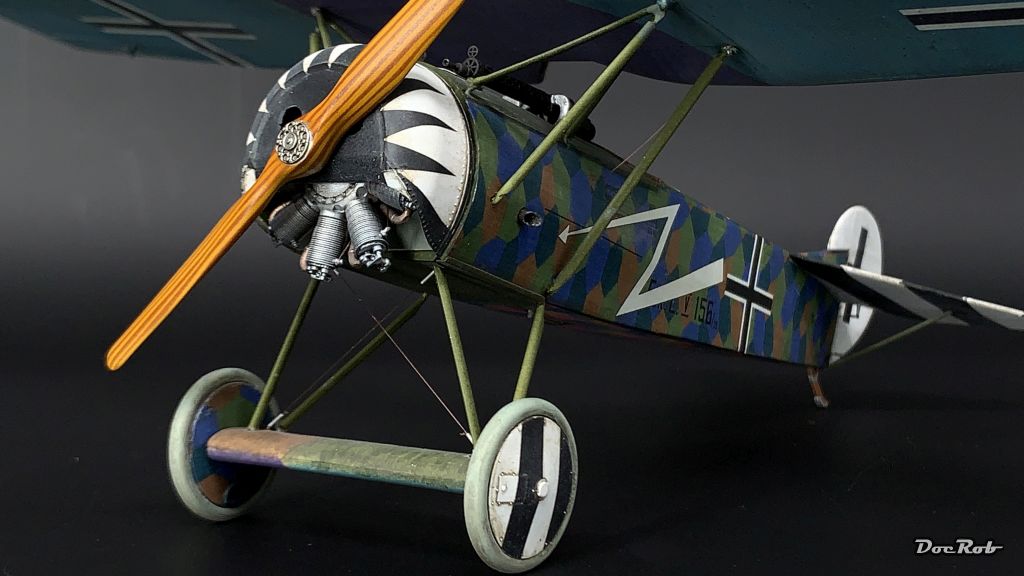
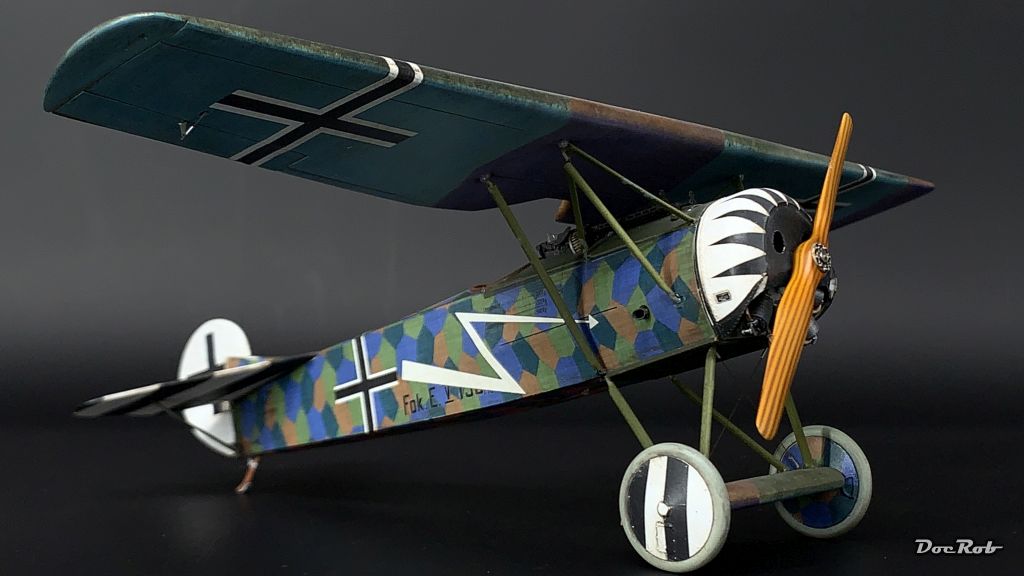
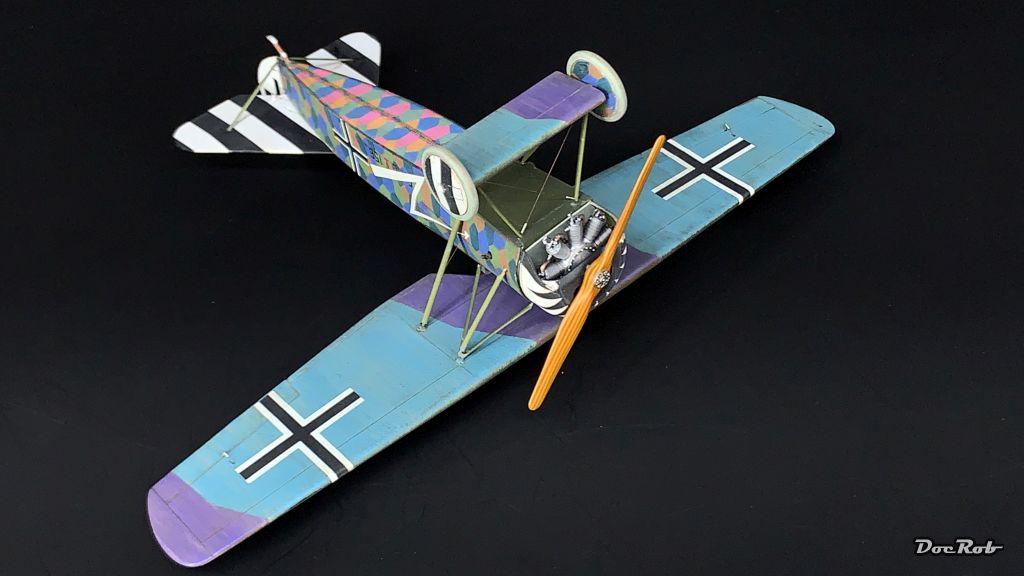
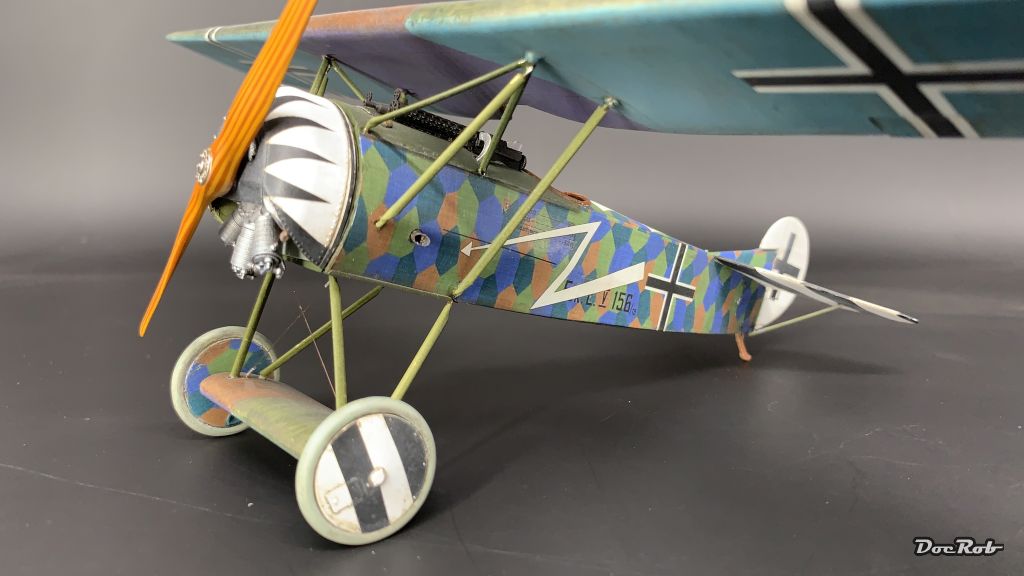
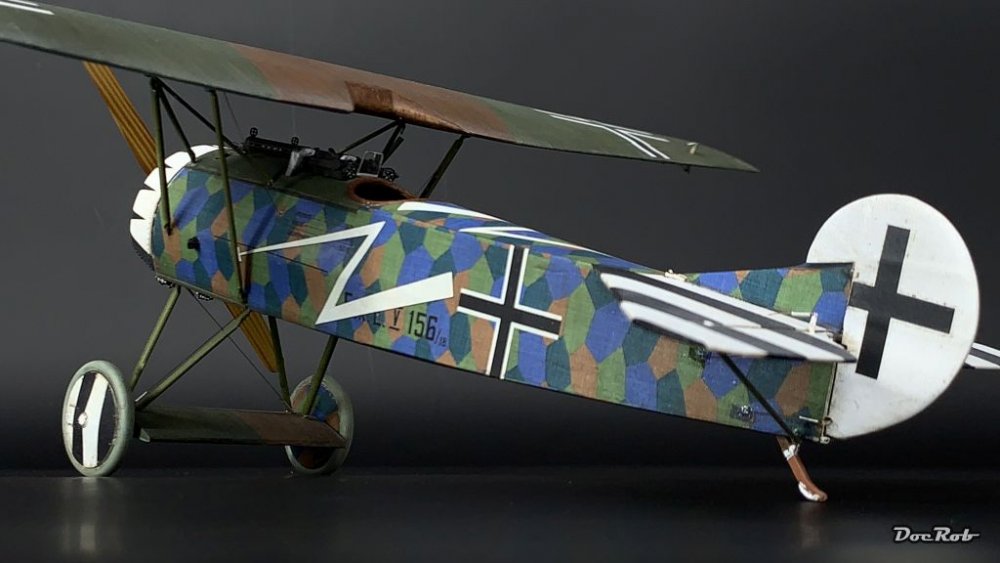
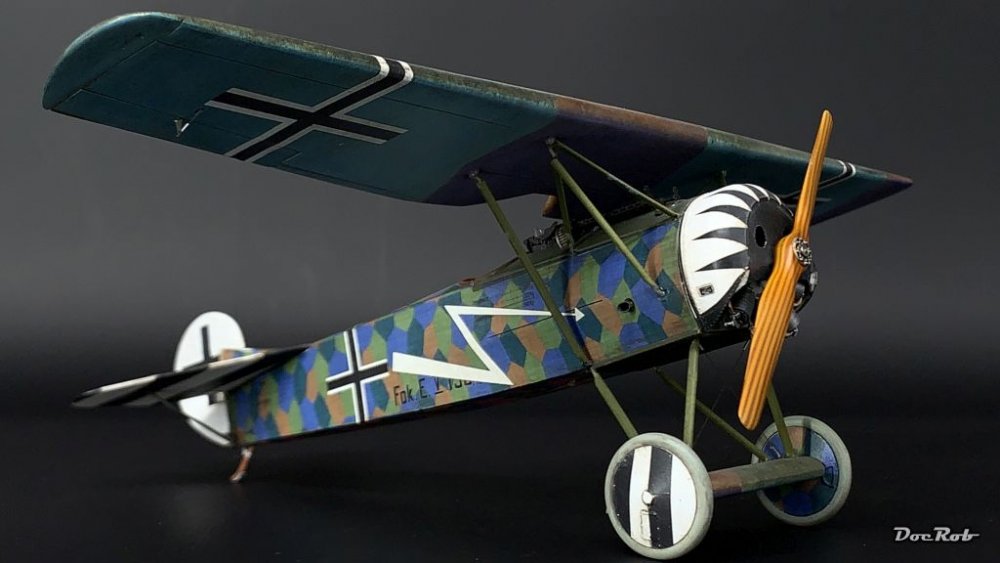
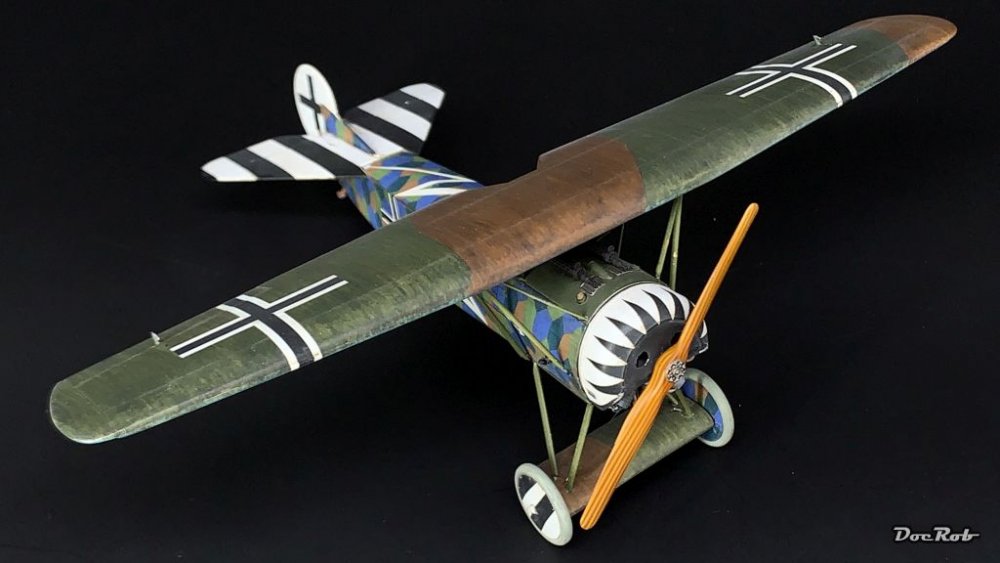
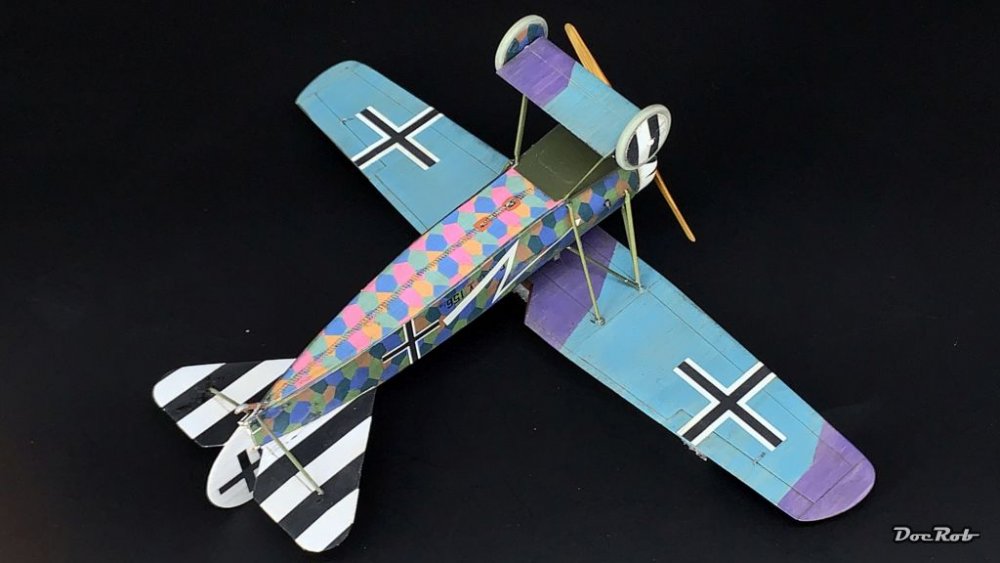
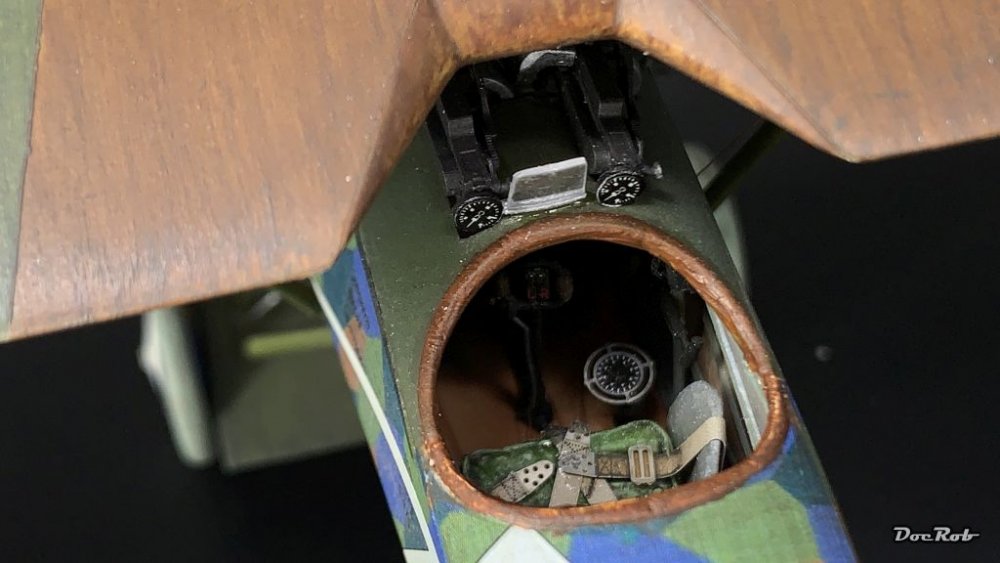
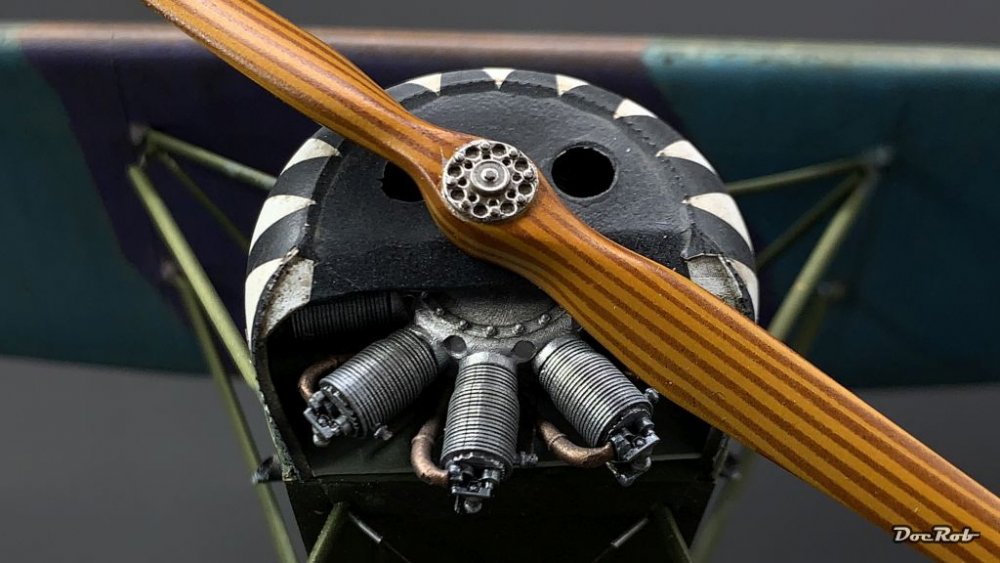
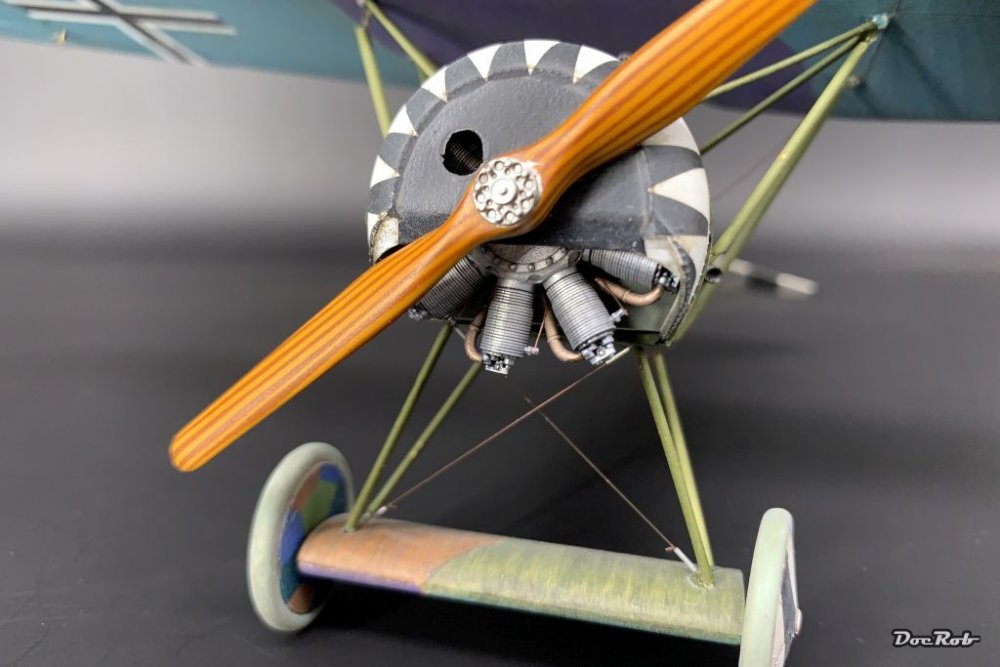
Hello friends of the colourful fighters of WWI, the Fokker D.VIII is finally done. It was a long and sometimes tempting, but always rewarding project. I had so much fun during this build and learned a lot of new techniques, like soldering my own struts from brass and cowering whole fuselages in decals instead of paint. I used lots of aftermarket items, where the kit showed it's weaknesses and shortcomings. They are mentioned in the building log. I would like to thank all of you, who came along the trip with a special mention of the two build logs, I often referred to, one by our gifted and resourceful member Mike Sandbagger and the other is available on the Aviattic website, written by Dave Hooper. Fokker E.V / D.VIII Parasol Mikro Mir 1/32 - Page 7 - LSM Work In Progress - Large Scale Modeller And here she is in her full galore. I will add some outdoor pics later, when there is blue skies. Cheers Rob


-
Fokker E.V / D.VIII Parasol Mikro Mir 1/32
DocRob replied to DocRob's topic in LSM 1/35 and Larger Work In Progress
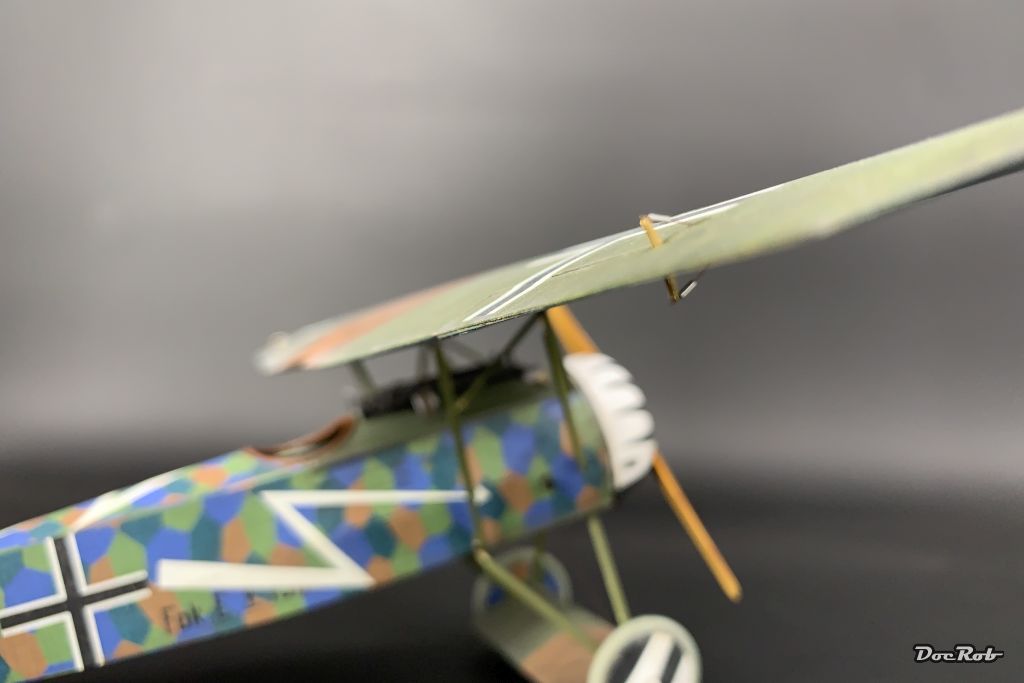
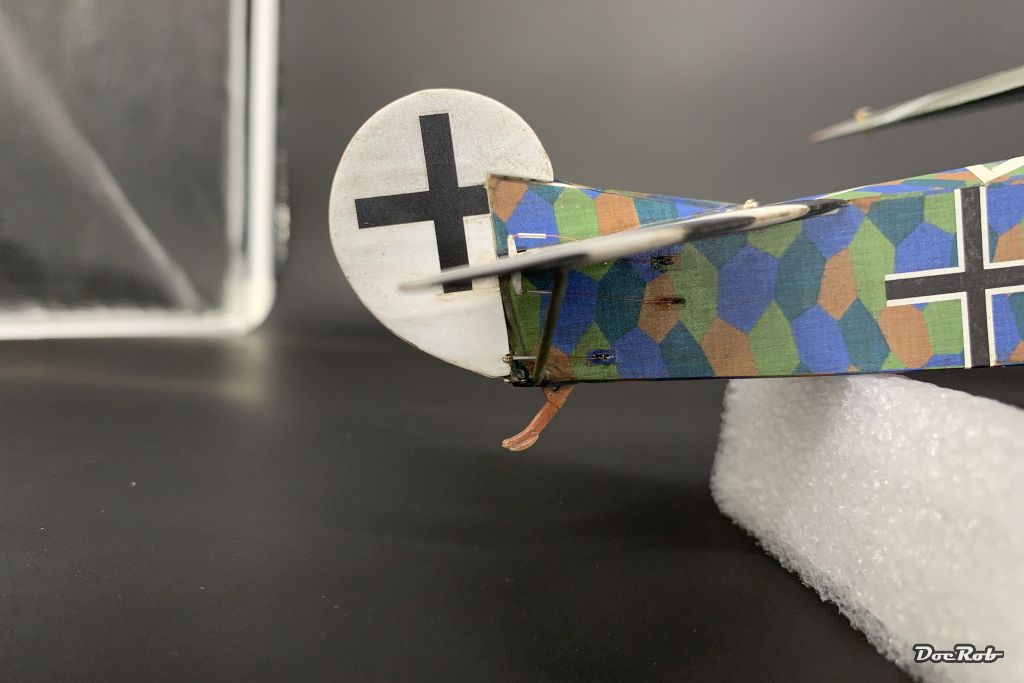
Muchas gracias Amigos, the end got a bit tricky, but all in all it was a pure pleasure build. Maybe I do a second one in bright yellow with black diamonds all over. It payed off to build everything really robust, because the Fokker needed more handling than every other plane I built. Nothing broke, except one elevator strut (plastic not brass ). I love the feeling, that in the end there is no rattling sound inside the fuselage, because of loosened parts. I used two build logs a lot and they were very helpful. One is from our Mike (Sandbagger) and the other is written by Dave Hooper and can be found on the Aviattic website. Cheers Rob -
Outstanding skillful build, I raise my hat. Cheers Rob
-
That's a nice addition to your Sherman lineup. They all look great. Cheers Rob
-
Fokker E.V / D.VIII Parasol Mikro Mir 1/32
DocRob replied to DocRob's topic in LSM 1/35 and Larger Work In Progress
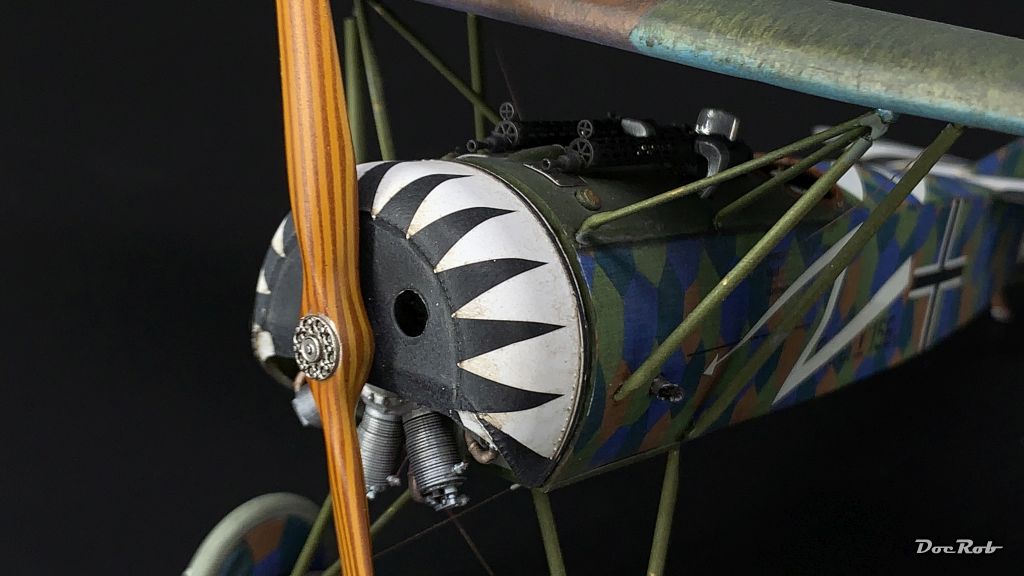
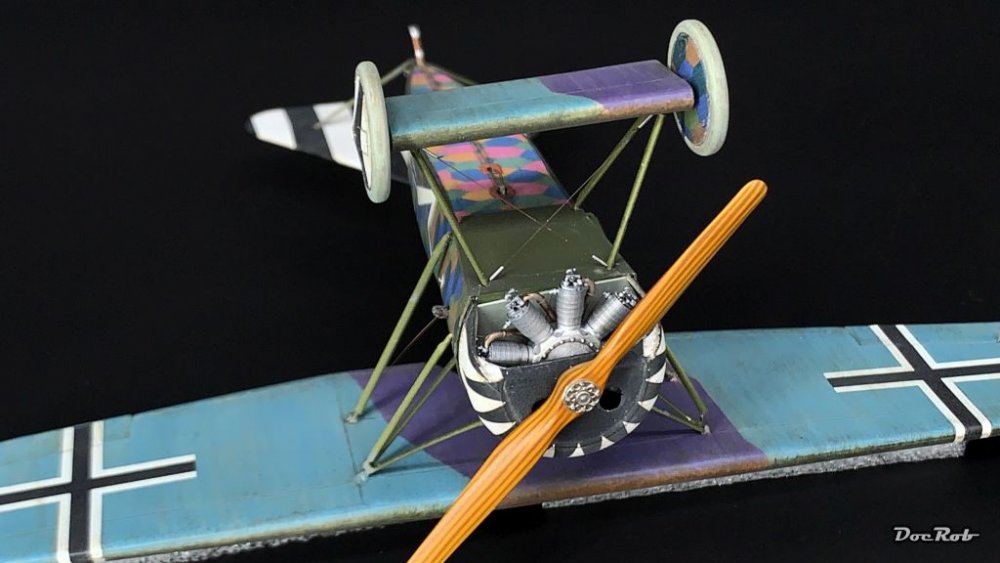
I'm freakin' out, the last pic post, before the Fokker will get a RFI post . Tomorrow, I will have to do some touchups here and there, inspect the whole plane through the magnifier and it will be done. The little things, I made last, where not so much fun in general. The minimal rigging, especially the rudder and elevator wires gave me headaches and eye strain . I added ignition wires and because my 2mm diameter brass tubes arrived together with my new saw and mitre box, I added the air intakes from blackened brass. Cheers Rob


-
Very nice paintjob and great looking kit overall. Cheers Rob
-
What is on your bench right now ? Share a picture :)
DocRob replied to Martinnfb's topic in Modelling Discussion
I don't know about the pancakes, but the company Fokker was found in my old hometown of Berlin in 1912. After 1918 the company moved to the Netherlands. Anton Herman Gerard „Anthony" Fokker, the founder, was born on Java, a Dutch colony by the time. Cheers Rob -
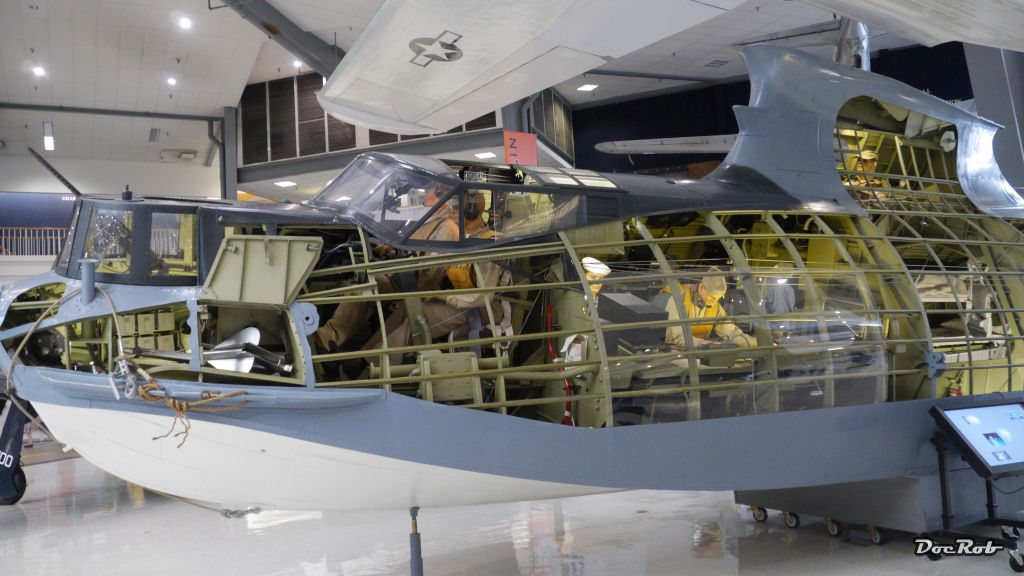
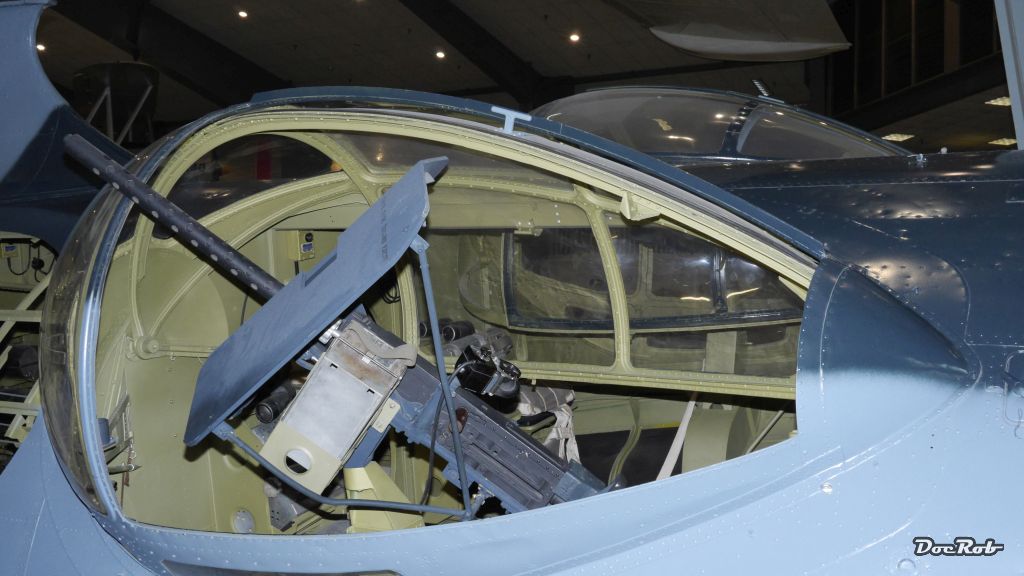
I've not seen too many builds of the cut away Cat. I was tempted often, but, it's to much for me. Keep up the great work. I'm sure you know about the one exhibited in NASM Pensacola Florida. Cheers Rob


- 77 replies
-
- 13
-

-

-
What is on your bench right now ? Share a picture :)
DocRob replied to Martinnfb's topic in Modelling Discussion
Nothing long about the 'O', it's a short 'O' as in 'Rocker' or 'mock' or Rob. Cheers Rob -
Israeli Mirage III C with Atar9C
DocRob replied to Kaireckstadt's topic in LSM 1/35 and Larger Work In Progress
Your pit looks great Kai, like Gaz said, it looks perfectly used in the best way. Cheers Rob -
What is on your bench right now ? Share a picture :)
DocRob replied to Martinnfb's topic in Modelling Discussion
Nice looking engines, like in a Ford factory of the 20's last century. The Fokkers look also great. Cheers Rob -
What is on your bench right now ? Share a picture :)
DocRob replied to Martinnfb's topic in Modelling Discussion
Looking great Gaz, there are too few ship builds here. I love to see, how you continue with the Kurfürst and maybe some day, I will have the power to start my Trumpeter Queen Elisabeth with all metal galore available. But before that, I will build a wooden ship. Cheers Rob -
1/32 Scottish Fishing Boat.
DocRob replied to BigDan's topic in LSM 1/35 and Larger Work In Progress
Great build all around, but the most advanced feature are your figure painting skills . The Fifie is on my list too. Cheers Rob -
Looks great, nice detail work on the turret. Cheers Rob
-
Caldercraft Brig Badger 1:64 (wooden ship model) - complete
DocRob replied to Landlubber Mike's topic in Non LSM 'WIP
No need to be sorry Mike, It's interesting to read your motivation and your approach on wooden ship models. You seem to dig deeper and deeper into the building process and there will be complete building from scratch as I understand. I'm primarily a plastic model builder and motivated by the appeal of a subject. I like to learn new techniques and to work with different materials than plastic only. Shipbuilding from wood has a special fascination to me, since my teens. Working with wood is different and can be very rewarding, if properly done. In the last years, I've done a lot of woodworking in the house, building chairs, tables, a very complicated kitchen with organic shapes,..., and learned a lot about working with wood. I feel prepared now, to start a project like the Duchess, mainly, because the perfect design of the kit makes it easier for the beginner, as it takes a lot of burdens from the builders shoulders. Generally I prefer larger scales and therefore smaller vessels. I can't stand to much redundancy in modelling, so no four engine planes for me and no ships of the line as well. Larger scales make detailing, painting and weathering easier, but ship modelling has developed a lot in the last time, incorporating materials, techniques and designs, which were more originated in advanced plastic modelling, like the use of photoetch and resin and painting and weathering techniques too. Let's see, where the journey ends, I have a lot of anticipation for the duchess and hope to see more of your great builds here. Cheers Rob -
Today, the Küster showed up. It took not even a week to get him to my tiny island, record time for a recent purchase, where it took decades of waiting for the kit to appear in my sight . The kit is a Wave reissue of the Nitto Kröte, with some sprues recently made for this version, but the rest is old Nitto stuff, which looks fairly crisp for it's age. The license wars must have been brutal, even the old sprues show erased info. It says only Nitto and Kröte, no year no nada. When I was a mid teen, I always wanted to own a Kröte, a Jerry and a Hornisse, but I couldn't afford them. They were not cheap, being Japan imports. If I had known, how expensive and hard to find these kits became, after Nitto ceased the production, I would've spent less money on girls . Since Hasegawa started to issue some new MAK kits since ten years, others followed, like Wave with partly reissues and new kits as well. I'm happy, that I own a more or less Kröte now. The Küster is very similar. Cheers Rob

-
On forum.ww1aircraftmodels.com there was a thread about WNW documentation and somebody made an archive to download everything in separate folders. Instructions, historic pics, schemes and pic of the models. I can't really search there, as I'm not a member, but I guess you will find it. Cheers Rob
-
HobbyBoss' 1/32nd B-24D Liberator
DocRob replied to ThomasProbert's topic in LSM 1/35 and Larger Work In Progress
This is a gorgeous looking interior, which oozes the lots of work, which have gone into, out of every pore. Will there be some weathering too? Cheers Rob -
Turretless armor, right down my alley. The UC looks exceptional and I really like the figures. Nice details to spot everywhere, did I mention the nets on the helmet? Welcome to LSM by the way and feel free to post a WIP about the Archer. I have both, the Archer and the UC in my stash, but the Universal Carrier is the Riich incarnation. I nearly forgot to praise the great presentation. Cheers Rob