DocRob
-
Posts
7,132 -
Joined
-
Last visited
Content Type
Profiles
Forums
Events
Gallery
Everything posted by DocRob
-
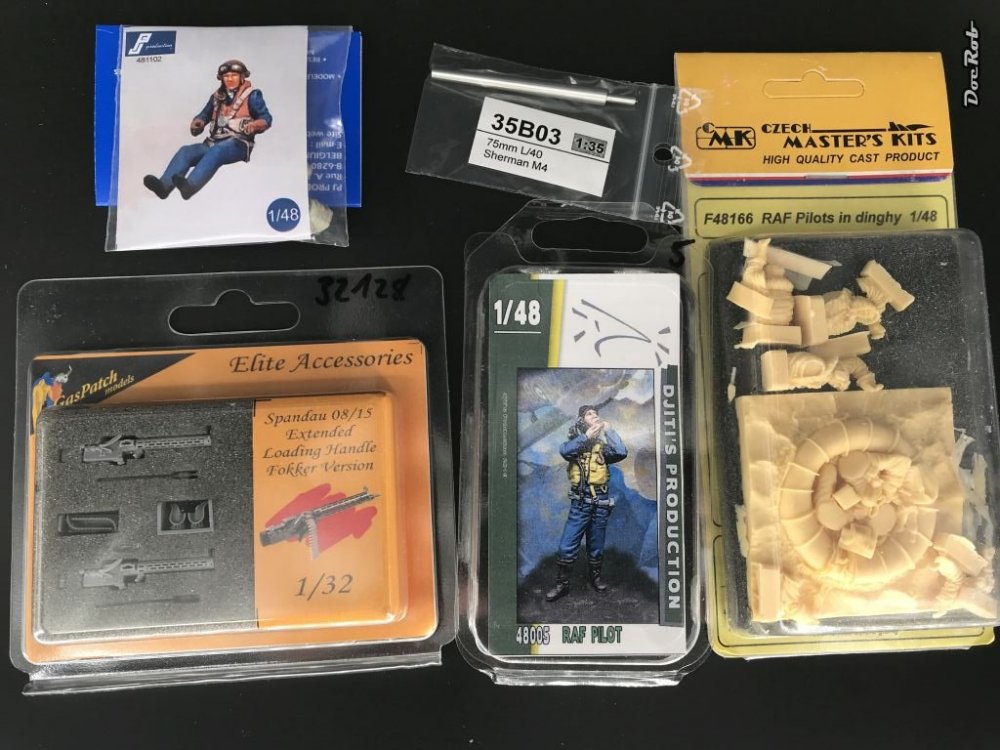
In normal times I may haven't posted this, but without mail for more than two weeks this arrived my bench. Some 08/15 for my Fokker D.VIII, a Sherman barrel and British pilots, some of them in a dinghy for my planned 1/48 scale Walrus dio. Cheers Rob
-

Share how COVID-19 Quarantine has affected you.
DocRob replied to 1to1scale's topic in General Discussion
So true, I'm completely fed up with the lots of conspiracy theorists, faux scientists and other charlatans which would have been tarred and feathered a century ago. Let's step back a little, let common sense rule and let the scientists do their job and not to forget, everybody can do his little part to help fighting that pandemia. Cheers Rob -
IBG models PZL P.11c. Finished
DocRob replied to Clunkmeister's topic in LSM 1/35 and Larger Work In Progress
Ernie, this is looking great, with only manageable effort it seems possible to build a halfed model, showing all the components, hint . Cheers Rob -
IBG models PZL P.11c. Finished
DocRob replied to Clunkmeister's topic in LSM 1/35 and Larger Work In Progress
Great pics Richard, thank you. I wonder if the P11 in their time sported a high gloss finish, the colourways hard to read historical photos seem to indicate matte finish. Cheers Rob -
Tamiya Spitfire IXe with ModXXX
DocRob replied to BlrwestSiR's topic in LSM 1/35 and Larger Work In Progress
At least, the Colours seem to match, more or less. Cheers Rob -
Share how COVID-19 Quarantine has affected you.
DocRob replied to 1to1scale's topic in General Discussion
I wish our Correos (mail) would at least be snarky, I can't remember the look of the post women, because I haven't seen her since nearly two weeks . -
Looking great Harv, are you planning to show the engine, would be a shame to hide your nice work. Cheers Rob
-
The classic way to do it is to fill the tube with fine grained sand properly before bending, but the coil thing looks interesting. Cheers Rob
-
IBG models PZL P.11c. Finished
DocRob replied to Clunkmeister's topic in LSM 1/35 and Larger Work In Progress
Hard to tell from that pic. To me it seems a tad too greenish and too dark, but I'm no expert on Polish planes. For my 1/48 Karas I bought A011 Light Polish Khaki from Hataka and if I follow their drift, that should be the Colour for the PZL-11 too. https://shop.hataka-hobby.com/aviation-paint-sets/21-htk-as01-polish-air-force-paint-set.html Is that gap in front of the cockpit on purpose? Cheers Rob -
IBG models PZL P.11c. Finished
DocRob replied to Clunkmeister's topic in LSM 1/35 and Larger Work In Progress
C'mon Ernie, a bit more than a year is FOREVER to you Yeah right, some other Clunkmeister hijacked your account Cheers Rob -
IBG models PZL P.11c. Finished
DocRob replied to Clunkmeister's topic in LSM 1/35 and Larger Work In Progress
Dementia Ernie? To help you out, a jet is where they forgot to add a propeller to the airframe and build bigger exhausts as substitutes. Cheers Rob -
Your Nautilus is looking very comfy , where I have to start with the interior and furniture, does the sofa have a starboard and larboard side? You went through the trouble of cutting the Salon's ceiling and insert the grids. I decided against it, because I feared more light transmission and shine through into the hull area and hope for more light in the salon with only drilled holes for the LED's. To hinder see through effects, I will prime the inside of the hull in black. I was thinking about stowing the battery in the hull as well, but after maybe twenty years it will run out of power and what then. On the other hand I was afraid of the extra weight on the octopus arms, vinyl is not the best material static wise and I don't want to encounter a dead squid with sagging arms . Cheers Rob
- 76 replies
-
- 3
-

-
- jules verne
- pegasus hobbies
- (and 1 more)
-
Oh yeah, the windows , one of the next steps, but I think assembling tank tracks is an equally dreading task . Cheers Rob
- 76 replies
-
- 1
-
-
- jules verne
- pegasus hobbies
- (and 1 more)
-
I modified my stock booth by adding a big transparent plastic case to the fan housing as can be seen in this thread. It works fine for most large scale kits. There are some other good ideas in that thread. Cheers Rob
-
I don't get the laughing part Sapper, but looked up the RP tool. Nice stuff, but I recommend to add an evenly long sharp blade for e.g. landing flaps. It makes sharp bendings of big parts much easier. Some time ago I added this little gem to my tools repertoire and use it a lot for tiny parts. Cheers Rob
-
Have you sealed your metal work on your Camel, Phil, possibly with Future and if, how was the result? Cheers Rob
- 76 replies
-
- 2
-
-
- jules verne
- pegasus hobbies
- (and 1 more)
-
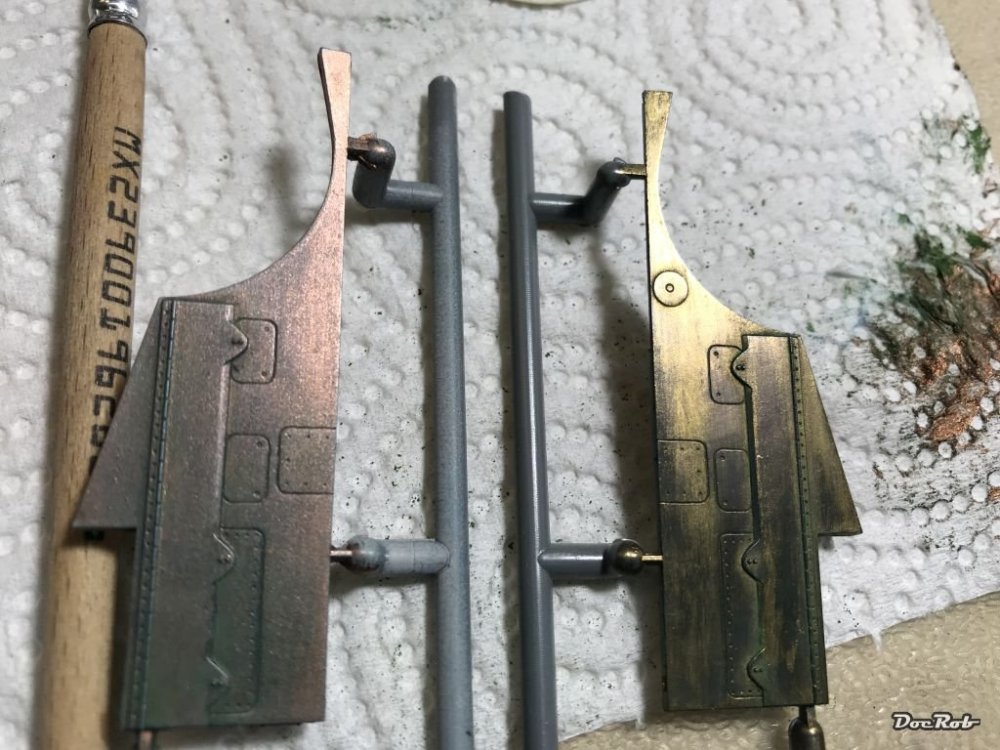
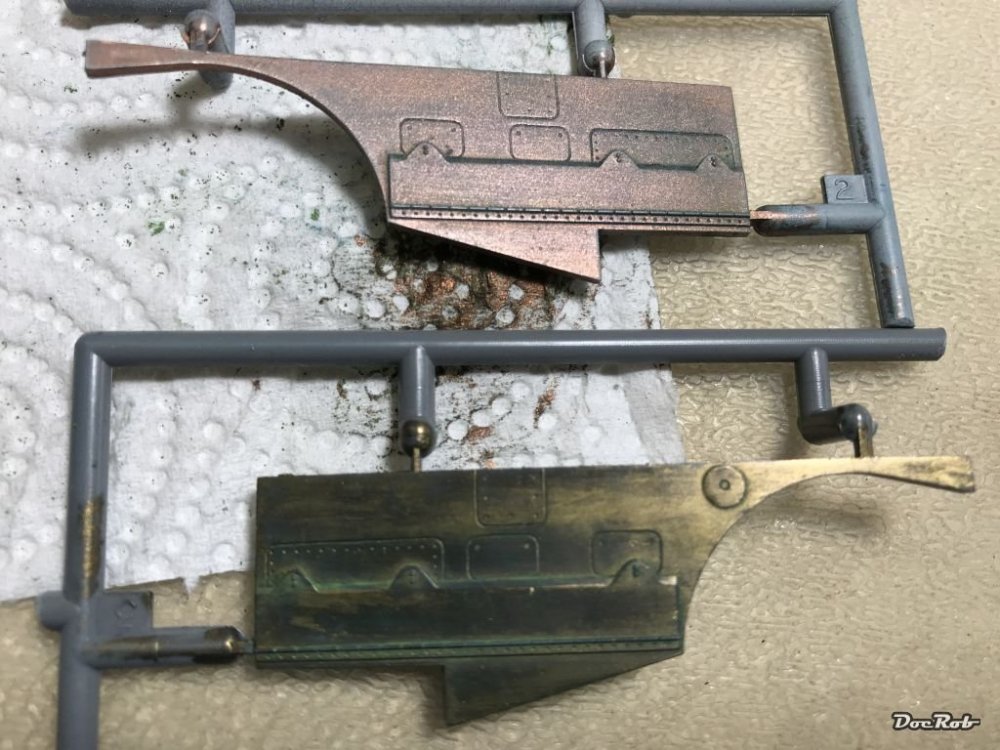
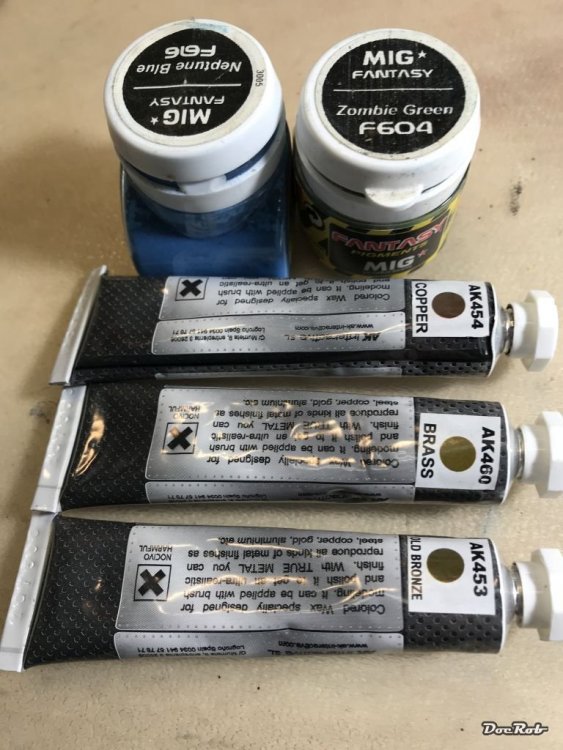
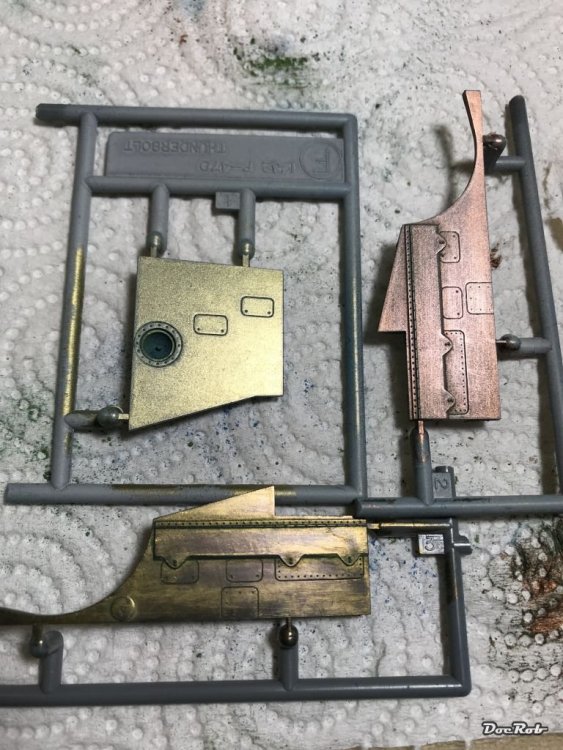
Wow, almost a year and no progress on the Nautilus, it's time to dive in again. The submarine was sidelined by other projects, but I felt after my recent pause with the Mig-31 (I will not get the needed Pilot figures soon), it would be good to continue with something else. The Nautilus will be a canvas for many experiments like lighting and for some future projects, the depiction of heavy metal or real old school NMF with no Aluminium involved . I spent some time to evaluate results on spare parts using AK's True Metal waxes and Mig Pigments. The waxes were of non FE-metals like copper, brass and bronze, the pigments where Neptune blue and Zombie green. Further experiments will show how the Extreme Metal paints from AK will behave and if it is possible to enhance and/or seal the result. Enhancement means here washes and working with pigments for the reproduction of algae and lichen. That is where I got so far. All surfaces where primed before except the bronze part, because coverage was good enough without. Copper and bronze with pigments rubbed in and buffed Here is a third sample of brass added These were the used products So far the bronze is very close to what I have in mind. Brass and copper needed primer and that effects the metallic shine and sharpness of detail a little a little. The uneven effect on the bronze is caused by not using primer, I guess. As I want to use at least two different metals for the hull, I will have to perform some Furter testing. Cheers Rob
- 76 replies
-
- 5
-
-

-
- jules verne
- pegasus hobbies
- (and 1 more)
-
Share how COVID-19 Quarantine has affected you.
DocRob replied to 1to1scale's topic in General Discussion
We are at day 14 of lock down and it sucks badly. Today the Spanish Government will issue some even sharper rules concerning companies. Since two weeks we are not allowed to leave the house except for a doctors visit or to buy supplies and this only with gloves and masks. It sucks big time, BUT.... … I fully agree with Phil, it has to be done. The longer we wait the wider is the uncontrolled spread of the plague. It's not all about government decisions, but about common sense and responsibility. Cheers Rob -
IBG models PZL P.11c. Finished
DocRob replied to Clunkmeister's topic in LSM 1/35 and Larger Work In Progress
Ernie, you make one of the few actual must buys, into a desperately needed one with your great work. Thanks for the wallet attack. Cheers Rob -
Bending PE is much easier and less dreading with the right tools. I got some different ones depending on what is to bend size ways, shape ways and complexity wise. For tiny parts I have a Tamiya made tweezer with a flat head, perfectly for e.g. optics in tank cupolas and other tiny stuff. Then there are flat pliers with differently shaped heads in my tool box. With a bending tool, you should first analyse your requirement size wise. If you plan to bend lets say landing flaps in 1/32 or large armor sheets you need a bigger tool. For these bigger tools you should get an equally long bending blade, smaller parts can be bend with a scalpel blade. It's always more fun to work with well designed tools made out of appropriate materials. I have this 5'' tool from the Small Shop since years and can recommend it highly. https://thesmallshop.com/collections/photo-etch-bending-tools/products/sms004-5-5-inch-hold-and-fold-the-5-speed Cheers Rob
-
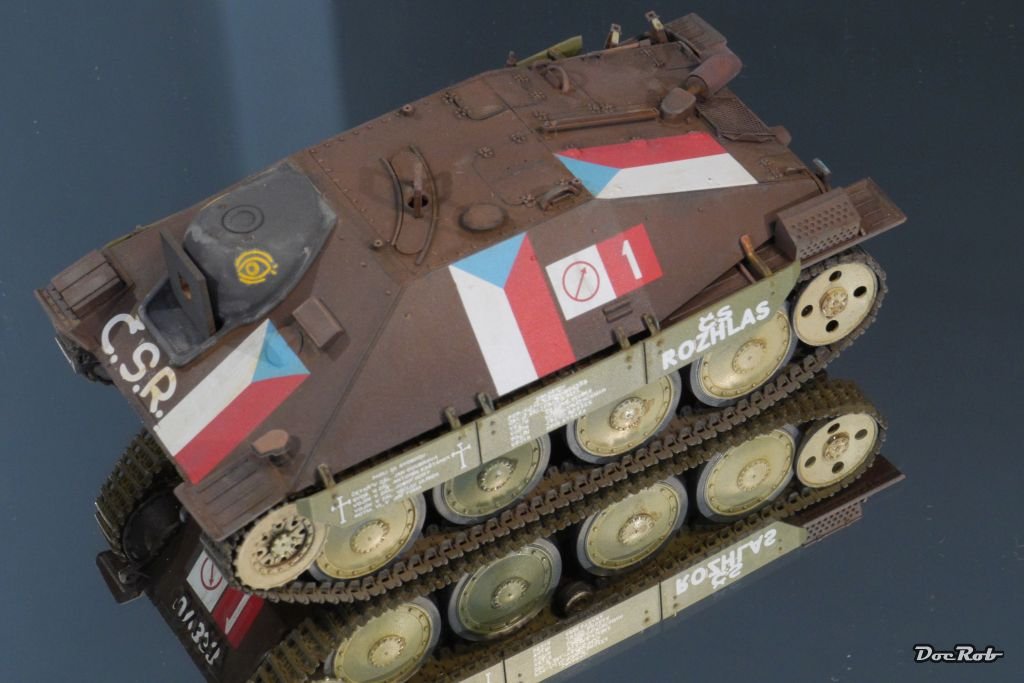
The Academy Hetzer isn't too bad either. I have built it some years ago over a weekend when I was ill. One of my fastest builds ever and it shows . I added Friuls for that Prague Hetzer. Cheers Rob

-
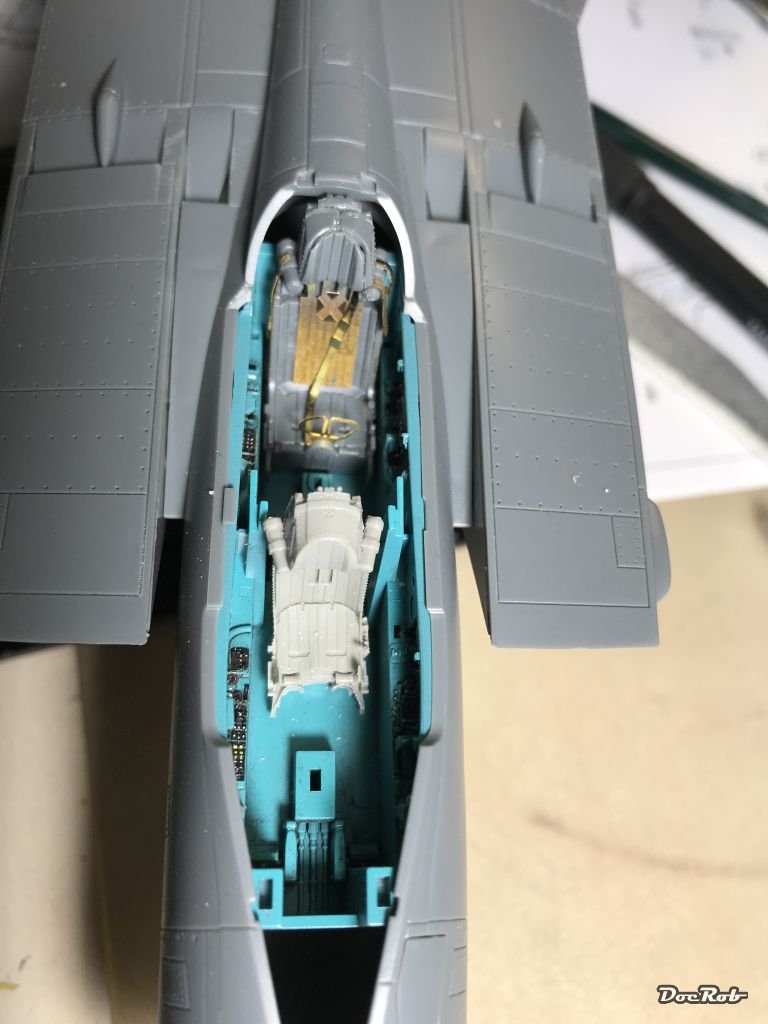
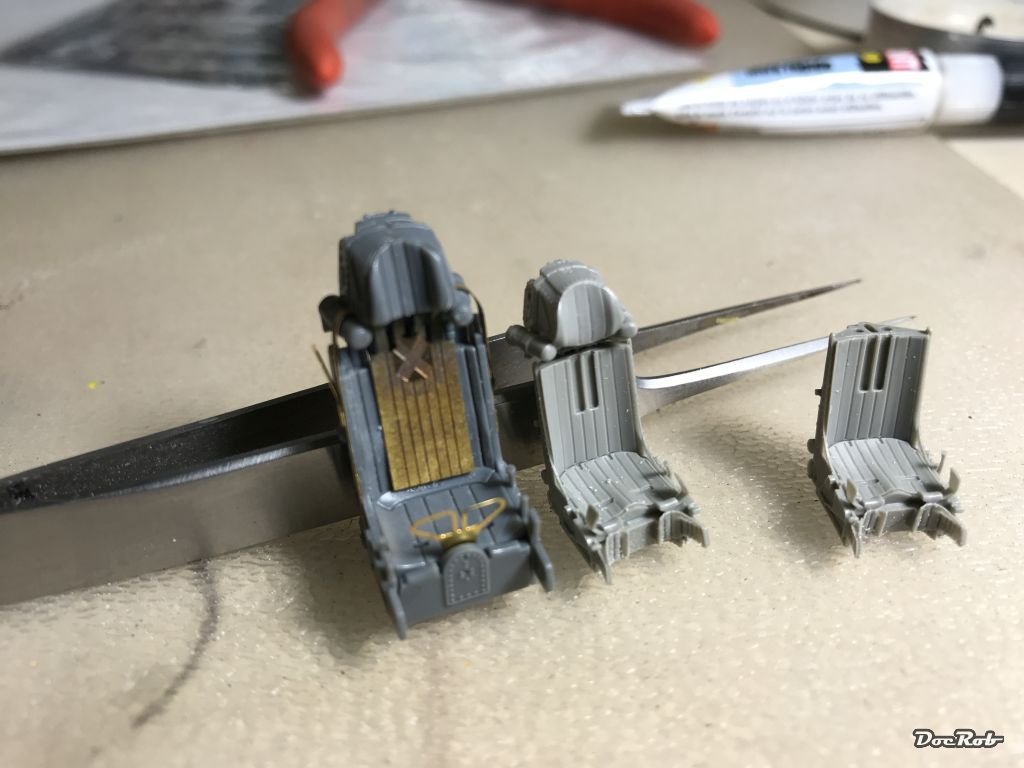
I will check the plastic seats for the Academy made SU-27 today, maybe the pit is not correct scale wise and Eduard had their Brassin seats scaled down a bit to fit. Don't get me wrong, the kit seats and the supplied PE will make a great looking seat, they seem to be a bit high, when fitted into the pit tub, but I haven't tried to fit the canopy. Where I got confused was the manual, generally well made, it fails to show the application of the PE parts well enough. I should have checked other references, anyway I will have the option with seated pilots from Aires, when I'm allowed to by the circumstances. Cheers Rob
-
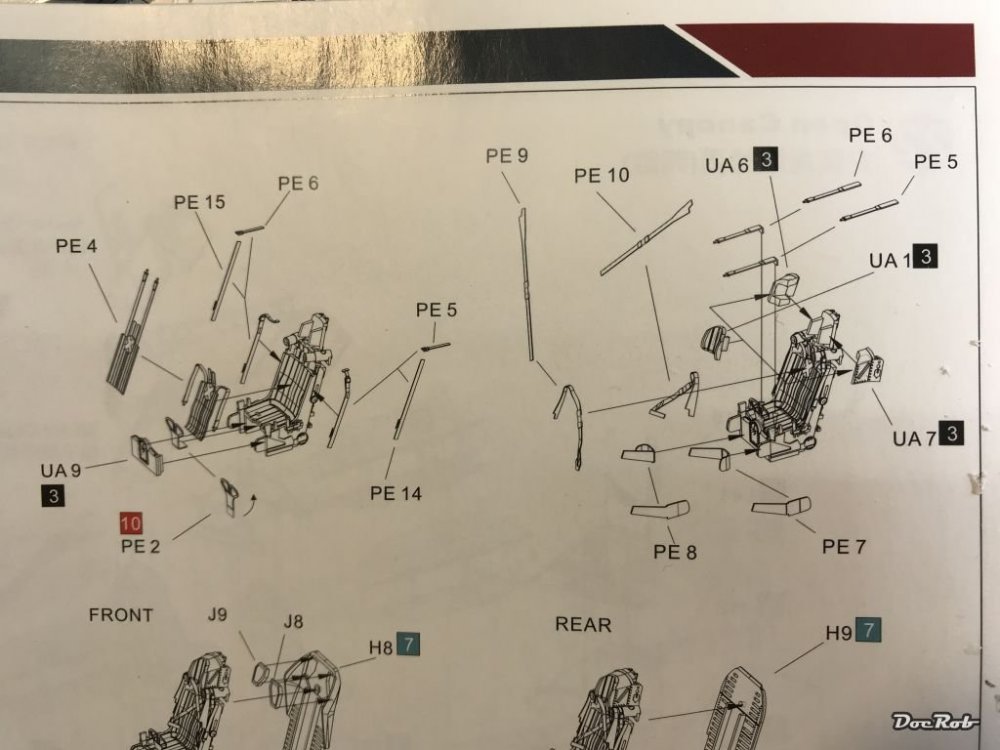
Yesterday I ran into some trouble with the build. I tried to assemble the ejection seats where the plastic went together well, but somehow I totally failed with the PE. I was to lazy to check against reference and payed the prize. The manual is confusing concerning the PE to say the least Today I decided not to use the kit seats and sourced my stash. An Eduard boxing of a SU-27 UB has two resin seats with Colour PE of the same type (or very similar). When I compared the seats I got this. Right the seats look like they were made for different scales. The direct comparison looks even worse. I have no idea who is right here, but with the kit seats, I don't know if the Canopy will close fully without hacking. I may opt for variant No. 3 and order two pilots with ejection seats from Aires, which was my favorite from the beginning, but with the situation now, I have no idea, how to get them soon. We had no mail delivered since one and a half week. Cheers Rob


-
WnW Sopwith 2F.1 ShIps Camel.
DocRob replied to Bomber_County's topic in LSM 1/35 and Larger Work In Progress
Hi Phil, British planes of the era were normally rigged with flat wire and Uschis thread is round. You can use it for the steering cables (Coded green, yellow and red in your manual) The blue coded wires have a flat (aerodynamic) shape of 0,1 x 0,3 mm. You can use the Prym elastic thread for that which has a flat profile or use PE if you want to make it right. German planes normally used only round profile wires. While rigging my recently finished Pfalz, I experimented with different threads and found it very hard (near impossible) to thread the 'wobbly' Uschi line through Bob's buckles. Fishing line was way easier to handle. Cheers Rob -
WnW Sopwith 2F.1 ShIps Camel.
DocRob replied to Bomber_County's topic in LSM 1/35 and Larger Work In Progress
There are usually measurements of the different thread types in the WNW rigging plans. Cheers Rob