DocRob
-
Posts
7,016 -
Joined
-
Last visited
Content Type
Profiles
Forums
Events
Gallery
Everything posted by DocRob
-
When I get my eyesight straight again with the help of some nice wine, I will tell you that this Pfalz is also my first WNW kit and yes the rigging part is daunting, but somehow it worked well with fishing line and Bobs Aluminum tubes and lots of patience and sharp tweezers. Bad hair day with my Pfalz

-

What is on your bench right now ? Share a picture :)
DocRob replied to Martinnfb's topic in Modelling Discussion
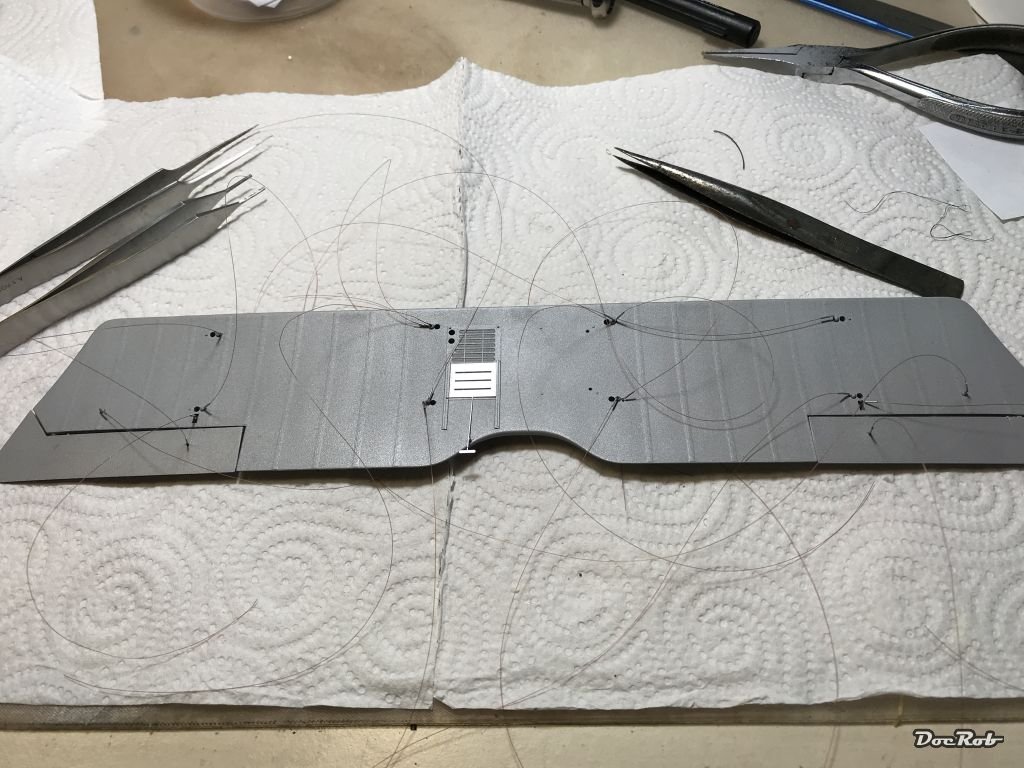
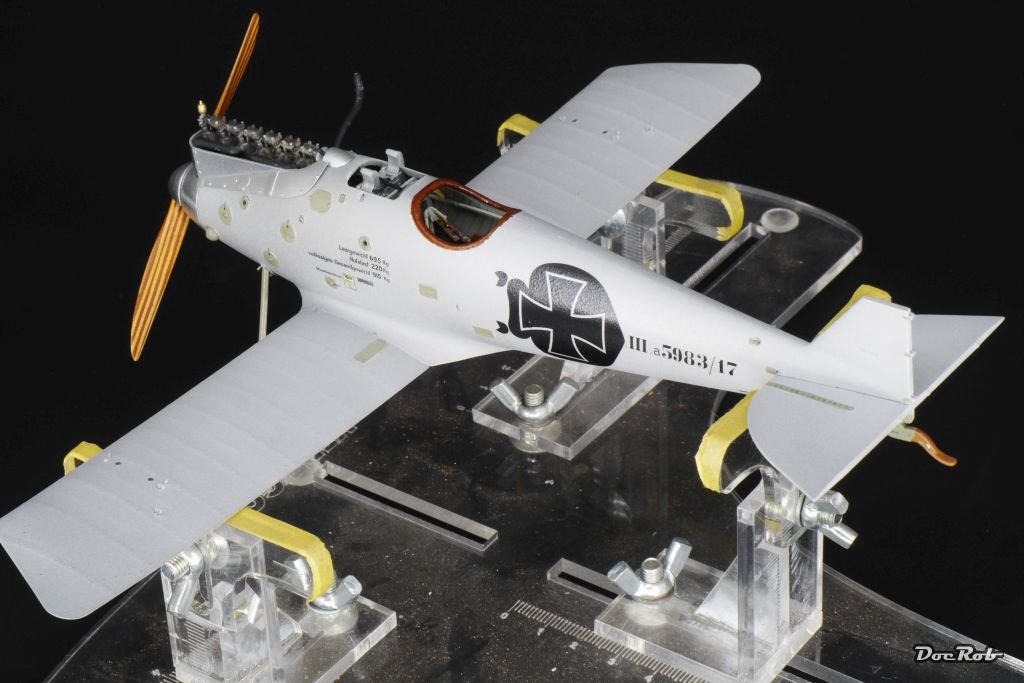
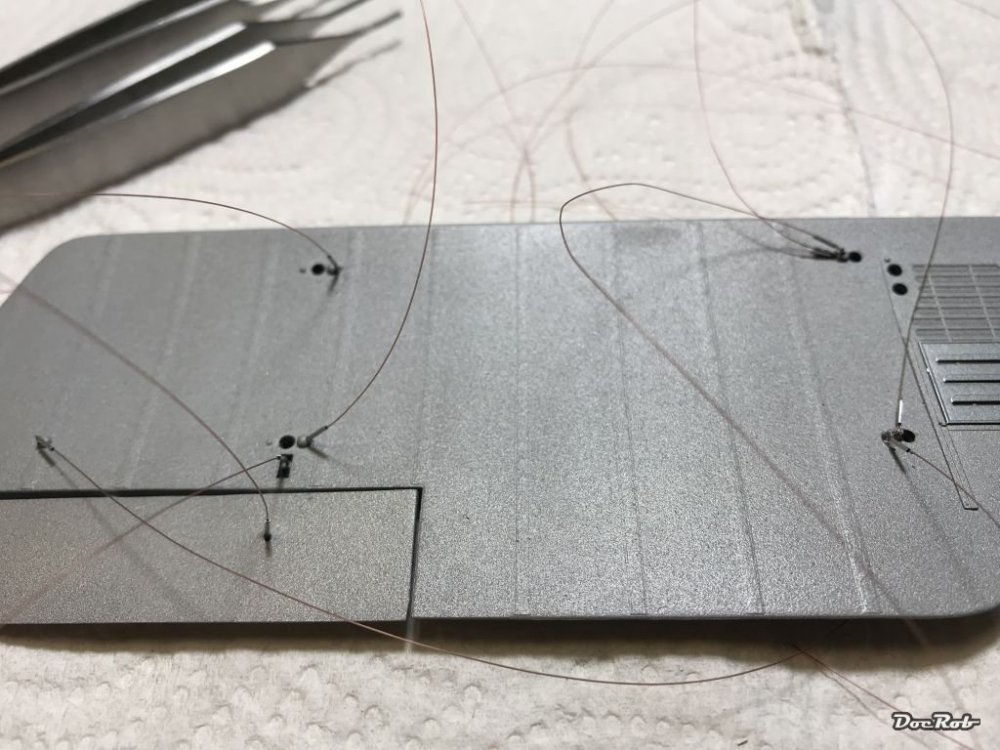
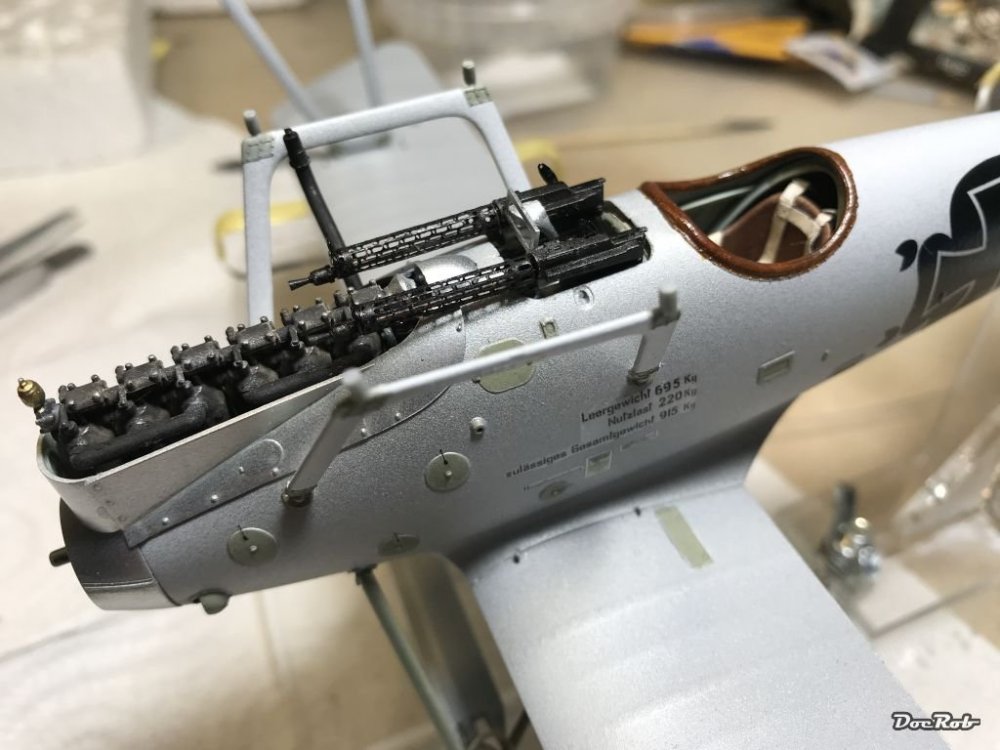
Rigging time on my Pfalz build. I managed to do all the pre rigging on the upper wing using Bobs Alu tubes and 0,12 mm fishing line. The line is fiddled into the tube, then into the eyelet and again trough the tube. You need some tweezer force to push the line trough the tube for the second time. The benefit is, that adjusting and securing with CA is easy, the downside might be the rigging of the lower fuselage with less maneuvering space. Its an eye stressing work , but after three hours this step was done. The Spandau MG's where added, which featured Master barrels and some smaller brass parts. Cheers Rob
-
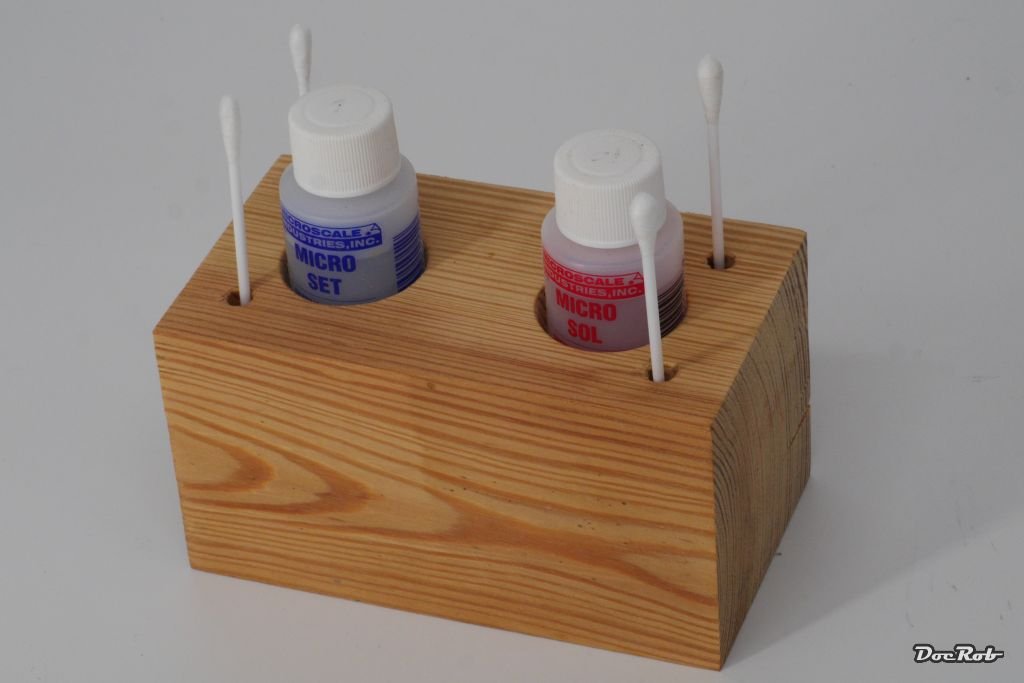
Not anymore, since I made this wooden holder .

- 8 replies
-
- 7
-

-
- bottle holder
- cement
- (and 1 more)
-
What is on your bench right now ? Share a picture :)
DocRob replied to Martinnfb's topic in Modelling Discussion
Thanks Gaz, it seems to be a part of the wing with the places, where the wing spars were imprint into the cloth. Cheers Rob -
What is on your bench right now ? Share a picture :)
DocRob replied to Martinnfb's topic in Modelling Discussion
Thanks Gaz, that pic would be well appreciated. The historic photos are very hard to read, because among the normal interpretation problems, Silbergrau changes it's appearance more than other Colours, because of the slightly reflective nature of the coating. Your assumption, that it was painted dope, is what I read too. If that photo you mentioned is an actual one, it may help to interpret the right hue better. Cheers Rob -
Using filters means to apply a very diluted transparent Colour over the whole surface or parts of the kit, to gain a tonal balance. To achieve that you have to choose the right filter color. The Char 1b here is only airbrushed in the first picture and I didn't like the stark contrasts. Among other effects the second picture shows the Char after a treatment with a red brown filter and whoosh, everything blends together and I got a reasonable tonal balance. Cheers Rob


-
You found a treasure in the midst of a pirates nest. It's a great story, that there are companies willing to do legal business after they went rogue and were talked out of it, by the initative of a forum. Very good to see these things happen. I would like to see you tackle this glider with a WIP and I believe this will be outstanding. The use of wood and silk paper will be a nice shift from plastic, though I believe it will be very fragile in 1/32. Seeing these laser cut parts, specially what seems to be the frame structure makes me look at my clumsy hands… I wish you luck with that project and it maybe gets me to continuing my wooden ship kit of the Cutter 'Le Renard'. Actually there is lots of fun working on wooden kits. Cheers Rob
-
What is on your bench right now ? Share a picture :)
DocRob replied to Martinnfb's topic in Modelling Discussion
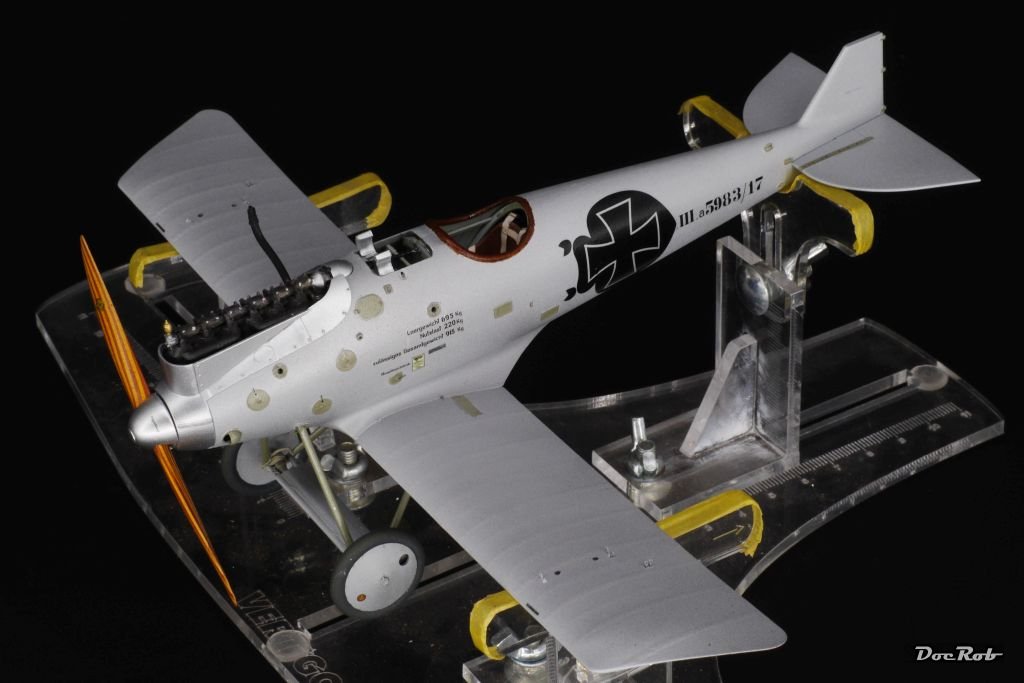
Some progress with the Pfalz. I added all the little things prior to the rigging. I will pre-rig the upper wing first, attach it to the struts and then connect the pre riggings with the lower wings eyelets and add turnbuckles. The typical Colour Silbergrau gave me some headaches while trying to mix. I tried different aluminum Colours from Alclad and AK and mixed them with Tamiya flat white. All these mixtures went lumpy, so I used the Tamiya white with Tamiya metallic gray and misted some matte aluminum from AK' Extreme Metals on. It's hard to capture on a photo, but I like the effect, as the elegant Pfalz looks even more speedy. Cheers Rob

-
Fa330 Bachsteize (Wagtail)
DocRob replied to rkranias's topic in LSM 1/32 and Larger Aircraft Ready for Inspection
Flying/sailing the Bachstelze must have been very close to flying with a jet belt for it's time. Not a lot of material around the pilot an no protection at all. Must be fierce to be the pilot in rough conditions say in the northern Atlantic area. Your rendition shows this fragility perfectly, with all the detail work and the rigging. You made a piece of art out of that tiny kit. Cheers Rob -
Trumpeter A7E - Hellenic AF
DocRob replied to GusMac's topic in LSM 1/32 and Larger Aircraft Ready for Inspection
Greatness spreads Cheers Rob -
If you go for a Dragon Tiger with DS tracks it's worth to check them on arrival. On my Wittman Tiger they were packed so stupidly, that lots of the guide teeth where bent, with no chance to make the tracks useable again. I planned to use AM, so it was no deal breaker for me. Cheers Rob
-
Very late group build entry, Marder III.
DocRob replied to 1to1scale's topic in D-Day 75th Anniversary Group Build
You are a machine, I think you could have made the deadline, even when you stated in February . In fourteen hours I manage to go through the sprues after opening the box . Will there be a dio, because I saw the Zündapp bike on your bench? Cheers Rob -
Congratulations Mike, your 'Berg' is a piece of art. These Austro-Hungarian lozenge makes up for an interesting look and your subtle weathering blends everything in. Cheers Rob
-
What is on your bench right now ? Share a picture :)
DocRob replied to Martinnfb's topic in Modelling Discussion
Thanks for the explanation, Gaz. Sounds like a time consuming and trying process, but you got rewarded with something special in the end. Your Idea of using micromesh or polishing compounds for removing overspray is stored on my brain-disk. I will try that for the next freehander. Cheers Rob -
What is on your bench right now ? Share a picture :)
DocRob replied to Martinnfb's topic in Modelling Discussion
Hi Gaz, your night fighter is looking awesome. How did you achieve that camo. The worn appearance combined with lots of visible detail like antennas and Schräge Musik let it stand out. It definitely is and to my eye it's the most elegant plane of her time, even more than the Albatros, which is bulkier and has that ugly beaver tail. That is the main reason I picked the monochrome finish, to keep the elegant lines in the foreground, the other is, that it's pilot was from Berlin like me. Next step will be decaling and then RIGGING and this will be about do or die for this project. Cheers Rob -
So tiny and so beautifully done. There are so many things to see on your little Focke, a true eye catcher. Cheers Rob
- 34 replies
-
- 3
-
-
- u-boat scout
- gyro glider
- (and 2 more)
-
What is on your bench right now ? Share a picture :)
DocRob replied to Martinnfb's topic in Modelling Discussion
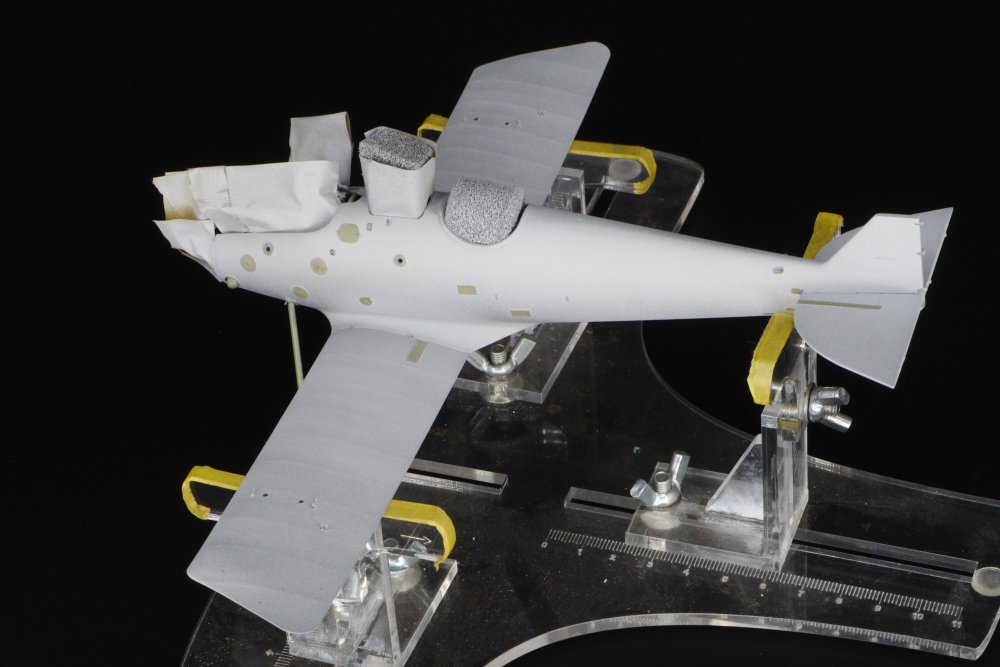
Found some time the last days to continue the Wingnut Wings Pfalz and closed the fuselage. I glued in all the eyelets as preparation for the rigging after drilling all holes with a 0,3mm drill. I then sprayed RLM 02 for all the hatches and masked them after drying. Then the fun begun. Pfalz Silbergrau (silver grey) was mixed using Tamiya flat white and Tamiya dark silver 1 to 1. On the wings I used a darker shade foe a little post shading. After the application, I misted some AK dark aluminum on top and coated everything with Pledge. I read a lot about the appearance of Silbergrau and decided to achieve a slightly matte very light grey with a little dull shine of aluminum in it. The result is exactly like I wanted it, historically right or not. Cheers Rob
-
1/35 Tiger 1 - Late Production.
DocRob replied to Bomber_County's topic in D-Day 75th Anniversary Group Build
Freehand camo always gives me the creeps, but yours is looking very bueno. Cheers Rob -
Sweet pre purpled thing , I have one in stash too, but this will fit into a fantasy-circus setting. No idea about weird pre shading right now. The main thing about Colour pre shading to me is to find a matching Colour enhancing the planned paintjob, purple for blueish grey looks great and gives a little warm hue to the shadowy areas. Cheers Rob
-
Hasegawa Nakajima Ki-84.
DocRob replied to Sir Desmond Glazebrook's topic in LSM 1/35 and Larger Work In Progress
Nice save with the tail, Dale. These grimy drop tanks look gorgeous. Cheers Rob -
That is what I think too. The question if filling single areas or doing a complete coating depends on the subject and state of condition to me. A heavy used falcon with lots of spare panels from the scrap yard, I would fill the panels individually, using slightly different shades of the base Colour. Pre shading with different Colours sometimes enhances the richness of the then applied base Colour.
-
1/32 Connie Edwards Ha-1112 Buchon
DocRob replied to JeroenPeters's topic in LSM 1/35 and Larger Work In Progress
Sweet, and the unusual wingless presentation makes it very interesting to the eye. The paintjob and subtle choose of Colour is just amazing. Cheers Rob -
Wow, that's scaringly creepy in a way . There is only one true theme song to me, because it's the unfulfilled answer to all the gruesome questions of the world like it is
-
What do you consider is the meanest tank in history?
DocRob replied to Sir Desmond Glazebrook's topic in General Discussion
Clearly the M-48 Patton to me. Why, because it was so big when I was playing in the West-Berlin forests (Grunewald) as a kid and the US Army had their trainings there in the same spot and I had to flee the tanks with my tiny bicycle. Cheers Rob -
That's the true OOB spirit , Ernie. I like the Idea generally, but thirty days…. What about aftermarket because the only Hasegawa 1/32 I own is actually, a P-40 from Eduard and supplied with some goodies. The only other one I have and would prefer as being part of the fast and easy crowd would be 1/48, a Japanese F1M2. Cheers Rob