DocRob
-
Posts
5,919 -
Joined
-
Last visited
Content Type
Profiles
Forums
Events
Gallery
Everything posted by DocRob
-
 Welcome to that polystyrol haunted place Barry, that is a really nice 'gal' you finished there. There are not too many of theese olive drab Mustangs around, so it is a nice one for a change. Nice job of blending the colors subtely. Cheers Rob
 -
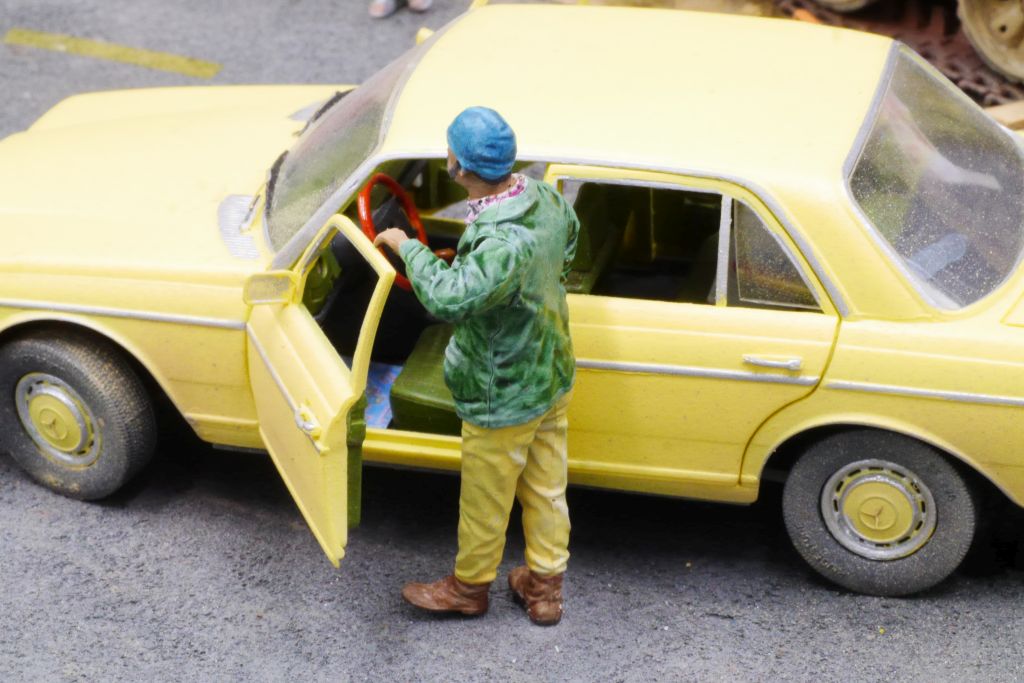
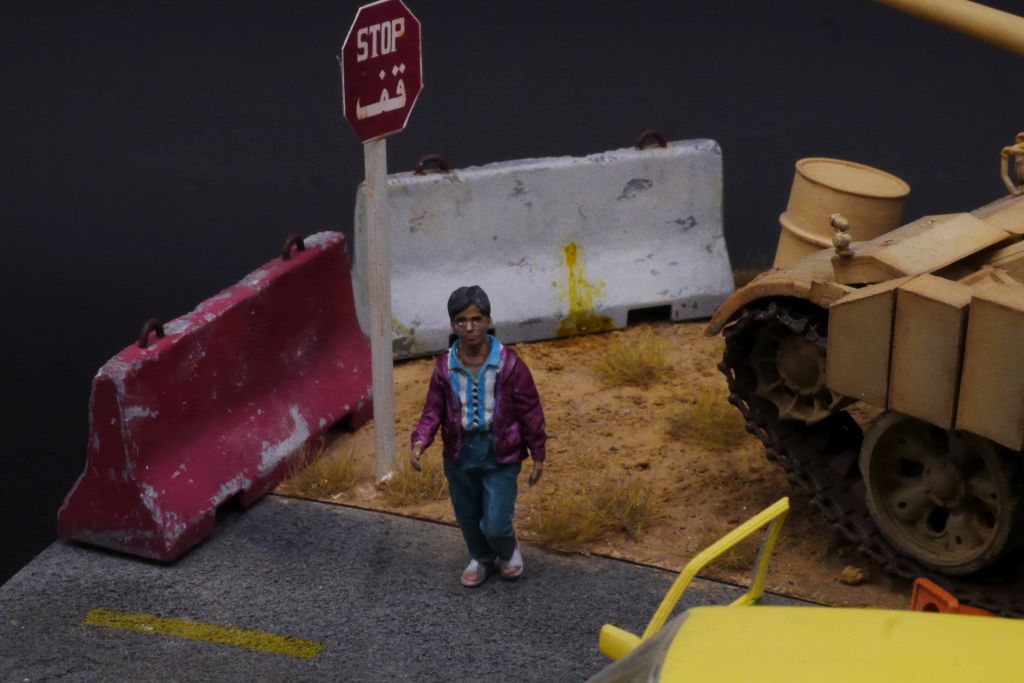
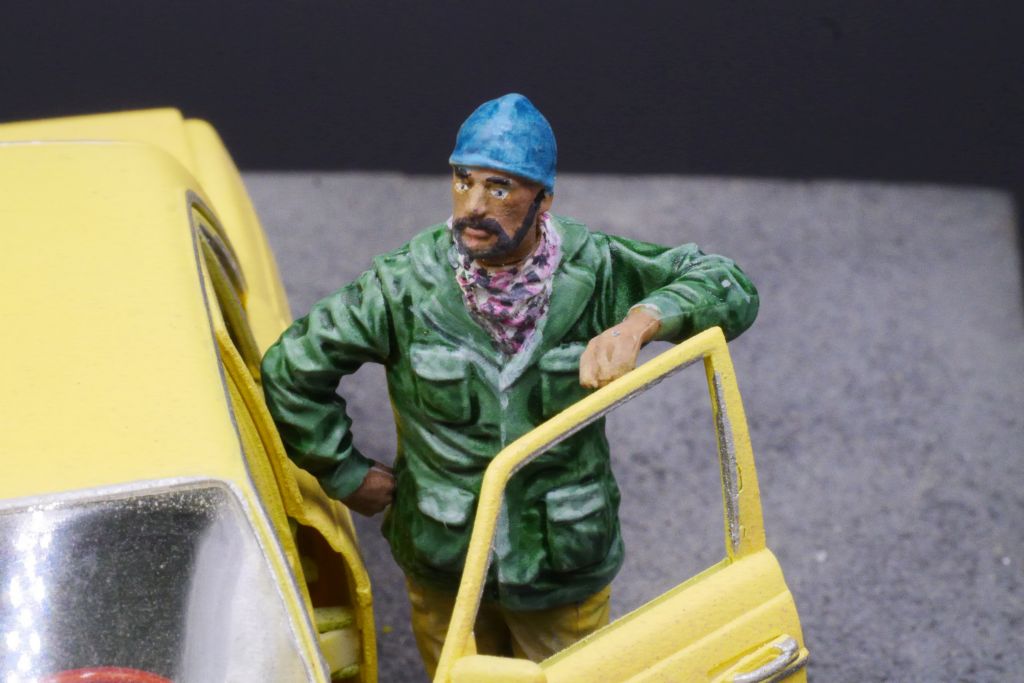
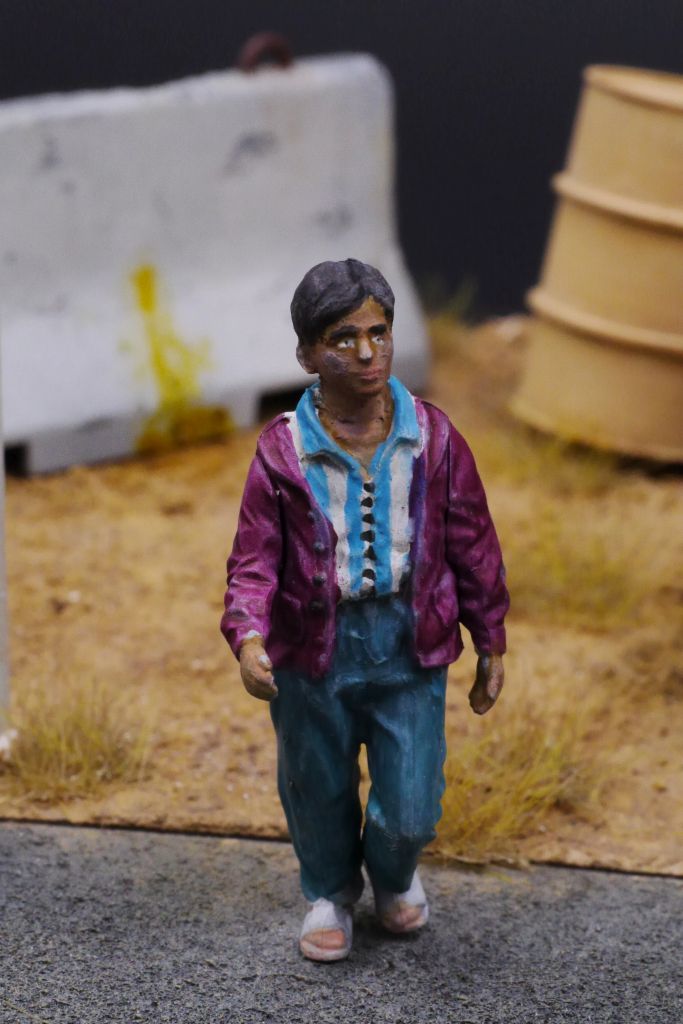
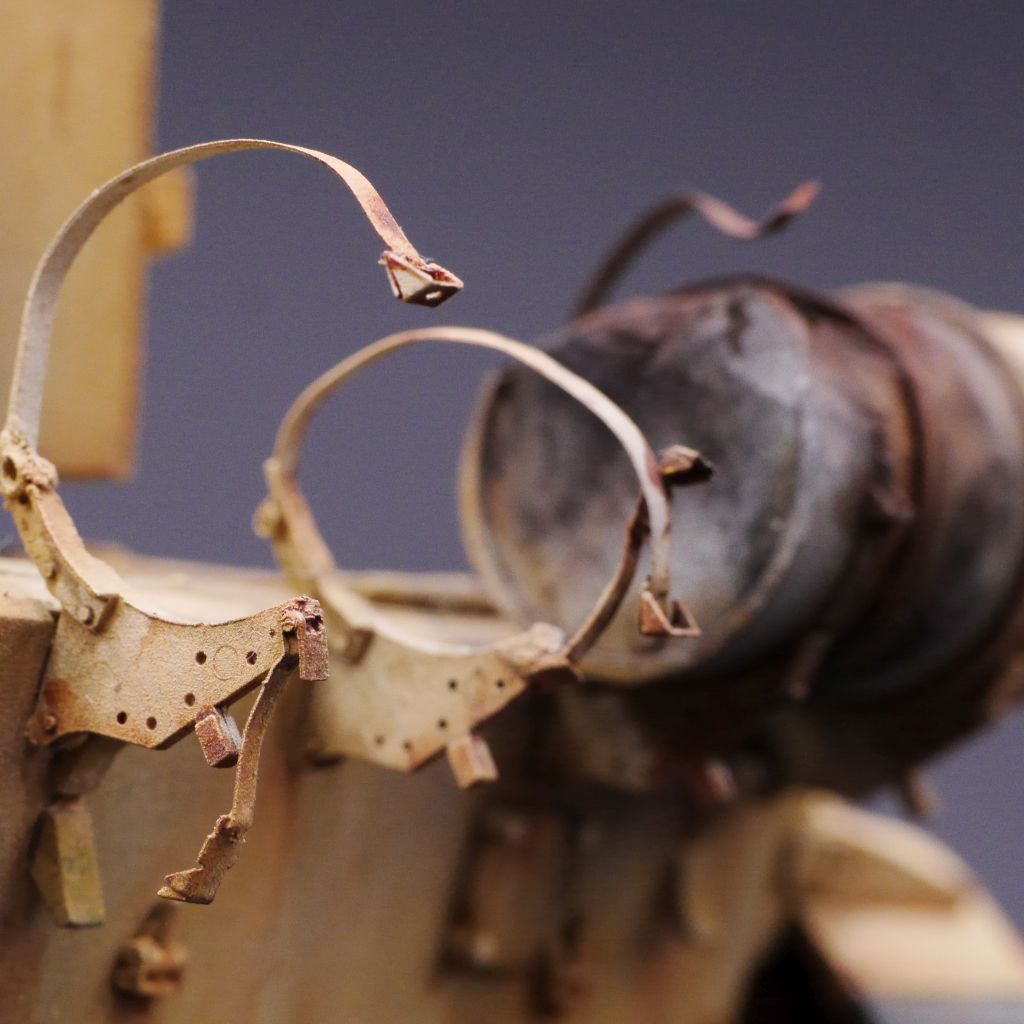
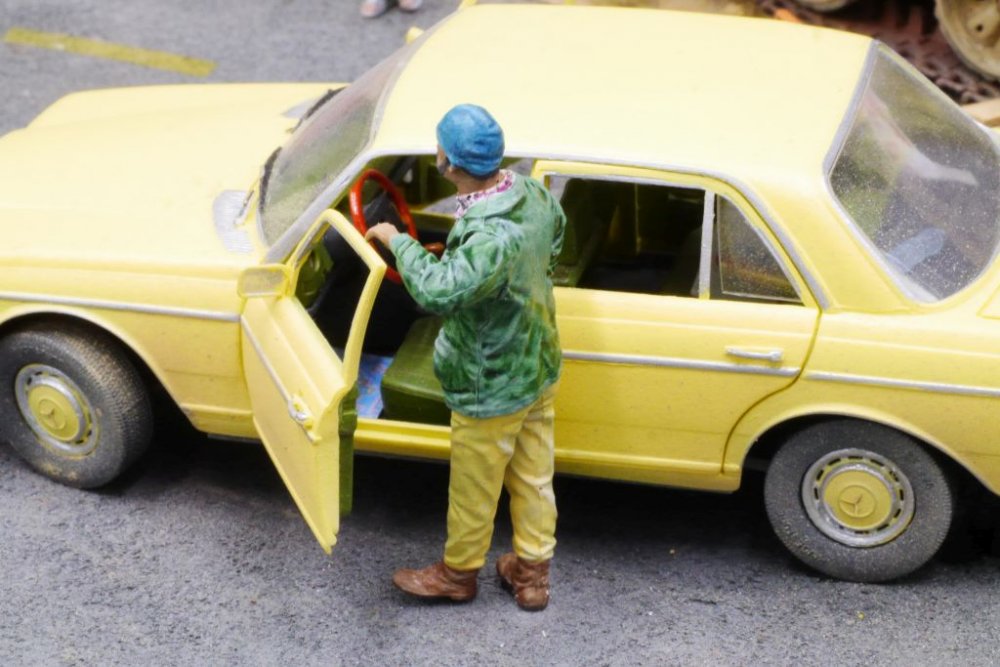
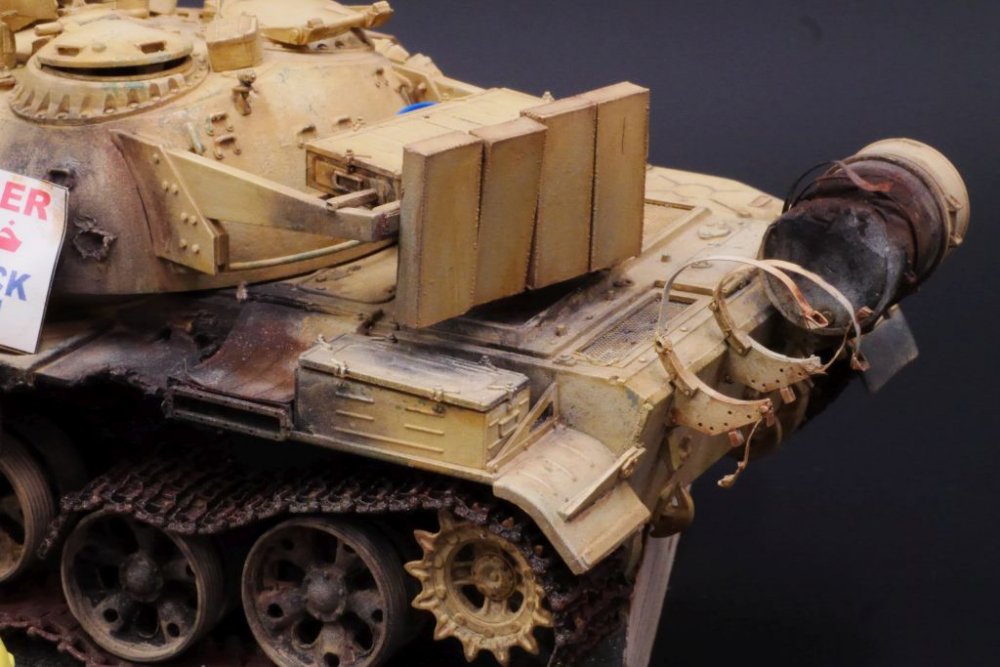
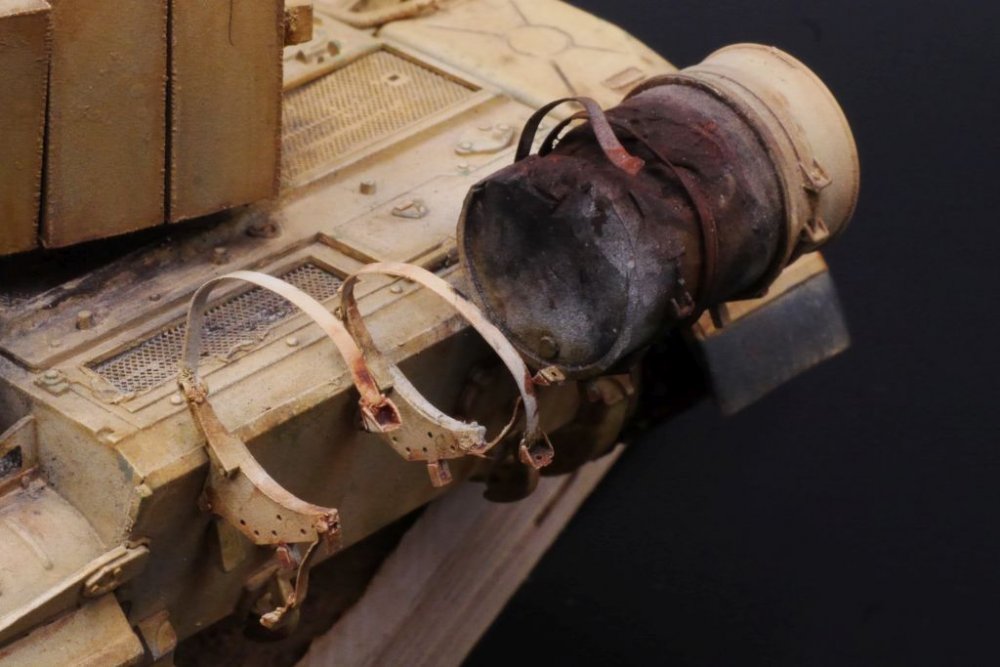
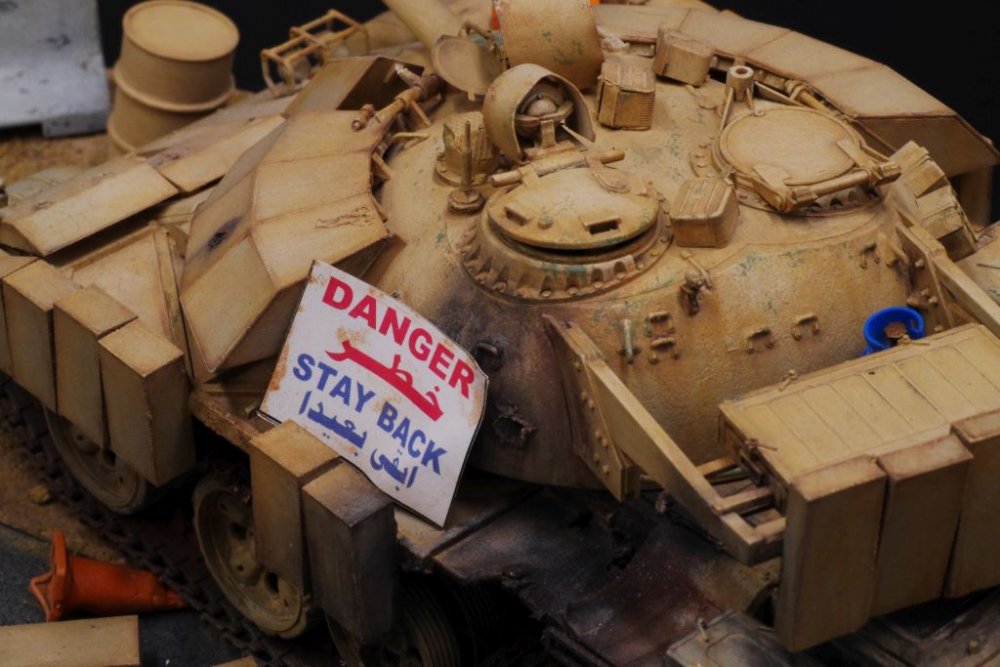
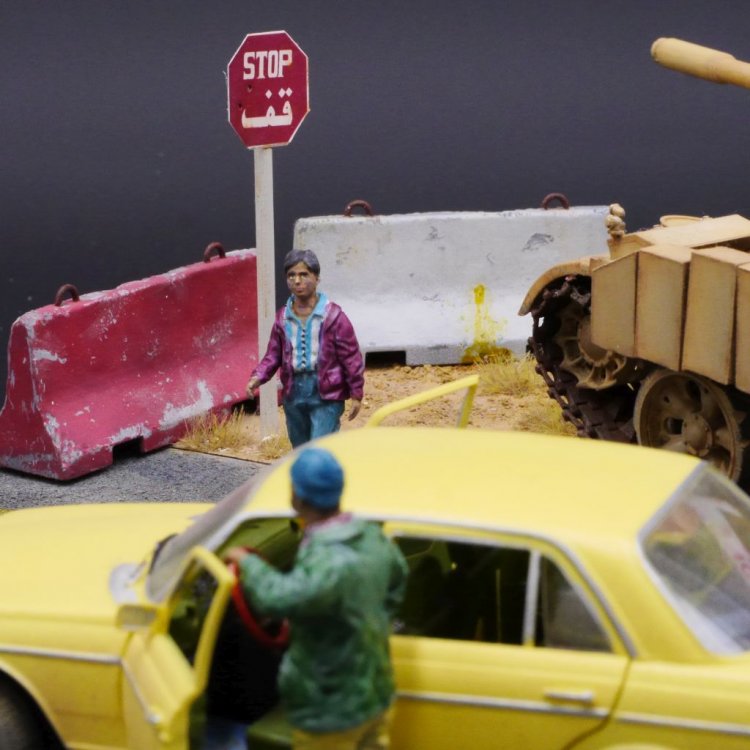
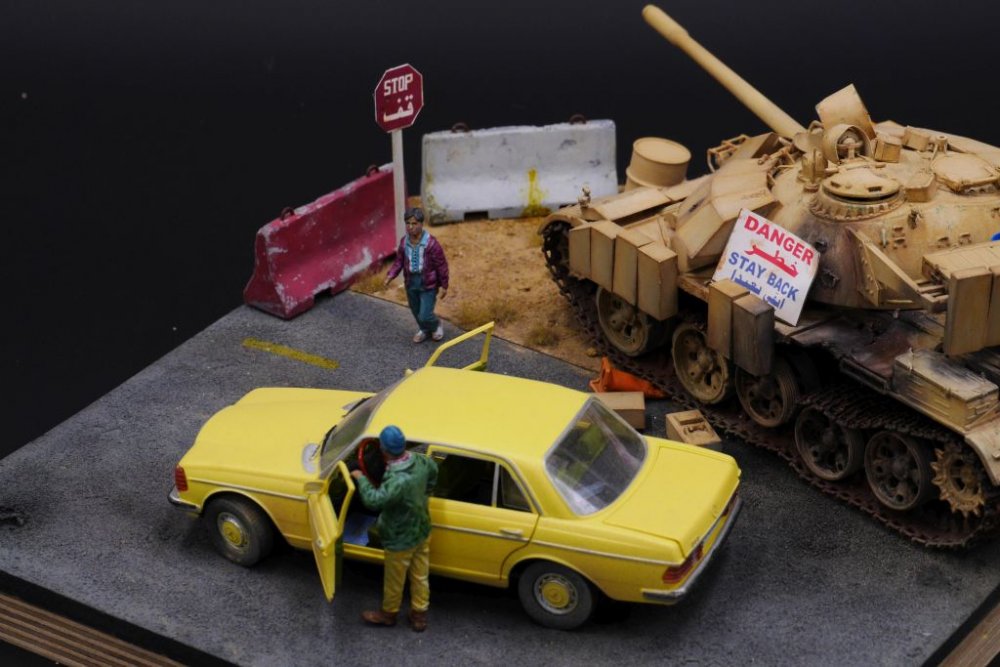
Ladies and Gentlemen, it happens to everybody once in a while... I just finished a project, which dated back from my Berlin days. The T-55 Enigma was build then, as was the Mercedes Benz and the surroundings. Sometimes I like to tackle serious events in modelling, but try to give them a humorous aspect, maybe to enhance the view for something monstrous by adding some pure human aspects. By the time I got the Diopark Benz Kit and the Meng Figures, the plan for this little leaking scene came to my mind. It took me a long time to reach the finish line while painting the figures, not one of my most loved actions. The T-55 Enigma is from Tamiya, but heavily added with Voyager Etch, the marvelous SKP-Lenses, burnt wheels by MIG, Friul tracks, an Aber barrel and Resin for the Armour bricks, to let them look a little disaranged. Th Benz is build oob and the kit is a piece of art. I hope you enyojed this one. Cheers Rob P.S. Hooray to the gods of the Forum, everything is working again.


-
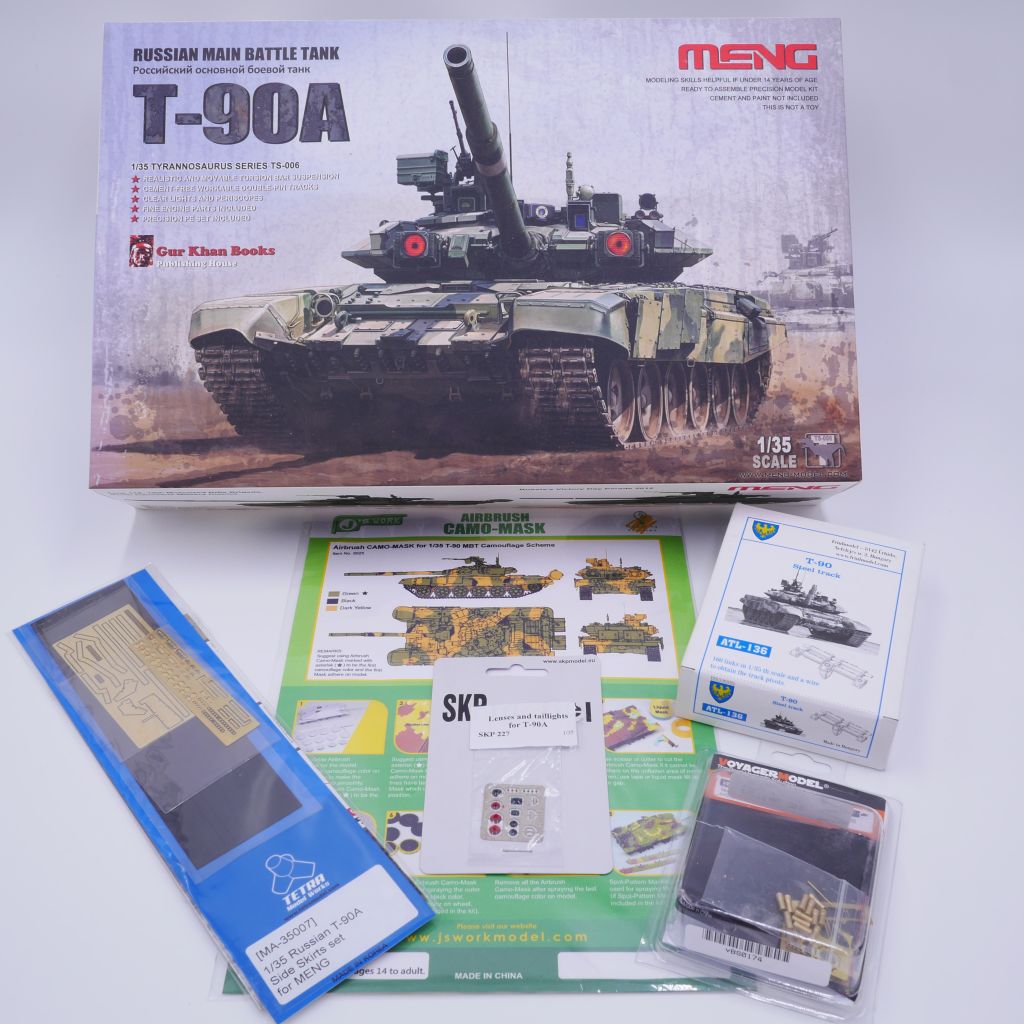
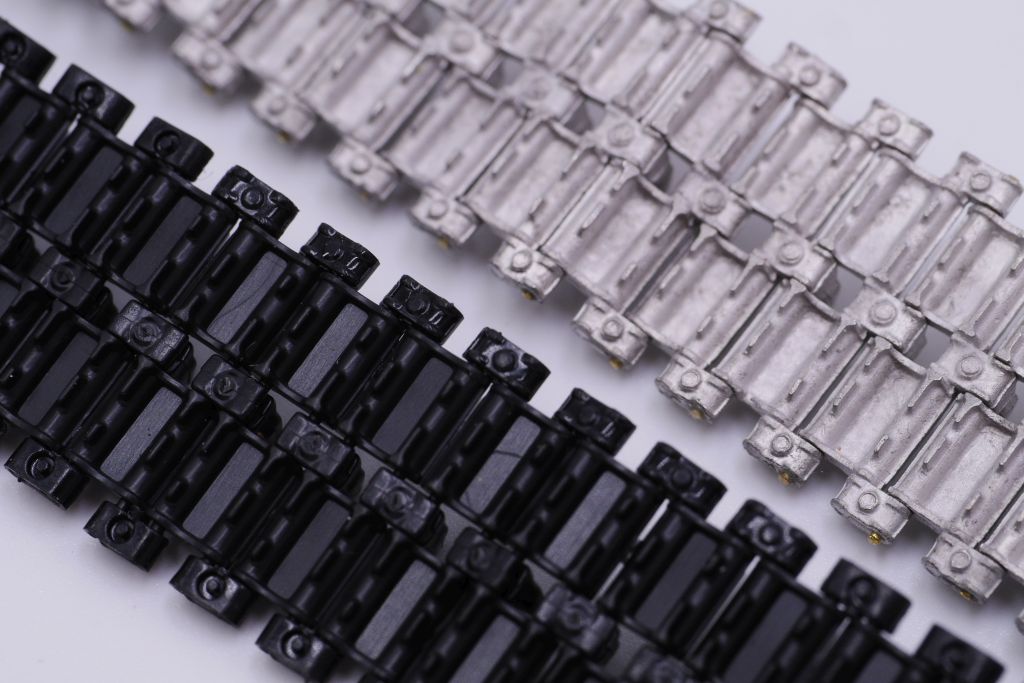
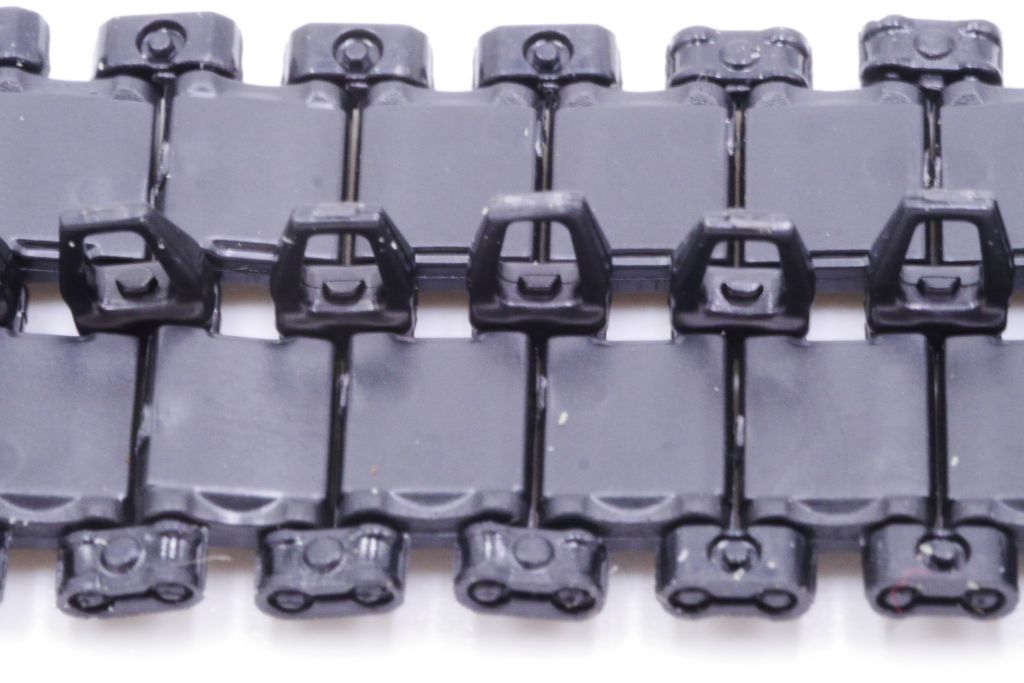
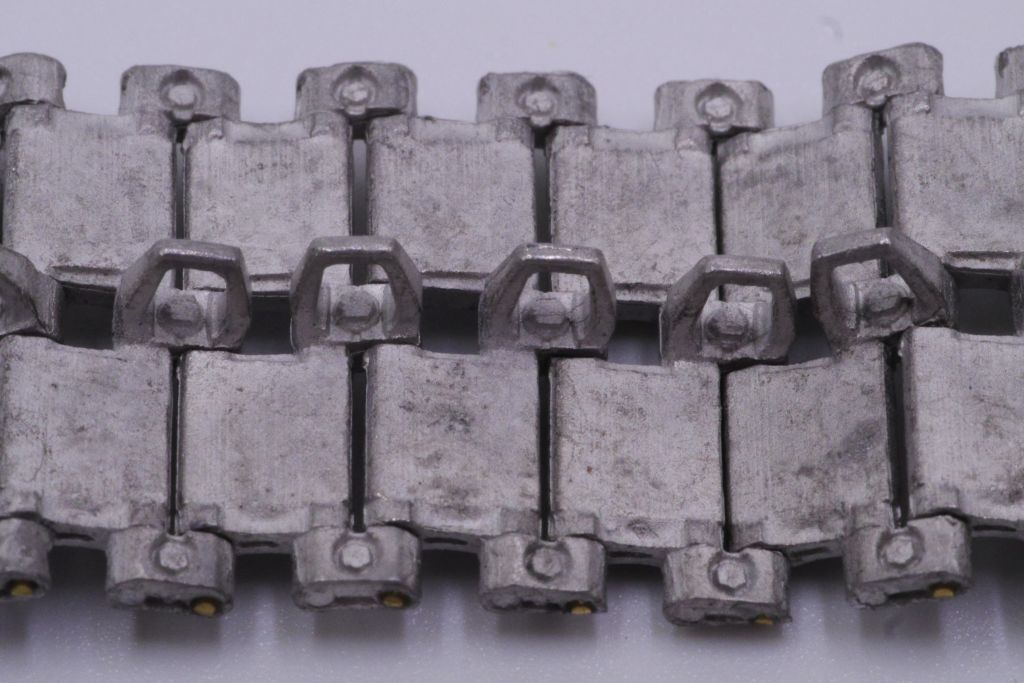
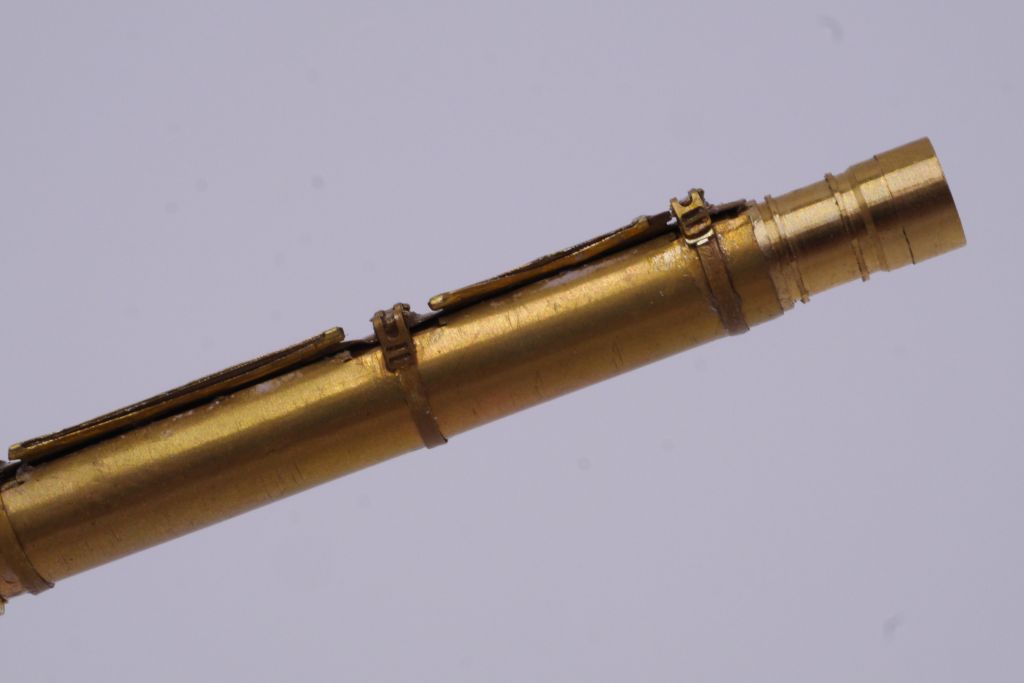
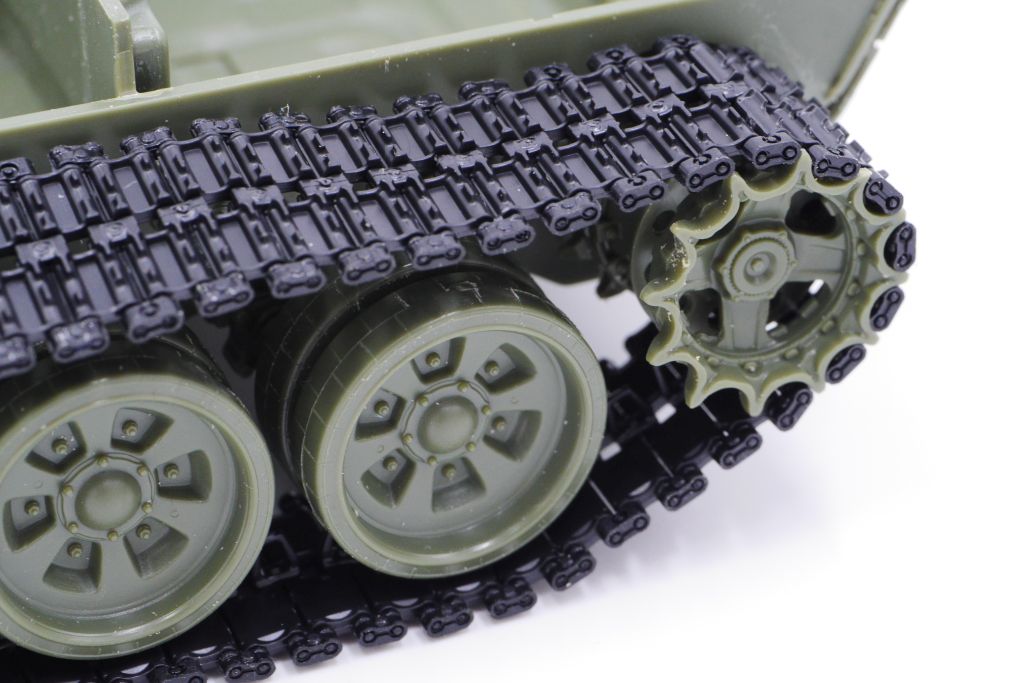
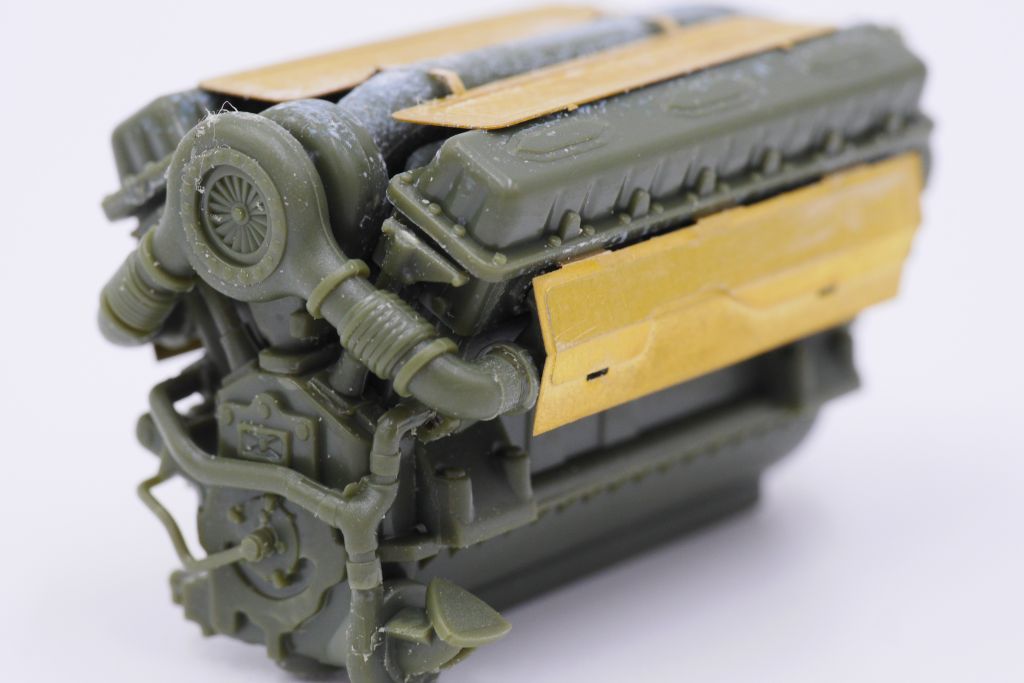
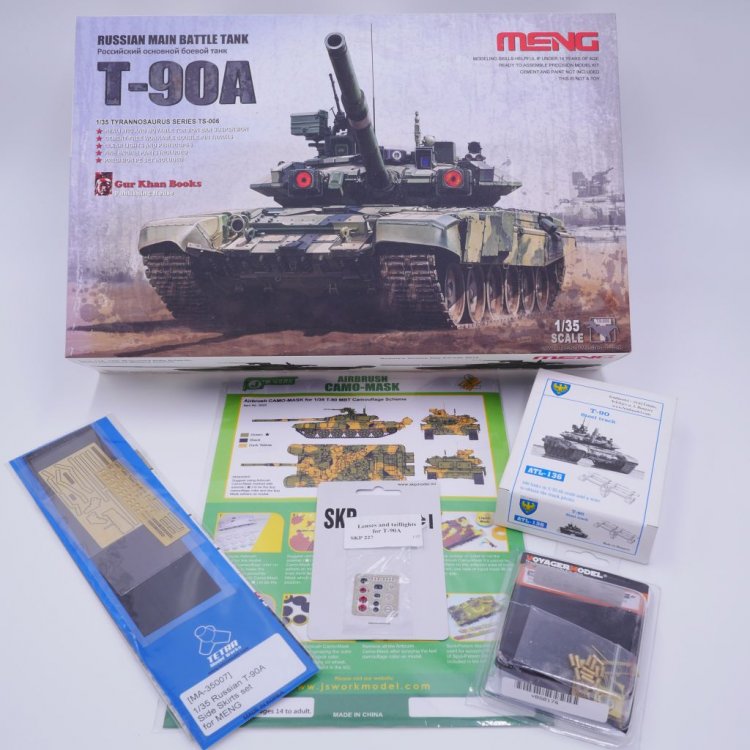
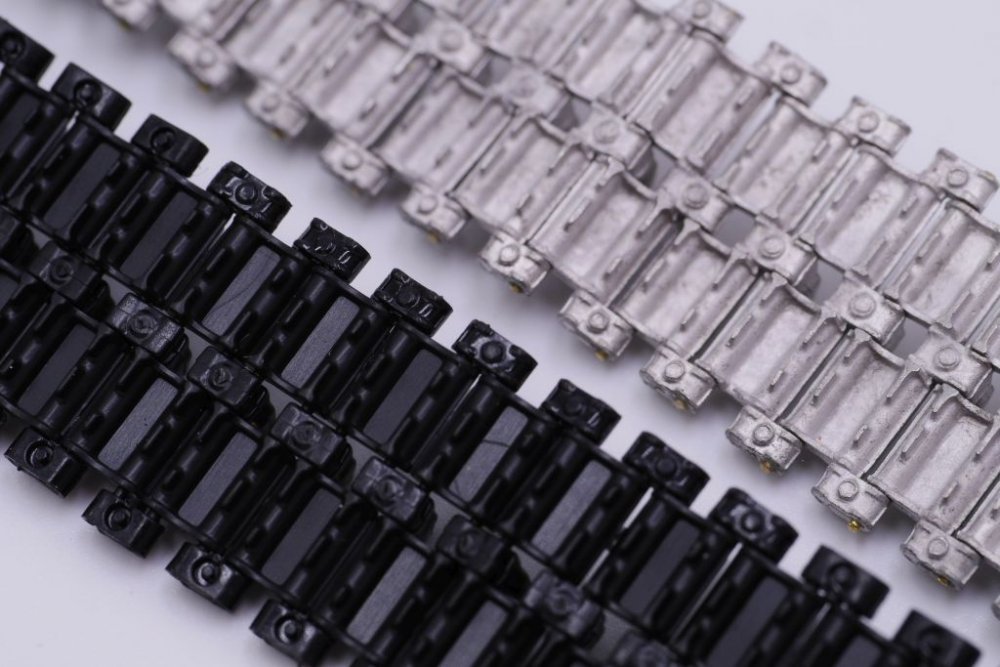
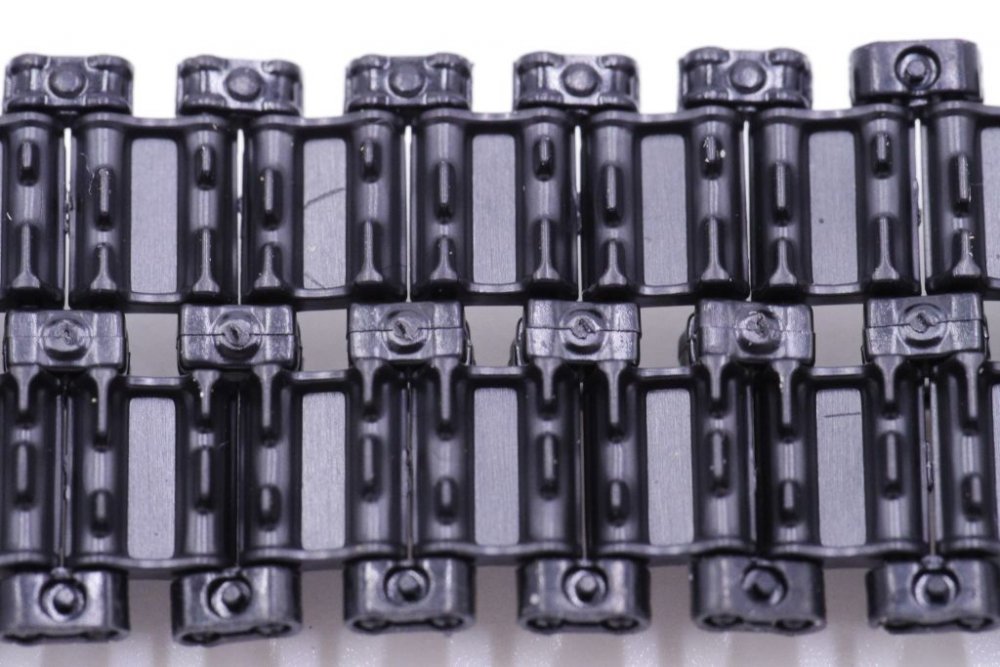
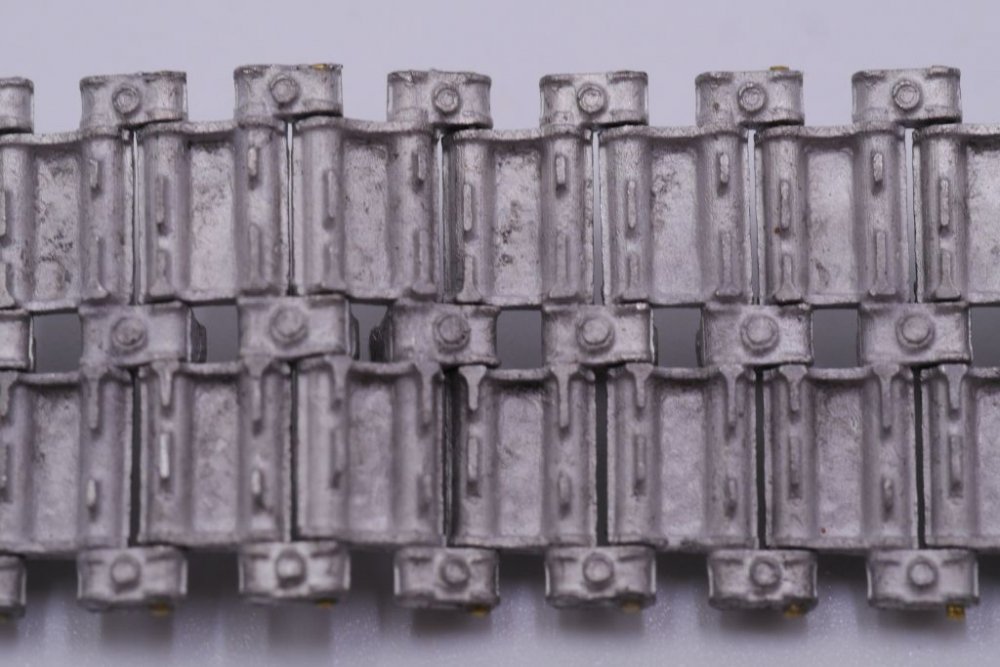
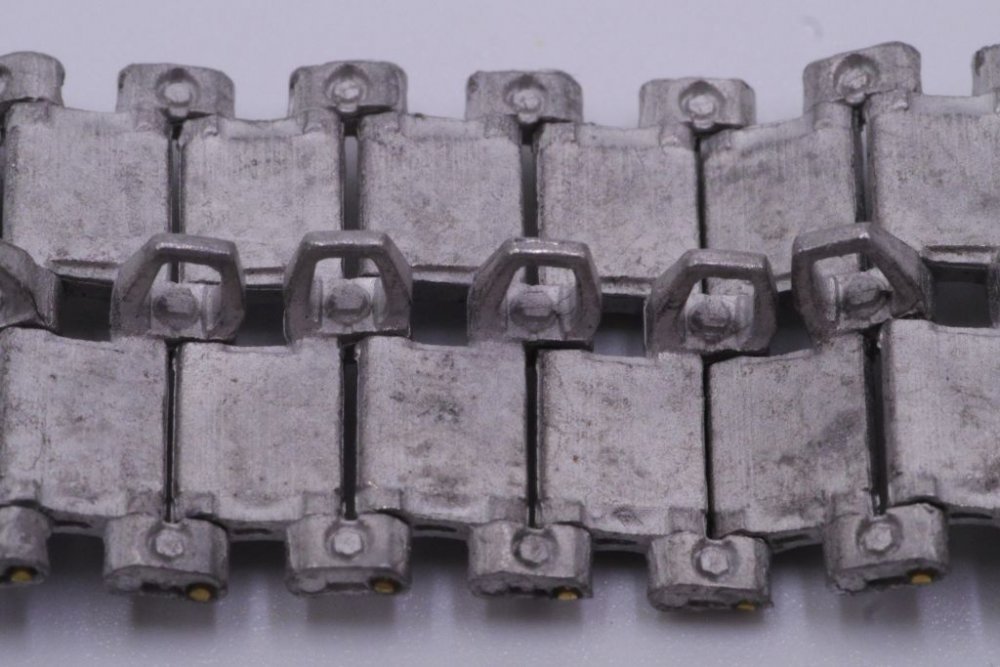
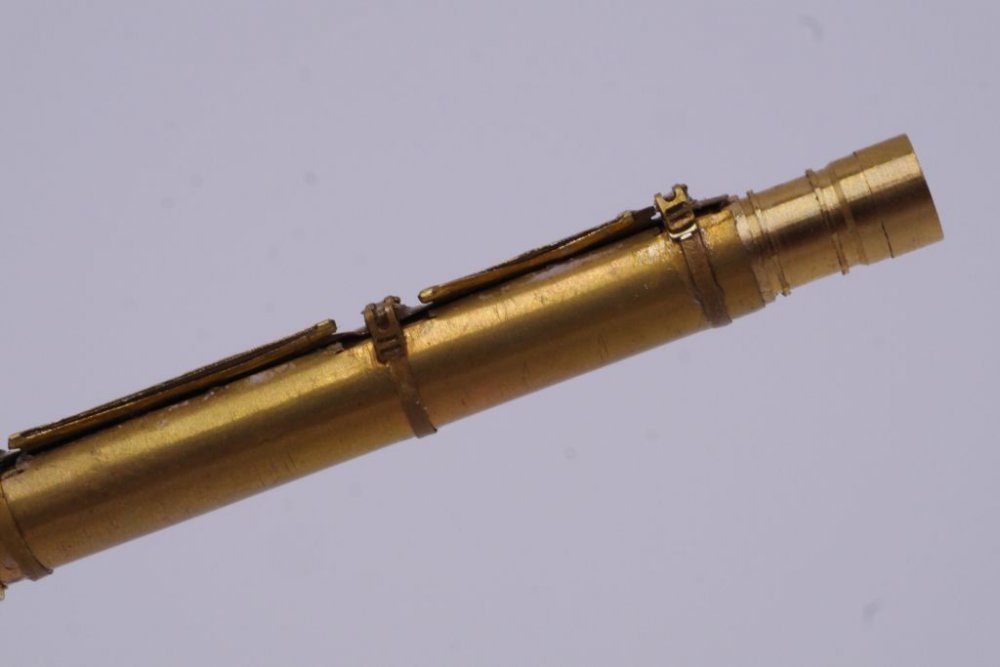
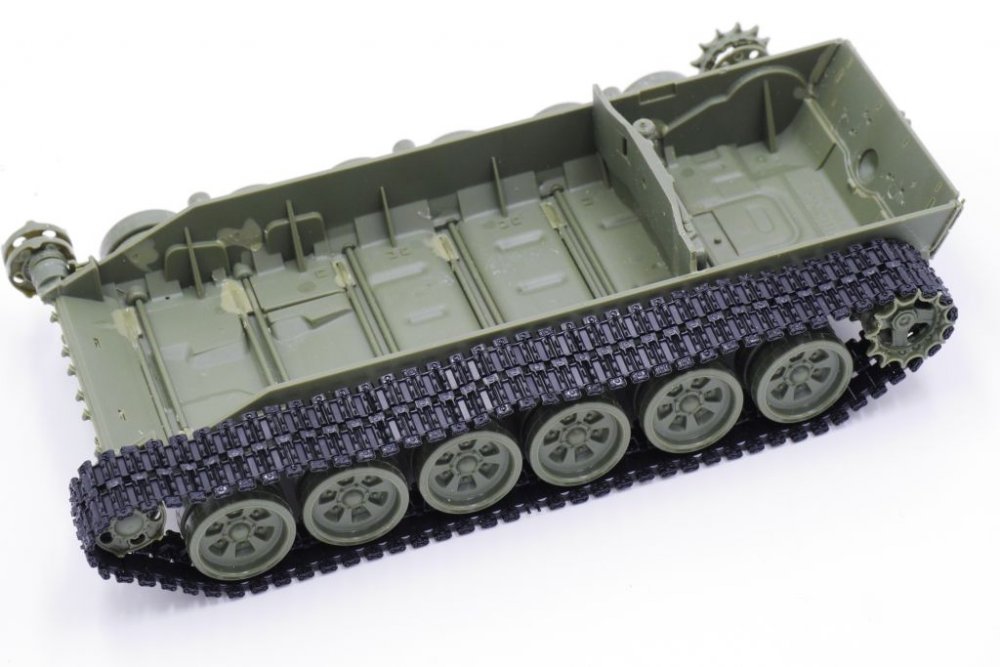
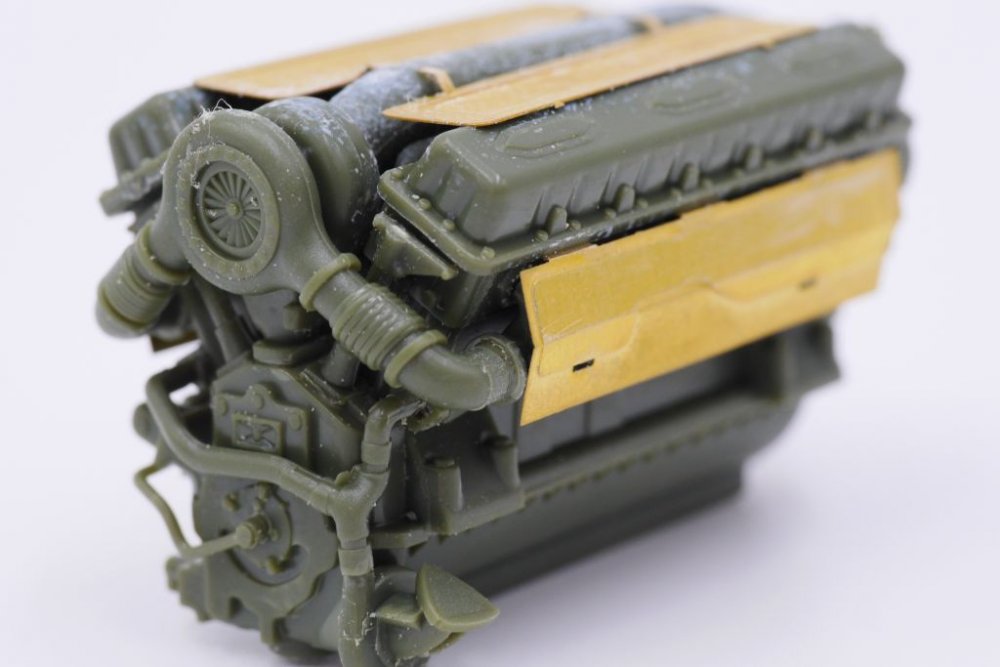
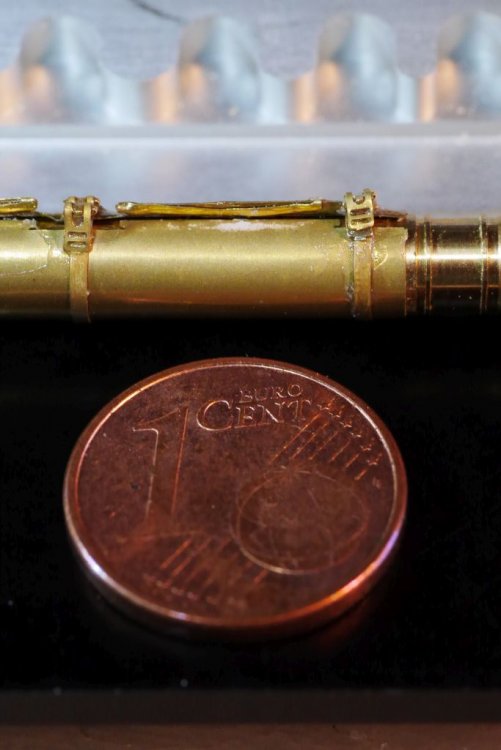
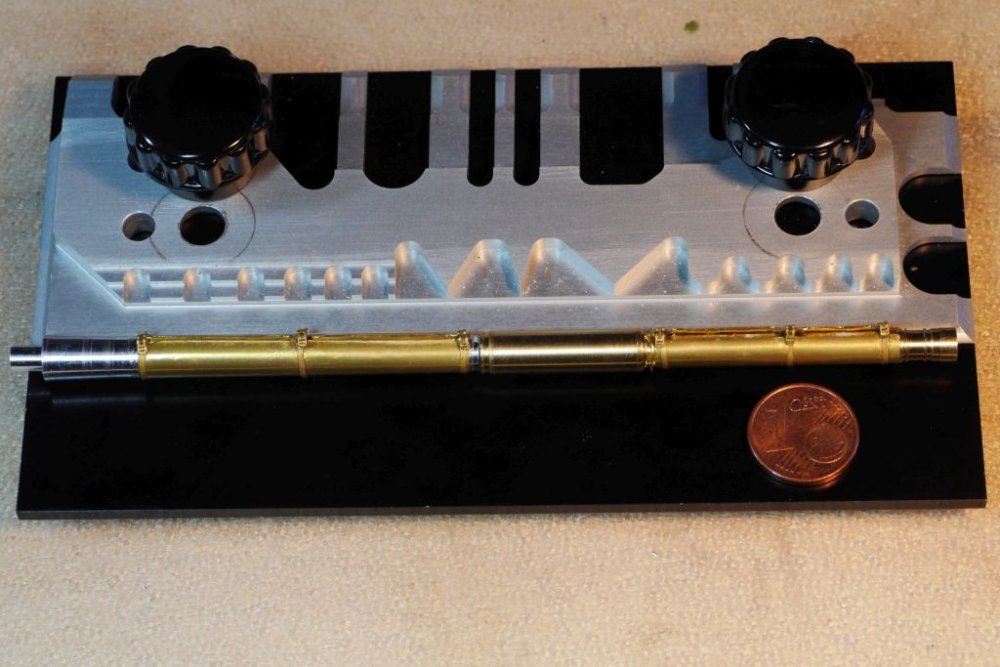
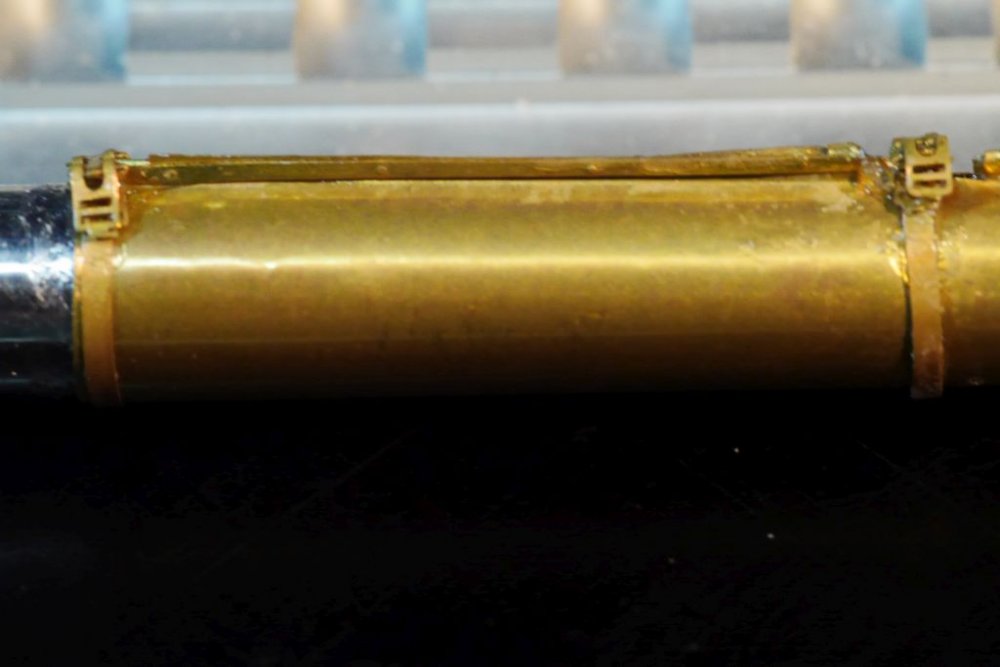
Hola Senhores, now, as my phototent arrived I will introduce you a little to my T-90 project. Some AM was sourced some time ago, like Friul Tracks, a Voyager Barrel, Tetra Works Sideskirts, SKP Lenses and some J's Work masksfor the camo. I started with the tracks and decieded to make a little shootout between the Friul ones and the provided ones. I chose the Meng tracks for my kit, because I liked the clever engineering, the flexibility and the durability with that cement free construction (except you opt for the rubber pads). You put everything together in a jig and it's a hell lot of work, because every link is made out of four parts. If you go for weathered tracks there is no need for cleanup. Detail on the Friuls might be a little bit better, but I didn't like the short connector wires (there are no holes through the whole link, as there are on other Friuls) and there are specially bended links provided for getting them around the sprockets. There is always the posiibility that you can't fiddle them in after mounting the sideskirts. But deciede for yourself Meng is black and Friul is grey And that's how they fit, perfectly, the sag is ok (81 links as mentioned in the manual) and they sit well on the sprocket. The wheels are sligthly movable for uneven turf The engine is a nice addition, but mine will have to wait for a job in the spare part box The Voyager barrel is really frigthening. I never saw a barrel made up from 40plus parts, but thats because of the thermal jacket. Outside it is pretty hot and sunny, so it is hart to imagine, that in the end this will be a snow and ice covered beast, preying through heavy mud. Time will tell. Cheers Rob


-
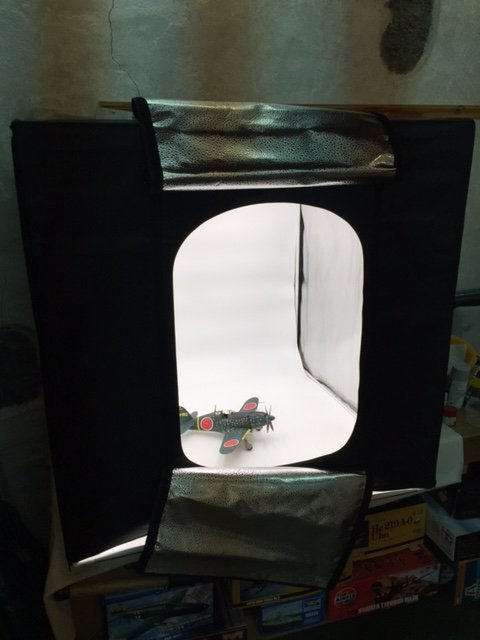
Hi Sharpshooters, Old thread, (more or less) new kid in town . I recieved a Havox Photobox today. It is a cubus of 80cm width, so it should be suitable for models up to 60cm wingspan (B-25 ?????). https://www.amazon.de/HAVOX-Fotostudio-80x80x80cm-LED-Beleuchtung-kommerziellen/dp/B01ATFIJYE/ref=sr_1_3?ie=UTF8&qid=1503580427&sr=8-3&keywords=havox That ugly shot shows the size of the box with a 1/32 Raiden in it. That was my first test shot, free handed, without any adjustments with f8. As I'm a landscape photographer and startrd to take photos of model kits just recently I will have to do a lot of experiments in the next time. I promise though my photos will improve and I will not hurt your eyes again. I use a Panasonic-Lumix GH3 which is a Micro 4/3 camera with interchangeable lenses. I have a lot of different lenses, but use manely prime lenses and no zooms. I like the 90mm Macro from Leica for Modelling shots, because of the distortion free depiction. For field shooting I adore my 85mm Leica prime lense with f1,2 (I love to do available light stuff, mainly in black and white) and my 30mm f 1,7, specially because of a full metal case and thanks god, a real aperture ring, like in the old days. This makes it so much easier to handle the cam in lowlight conditions, at least when you are not using automatics. My third "always in the bag lens" is a zoom, but a special one with a focal length between 14mm and 28mm for the more dramatic stuff, but not useful for modelling subjects. After some more expieriences in the next days I will leave some shots of the finished Raiden in the Finished work section. Cheers Rob
-
Hi Gus, I start to see the finish line of your F-16 and it will be a nice one for sure. Is that liquid mask you use for the canopy a Mr. Hobby one? I had my issues with that stuff on clear parts, causing a little blinding of the transparencies. But maybe that is because I'm a slow worker and sometime it takes a month or two for the mask to get removed. Any way I'm interested in your experiences after removing the sticky stuff. Cheers Rob
-
Profimodeller Fi103 V1
DocRob replied to JeroenPeters's topic in LSM 1/35 and Larger Work In Progress
Nice work Jeroen. The bucket (transport cover) on the nose robs the thing of some of it's elegance, on the other hand it's not a beauty contest and I see sense in applying it, while on the Schlepper. Cheers Rob -
Tamiya F-4J Phantom VMFA-451 "Warlords" WIP
DocRob replied to a topic in LSM 1/35 and Larger Work In Progress
Hi Danny, thank you for your answer. What you have planned sounds like a very interesting project and I can understand the top prio on the jets and helmets for you. In fact I didn't want to push you into WIP-ing ahead into the Fe.2B, I just wanted to know, because your build is very inspiring. Actually I have no idea, when I start mine. As being a little geographical isolated, I build only for my own fun and after my own not very strict schedule, which is also rattled by lots of other hobbies. Have fun with the Phantom and tons of luck for a good APH-deal. Rob -
MH 60 s Knighthawk Academy 1/35
DocRob replied to shark64's topic in LSM 1/35 and Larger Work In Progress
I have to join the "wow-chorus", great work. Chears Rob -
Tamiya F-4J Phantom VMFA-451 "Warlords" WIP
DocRob replied to a topic in LSM 1/35 and Larger Work In Progress
Hi Danny, you entered the Jet Age and I'm tempted to follow this one, but what about the old school stuff. I mean your great and encouraging Fe.2B WIP? Cheers Rob -
Profimodeller Fi103 V1
DocRob replied to JeroenPeters's topic in LSM 1/35 and Larger Work In Progress
Nice, sleek, aaaaaaaaaaaand wingless -
Thanks guys, more or less 50 parts for one barrel is no fun ride, next time I will choose some WW2 stuff like a Sherman . Thank god the tracks are finished, that was simila painful to do, but that I will show later, so now it's time to cash in the fun parts of the build. @Jeroen: I hope it will turn out cool, because this will end up as a snow and ice covered caucasian beast.
-
Hello Friends of delicate plastic (and metal), I started a new summer (easy going) project with the thought in mind "and now to something completely different". After browsing my stash I decieded to give Mengs T-90A a try, using some aftermarket stuff to enhance detail. I will go into detail about that later, now the kit is halfway finished. Today was one of those more painful days being a modeller. Having bought a Voyager barrel, I was skipping through the manual and got a little afraid. Lots of stuff to bend, some brass parts I couldn't even see with my bare eye and turned barrel parts made from brass and aluminum. This is defenetly not made for the beginner and for the owners of carpets under their workbenches. As you have to bend a lot and due to the volume of the barrel I decieded against soldering, which I normally prefer to CA-glue. So this is the result of one full day with magnifying glasses and the use of many unprintable swearwords and an aching back. On some of these warm summer days you should go surfing instead of sitting at the bench, but that's for tomorrow. All looks to be a little twisted and bended, but that's not really visible with the bare eye. More than once I thought about using the supplied plastic barrel, but did not even try to, to not get tempted. More on the kit and further used AM-stuff later, when I hopefully receive my photo tent for better quality pictures. Cheers Rob
-
Coooooool .
-
You get a big thumbs-up exclusively from me for this one . I have a Resin-Stempunk-Submarine in my stash and the hull will be displayed underwater in a look of corroded and beaten copper and brass with lots of patina, so I will follow your more Heavy Metal way of getting steel look like a piece of rotten art. Cheers Rob
-
Luckily not, at least not in Reality
-
Nice and clean finish. You have a great pair of Spit's there which show the evolution of the bird. I'm normally not a Revell-guy, but your bird makes me thinking. Cheers Rob
-
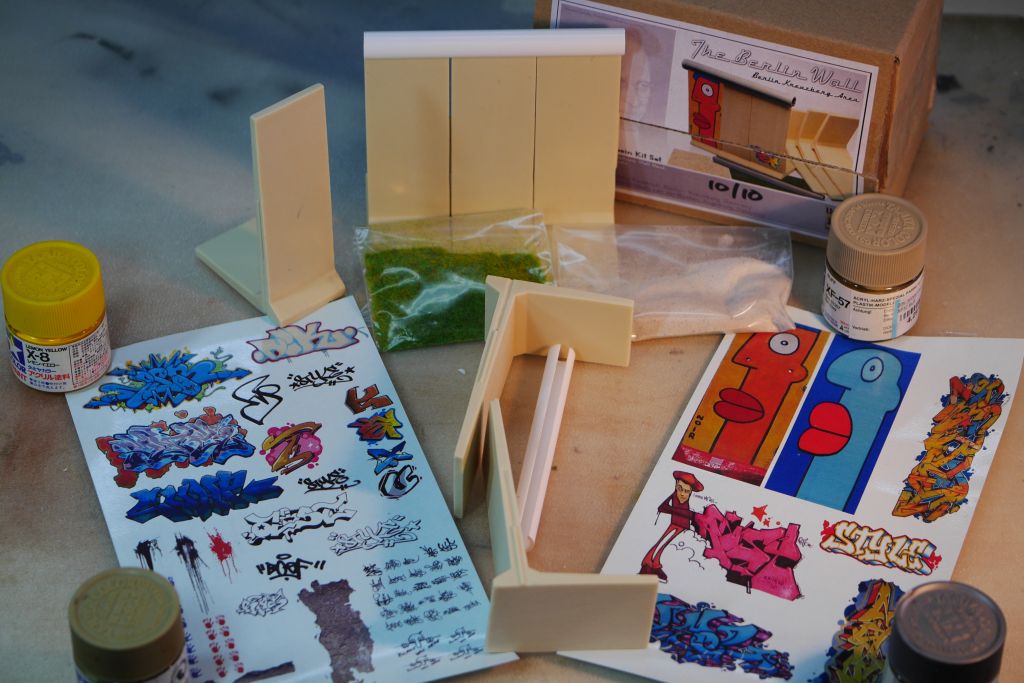
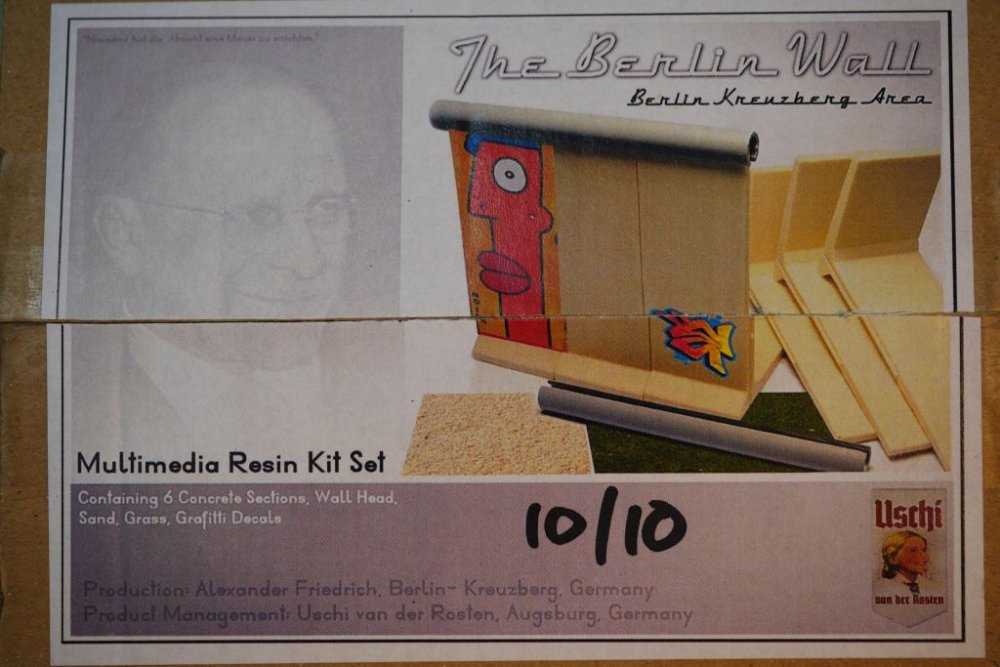
Being born in West Berlin with the Wall around, I was more than delighted to see that Uschi van der Rosten has this part of (my) history in their shelves, at least until now, because I got No. 10 of 10, which indicates it's the last one. The Berlin Wall was teared down and thanks to Alex I got the last !/35 reminder. The wall will be the background of my entry to the Resin-GB, a Sci-Fi, What-if or whatever non-serious Dio with some russian Smurfs and a strange hovering vehicle. The Box with intriguing Boxart And that's included, not the Tamiya colors of course or did you think the Wall was yellow ? Cheers Rob

-
That's connected. Cheers Rob
-
F-104G Starfighter BAF 23e "Smaldeel"
DocRob replied to a topic in LSM 1/32 and Larger Aircraft Ready for Inspection
Nice presentation Danny, the best end of a project is if the problems occuring through the building phase are not noticeable on the finished thing. Chapeau, you nailed it. Cheers Rob -
hkm Meteor T.7, G-BWMF
DocRob replied to James H's topic in LSM 1/32 and Larger Aircraft Ready for Inspection
Sulphur Yellow is the name of the game . That paintjob is great, the fulfillment of ugliness, which disrupts the slender, even a little elegant shape of the bird. What is the story behind the original plane? Was it painted for reconnaissance in toxical wasted areas ? At first sight it seemed only primed, but the last picture suggests, that it is flying that way. Great job. Cheers Rob -
1/32 Tamiya Spitfire MkIXc WD-W EN354
DocRob replied to Mauricio_1971's topic in LSM 1/35 and Larger Work In Progress
Hi Mauricio, that might be the best way to go, just to deciede step by step which AM is useful and which is not. Cheers Rob -
Hola Senhores, more than a week ago I noticed that some sections of LSM are not showing (I get error messages), when I try to open them. That is 'Profiles', 'Leaderboard', 'Search' and most important 'Unread Content'. I tried with different browsers, signed in and signed out and even on the phone, nothin' doin' . I sent a mail to the team via contact, but no response. Folks is it just me missing these sections. I hope there is a solution. Cheers Rob
-
1/32 Tamiya Spitfire MkIXc WD-W EN354
DocRob replied to Mauricio_1971's topic in LSM 1/35 and Larger Work In Progress
Hello Mauricio, welcome back to LSM. What a great start for a rebench . The Spit's engine looks just right, covered with a little desert dust. Is the interieur from Eduard really a step forward compared to the Tamiya offer? I will use a lot of AM for my Tamiya Mossie, but for the Instrument Panel I'm not that sure if I use PE-stuff. Cheers Rob -
Dosen't look too bad to me, Danny. You build a not so perfect base kit with suboptimal to work with paints into something. Sure you can argue about wasted efforts . The best way to handle it is to say lessons learned an get the canopy closed and to move on with a refreshing drink and project. There are worse looking 104's in the world Cheers Rob
-
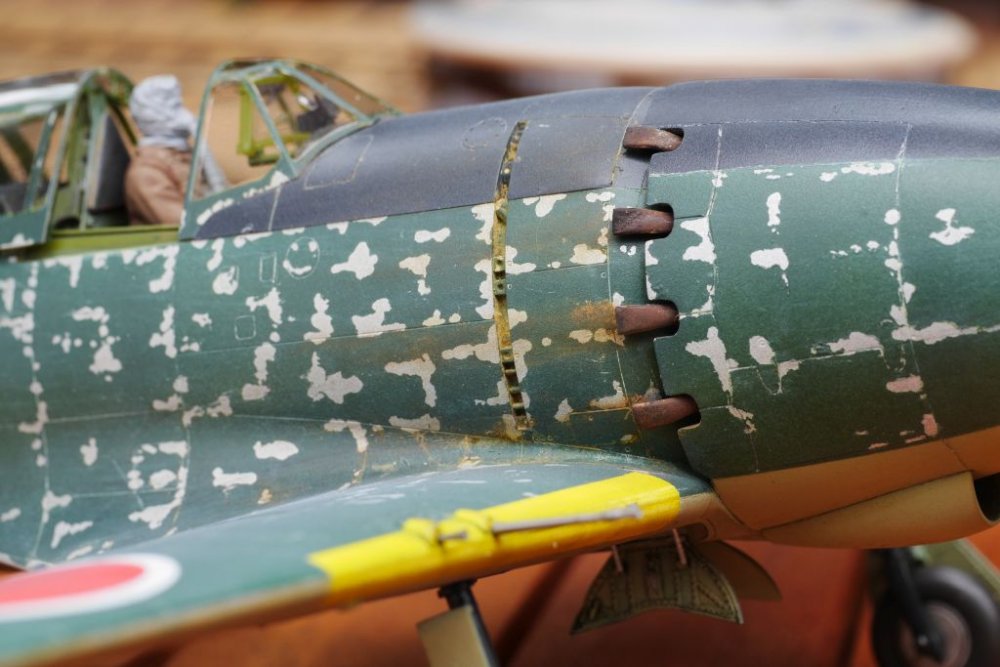
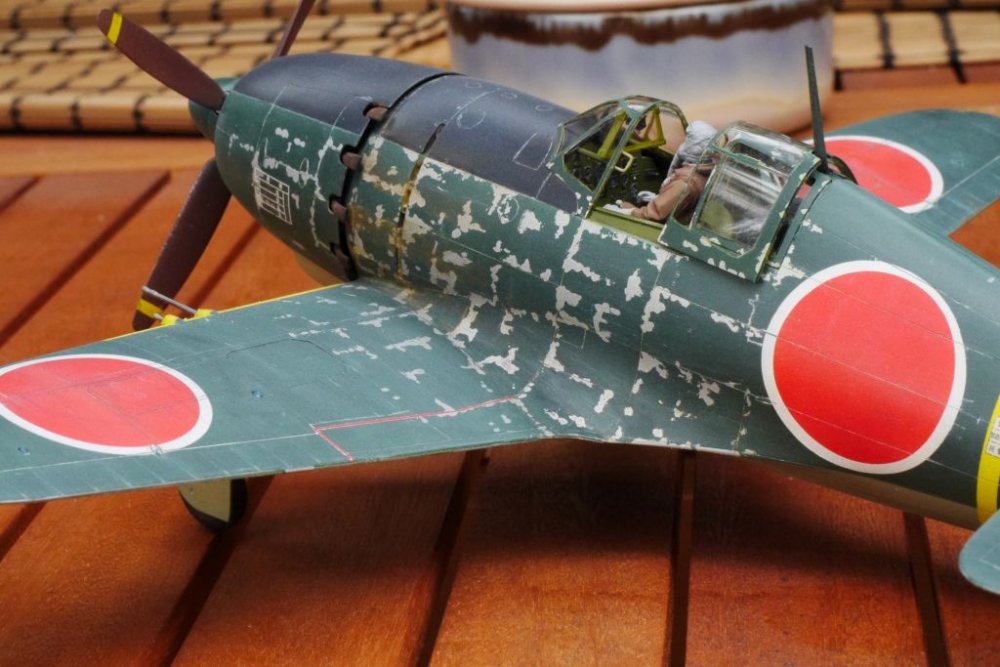
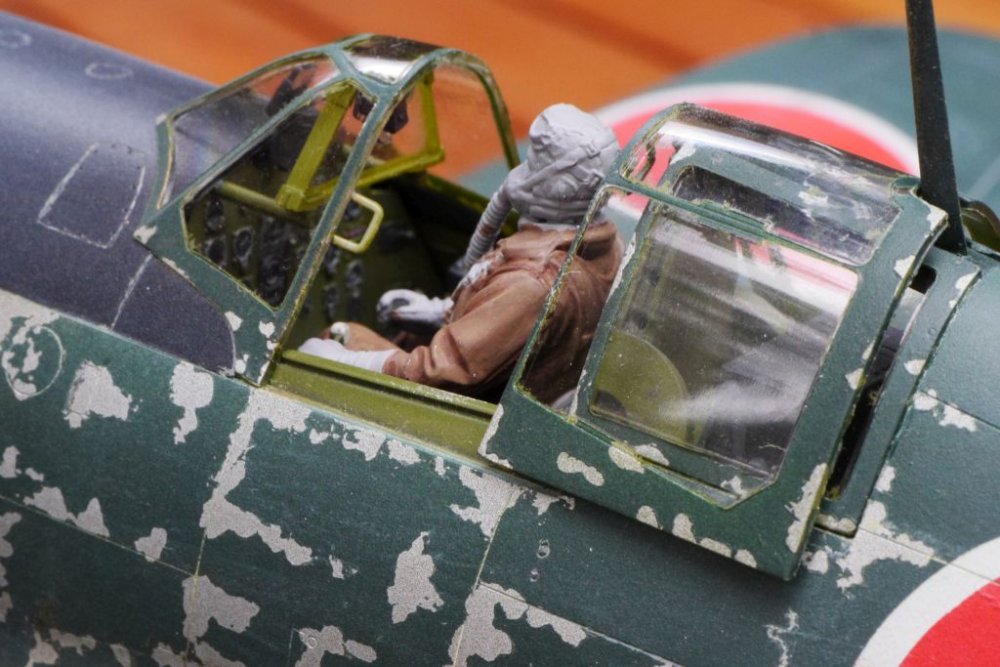
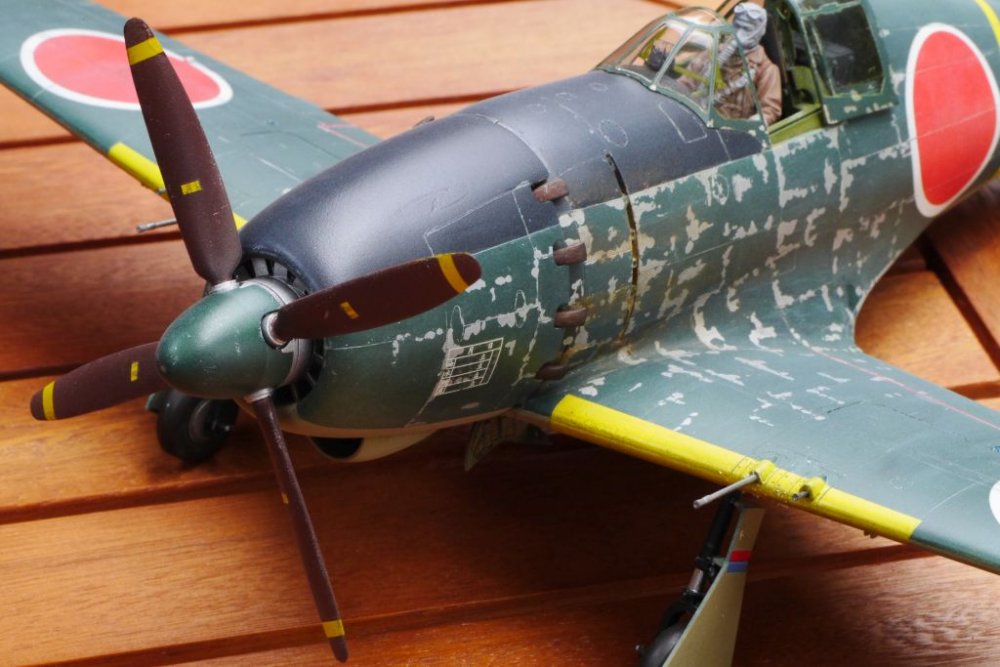
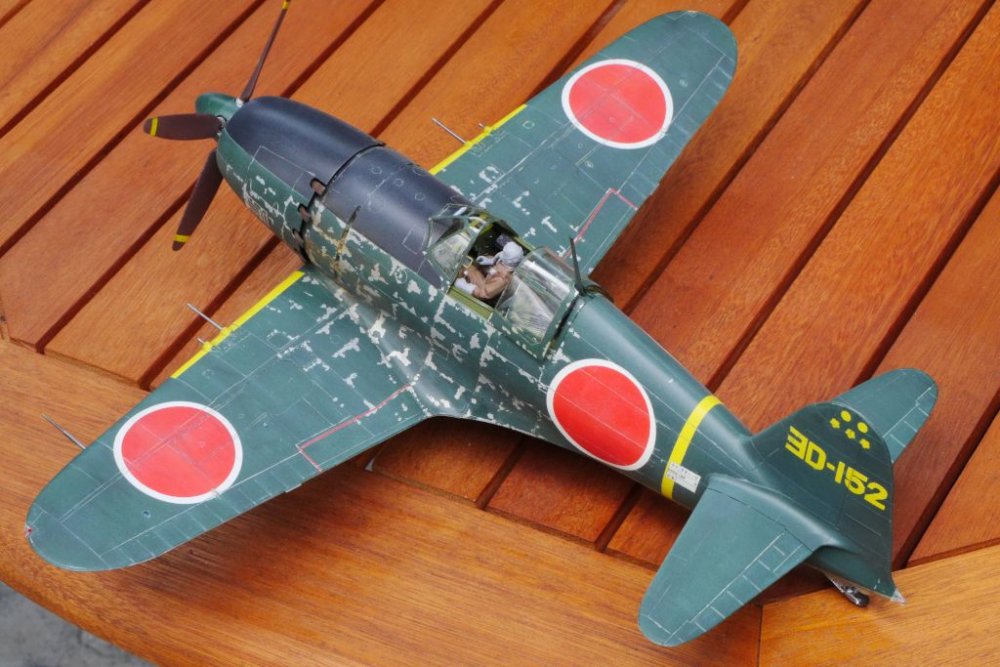
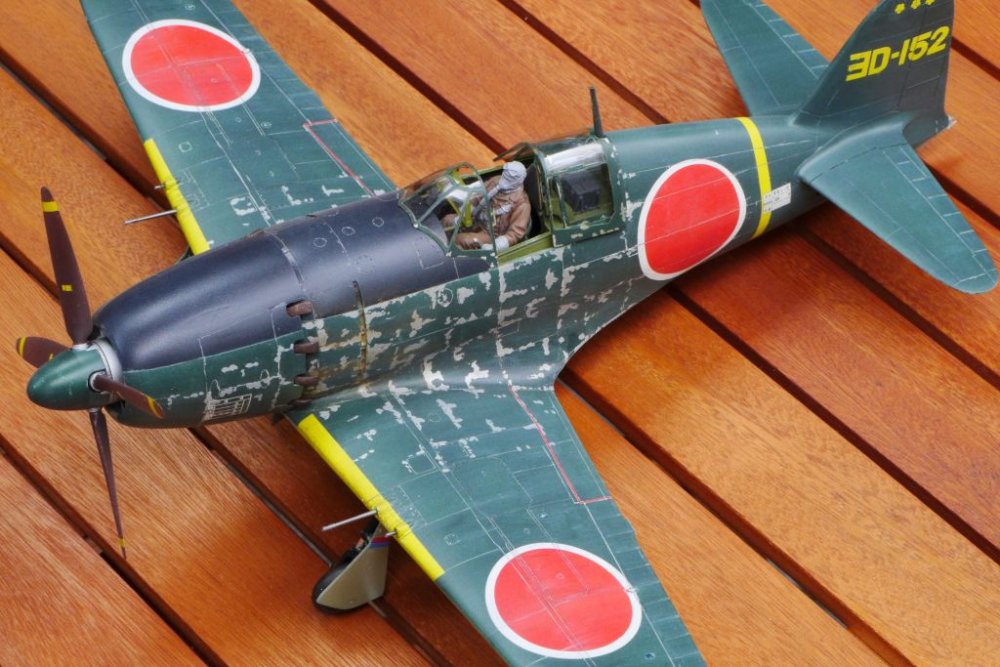
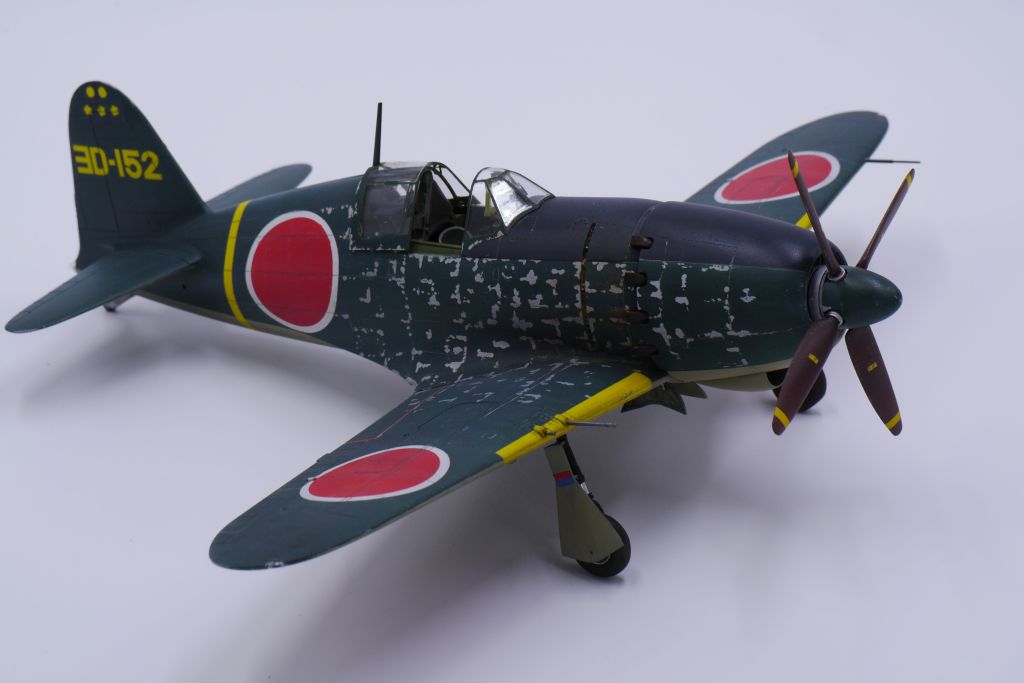
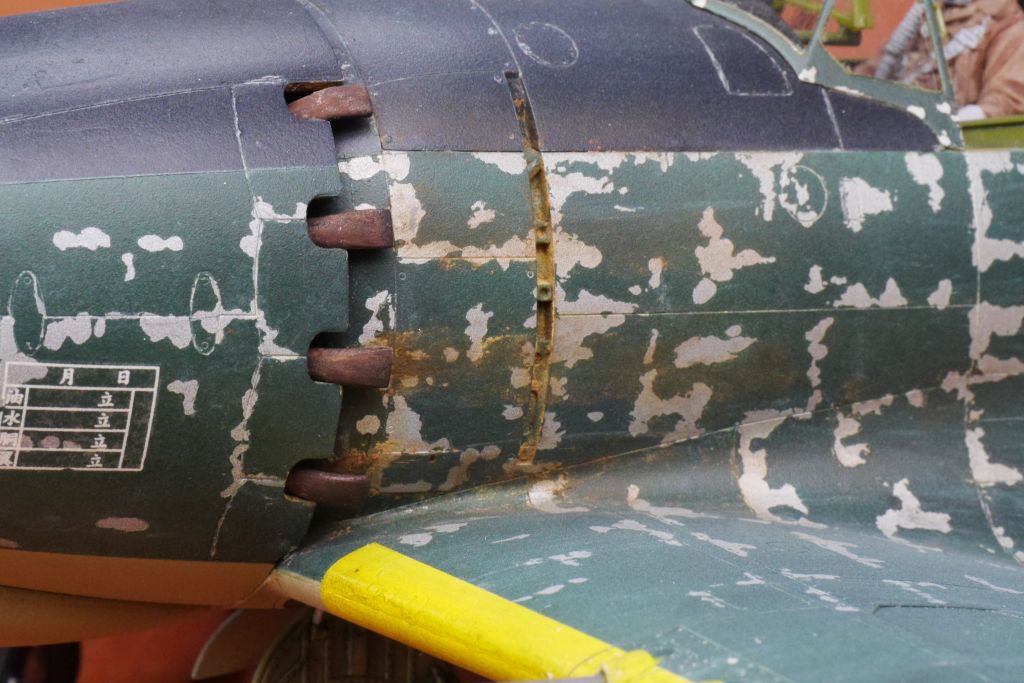
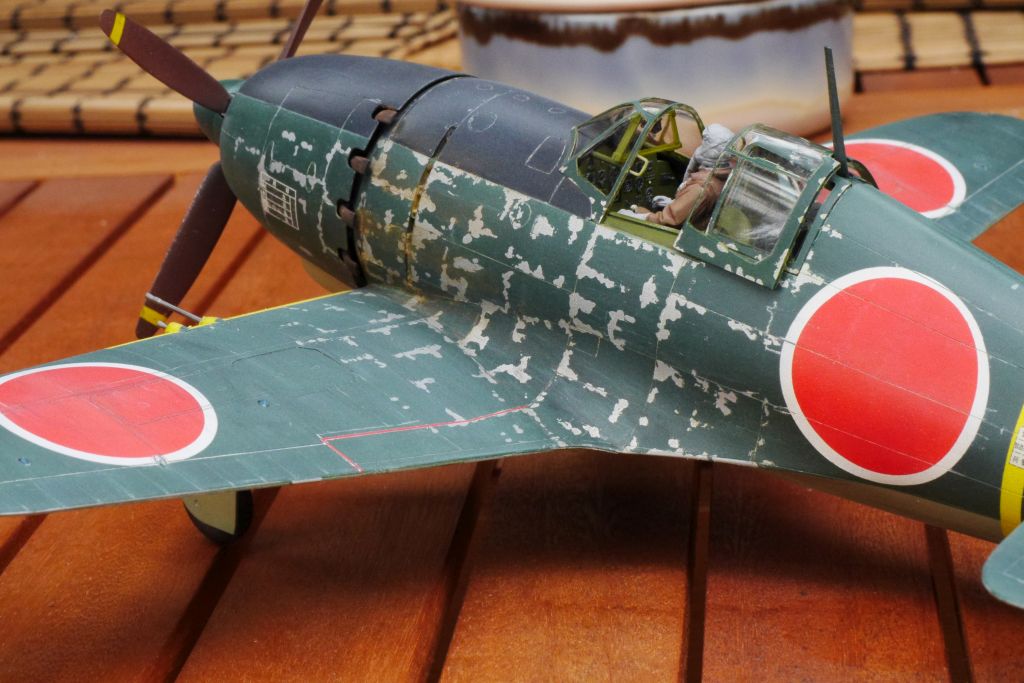
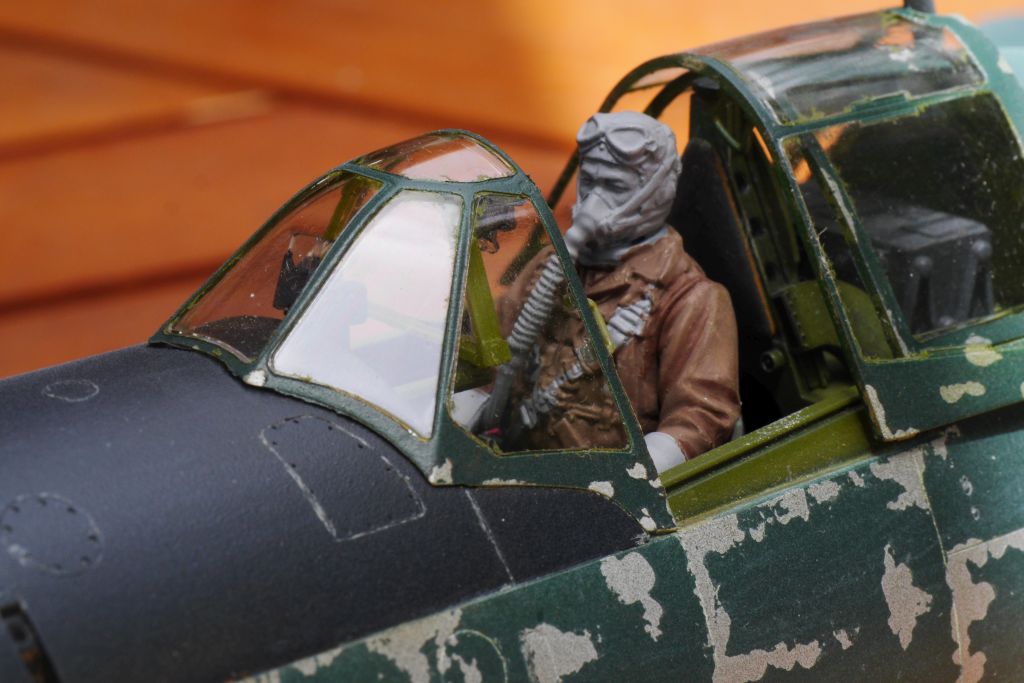
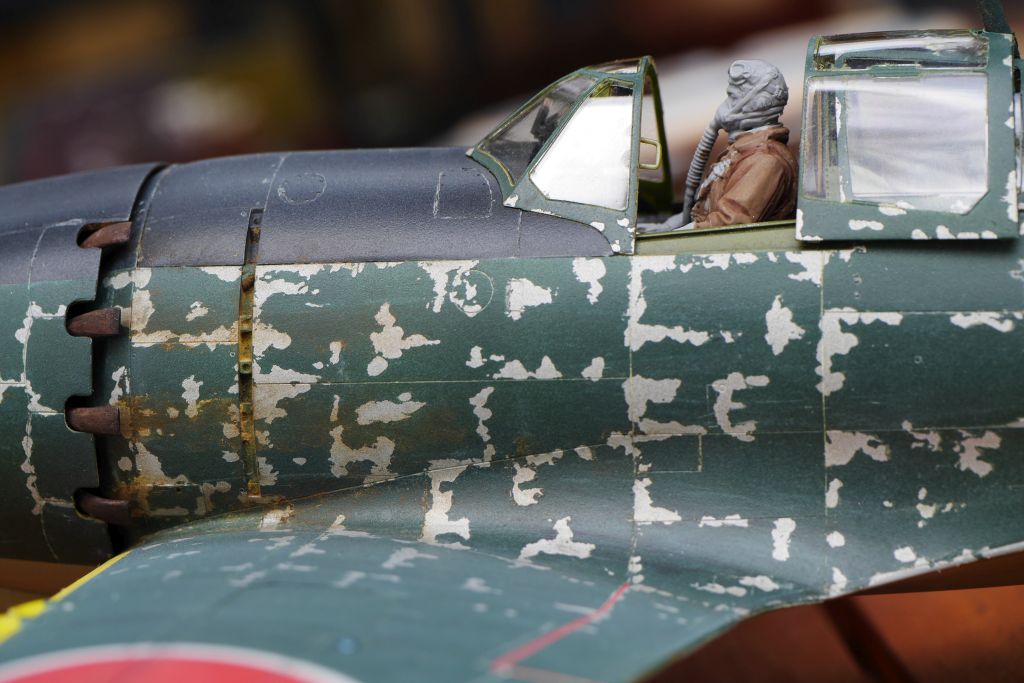
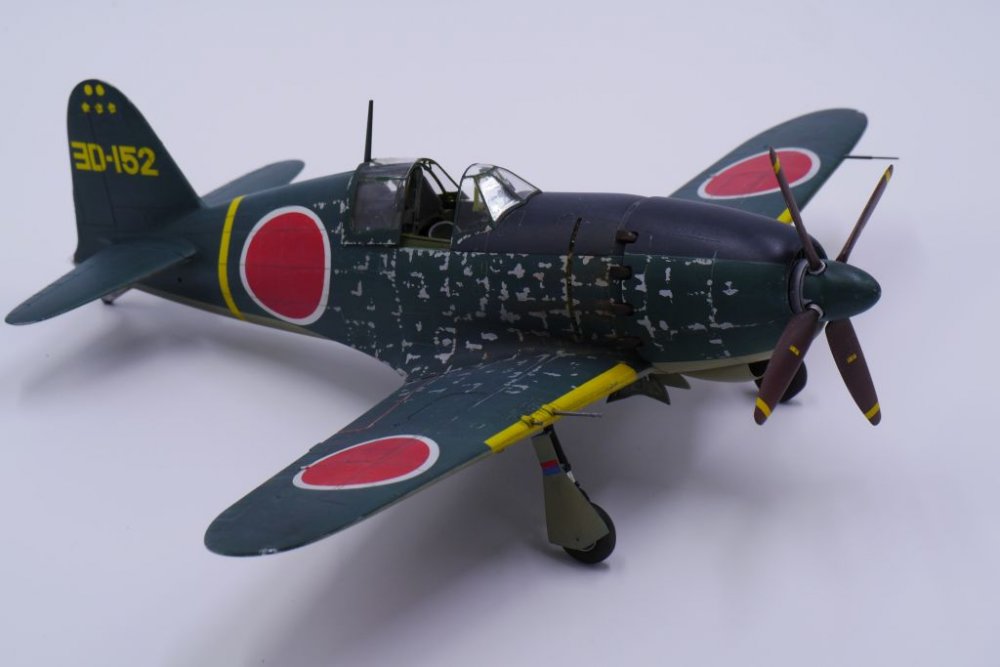
Hasegawa J2M3 Raiden - In Between Build
DocRob replied to DocRob's topic in LSM 1/35 and Larger Work In Progress
Voila Gentlemen, nearly ready for takeoff now. Yeah I know, the pilot is lacking some colorful expression and there are some cleanups and touchups to be made. I completed the wheel section, installed the engine and exhausts, the cowling and the prop and guess what, everything fitted very well. I added the guns, which where only 'rolled' in Uschis Iron Powder, which gives a convincing metal appeareance. The position lights where added using Contacta Clear and finally, tataaa, the masks where peeled of the canopy. A little bad surprise here, since there got some color under the mask of the open canopy section. After unsucsessfully trying to polish that away, I decieded to leave it that way and tell everybody that all was intended as grime on that used warhorse . After finalizing I will post some proper pictures in the finished work section, not that slightly crappy "action stuff". I really enjoyed most of the build and I hope you did as well. Cheers Rob